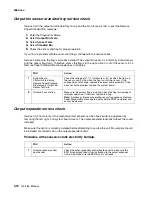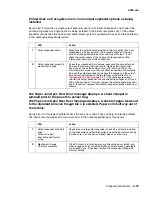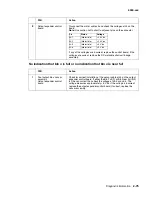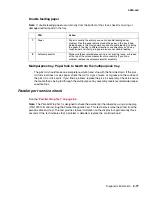
2-78
Service Manual
4060-
xxx
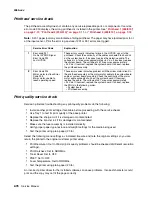
Printhead service check
The printhead assembly does not contain any service replaceable parts or components. If service
error code 930 displays, the wrong printhead is installed in the printer. See
“Printhead 1 (000/010)”
on page 7-10
,
“Printhead 2 (200/210)” on page 7-11
, or
“Printhead 3 (400/410)” on page 7-12
.
Note:
A 201 paper jam may also indicate a failing printhead. The paper may have jammed prior to or
at the input sensor. Print the error log and see if 201 or 931 errors are logged.
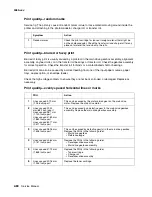
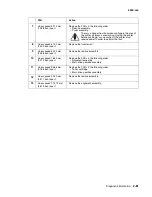
Print quality service check
Service tip: Before troubleshooting any print quality problems do the following:
•
Install another print cartridge if available before proceeding with the service checks.
•
Use Tray 1 to test for print quality of the base printer.
•
Replace the charge roll if it is damaged or contaminated.
•
Replace the transfer roll if it is damaged or contaminated.
•
Make sure the fuser assembly is installed correctly.
•
Verify proper paper type, texture, and weight settings for the media being used.
•
Test the printer using plain paper (20 lb).
Select the following menu settings as indicated. Be sure and note the original settings so you can
return the printer to the original customer printer setup.
•
Print Resolution: Set to 300 dpi (print quality problems should be checked at different resolution
settings).
•
Print Darkness: Set to NORMAL.
•
Toner Saver: Set to OFF.
•
PQET: Set to OFF.
•
Fuser Temperature: Set to NORMAL.
•
Test the printer using plain paper (20 lb).
An incorrect printer driver for the installed software can cause problems. Incorrect characters could
print and the copy may not fit the page correctly.
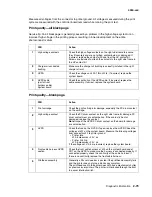
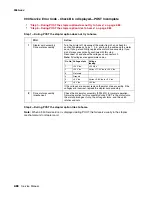
Service Error Code
Explanation
1
Error code 931
No first HYSNC Signal
Error Code 932
Lost HYSNC
These errors usually indicate a failure in the HYSNC signal to the
printhead. Check the continuity of the cables connected to J5 and J4
on the system board. If incorrect, replace the defective cable. The
voltage at J4-1 measures approxi5 V dc. If incorrect, replace
the system board. The voltage at J5-7 measures approximately
+24 V dc. If incorrect, replace the system board. If correct, replace
the printhead assembly.
2
Error Code 934
Mirror motor lost lock Error
Code 935
Mirror motor unable to
reach operating speed
These error codes indicate a problem with the mirror motor circuit in
the printhead assembly or the mirror motor cable to the system board
cable or system board assembly. Check the continuity of the mirror
motor cable connected to J5 on the system board. If incorrect,
replace the cable. The voltage at J5-7 measures approximately
+24 V dc. If incorrect, replace the system board. If correct, replace
the FRUs in the following order:
• System board
• Printhead assembly
Summary of Contents for T63 Series
Page 13: ...Laser notices xiii 4060 xxx Japanese Laser Notice ...
Page 14: ...xiv Service Manual 4060 xxx Korean Laser Notice ...
Page 34: ...1 16 Service Manual 4060 xxx ...
Page 218: ...4 64 Service Manual 4060 xxx ...
Page 236: ...6 2 Service Manual 4060 xxx ...
Page 238: ...7 2 Service Manual 4060 xxx Assembly 1 Covers ...
Page 240: ...7 4 Service Manual 4060 xxx Assembly 2 Frame 1 5 2 1 3 4 3 4 8 6 7 ...
Page 252: ...7 16 Service Manual 4060 xxx Assembly 9 Paper feed alignment 3 2 1 4 ...
Page 258: ...7 22 Service Manual 4060 xxx Assembly 12 Drives Main drive and developer drive 3 2 4 1 7 6 5 ...
Page 260: ...7 24 Service Manual 4060 xxx Assembly 13 Hot roll fuser 3 7 5 2 6 4 1 5 8 7 9 ...
Page 262: ...7 26 Service Manual 4060 xxx Assembly 14 Transfer charging 3 2 4 1 5 6 7 9 10 8 ...
Page 264: ...7 28 Service Manual 4060 xxx Assembly 15 Electronics power supplies 3 7 5 2 6 4 1 ...
Page 266: ...7 30 Service Manual 4060 xxx Assembly 16 Electronics card assemblies 3 1 4 5 6 9 2 4 7 8 10 ...
Page 268: ...7 32 Service Manual 4060 xxx Assembly 17 Electronics shields ...
Page 270: ...7 34 Service Manual 4060 xxx Assembly 18 Cabling diagrams 1 3 1 2 4 5 6 7 8 7 4 ...
Page 272: ...7 36 Service Manual 4060 xxx Assembly 19 Cabling diagrams 2 HVPS LVPS 3 5 4 1 2 6 ...
Page 276: ...7 40 Service Manual 4060 xxx Assembly 21 250 sheet paper tray ...
Page 284: ...7 48 Service Manual 4060 xxx Assembly 23 Duplex option 1 ...
Page 286: ...7 50 Service Manual 4060 xxx Assembly 24 Envelope feeder 3 11 7 13 5 9 2 10 6 4 12 8 14 1 ...
Page 288: ...7 52 Service Manual 4060 xxx Assembly 25 Output expander ...
Page 290: ...7 54 Service Manual 4060 xxx Assembly 25 cont Output expander ...
Page 292: ...7 56 Service Manual 4060 xxx Assembly 26 High capacity output expander ...
Page 296: ...7 60 Service Manual 4060 xxx Assembly 27 5 bin mailbox ...
Page 298: ...7 62 Service Manual 4060 xxx Assembly 27 cont 5 bin mailbox ...
Page 300: ...7 64 Service Manual 4060 xxx Assembly 28 High capacity feeder 1 ...
Page 320: ...7 84 Service Manual 4060 xxx Assembly 38 StapleSmart finisher 4 1 ...
Page 344: ...I 20 Service Manual 4060 xxx ...
Page 345: ......

