4-4
Service Manual
4060-
xxx
Paper alignment assembly adjustment
Do the alignment assembly adjustment whenever you replace the alignment assembly. Always print
a copy of the Quick Test Page before making any adjustments to the alignment assembly reference
adjustment screw. When replacing the alignment assembly, it is necessary to back the reference
adjustment screw out far enough to remove the old assembly and install the new one.
•
If you are replacing the alignment assembly go to step A.
•
If you are only adjusting the reference adjustment screw go to step B.
Step A
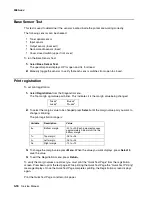
Print a copy of the Quick Test Page and check the margin adjustments printed on the test page.
These settings should be within the range specified in
“Print registration” on page 3-16
.
Do the reference adjustment if you are sure the margins are set correctly.
1.
Loosen the locknut on the inside rear of the alignment assembly.
2.
Remove the two screws holding the alignment assembly to the left side frame.
3.
Back the reference adjustment screw out far enough to allow the alignment assembly to be
removed from the printer. It is not necessary to completely remove the screw.
4.
Install the new alignment assembly. Turn the reference screw clockwise with a 7 mm nut driver
until it touches the back of the reference plate and tighten the nut with a 5.5 mm wrench.
The reference adjustment screw can be adjusted without loosening the nut. Turn the screw clockwise
a few turns and print a copy of the Quick Test Page as you check the diamonds on the left margin.
Continue adjusting the screw as you check the results of each adjustment on a new test page until
you obtain the results you want.
Summary of Contents for T63 Series
Page 13: ...Laser notices xiii 4060 xxx Japanese Laser Notice ...
Page 14: ...xiv Service Manual 4060 xxx Korean Laser Notice ...
Page 34: ...1 16 Service Manual 4060 xxx ...
Page 218: ...4 64 Service Manual 4060 xxx ...
Page 236: ...6 2 Service Manual 4060 xxx ...
Page 238: ...7 2 Service Manual 4060 xxx Assembly 1 Covers ...
Page 240: ...7 4 Service Manual 4060 xxx Assembly 2 Frame 1 5 2 1 3 4 3 4 8 6 7 ...
Page 252: ...7 16 Service Manual 4060 xxx Assembly 9 Paper feed alignment 3 2 1 4 ...
Page 258: ...7 22 Service Manual 4060 xxx Assembly 12 Drives Main drive and developer drive 3 2 4 1 7 6 5 ...
Page 260: ...7 24 Service Manual 4060 xxx Assembly 13 Hot roll fuser 3 7 5 2 6 4 1 5 8 7 9 ...
Page 262: ...7 26 Service Manual 4060 xxx Assembly 14 Transfer charging 3 2 4 1 5 6 7 9 10 8 ...
Page 264: ...7 28 Service Manual 4060 xxx Assembly 15 Electronics power supplies 3 7 5 2 6 4 1 ...
Page 266: ...7 30 Service Manual 4060 xxx Assembly 16 Electronics card assemblies 3 1 4 5 6 9 2 4 7 8 10 ...
Page 268: ...7 32 Service Manual 4060 xxx Assembly 17 Electronics shields ...
Page 270: ...7 34 Service Manual 4060 xxx Assembly 18 Cabling diagrams 1 3 1 2 4 5 6 7 8 7 4 ...
Page 272: ...7 36 Service Manual 4060 xxx Assembly 19 Cabling diagrams 2 HVPS LVPS 3 5 4 1 2 6 ...
Page 276: ...7 40 Service Manual 4060 xxx Assembly 21 250 sheet paper tray ...
Page 284: ...7 48 Service Manual 4060 xxx Assembly 23 Duplex option 1 ...
Page 286: ...7 50 Service Manual 4060 xxx Assembly 24 Envelope feeder 3 11 7 13 5 9 2 10 6 4 12 8 14 1 ...
Page 288: ...7 52 Service Manual 4060 xxx Assembly 25 Output expander ...
Page 290: ...7 54 Service Manual 4060 xxx Assembly 25 cont Output expander ...
Page 292: ...7 56 Service Manual 4060 xxx Assembly 26 High capacity output expander ...
Page 296: ...7 60 Service Manual 4060 xxx Assembly 27 5 bin mailbox ...
Page 298: ...7 62 Service Manual 4060 xxx Assembly 27 cont 5 bin mailbox ...
Page 300: ...7 64 Service Manual 4060 xxx Assembly 28 High capacity feeder 1 ...
Page 320: ...7 84 Service Manual 4060 xxx Assembly 38 StapleSmart finisher 4 1 ...
Page 344: ...I 20 Service Manual 4060 xxx ...
Page 345: ......

