Diagnostic information
2-7
4060-
xxx
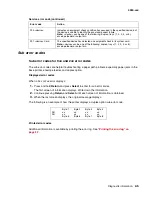
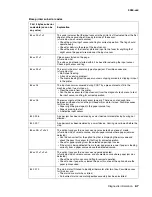
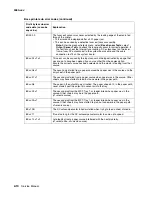
Base printer sub error codes
First 6 bytes sub error
code data (
xx
can be
any value)
Explanation
84
xx
00
x
1
x
2
This code indicates that the input sensor in the printer is still actuated from the first
sheet and the second sheet is ready to arrive at the sensor.
(
x
1=media size,
x
2=media source)
• Check the printer input sensor and flag for correct operation. The flag should
operate freely.
• Check for debris in the area of the input sensor.
• Check the area of the transfer plate and input to the fuser for anything that
might cause the paper to remain over the input sensor.
84
xx
01
x
1
Video never started on the page.
(
x
1=media size)
The video signal never started within 2 inches after actuating the input sensor.
Check input sensor and flag.
84
xx
02
x
1
This error is the most common type of paper jam. Possible causes are:
(
x
1=media size)
• Multi sheet feeding.
• A tray size sensing problem.
• The media feeding from the paper source is slipping or media is slipping in input
to the printer.
84
xx
04
The input sensor was covered during POST by a piece of media still in the
machine when it was turned on.
• Clear the media from the printer.
• Run the base sensor test (input sensor) from the diagnostic tests menu to test
the input sensor and flag for correct operation.
84
xx
05
There was media at the input sensor too early. There was not enough time
between printhead start and the printhead mirror motor to lock. Possible causes
for this error are:
• Paper might be pre-staged in the paper source tray.
• Paper is picking too fast.
• A defective input sensor.
84 00 06
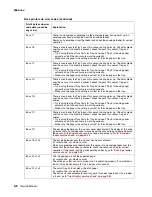
A paper jam has been declared by a smart device. Immediate stop homing not
allowed.
84 00 07
A paper jam has been declared by a smart device. Homing was allowed before the
stop.
84
xx
0B
x
1
x
2
x
3
The option tray pass thru sensor was never actuated by a piece of media.
(
x
1=media size,
x
2=media source, and
x
3=paper source where paper jam was
detected)
• Run the sensor test for the option tray that is displaying the error code and
check the pass thru sensor for that tray for correct operation.
• Check for paper picking from the selected paper input source.
• If the error is being detected from a lower paper source, see if paper is feeding
correctly from a paper source above the detected source.
84
xx
0f
x
1
x
2
x
3
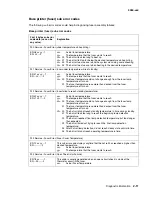
The option tray pass thru sensor was never deactivated.
(
x
1=media size,
x
2=media source, and
x
3=media source where paper jam was
detected)
• Check the pass thru sensor and flag for correct operation.
• Check to see if paper has cleared the pass thru area of the option where the
paper jam occurred.
84 00 10
The main motor ID failed to identify either motor after two tries. Possible causes
for this error are:
• The main drive motor has stalled.
• An incorrect main drive motor/gearbox assembly has been installed.
Summary of Contents for T63 Series
Page 13: ...Laser notices xiii 4060 xxx Japanese Laser Notice ...
Page 14: ...xiv Service Manual 4060 xxx Korean Laser Notice ...
Page 34: ...1 16 Service Manual 4060 xxx ...
Page 218: ...4 64 Service Manual 4060 xxx ...
Page 236: ...6 2 Service Manual 4060 xxx ...
Page 238: ...7 2 Service Manual 4060 xxx Assembly 1 Covers ...
Page 240: ...7 4 Service Manual 4060 xxx Assembly 2 Frame 1 5 2 1 3 4 3 4 8 6 7 ...
Page 252: ...7 16 Service Manual 4060 xxx Assembly 9 Paper feed alignment 3 2 1 4 ...
Page 258: ...7 22 Service Manual 4060 xxx Assembly 12 Drives Main drive and developer drive 3 2 4 1 7 6 5 ...
Page 260: ...7 24 Service Manual 4060 xxx Assembly 13 Hot roll fuser 3 7 5 2 6 4 1 5 8 7 9 ...
Page 262: ...7 26 Service Manual 4060 xxx Assembly 14 Transfer charging 3 2 4 1 5 6 7 9 10 8 ...
Page 264: ...7 28 Service Manual 4060 xxx Assembly 15 Electronics power supplies 3 7 5 2 6 4 1 ...
Page 266: ...7 30 Service Manual 4060 xxx Assembly 16 Electronics card assemblies 3 1 4 5 6 9 2 4 7 8 10 ...
Page 268: ...7 32 Service Manual 4060 xxx Assembly 17 Electronics shields ...
Page 270: ...7 34 Service Manual 4060 xxx Assembly 18 Cabling diagrams 1 3 1 2 4 5 6 7 8 7 4 ...
Page 272: ...7 36 Service Manual 4060 xxx Assembly 19 Cabling diagrams 2 HVPS LVPS 3 5 4 1 2 6 ...
Page 276: ...7 40 Service Manual 4060 xxx Assembly 21 250 sheet paper tray ...
Page 284: ...7 48 Service Manual 4060 xxx Assembly 23 Duplex option 1 ...
Page 286: ...7 50 Service Manual 4060 xxx Assembly 24 Envelope feeder 3 11 7 13 5 9 2 10 6 4 12 8 14 1 ...
Page 288: ...7 52 Service Manual 4060 xxx Assembly 25 Output expander ...
Page 290: ...7 54 Service Manual 4060 xxx Assembly 25 cont Output expander ...
Page 292: ...7 56 Service Manual 4060 xxx Assembly 26 High capacity output expander ...
Page 296: ...7 60 Service Manual 4060 xxx Assembly 27 5 bin mailbox ...
Page 298: ...7 62 Service Manual 4060 xxx Assembly 27 cont 5 bin mailbox ...
Page 300: ...7 64 Service Manual 4060 xxx Assembly 28 High capacity feeder 1 ...
Page 320: ...7 84 Service Manual 4060 xxx Assembly 38 StapleSmart finisher 4 1 ...
Page 344: ...I 20 Service Manual 4060 xxx ...
Page 345: ......

