2-52
Service Manual
4060-
xxx
Fuser service checks
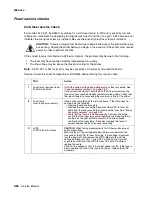
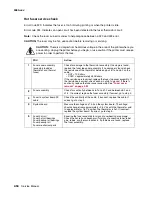
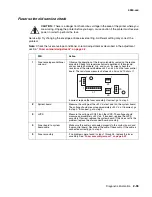
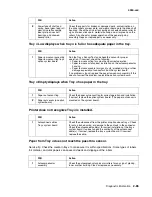
Cold fuser service check
Error codes 920, 921, and 922 may display for a cold fuser failure. A 920 error caused by low line
voltage can sometimes be cleared by turning the machine off and then on again. A 925 service error
indicates the wrong fuser lamp is installed. Be sure the correct type of fuser lamp is installed.
CAUTION:
There is a danger from hazardous voltage in the area of the printer where you
are working. Unplug the printer before you begin, or use caution if the printer must receive
power in order to perform the task.
If the correct lamp is installed and a 925 error remains, the problem may be due to the following:
•
The fuser may have reached standby temperature too quickly.
•
The line voltage may be above the maximum rating for the printer.
Note:
A 920, 921 or 922 fuser error may be caused by an incorrectly mounted thermistor.
Service tip: Set the Fuser Temperature to NORMAL before starting this service check.
FRU
Action
1
Fuser lamp (incorrect lamp/
925 Service Error)
Install the correct voltage and wattage lamp or fuser assembly. See
“Fuser assembly removal” on page 4-23
.
If the correct fuser lamp is installed and the 925 error remains, the
fuser may have reached standby temperature too quickly. Check that
the line voltage is not exceeding the maximum rating for the printer.
2
Fuser lamp
fuser top cover assembly
Observe the lamp through the left side frame. If the lamp does not
come on, do the following:
• Remove the redrive assembly.
• Remove the fuser assembly, disconnect the LVPS to fuser AC
cable from the fuser assembly, and remove the fuser. See
“Fuser
assembly removal” on page 4-23
.
• Verify that the lamp is installed correctly. If correct, check the
continuity of the fuser top cover assembly by verifying the lamp
contacts on the right contact assembly. If incorrect, check
continuity of the fuser lamp. If incorrect, replace the lamp. If
correct, replace the fuser top cover assembly.
3
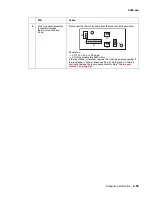
LVPS
LVPS to fuser AC cable
CAUTION
: When taking measurements for AC power, observe all
safety precautions.
Measure the AC line voltage between the two connectors on the
fuser end of the LVPS to fuser AC cable. If the voltage is incorrect,
turn the power off, and remove the LVPS. Measure the AC line
voltage between pins CN1-1 and CN1-3 on the board. If correct,
check the continuity of the LVPS to fuser AC cable. If incorrect,
replace the cable.
If the AC line voltage at CN1 is incorrect, check fuse F2. If the fuse is
blown, replace the fuse. If the fuse is not blown, replace the LVPS
assembly.
Summary of Contents for T63 Series
Page 13: ...Laser notices xiii 4060 xxx Japanese Laser Notice ...
Page 14: ...xiv Service Manual 4060 xxx Korean Laser Notice ...
Page 34: ...1 16 Service Manual 4060 xxx ...
Page 218: ...4 64 Service Manual 4060 xxx ...
Page 236: ...6 2 Service Manual 4060 xxx ...
Page 238: ...7 2 Service Manual 4060 xxx Assembly 1 Covers ...
Page 240: ...7 4 Service Manual 4060 xxx Assembly 2 Frame 1 5 2 1 3 4 3 4 8 6 7 ...
Page 252: ...7 16 Service Manual 4060 xxx Assembly 9 Paper feed alignment 3 2 1 4 ...
Page 258: ...7 22 Service Manual 4060 xxx Assembly 12 Drives Main drive and developer drive 3 2 4 1 7 6 5 ...
Page 260: ...7 24 Service Manual 4060 xxx Assembly 13 Hot roll fuser 3 7 5 2 6 4 1 5 8 7 9 ...
Page 262: ...7 26 Service Manual 4060 xxx Assembly 14 Transfer charging 3 2 4 1 5 6 7 9 10 8 ...
Page 264: ...7 28 Service Manual 4060 xxx Assembly 15 Electronics power supplies 3 7 5 2 6 4 1 ...
Page 266: ...7 30 Service Manual 4060 xxx Assembly 16 Electronics card assemblies 3 1 4 5 6 9 2 4 7 8 10 ...
Page 268: ...7 32 Service Manual 4060 xxx Assembly 17 Electronics shields ...
Page 270: ...7 34 Service Manual 4060 xxx Assembly 18 Cabling diagrams 1 3 1 2 4 5 6 7 8 7 4 ...
Page 272: ...7 36 Service Manual 4060 xxx Assembly 19 Cabling diagrams 2 HVPS LVPS 3 5 4 1 2 6 ...
Page 276: ...7 40 Service Manual 4060 xxx Assembly 21 250 sheet paper tray ...
Page 284: ...7 48 Service Manual 4060 xxx Assembly 23 Duplex option 1 ...
Page 286: ...7 50 Service Manual 4060 xxx Assembly 24 Envelope feeder 3 11 7 13 5 9 2 10 6 4 12 8 14 1 ...
Page 288: ...7 52 Service Manual 4060 xxx Assembly 25 Output expander ...
Page 290: ...7 54 Service Manual 4060 xxx Assembly 25 cont Output expander ...
Page 292: ...7 56 Service Manual 4060 xxx Assembly 26 High capacity output expander ...
Page 296: ...7 60 Service Manual 4060 xxx Assembly 27 5 bin mailbox ...
Page 298: ...7 62 Service Manual 4060 xxx Assembly 27 cont 5 bin mailbox ...
Page 300: ...7 64 Service Manual 4060 xxx Assembly 28 High capacity feeder 1 ...
Page 320: ...7 84 Service Manual 4060 xxx Assembly 38 StapleSmart finisher 4 1 ...
Page 344: ...I 20 Service Manual 4060 xxx ...
Page 345: ......


