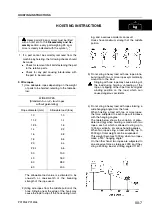
13. Before starting work, remove the leads from the
battery. Always remove the lead from the negative
( ± ) terminal first.
14. When raising heavy components, use a hoist or
crane. Check that the wire rope, chains and hooks
are free from damage.
Always use lifting equipment which has ample ca-
pacity. Install the lifting equipment at the correct
places.
Use a hoist or crane and operate slowly to prevent
the component from hitting any other part.
Do not work with any part still raised by the hoist
or crane.
15. When removing covers which are under internal
pressure or under pressure from a spring, always
leave two bolts in position on opposite sides.
Slowly release the pressure, then slowly loosen
the bolts to remove.
16. When removing components, be careful not to
break or damage the wiring.
Damage wiring may cause electrical fires.
17. When removing piping, stop the fuel or oil from
spilling out. If any fuel or oil drips on to the floor,
wipe it up immediately.
Fuel or oil on the floor can cause you to slip, or
can even start fires.
18. As a general rule, do not use gasoline to wash
parts. In particular, use only the minimum of gaso-
line when washing electrical parts.
19. Be sure to assemble all parts again in their origi-
nal places. Replace any damage parts with new
parts.
When installing hoses and wires, be sure that
they will not be damaged by conctat with other
parts when the machine is being operated.
20. When installing high pressure hoses, make sure
that they are not twisted. Damaged tubes are dan-
gerous, so be extremely careful when installing
tubes for high pressure circuits. Also, check that
connecting parts are correctly tightened.
21. When assembling or installing parts, always use
specified tightening torques.
When installing the parts which vibrate violently or
rotate at high speed, be particulary careful to
check that they are correctly installed.
22. When aligning two holes, never insert your fingers
or hand.
23. When measuring hydraulic pressure, check that
the measuring tool is correctly assembled before
taking any measurement.
24. Take sure when removing or installing tracks.
When removing the track, the track separates
suddenly, so never let anyone stand at either
end of the track.
00-4
PC12R-8 PC15R-8
Summary of Contents for PC12R-8 MISTRAL
Page 1: ......
Page 2: ...40 28 PC15R 8 ...
Page 4: ...00 2 PC12R 8 PC15R 8 ...
Page 17: ...GROUP 10 ...
Page 18: ...40 28 PC15R 8 ...
Page 30: ...10 12 PC12R 8 PC15R 8 PAGE INTENTIONALLY LEFT BLANK ...
Page 32: ...10 14 PC12R 8 PC15R 8 PAGE INTENTIONALLY LEFT BLANK ...
Page 34: ...10 16 PC12R 8 PC15R 8 PAGE INTENTIONALLY LEFT BLANK ...
Page 36: ...10 18 PC12R 8 PC15R 8 PAGE INTENTIONALLY LEFT BLANK ...
Page 38: ...10 20 PC12R 8 PC15R 8 PAGE INTENTIONALLY LEFT BLANK ...
Page 40: ...10 22 PC12R 8 PC15R 8 PAGE INTENTIONALLY LEFT BLANK ...
Page 42: ...10 24 PC12R 8 PC15R 8 PAGE INTENTIONALLY LEFT BLANK ...
Page 44: ...10 26 PC12R 8 PC15R 8 PAGE INTENTIONALLY LEFT BLANK ...
Page 79: ...10 61 PC12R 8 PC15R 8 PAGE INTENTIONALLY LEFT BLANK ...
Page 130: ...10 112 PC12R 8 PC15R 8 PAGE INTENTIONALLY LEFT BLANK ...
Page 132: ......
Page 133: ...GROUP 20 ...
Page 134: ...40 28 PC15R 8 ...
Page 158: ...20 24 PC12R 8 PC15R 8 PAGE INTENTIONALLY LEFT BLANK ...
Page 198: ......
Page 199: ...GROUP 30 ...
Page 200: ...40 28 PC15R 8 ...
Page 283: ...GROUP 40 ...
Page 284: ...40 28 PC15R 8 ...
Page 317: ...40 33 PC12R 8 PC15R 8 PAGE INTENTIONALLY LEFT BLANK ...
Page 324: ......


