REMOVAL OF THE BUCKET
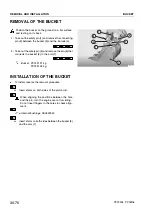
Position the bucket on the ground on a flat surface,
and resting on its back.
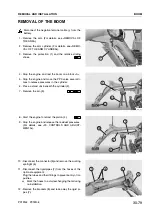
1 - Take out the safety pin (1) and remove the connecting
pin (2) between the bucket (3) and the tie-rods (4).
2 - Take out the safety pin (5) and remove the pin (6) that
connects the bucket (3) to the arm (7).
Bucket: PC12R: 21 kg
PC15R: 22 kg
INSTALLATION OF THE BUCKET
.
To install, reverse the removal procedure.
H
Insert shims on both sides of the piston rod.
When aligning the positions between the hole
and the pin, turn the engine over at low idling.
Do not insert fingers in the holes to check align-
ment.
Internalbushings: ASL800040
H
Insert shims on both sides between the bucket (3)
and the arm (7).
30-76
REMOVAL AND INSTALLATION
BUCKET
PC12R-8 PC15R-8
RKPA1550
4
1
2
5
6
7
3
Summary of Contents for PC12R-8 MISTRAL
Page 1: ......
Page 2: ...40 28 PC15R 8 ...
Page 4: ...00 2 PC12R 8 PC15R 8 ...
Page 17: ...GROUP 10 ...
Page 18: ...40 28 PC15R 8 ...
Page 30: ...10 12 PC12R 8 PC15R 8 PAGE INTENTIONALLY LEFT BLANK ...
Page 32: ...10 14 PC12R 8 PC15R 8 PAGE INTENTIONALLY LEFT BLANK ...
Page 34: ...10 16 PC12R 8 PC15R 8 PAGE INTENTIONALLY LEFT BLANK ...
Page 36: ...10 18 PC12R 8 PC15R 8 PAGE INTENTIONALLY LEFT BLANK ...
Page 38: ...10 20 PC12R 8 PC15R 8 PAGE INTENTIONALLY LEFT BLANK ...
Page 40: ...10 22 PC12R 8 PC15R 8 PAGE INTENTIONALLY LEFT BLANK ...
Page 42: ...10 24 PC12R 8 PC15R 8 PAGE INTENTIONALLY LEFT BLANK ...
Page 44: ...10 26 PC12R 8 PC15R 8 PAGE INTENTIONALLY LEFT BLANK ...
Page 79: ...10 61 PC12R 8 PC15R 8 PAGE INTENTIONALLY LEFT BLANK ...
Page 130: ...10 112 PC12R 8 PC15R 8 PAGE INTENTIONALLY LEFT BLANK ...
Page 132: ......
Page 133: ...GROUP 20 ...
Page 134: ...40 28 PC15R 8 ...
Page 158: ...20 24 PC12R 8 PC15R 8 PAGE INTENTIONALLY LEFT BLANK ...
Page 198: ......
Page 199: ...GROUP 30 ...
Page 200: ...40 28 PC15R 8 ...
Page 283: ...GROUP 40 ...
Page 284: ...40 28 PC15R 8 ...
Page 317: ...40 33 PC12R 8 PC15R 8 PAGE INTENTIONALLY LEFT BLANK ...
Page 324: ......

