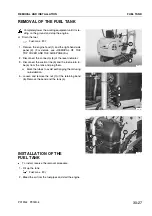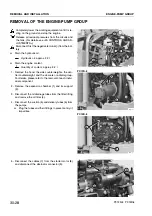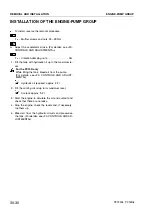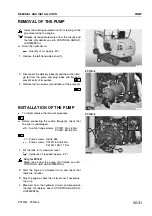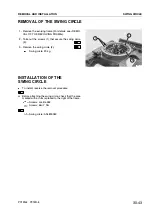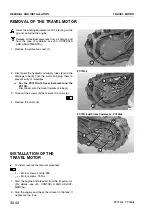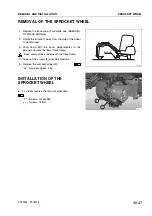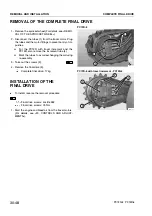
REMOVAL OF THE REVOLVING FRAME
Lower the working equipment untilit is resting on the
ground, and stop the engine.
Release all residual pressures from all circuits and
from the tank. (For details, see «20. CONTROLS
AND ADJUSTMENTS»).
1 - Remove the canopy or the cab. (For details, see «RE-
MOVAL OF THE CANOPY AND CAB»).
2 - Remove the top casing, the side panels, and the en-
gine hood. (For details, see the removal of the indivi-
dualparts).
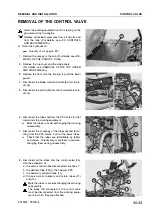
3 - Remove the battery (1).
H
First disconnect the negative terminalcable (±)
and then the positive terminalcable (+).
4 - Remove the rear grills and the counterweight.
(For details, see «REMOVAL OF THE REAR COUN-
TERWEIGHT»).
5 - Drain the hydraulic oil tank.
Quantity of oil: approx. 22
,
6 - Drain the fueltank.
Quantity of fuel: max. 20
,
7 - Remove the working equipment. (For details, see
«REMOVAL OF THE WORKING EQUIPMENT»).
8 - Remove the boom-raising cylinder. (For details, see
REMOVAL OF THE BOOM CYLINDER»).
9 - Disconnect the upper tubes (3) from the swiveljoint
(2) and plug them (7 tubes for the PC12R and 8 tubes
for the PC12R with travelincrement - PC15R).
H
Mark the tubes to avoid exchanging them during
re-assembly.
10 - Remove the bracket (4) of the joint (2).
11 - Remove the swing motor. (For details, see «REMO-
VAL OF THE SWING MOTOR»).
12 - Disconnect the swing circle lubrication tubes (5) and
remove the couplings (6).
13 - Loosen and remove the screws (7) that secure the re-
volving frame.
H
Leave two opposite screws in position for safety.
14 - Attach the evolving frame (8) to some hoisting tackle
and apply a slight tension to the cables.
H
Adjust the length of the cables to balance the
group.
30-41
REMOVAL AND INSTALLATION
REVOLVING FRAME
PC12R-8 PC15R-8
RKPA0811
1
RKPA1101
3
3
2
RKPA1150
5
6
4
7
6
5
RKPA1160
8
Summary of Contents for PC12R-8 MISTRAL
Page 1: ......
Page 2: ...40 28 PC15R 8 ...
Page 4: ...00 2 PC12R 8 PC15R 8 ...
Page 17: ...GROUP 10 ...
Page 18: ...40 28 PC15R 8 ...
Page 30: ...10 12 PC12R 8 PC15R 8 PAGE INTENTIONALLY LEFT BLANK ...
Page 32: ...10 14 PC12R 8 PC15R 8 PAGE INTENTIONALLY LEFT BLANK ...
Page 34: ...10 16 PC12R 8 PC15R 8 PAGE INTENTIONALLY LEFT BLANK ...
Page 36: ...10 18 PC12R 8 PC15R 8 PAGE INTENTIONALLY LEFT BLANK ...
Page 38: ...10 20 PC12R 8 PC15R 8 PAGE INTENTIONALLY LEFT BLANK ...
Page 40: ...10 22 PC12R 8 PC15R 8 PAGE INTENTIONALLY LEFT BLANK ...
Page 42: ...10 24 PC12R 8 PC15R 8 PAGE INTENTIONALLY LEFT BLANK ...
Page 44: ...10 26 PC12R 8 PC15R 8 PAGE INTENTIONALLY LEFT BLANK ...
Page 79: ...10 61 PC12R 8 PC15R 8 PAGE INTENTIONALLY LEFT BLANK ...
Page 130: ...10 112 PC12R 8 PC15R 8 PAGE INTENTIONALLY LEFT BLANK ...
Page 132: ......
Page 133: ...GROUP 20 ...
Page 134: ...40 28 PC15R 8 ...
Page 158: ...20 24 PC12R 8 PC15R 8 PAGE INTENTIONALLY LEFT BLANK ...
Page 198: ......
Page 199: ...GROUP 30 ...
Page 200: ...40 28 PC15R 8 ...
Page 283: ...GROUP 40 ...
Page 284: ...40 28 PC15R 8 ...
Page 317: ...40 33 PC12R 8 PC15R 8 PAGE INTENTIONALLY LEFT BLANK ...
Page 324: ......

