


10
www.kodak.com/go/aiosupport
7
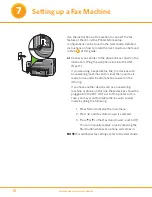
Setting up a Fax Machine
Use the instructions in this section to connect the fax
feature of the All-in-One Printer. More setup
confi gurations can be found in the User Guide. Detailed
instructions on how to locate the User Guide can be found
in step
8
of this guide.
a)
Connect your printer to the phone line as shown in the
illustration. (Plug the wall phone line into the LINE
IN port.)
If you are using a separate fax line, (no devices such
as answering machines on this line) then your fax is
ready to use and will automatically answer on the
4th ring.
If you have another device such as an answering
machine or phone on this line, these devices should be
plugged into the EXT OUT port of the printer. In this
case, you may want to disable the fax auto-answer
mode by doing the following:
1. Press Menu to display the main menu.
2. Press
until
Fax Auto Answer
is selected.
3. Press or so that
Fax Auto Answer
is set to
Off
.
You can manually receive a fax by pressing the
Start button whenever a phone call comes in.
NOTE:
For additional fax settings, refer to the User Guide.
Summary of Contents for ESP 9 ALL-IN-ONE PRINTER - SETUP BOOKLET
Page 17: ...All in One Printer print copy scan fax 9 User Guide ...
Page 28: ...Getting Help 4 Kodak ESP 9 Printer User Guide ...
Page 82: ...Copying 58 Kodak ESP 9 Printer User Guide ...
Page 130: ...Troubleshooting 106 Kodak ESP 9 Printer User Guide ...
Page 146: ...Glossary 122 Kodak ESP 9 Printer User Guide ...
Page 148: ...If you need to call Customer Support 124 Kodak ESP 9 Printer User Guide ...
Page 157: ... 1K3289 1K3289 1K3289 B ...


