background image

Long-Range Medium-Load PTZ Camera 


                User Manual 

79 


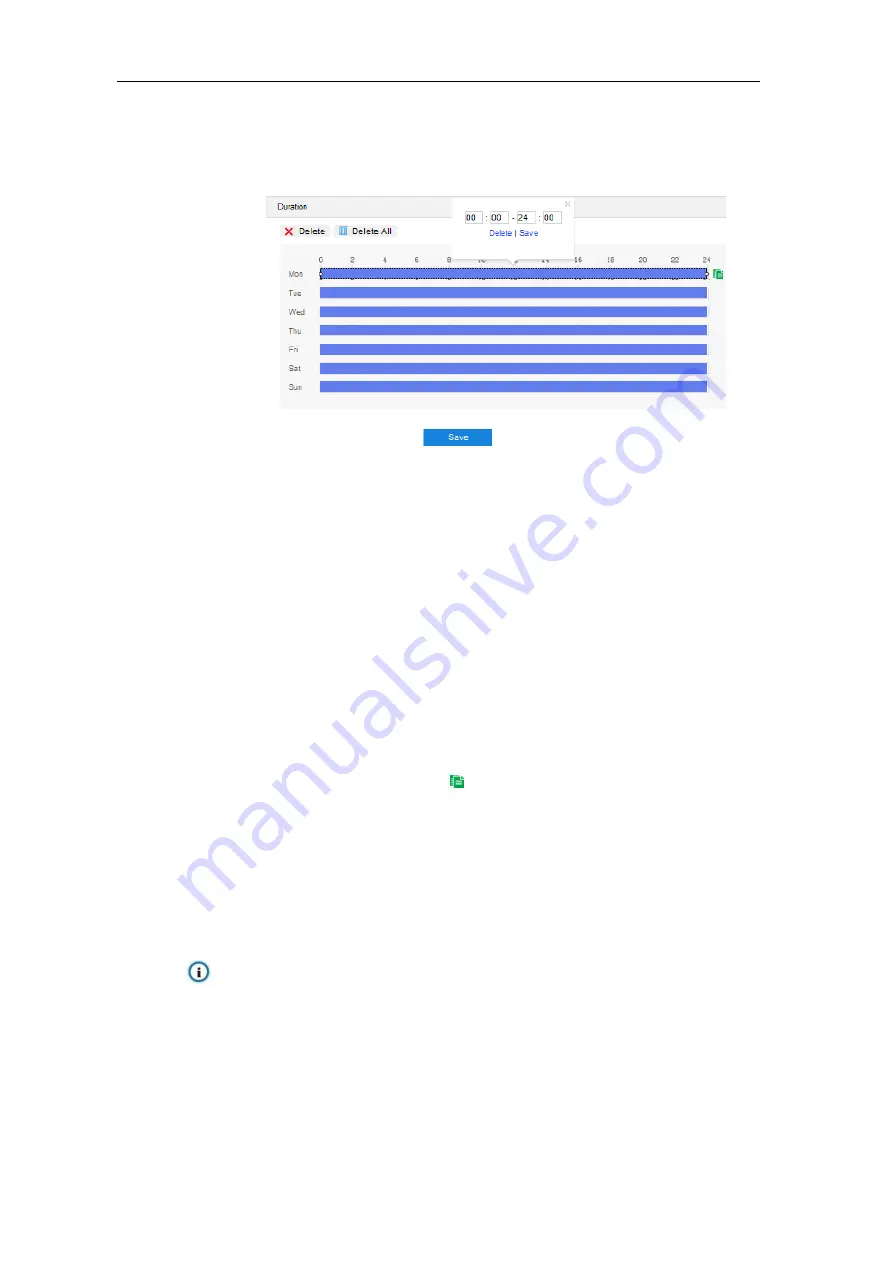
9)  Set arming duration: the default is 24 hours displaying in blue bar, or user can customize 

durations. The maximum allowed number of durations is 10 on one day and different durations 

cannot overlap with each other; 


Picture 6-13 Arming durations 


Set duration: configure arming durations according to actual requirements. 


Click the blue bar to pop up a window for editing the accurate start time and end time; 

click "

Save

" to validate setting.   


Click any duration and there will be small white squares on the 2 ends of it. Put the 

mouse on any whit square, left-click and drag the edit the start time and end time. 


Select the timeline of any day and delete the default blue bar. Left click on the mouse 

and drag on the timeline from left to right to form a blue bar, above which it shows the 

start time and end time. 


Copy duration: click the copy icon 

  behind the timeline and copy the durations on the 

day to one or several other days. 


Delete duration: click "

Delete All

" above the timeline to delete all the durations. Select any 

duration and click "

Delete

" on the popup window or above the timeline to delete the 

duration. 

Note: Select any duration with a mouse, and drag the blue bar on the timeline as a whole 

without changing the length of recording duration. 

10)  Click "

Save

" to validate settings. 

Summary of Contents for IPC524 Series

Page 1: ...KEDACOM User Manual for Long Range Medium Load PTZ Camera V1 February 2020 ...

Page 2: ...reserved Without the prior written permission of Suzhou Keda Technology Co Ltd any reproduction translation or retransmission of all or any part of this document for any purpose in either electronic or mechanical form is not allowed Notice The information in this document is subject to change without notice Every effort has been made in the preparation of this document to ensure accuracy of the co...

Page 3: ...age range 2 If the product does not work properly please contact your dealer or the nearest service center Never attempt to disassemble or repair the product yourself in any way 3 Do not drop the camera or subject it to physical shock 4 When cleaning the lens please use a rubber dust blower to remove dust on the lens or filter and use dry soft cleaning cloth to remove the dirt on camera surface Fo...

Page 4: ... to reduce damage efficiently such as thunder 1 The distance between the signal wire and the high tension apparatus or high voltage cable should be at least 50m 2 Try to route cables along the eave when installing outdoor 3 When installing camera in an open field route cables inside sealed steel pipes under the earth and ground the pipes with one point Never route cables in aerial way 4 In heavy t...

Page 5: ... Reset 11 2 5 Main Interface 12 3 Basic Functions 13 3 1 Live View 13 3 1 1 PTZ Control 13 3 1 2 Preset 14 3 1 3 Image Adjustment 15 3 1 4 Live View Window 15 3 2 Playback 17 3 3 Snapshot 19 3 4 Local Setting 20 4 Network 24 4 1 IP and Port 24 4 1 1 LAN 24 4 1 2 Port 25 4 1 3 Positioning 26 4 1 4 Multicast 26 4 2 Access Protocol 27 4 2 1 VSIP 27 4 2 2 ONVIF 28 4 2 3 GB28181 29 4 3 Other Protocol 3...

Page 6: ...5 1 10 Rotate and BNC 47 5 1 11 Effect Parameters 47 5 2 OSD 48 5 3 Video 50 5 3 1 Encoding Format 50 5 3 2 ROI 52 5 3 3 Privacy Mask 52 5 3 4 Video Info Overlay 54 5 4 Audio 55 5 4 1 Audio Encoding 55 5 4 2 Audio Decoding 56 5 5 PTZ 57 5 5 1 Basic Configuration 57 5 5 2 Guard Tour 59 5 5 3 Preset Position 59 5 5 4 Restricted Patrol 60 5 5 5 Path Mode 61 5 5 6 Scheduled Task 62 5 5 7 Positioning 6...

Page 7: ...rge 89 6 2 Alarm Input 91 6 3 Alarm Output 93 6 4 Abnormality Linkage 94 7 Storage 95 7 1 Storage Management 95 7 2 Recording 96 7 3 Snapshot 97 8 System 100 8 1 Device Info 100 8 2 User Security 100 8 2 1 User 100 8 2 2 RTSP Authorization 102 8 2 3 IP Filter 103 8 2 4 Security Service 103 8 3 Time 104 8 4 Serial Port 105 8 5 Log 106 8 6 System Maintenance 106 8 6 1 System Maintenance 106 8 6 2 Ne...

Page 8: ...amera IPC524 is equipped with motorized zoom lenses starlight low light image sensor follow up laser fill light and high precision medium load PTZ It is applicable to long distance surveillance scenes such as the high point of a city expressway river channels and harbors Picture 1 1 IPC524 series ...

Page 9: ...cal support for the cameras Requirements of PC for installing the client Processor 3 3 GHz CORE i3 series and later version or other equivalent processors RAM Memory 4GB or above Operating System Windows 7 or higher versions Browser recommend IE kernel browsers otherwise some functions of the web client may fail DirectX 9 0 C 2 1 Activate Camera When the camera is first used user should activate i...

Page 10: ...here are more than one non activated devices select the devices and click Batch processing On the popup interface set admin user s password and the email address to claim password Click Activate and wait for rebooting Picture 2 2 Batch Processing Activate through browser a Configure the IP addresses of PC in the same network segment as the camera and input the camera IP address in browser the devi...

Page 11: ...such as once every 3 months If the device is used in highly risky environment suggest modifying the password monthly or weekly Please keep your username and password safe 2 2 Quick Setting of Network Parameters After activating the device user can quickly modify the network parameters of the camera through IPCSearch including IP address subnet mask gateway and etc 1 Open IPCSearch and the system w...

Page 12: ...re 2 5 Reboot device Note To configure more parameters login to the web client and modify Please refer to Chapter 4 for details 2 3 Login and Log Out Login After activating the camera and modifying the parameters the device will reboot After reboot the button will be enabled again Select either of the following methods to login to the web client ...

Page 13: ... the browser to login to the web client Input username and the password set during activation and click Login as shown in the following picture Picture 2 6 Login Interface When login successfully for the first time please download and install the plug in Close browser during installation After finishing re login to the web client Interface after login is shown below Attention Recommend using IE ke...

Page 14: ... Quick Setting to enter quick setting interface and perform simple settings To disable quick setting go to Settings Local Setting and unselect Enable Configuration Guide checkbox or select No Prompt under Quick Setting on the quick setting interface Picture 2 8 Quick setting interface Picture 2 9 Quick setting Log Out On the live view interface click to log out ...

Page 15: ...d up for 10 minutes during which user cannot login to this camera If user forgets the password reset the password 1 Open IPCSearch and select the device whose password needs to be reset Click Password Reset and a window will pop up as shown below Picture 2 10 Password Reset 2 Click the password reset link or scan the QR code in the above picture with a mobile device and fill in the Serial Number a...

Page 16: ...The device will reboot 2 5 Main Interface On the main interface of camera you can view live video playback video records manage snapshots and configure settings Live View preview camera live video and adjust camera parameters Playback search playback and download video records by timeline or record types Snapshot view search and download snapshots by picture types Settings configure camera functio...

Page 17: ...Preset and Image Adjustment interfaces Click it again to show the interfaces 3 1 1 PTZ Control Click to show the following interface Picture 3 2 PTZ Control Icon Note Click the 8 direction buttons to control the pan and tilt rotation of the PTZ Click and the camera will patrol in pan click again to stop Drag the slide bar to adjust camera rotation step length The larger the step length is the fast...

Page 18: ...t aperture automatically Wiper is used to clean the glass dome In the PTZ control part of the Live View interface Click the icon to enable wiper and click again to disable it The wiper will stop automatically after 10 brushes Click it to enable it again if necessary 3 1 2 Preset Click to show the following interface Picture 3 3 Preset After setting and saving presets you can load edit or delete th...

Page 19: ...ind the slide bar to adjust image contrast by request The higher the value is the clearer contrast between the dark and the bright of the image there will be Saturation Drag Saturation slide bar or enter a value behind the slide bar to adjust image saturation by request The higher the value is the fresher the image will be Sharpness Drag Sharpness slide bar or enter a value behind the slide bar to...

Page 20: ...lick to select audio channel Drag the slide bar to adjust volume Click this button to call and talk to camera Click again to stop talking Snapshot click to capture current image click to select camera snapshot or local snapshot The former means the camera captures an image and sends it to local client the latter means the web client captures an image and saves it locally Start Stop recording click...

Page 21: ...to recover image During video freeze the PTZ function is disabled Full screen click this button to display in full screen Double click in full screen or press Esc to exit full screen 3 2 Playback Click Playback to enter the interface of recording management User can search view and download video records in SD card Picture 3 5 Playback Operation steps 1 Select recording duration from the calendar ...

Page 22: ...he mouse and drag the timeline to the left or right to skip playing Also user can set playback time under Go To and click to select playback time Buttons on the playback interface Icon Note Play Pause click the icon to play the video and click again to pause Stop click the icon to stop playing the video Decelerate playing speed click the icon to decelerate the speed of playing the video one click ...

Page 23: ...k the icon to pop up the download interface On the popup interface configure the start time end time and select video type s to download Click Search to display expected videos Select the files to be downloaded and click Download User can view the download progress on the list Save path can be set in Settings Local Setting Zoom in Zoom out timeline adjust the scale interval on the timeline Click t...

Page 24: ...Time 3 Click Search and the search result will show on the right list from which you can see picture ID and snapshot time 4 Select pictures and click the icon to download the selected pictures Snapshot save path can be set in Local Setting Camera Snapshot Save Path 3 4 Local Setting Go to Settings Local Setting and configure parameters of video playing the size and save path of video records and s...

Page 25: ... default being TCP UDP is applicable when the request for image quality is not high and the network is unstable Performance Select playing level from Real time Balanced and Smooth default being Balanced Balanced mode gives consideration of both real time playing and smooth playing real time ensures the shortest latency of video playing but affects the ...

Page 26: ...a status icon in the menu bar at the bottom of the live view window Click it to view frame rate bitrate and packet loss rate Rule Information Display If a device supports intelligent functions when this option is selected the settings on Settings Event Intelligent Function interfaces and on Settings Camera Video Video Info Overlay interface will be shown in the intelligent zone on live view window...

Page 27: ...ved currently Note Camera Snapshot Camera captures an image and sends it to local client The image quality is good but there is some time delay caused by network Local Snapshot Client captures an image and saves it locally The image quality is ordinary but there is no time delay Snapshot Save Path Configure the local save path for snapshots captured during playback Click the button of View to cust...

Page 28: ...the mode includes Static or DHCP When selecting static mode you need to configure IP Address Subnet Mask and Default Gateway manually when selecting DHCP mode the system obtains IP address automatically Note When filling the IPV4 IP address click Test to confirm if the address is available If selecting IPV6 the mode includes Manual and Automatically obtain Under the Automatically obtain mode the I...

Page 29: ...2 Port Go to Settings Network IP and Port Port and configure the ports Picture 4 2 Port HTTP Port Hypertext Transport Protocol Port When login through browser you need to add a port number behind camera IP address For example if HTTP port is edited as 83 when you login through browser you need to input http camera IP address 83 The number is 80 by default ranging 1 65535 HTTPS Port Hypertext Trans...

Page 30: ...le positioning function 2 The default system is GPS 3 Select speed unit options including km h and mile h 4 After finishing configuration click Save and view current location below 4 1 4 Multicast Go to Settings Network IP and Port Multicast and configure multicast parameters such as Stream Type Media Type and Multicast Address Note Multicast is a method of data packet transmission The source host...

Page 31: ... this multicast address under Passive mode only when receiving the request of multicast can the system send stream to the multicast address If the address is set 0 0 0 0 the system will send stream to 239 2 2 2 by default TTL Time to Live ranging 0 255 Note TTL means the maximum number of network segments allowed to pass through IP data packet before it is discarded by the router It is used to avo...

Page 32: ...nable function of auto networking When the NVR adds devices automatically the camera will be added to the NVR automatically 7 After finish click Save to validate setting Note For the operations of adding front end devices to back end platform please refer to the user manual of PMC client VSIP protocol only supports registering to back end platform of this company or other SDK integrated back end p...

Page 33: ...o verify username and password before login 4 Click Save to validate settings 4 2 3 GB28181 On GB28181 interface add the camera to GB platform according to the requirements of GB T28181 Configuration steps are as follows 1 Go to Settings Network Access Protocol GB28181 2 Select the Registered VMS Registered VMS 1 or Registered VMS 2 The camera supports registered to 2 different VMS 3 Select Enable...

Page 34: ...ocol 4 3 1 DDNS DDNS Dynamic Domain Name Server is to connect the camera to various servers so that user can login to the camera through servers Apply domain names at different server websites and then visit the device by domain names directly even if the IP address has been modified ...

Page 35: ...me should be filled 4 Enter username and password according to the selected DDNS server 5 Click Save to validate setting 4 3 2 FTP File Transfer Protocol the web client supports FTP protocol and user can upload the pictures of the camera to specific FTP server Configuration steps are as follows 1 Go to Settings Network Other Protocols FTP Picture 4 9 FTP 2 Enter FTP server address and port 3 Enter...

Page 36: ...lt will show on the dialogue box 6 Click Save to validate setting 4 3 3 PPPoE PPPoE Point to Point Protocol over Ethernet function is to access camera to the internet by dialing the account provided by ISP Telecom Unicom and CMCC Configuration steps are as follows 1 Go to Settings Network Other Protocols PPPoE Picture 4 10 PPPoE 2 Select Enable to enable PPPoE function 3 Input user name and passwo...

Page 37: ...ol if the device connected to the LAN can access to the LAN which will support the requirements of network authentication charging safety and management well Configuration steps are as follows 1 Go to Settings Network Other Protocols 802 1X Picture 4 12 802 1X 2 Select Enable to enable IEEE 802 1X protocol 3 Select Protocol Type from the dropdown list and select version from the list of EAPOL Vers...

Page 38: ...rent packet loss rates during network congestion thus the quality of service is ensured Attention You need to configure the same value on the router 4 Click Save to validate setting 4 3 7 UPnP By UPnP protocol it is able to set up mapping relation between private network and the internet Internal port is camera port while external port is router port User can visit camera when accessing to the ext...

Page 39: ...y for user to visit current IP address 4 Select Auto or Manual for Mapping Mode When selecting Manual enter external port number manually 5 Click Save to validate setting 4 3 8 SNMP SNMP means Simple Network Management Protocol It is an application level protocol consisting of a set of network management standards that support a network management system for monitoring devices connected to the net...

Page 40: ... to validate settings Attention Before configuring SNMP protocol parameters make sure the SNMP server is already equipped and correctly configured 4 3 9 SMTP SMTP means Simple Message Transfer Protocol When an alarm is triggered the system will send email notification automatically through SMTP protocol Configuration steps are as follows 1 Go to Settings Network Other Protocols SMTP Picture 4 16 S...

Page 41: ...l address and click the symbol behind it and the address will be saved to the list below Select an address from the list and click the symbol to remove the email address 6 Click Save to validate setting Note After finishing configuration and enabling email notification it will send alarm emails normally ...

Page 42: ...SD Video Audio and etc 5 1 Image Go to Settings Camera Visible Image and configure image adjustment exposure focus and etc Picture 5 1 Image 5 1 1 Image Adjustment Picture 5 2 Image adjustment The image adjustment in this part is the same as that on the Live View interface which can be referred to in chapter of Image Adjustment ...

Page 43: ...hrough the lens A large aperture allows more light input and the image looks bright Options including DC IRIS Auto and DC IRIS Manual Auto mode is suggested If selecting DC IRIS Auto drag the slide bar of Aperture Size and Aperture Sensitivity If selecting DC IRIS Manual drag the slide bar of Aperture Size to set the value and the aperture will remain as the set value Shutter Mode Camera shutter m...

Page 44: ...form images Adjustment of focus mode will help obtaining optimum and clear target images Picture 5 4 Focus Focus Mode Select a mode from the dropdown list by request The default mode is Single Focus Manual On the live view interface click focus icons to perform manual focusing Single Focus The camera will trigger automatic focusing once the PTZ changes 5 1 4 Focus Assist Go to Settings System Syst...

Page 45: ...re 5 6 White Balance Select an option from the dropdown list of white balance mode Suggest Auto Manual support R Gain and B Gain adjustment Drag the slide bar of White Balance R Gain and White Balance B Gain to adjust the value ranging 0 100 Auto 2 has a larger white balance range than Auto 1 though both are auto mode Lock White Balance lock current color correction matrix If the camera works unde...

Page 46: ...g sensitivity from night mode to day mode The lower the sensitivity is the higher brightness in the condition the camera needs to switch to day mode the higher the sensitivity is the lower brightness in the condition the camera needs Latency When the camera detects that the light condition is satisfactory to trigger night cut and the time lasts longer than the preset latency the camera will switch...

Page 47: ... switch night cut automatically The range of it is 5 s to 120 s Night Cut Threshold The switch threshold from day mode to night mode The lower the value is the harder it is to switch from day mode to night mode Scheduled Day Night Under Scheduled Day Night mode click Edit Time and configure Day Mode Start Time and Day Mode End Time on the popup interface The camera will switch day and night modes ...

Page 48: ...t If selecting the latter adjust the spotlight size through the buttons on the right 4 User can adjust laser center manually and drag the slide bar of Rotation Step to configure the rotation speed ranging 0 to 100 adjust laser center through the direction button above 5 1 8 Image Enhancement When there are many noise points caused by environment and camera lens noise reduction function can be enab...

Page 49: ...ment Select a mode from the dropdown list according to actual requirements Disable the default option is Disable which disables dynamic adjustment Backlight compensation Backlight compensation can provide optimal exposure of target when there is strong background light When selecting Backlight Auto drag the slide bar to adjust Backlight Sensitivity when selecting Backlight Manual drag the slide ba...

Page 50: ...ble the function It can distinguish the dark part and the bright part of the image effectively so as to improve image contrast Double Lens Enabling this function will increase camera focal length magnifying the original focal length into two times Note Only some models support this function Distortion Correction It is disabled by default When the radian of camera lens is too large and the image is...

Page 51: ...l output port PAL Progressive scanning to output analog image with high definition NTSC Interlaced scanning to output analog image with low definition 5 1 11 Effect Parameters Effect parameters include Auto Mode Standard Mode and Save Parameters Picture 5 13 Effect parameters Auto Mode Select Auto Mode and configure the switch conditions on the popup interface options including Night Cut and Time ...

Page 52: ...nd will show as a mode option on the dropdown list of Effect Parameters for future use 5 2 OSD On OSD interface you can configure OSD text on the surveillance window Configuration steps are as follows 1 Go to Settings Camera OSD Picture 5 15 OSD 2 Select options in Content according to requirements and preview the effect in the window below options including Time Label Alarm PTZ and OSD 3 Click Ad...

Page 53: ...w it on the image When selecting magnification click OK and the image will display the content in the set zoom ratio 5 Edit OSD positions select the OSD in the window with mouse and drag to change its position The dark blue box and the light blue box can move freely in the yellow box and they can even overlap with each other The time label and alarm OSDs in the dark blue box move with the box whil...

Page 54: ...e steps 5 3 Video Go to Settings Camera Video and configure Encoding Format ROI Privacy Mask and Video Info Overlay 5 3 1 Encoding Format Go to Settings Camera Video Encoding Format and configure parameters of stream type resolution bit rate type and etc Picture 5 17 Encoding Format Multi Stream It means the same video source is encoded in several streams with different resolutions This parameter ...

Page 55: ... bit rate for CBR Encoding Format Select according to actual requirements options including H 264 H 265 and MJPEG Encoding Complexity Select encoding complexity level according to actual request Under the same bitrate the higher the complexity level is the better quality the image will have and the more bandwidth it will require When the encoding format is MJPEG the encoding complexity is certain ...

Page 56: ...quality of this area while at the cost of decreasing the image quality outside this area It not only ensures the image quality of ROI area but also reduces the bit rate Configuration steps are as follows 1 Go to Settings Camera Video ROI Picture 5 18 ROI 2 Select Enable to enable ROI function 3 Click Edit and drag an area from the left window as the clipping area Select encoding grade from the dro...

Page 57: ...mns and 12 rows of small squares Click any square and drag an area toward lower right then this area is the privacy mask detection area Click Clear to reset the area 4 Select a color from the dropdown list of Mask Color 5 Configure arming duration The default arming duration is 24 hours in blue bars or you can customize the durations Picture 5 20 Arming durations ...

Page 58: ...ete on the popup window or on the top of the duration bars to remove this duration 6 Click Save to validate the settings Note A camera supports maximum 4 Privacy Mask areas 5 3 4 Video Info Overlay Go to Settings Camera Video Video Info Overlay and composite basic intelligent feature and digital watermarking into the surveillance image Picture 5 21 Video info overlay GPS Select it to show camera c...

Page 59: ...ions including LINE IN or MIC IN You can select according to actual requests LINE IN means linear input while MIC IN means microphone input Audio Encoding Setting Sampling Rate It means the sampling times to sound signals by the audio recording device in 1 second The higher the sampling rate is the more real and natural the sound reproduction will be Encoding Volume Drag the slide bar to adjust au...

Page 60: ... and select according to the capacity of the device When selecting one channel you can hear the sound of this channel through the platform when selecting both channels at the same time you will hear mixed sound Click Save to validate settings 5 4 2 Audio Decoding Go to Settings Camera Audio Audio Decoding and configure audio decoding Picture 5 23 Audio decoding Decoding Volume i e audio output vol...

Page 61: ...on so that the functions of preset loading and path patrol will work normally 5 5 1 Basic Configuration Go to Settings Camera PTZ Basic Config and configure basic parameters of the PTZ as shown in the following picture Picture 5 24 Basic Configuration Basic Config PT Version Display the version of current PT Patrol Speed Level Configure speed level 1 40 during patrol The larger the value is the fa...

Page 62: ...lect the chechbox to enable Last Spot Recovery 2 Select recovery mode Options include Last Spot Recovery and Load Preset When Power On If selecting Last Spot Recovery the PT will load to the last position before powering off automatically when it is powered again Configure recovery time If selecting Load Preset When Power On the PT will load to the selected preset directly Configure preset No 3 Re...

Page 63: ...rating on the camera for a certain period of time the camera will return to a preset position automatically The Waiting Time and Preset No are configurable Please refer to chapter 5 5 3 Path Mode After user stops operating on the camera for a certain period of time camera will enable Path Mode automatically The Waiting Time is configurable Please refer to chapter 5 5 5 4 Set Waiting Time according...

Page 64: ... preset 7 In the preset part of the Live View interface user can also select a preset to load save or delete Details can be referred to in chapter 3 1 2 5 5 4 Restricted Patrol Restricted Patrol includes Manual and Auto modes After enabling this function user can define borders of PTZ patrol Configuration steps are as follows 1 Go to Settings Camera PTZ Restricted Patrol Picture 5 27 Restricted Pa...

Page 65: ... Mode Path Mode means the camera patrols around all the valid presets on a path After enabling this function click any button on PTZ control to disable it Currently the camera supports 8 paths and the maximum allowed number of patrol spots on each path is 32 which can be selected from the 512 presets Configuration steps are as follows 1 Go to Settings Camera PTZ Path Mode Picture 5 28 Path mode 2 ...

Page 66: ...duled Task and set durations and tasks Camera will complete the tasks within the set durations Configuration steps are as follows 1 Go to Settings Camera PTZ Scheduled Task Picture 5 30 Scheduled Task 2 Select Enable to enable scheduled task 3 Enter Task Recovery Time 5 720s Take 5s as example if user performs other PTZ operations during the task camera will recover the scheduled task in 5 seconds...

Page 67: ...duled task c Click any free point on the timeline and configure the next duration Different durations cannot overlap d Click the icon behind the timeline and the copy window will pop up Select several weekdays or Select All and click Copy to copy the scheduled task of the duration to the selected weekdays e Click Delete on the window of editing scheduled task or click below Duration and Scheduled ...

Page 68: ...the target horizontal coordinate and click Horizontal Positioning then the PTZ will rotate to the target pan position Vertical Coordinate fill the target vertical coordinate and click Vertical Positioning then the PTZ will rotate to the target tilt position Azimuth Positioning it means the PTZ camera faces to the due north Rotate the camera to a specific position and click Azimuth Positioning Save...

Page 69: ... configured duration unselect Enable or select Sprayer Wiper to stop it d Click Save to validate settings Picture 5 33 Common wiper Sprayer Wiper a Select Sprayer Wiper from the dropdown list of Wiper Mode and the wiper will sprayer water and brush 2 rounds b Select Enable to start scheduling mode c Configure scheduling cycle which is Everyday by default configure scheduling time which is 8 00 by ...

Page 70: ...the linkage method set by user Configuration steps are as follows 1 Go to Settings Event Intelligent Function Motion Detection 2 Select Enable 3 Adjust the surveillance scene through the PTZ 4 Set motion detection area the default being full area detection Click Clear All and then Edit and the image will be divided into 16 columns and 12 lines of small squares Click a square drag toward lower righ...

Page 71: ...1 Motion detection 7 Set arming duration the default is 24 hours displaying in blue bar or user can customize durations the maximum allowed number of durations is 10 on one day and different durations cannot overlap with each other Picture 6 2 Arming durations ...

Page 72: ...ve the timeline to delete the duration Note Select any duration with a mouse and drag the blue bar on the timeline as a whole without changing the length of recording duration 8 Click Save to validate settings 6 1 2 Video Blocked When the preset area is blocked intentionally and affects normal surveillance of this area an alarm will be triggered After receiving the alarm user can find the cause of...

Page 73: ...od s when video blocked triggers an alarm Picture 6 3 Video blocked 7 Set arming duration the default is 24 hours displaying in blue bar or user can customize durations the maximum allowed number of durations is 10 on one day and different durations cannot overlap with each other Picture 6 4 Arming durations ...

Page 74: ...uration and click Delete on the popup window or above the timeline to delete the duration Note Select any duration with a mouse and drag the blue bar on the timeline as a whole without changing the length of recording duration 8 Click Save to validate settings 6 1 3 Guard Line Guard line is to trigger an alarm once there is any object entering the guard line Configuration steps are as follows 1 Go...

Page 75: ...default Moving objects over max or below min will not trigger an alarm when they enter the guard line s 7 Area Setting to set guard lines Click Edit and drag the mouse in the scene to draw a guard line User can click its starting or end point to adjust its length and angle click Stop to stop editing 8 Drag the slide bar of Sensitivity to set the guard line s sensitivity to moving objects the highe...

Page 76: ...e will be small white squares on the 2 ends of it Put the mouse on any whit square left click and drag the edit the start time and end time Select the timeline of any day and delete the default blue bar Left click on the mouse and drag on the timeline from left to right to form a blue bar above which it shows the start time and end time Copy duration click the copy icon behind the timeline and cop...

Page 77: ...t linkage type s which is are the alarm output method s when defocus triggers an alarm 5 Click Save to validate settings 6 1 5 Scene Change Scene change detection is to detect if the surveillance scene changes The camera will judge if it is necessary to trigger an alarm Configuration steps are as follows 1 Go to Settings Event Intelligent Function Scene Change 2 Select Enable 3 Select a detection ...

Page 78: ...different durations cannot overlap with each other Picture 6 9 Arming durations Set duration configure arming durations according to actual requirements Click the blue bar to pop up a window for editing the accurate start time and end time click Save to validate setting Click any duration and there will be small white squares on the 2 ends of it Put the mouse on any whit square left click and drag...

Page 79: ...cessary to trigger an alarm Configuration steps are as follows 1 Go to Settings Event Intelligent Function Entry Guard Area 2 Select Enable 3 Adjust the surveillance scene through the PTZ 4 Select a number from the dropdown list of Guard Area and user can set only one area at one time After saving it user can set another and max 4 guard areas can be set 5 Target Filter to set target area Click Edi...

Page 80: ...0 Entry guard area 9 Set arming duration the default is 24 hours displaying in blue bar or user can customize durations The maximum allowed number of durations is 10 on one day and different durations cannot overlap with each other Picture 6 11 Arming durations ...

Page 81: ...nd click Delete on the popup window or above the timeline to delete the duration Note Select any duration with a mouse and drag the blue bar on the timeline as a whole without changing the length of recording duration 10 Click Save to validate settings 6 1 7 Exit Guard Area The function is to detect if there is anything leaving the set guard area and the camera will judge if it is necessary to tri...

Page 82: ...o 6 points in the scene Right click or click the starting or ending point to close the area Click Stop to finish editing 7 Drag the slide bar of Sensitivity the higher the sensitivity is the easier it will trigger an alarm 8 Select linkage type s which is are the alarm output method s when an event triggers an alarm Picture 6 12 Exit guard area ...

Page 83: ... Put the mouse on any whit square left click and drag the edit the start time and end time Select the timeline of any day and delete the default blue bar Left click on the mouse and drag on the timeline from left to right to form a blue bar above which it shows the start time and end time Copy duration click the copy icon behind the timeline and copy the durations on the day to one or several othe...

Page 84: ...e in the scene to draw a rectangle Click Stop after finishing and drag the slide bar of Max and Min Target Ratio 1 by default Moving objects over max or below min will not trigger an alarm when they enter the guard area s 6 Area Setting to set guard area Click Edit and click mouse to draw a closed area made up of 3 to 6 points in the scene Right click or click the starting or end point to close th...

Page 85: ...4 Enter guard area 10 Set arming duration the default is 24 hours displaying in blue bar or user can customize durations The maximum allowed number of durations is 10 on one day and different durations cannot overlap with each other Picture 6 15 Arming durations ...

Page 86: ...d click Delete on the popup window or above the timeline to delete the duration Note Select any duration with a mouse and drag the blue bar on the timeline as a whole without changing the length of recording duration 11 Click Save to validate settings 6 1 9 Object Left The function is to detect if there is any object being left in the set guard area and staying for a period of time reaching the se...

Page 87: ... end point to close the area Click Stop to finish editing 6 Drag the slide bar of Sensitivity the higher the sensitivity is the easier it will trigger an alarm 7 Drag the slide bar of Time Threshold i e the maximum allowed time for the object to stay in the area For example if it is set 5 s when there is an object entering the guard area and stays for 5 s it will trigger an alarm Picture 6 16 Obje...

Page 88: ... will be small white squares on the 2 ends of it Put the mouse on any whit square left click and drag the edit the start time and end time Select the timeline of any day and delete the default blue bar Left click on the mouse and drag on the timeline from left to right to form a blue bar above which it shows the start time and end time Copy duration click the copy icon behind the timeline and copy...

Page 89: ...le Click Stop after finishing and drag the slide bar of Max and Min Target Ratio 1 by default Moving objects over max or below min will not trigger an alarm when they enter the guard area s 5 Area Setting to set guard area Click Edit and click mouse to draw a closed area made up of 3 to 6 points in the scene Right click or click the starting or end point to close the area Click Stop to finish edit...

Page 90: ...18 Object removal 9 Set arming duration the default is 24 hours displaying in blue bar or user can customize durations The maximum allowed number of durations is 10 on one day and different durations cannot overlap with each other Picture 6 19 Arming durations ...

Page 91: ... above the timeline to delete the duration Note Select any duration with a mouse and drag the blue bar on the timeline as a whole without changing the length of recording duration 10 Click Save to validate settings 6 1 11 Gathering When the coverage of people in the guard area exceeds a set ratio the camera will judge if it is necessary to trigger an alarm For example if the ratio is set 50 when 5...

Page 92: ...ethod s when an event triggers an alarm Picture 6 20 Gathering 8 Set arming duration the default is 24 hours displaying in blue bar or user can customize durations The maximum allowed number of durations is 10 on one day and different durations cannot overlap with each other Picture 6 21 Arming durations ...

Page 93: ... timeline to delete all the durations Select any duration and click Delete on the popup window or above the timeline to delete the duration Note Select any duration with a mouse and drag the blue bar on the timeline as a whole without changing the length of recording duration 9 Click Save to validate settings 6 1 12 Audio Surge When there is audio surge the camera will judge if it is necessary to ...

Page 94: ...n customize durations The maximum allowed number of durations is 10 on one day and different durations cannot overlap with each other Picture 6 23 Arming durations Set duration configure arming durations according to actual requirements Click the blue bar to pop up a window for editing the accurate start time and end time click Save to validate setting ...

Page 95: ...a whole without changing the length of recording duration 6 Click Save to validate settings 6 2 Alarm Input Before starting configuration make sure that the camera has connected to alarm input devices such as smoke detector alarm bell or sprayer through the parallel port Configure parameters for each alarm input devices and the camera will judge by the received alarm signal if it is necessary to t...

Page 96: ...n the default is 24 hours displaying in blue bar or user can customize durations The maximum allowed number of durations is 10 on one day and different durations cannot overlap with each other Picture 6 25 Arming durations Set duration configure arming durations according to actual requirements ...

Page 97: ...l other days Delete duration click Delete All above the timeline to delete all the durations Select any duration and click Delete on the popup window or above the timeline to delete the duration Note Select any duration with a mouse and drag the blue bar on the timeline as a whole without changing the length of recording duration 8 If user sets several alarm input ports select All under Copy to Al...

Page 98: ...lity Linkage Configure the alarm linkage method for abnormal events and the camera will judge if it is necessary to trigger an alarm Configuration steps are as follows 1 Go to Settings Abnormality Linkage Picture 6 27 Abnormality Linkage 2 Select Enable 3 Select an option from the dropdown list of Abnormality Type Note Disk Full when the disk storage is insufficient Disk Error when the disk cannot...

Page 99: ...ording has stopped Storage Device List Display the status capacity progress and other information of all storage devices Disk ID display the serial number of the storage device Capacity display the storage space of the storage device Remaining Space display the remaining space of the storage device Status show the status of storage devices such as Normal with a storage card which can read and writ...

Page 100: ... which means the storage card can be used normally 2 Go to Settings Storage Recording to configure video recording Recording Type Select the stream to be recorded If none is selected it will not be able to record videos Code Stream Format Select a video packaging format according to the type of access protocol Prerecord Select prerecord duration i e the prerecord duration before recording starts I...

Page 101: ...uration click Delete All above the timeline to delete all the durations Select any duration and click Delete on the popup window or above the timeline to delete the duration Note Select any duration with a mouse and drag the blue bar on the timeline as a whole without changing the length of recording duration 5 Click Save to validate setting 7 3 Snapshot After configuring scheduled snapshot the ca...

Page 102: ...g the accurate start time and end time click Save to validate setting Click any duration and there will be small white squares on the 2 ends of it Put the mouse on any whit square left click and drag the edit the start time and end time Select the timeline of any day and delete the default blue bar Left click on the mouse and drag on the timeline from left to right to form a blue bar above which i...

Page 103: ...e and drag the blue bar on the timeline as a whole without changing the length of recording duration 4 Configure event snapshot a Select Enable to enable event snapshot b Configure time interval c Configure the number of snapshots captured at each event 5 Click Save to validate settings ...

Page 104: ...ave and the device name will be synchronized to the OSD interface shown below Picture 8 1 Device info 8 2 User Security Go to Settings System User Security and configure user information RTSP authorization IP filter and security service 8 2 1 User Go to Settings System User Security User you can add user delete user edit username and password configure user authorizations and etc Anonymous Access ...

Page 105: ...the Authorization List After setting click Confirm Picture 8 3 Add user Note By default all options are available to administrator users Live View Playback Snapshot and PTZ Control options are available to operator users a browser can only view the live video from the camera Some settings take effect after rebooting the camera which requires user with both the authorizations of configuration and r...

Page 106: ...n Go to Settings System User Security RTSP Authorization and select authorization type from the dropdown list options including none basic digest and digest By default it is basic digest Note basic means basic authorization which transfers messages without encryption and has a severe safety risk digest means digest authentication which transfers information through MD5 Hash conversion and has a hi...

Page 107: ... and click Modify to modify the IP address and click Confirm Delete Black White List Select IP address from the black white list and click Delete to delete the IP address Click Delete All to clear all the added IP addresses 4 Click Save to validate settings 8 2 4 Security Service Go to Settings System User Security Security Service and configure the parameters to protect user safety Picture 8 8 Se...

Page 108: ... user IP will be locked up Click Save to validate settings 8 3 Time Go to Settings System Time and configure Device Time Zone Device Time Auto Time Correction NTP Clock Synchronization and DST Configure parameters by actual requests and click Save to validate setting Picture 8 9 Time setting Set device time zone and device time Click Manual Setting select time zone and set time on the popup interf...

Page 109: ...gure the parameters thereof NTP Clock Synchronization Select Enable and configure Server Address NTP Port certain to be 123 and Time Correction Interval When it is enabled the camera will correct time on a time basis of the configured interval DST DST daylight saving time is the practice of advancing clocks during summer months so that evening daylight lasts longer while sacrificing normal sunrise...

Page 110: ...d Time and click Search The search result will show on the list below 3 Click Save Logs to download all logs locally click Delete logs to clear all logs Note When selecting User Operation or Alarm Info for Log Type you need to select a Secondary Type to narrow the search scope The system can save maximum 2 000 entries of logs When it is full the latest one will overwrite the oldest one automatical...

Page 111: ...h to find the device by flashing Auto Maintenance Select Enable and configure Maintenance Cycle and Maintenance Time Click Save to validate setting PT Maintenance including restore default PT settings PT upgrade and PT maintenance Restore Default PT Settings Restore PT settings to factory default PT Upgrade Upgrade the PT version PT Maintenance Select Enable to enable PT maintenance and configure ...

Page 112: ...ompatibility Keep Alive the Stream UDP Network Adaptation Function Switch Working Mode and Audio Noise Reduction Only admin user can perform advanced configuration Click Configuration input the right password for advanced user and click Confirm to enter the configuration interface Picture 8 14 Advanced configuration VSIP Protocol Compatibility select the OSD picture obtaining method for the camera...

Page 113: ...sources 8 6 2 Network Test Go to Settings System System Maintenance Network Test and test the network connectivity between the device and the destination address Enter an IP address in Destination Address and click ping The test result will show on the list below Picture 8 15 Network test ping Enter an IP address in Destination Address and click trace The test result will show the routing entries ...

Page 114: ...operation in systems with low frame loss G 726 Audio coding algorithm H 264 Advanced video coding for generic audiovisual services H 265 High Efficiency Video Coding HD High definition IP Internet Protocol MPEG4 Moving Pictures Experts Group MJPEG Motion Joint Photographic Experts Group NAT Network Address Translation NTSC National Television Standards Committee PAL Phase Alternation Line PC Perso...

Reviews: