1
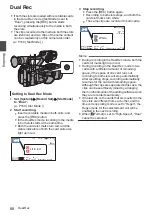
Set [System]
B
[Record Set]
B
[Slot Mode]
to “Backup
Y
” or “Backup
G
”.
0
The slot mode can be identified on the status
screen.
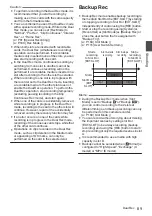
2
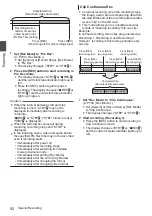
Start backup recording (to Slot B or
[EXT.SLOT])
0
Select “REC” in [System]
B
[Record Set]
B
[Slot Mode]
B
[Backup Rec] and press the
Set button (
R
).
0
You can also press the user button that is
assigned with “Backup Trig”.
0
Backup recording into slot B or [EXT.SLOT]
starts.
0
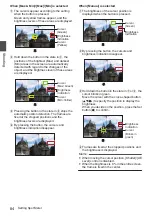
The Slot B or [EXT.SLOT] mark turns red
(indicating that is is currently selected), and
the Slot B or [EXT.SLOT] status indicator
lights up in red.
.
100min
50min
282min
1/ 60
F2. 8
AE
±
0
ND
1 /64
12 :34 : 56
ISO
102400
00: 00: 00.00
5 . 6f t
B 5600
K
4030 20
10
0
50min
100min
Red (selected)
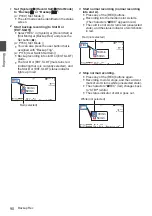
3
Start normal recording (normal recording
into slot A).
0
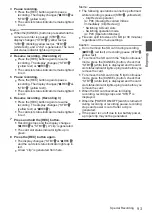
Press any of the [REC] buttons.
0
Recording into the media in slot A starts.
(The characters “
R
REC” appear in red.)
0
The card icon of slot A turns red (unselected
state), and the status indicator of slot A blinks
in red.
.
100min
50min
282min
1/ 60
F2. 8
AE
±
0
ND
1 /64
12 :34 : 56
ISO
102400
00: 00: 00.00
5 . 6f t
B 5600
K
4030 20
10
0
50min
100min
Red (not selected)
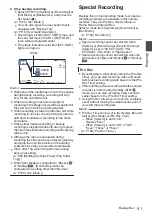
4
Stop normal recording.
0
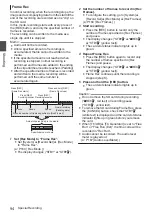
Press any of the [REC] buttons again.
0
Recording to slot A stops, and the card slot
mark of slot A turns white (unselected state).
0
The characters “
R
REC” (red) changes back
to “STBY” (white).
0
The status indicator of slot A goes out.
.
100min
50min
282min
1/ 60
F2. 8
AE
±
0
ND
1 /64
12 :34 : 56
ISO
102400
00: 00: 00.00
5 . 6f t
B 5600
K
4030 20
10
0
50min
100min
White (not selected)
90
Backup Rec
Shooting
Summary of Contents for Connected Cam GY-HC500E
Page 2: ...2 ...
Page 267: ...267 ...

