Game Service & Troubleshooting
E-9
E.6
Performing a Full Software Update
Preparations:
Visit
https://www.jerseyjackpinball.com/support/
and
download the latest full Dialed In software update. If you have not
already done so, download the UNETBOOTIN utility for Windows or
Macintosh.
Tools Required:
Personal computer
8 GB (min) USB memory stick
The full software update is also referred to as a factory reinstallation of game software. At times, a full software
update will be the only method for updating your game, as critical, underlying operating system changes are often
required.
1)
Insert an 8 GB USB memory stick into an empty USB slot in your personal computer.
WARNING: All data on
the USB stick will be erased during this process!
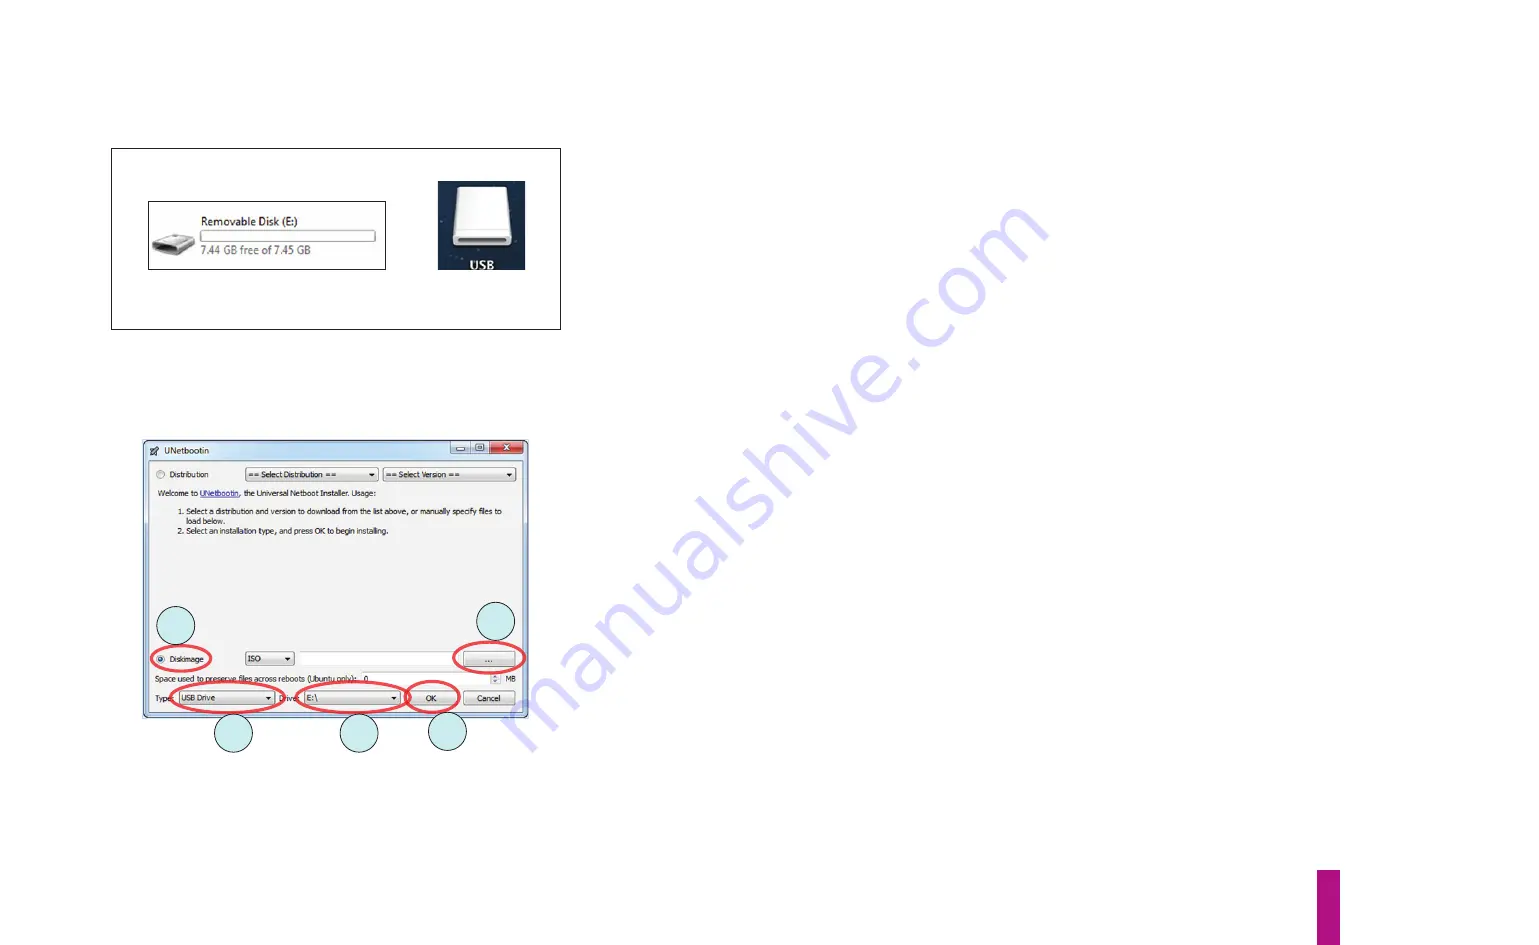
You should see a new
Removable Disk
under
My Computer
(Windows) or a new
Drive
on your
Desktop
(Macintosh), as shown in figure E7.
2)
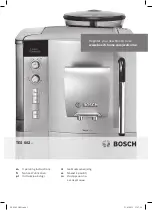
Run the UNETBOOTIN application. The UNETBOOTIN window (shown in figure E8) will open.
3)
Select the
Disk Image
option, then click the ‘
...
‘ button (both are circled in figure E8). Locate and select the
Dialed In ISO file you downloaded from the Jersey Jack Pinball® website.
4)
Ensure that the
USB Drive
is selected under
Type
and the USB stick you inserted earlier (“
E:\
” in this example) is
selected under
Drive
(both are circled in figure E8).
5)
Click the
OK
button to begin the copy/burn process, which will take approximately 10-20 minutes to complete
(depending upon the speed of your computer). Again, all data on the USB stick will be erased during this process.
Windows
Macintosh
Figure E7. Icons for USB stick.
3
3
4
4
5
Figure E8. Initial UNETBOOTIN application window.
Summary of Contents for Dialed in!
Page 2: ......
Page 4: ......
Page 15: ...Game Assembly Setup A 1 Game Assembly Setup Section A...
Page 43: ...The Dialed In Menu System B 1 The Dialed In Menu System Section B...
Page 99: ...Game Parts Information C 1 Game Parts Information Section C...
Page 104: ...Game Parts Information C 6 7 9 17 5 4 19 1 2 10 16 13 14 15 8 12 18 11 6 3 20 5 21 23 22...
Page 106: ...Game Parts Information C 8 1 2 3 4 5 6 7 8 9 10 11 12 13 18 15 16 14 17 19 20 22 21...
Page 114: ...Game Parts Information C 16 10 3 11 1 7 7 12 4 6 9 8 8 2 5 8a...
Page 126: ...Game Parts Information C 28 1 4 8 9 3 5 3 2 6 3 7...
Page 130: ...Game Parts Information C 32 7 2 4 8 1 11 3 10 5 6 12 15 9 13 14...
Page 148: ...Game Parts Information C 50 1 2 3 4 5 7 8 9 10 12 12 14 15 6 6 6 6 6 6 6 13 11...
Page 150: ...Game Parts Information C 52 1 2 3 4 5 6 7 8 9 10 12 10 10 10 10 11 11 13...
Page 160: ...Game Parts Information C 62 9 9 1 7 2 4 5 6 6 8 3...
Page 166: ...Game Parts Information C 68 1 2 3 4 5 6 9 10 11 12 13 14 17 19 21 22 26 27 28 35 36...
Page 168: ...Game Parts Information C 70 1 2 3 4 5 6 9 10 11 12 13 14 17 19 21 22 26 27 28 36 35...
Page 170: ...Game Parts Information C 72 41 42 44 45 46 47 48 57 58 59...
Page 172: ...Game Parts Information C 74 57 58 59 41 42 44 45 46 47 48...
Page 208: ...Game Parts Information C 110 1 2 2 2 3 4 5 6 11 9 10 10 10 7 8 12 12 12 13 15 14 16...
Page 210: ...Game Parts Information C 112 1 2 4 5 5 5 3...
Page 212: ...Game Parts Information C 114 1 2 5 6 7 8 4 9 11 10 12 13 14 15 17 17 18 19 20 21 16 24 23 22 3...
Page 222: ...Game Parts Information C 124 4 2 3 1 5...
Page 224: ...Game Parts Information C 126 1 2 3 1 2 3 4 4 5 5 5 5 5 5 5 5 5 5 5 6 6 9 8 10 7 11 13 12...
Page 236: ...Game Parts Information C 138...
Page 237: ...Reference Diagrams Schematics D 1 Reference Diagrams Schematics Section D...
Page 312: ...Reference Diagrams Schematics D 76...
Page 348: ...Reference Diagrams Schematics D 112 1 Fuse Locations In Bottom of Cabinet 4 2 3 In Backbox...
Page 354: ...Reference Diagrams Schematics D 118...
Page 355: ...Game Service Troubleshooting E 1 Game Service Troubleshooting Section E...
Page 367: ...Appendices...


