background image

Registering E-mail Destinations to a Group

109

5

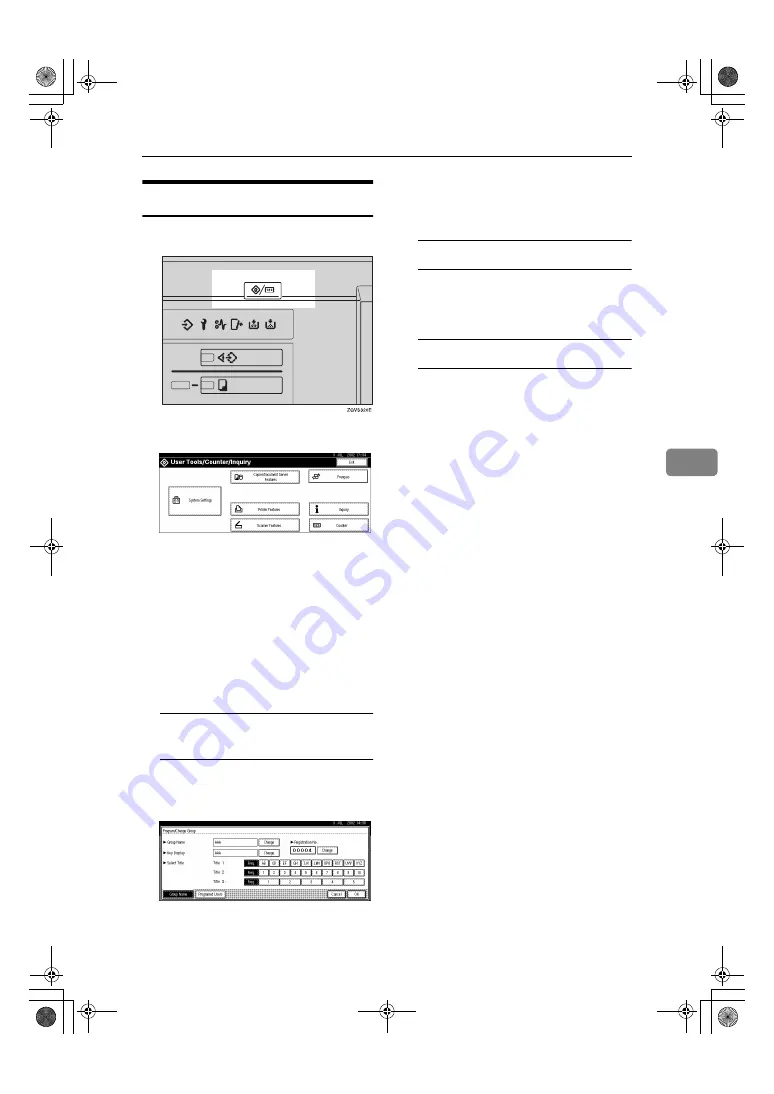
Changing a Group Name

AAAA

Press the 

{{{{

User Tools/Counter

}}}}

 key.

BBBB

Press the 

[

System Settings

]

 key.

CCCC

Press the 

[

Key Operator Tools

]

 key.

DDDD

Press the 

[

Address Book: Pro-

gram/Change/Delete Group

]

 key.

EEEE

Press the group key you want to
change.

FFFF

Reenter the item you want to
change.

To change a group name or the 
key display

A

Press the 

[

Change

]

 key in

“Group Name” or “Key Dis-
play”.

B

Reenter the group name or key
display, and then press the

[

OK

]

key.

To change a title

A

Press the title key in “Select Ti-
tle” of the group you want to
sort.

To change a registration number

A

Press the 

[

Change

]

 key in “Reg-

istration No.”.

B

Enter the registration number
using the number keys.

C

Press the 

[

#

]

 key.

GGGG

Press the 

[

OK

]

 key.

MartiniC1_GBzen2_FM.book  Page 109  Friday, April 19, 2002  2:18 PM

Summary of Contents for Aficio 2060

Page 1: ... A RICOH CORPORATION 5 Dedrick Place West Caldwell New Jersey 07006 Phone 1 973 882 2000 The Netherlands RICOH EUROPE B V Groenelaan 3 1186 AA Amstelveen Phone 31 0 20 5474111 United Kingdom RICOH UK LTD Ricoh House 1 Plane Tree Crescent Feltham Middlesex TW13 7HG Phone 44 0 20 8261 4000 Germany RICOH DEUTSCHLAND GmbH Mergenthalerallee 38 40 65760 Eschborn Phone 49 0 6196 9060 France RICOH FRANCE ...

Page 2: ...ure Notes The model names of the machines do not appear in the following pages Check the type of your ma chine before reading this manual For details see p 15 Machine Types Type 1 IS 2060 Type 2 IS 2075 Certain types might not be available in some countries For details please contact your local dealer Two kinds of size notation are employed in this manual With this machine refer to the metric vers...

Page 3: ...f the EMC Directive 89 336 EEC and the Low Voltage Directive 73 23 EEC In accordance with IEC 60417 this machine uses the following symbols for the main power switch a a a a means POWER ON c c c c means STAND BY MartiniC1_GBzen2_FM book Page 1 Friday April 19 2002 2 18 PM ...

Page 4: ...User Management 20 2 Basics Guide To Components 21 External Options 23 Control Panel 24 Display Panel 26 Connecting the Machine Network Connections 27 Requirements 28 When the Wireless LAN Board option is installed 29 Connecting the Network Cable to the Network 30 Turning On the Power 32 Turning On the Main Power 32 Turning On the Power 32 Turning Off the Power 33 Turning Off the Main Power 33 Con...

Page 5: ...nterface 86 Interface Settings IEEE 1394 option 87 Interface Settings IEEE 802 11b option 88 File Transfer 89 Key Operator Tools 90 User Codes 96 To Register a New User Code 97 Changing a User Code 98 Clearing a User Code 99 Displaying the Counter for Each User Code 100 Printing the Counter for Each User Code 100 Clearing the Counter 101 E mail Destination 102 Registering an E mail Destination 102...

Page 6: ...inisher Saddle Stitch 136 Finisher 3000B 100 Sheet Staples 138 e e e e Removing Jammed Staples 140 Finisher 3000M 50 Sheet Staples Booklet Finisher 140 Booklet Finisher Saddle Stitch 142 Finisher 3000B 100 Sheet Staples 144 y y y y Removing Punch Waste 146 Finisher 3000M 50 Sheet Staples Booklet Finisher 146 Finisher 3000B 100 Sheet Staples 147 7 REMARKS Do s And Don ts 149 Toner 150 Handling Tone...

Page 7: ...t Staples option 167 Finisher 3000B 100 Sheet Staples option 169 Copy Tray option 171 Large Capacity Tray LCT option 172 Interposer option 173 Punch Unit option 174 Others 176 Copy Paper 177 Recommended Paper Sizes and Types 177 Non recommended Paper 180 Paper Storage 181 INDEX 182 MartiniC1_GBzen2_FM book Page iv Friday April 19 2002 2 18 PM ...

Page 8: ... LAN Interface option Users Notice to Users in EEA Countries This product complies with the essential requirements and provisions of Direc tive 1999 5 EC of the European Parliament and of the Council of 9 March 1999 on radio equipment and telecommunications terminal equipment and the mu tual recognition of their conformity The CE Declaration of Conformity is available on the Internet at URL http w...

Page 9: ...e marks The proper names of the Windows operating systems are as follows The product name of Windows 95 is Microsoft Windows 95 The product name of Windows 98 is Microsoft Windows 98 The product name of Windows Me is Microsoft Windows Millennium Edi tion Windows Me The product names of Windows XP are as follows Microsoft Windows XP Professional Microsoft Windows XP Home Edition The product names o...

Page 10: ... the Software to deal in the Software without restriction including without limitation the rights to use copy modify merge publish distribute sublicense and or sell copies of the Software and to permit persons to whom the Software is furnished to do so sub ject to the following conditions The above copyright notice and this permission notice shall be included in all copies or substantial portions ...

Page 11: ... with the distribution C All advertising materials mentioning features or use of this software must display the following acknowledgment This product includes software developed by the NetBSD Foundation Inc and its contributors D Neither the name of The NetBSD Foundation nor the names of its contribu tors may be used to endorse or promote products derived from this software without specific prior ...

Page 12: ...s product includes software developed by Jonathan Stone and Jason R Thorpe for the NetBSD Project This product includes software developed by the University of California Lawrence Berkeley Laboratory and its contributors This product includes software developed by Christos Zoulas This product includes software developed by Christopher G Demetriou for the NetBSD Project This product includes softwa...

Page 13: ...ol Be sure to read the instructions all of which are included in the Safety Information section The statements above are notes for your safety Important If this instruction is not followed paper might be misfeed originals might be damaged or data might be lost Be sure to read this Preparation This symbol indicates the prior knowledge or preparations required before op erating Note This symbol indi...

Page 14: ...JISKL B5 JISKL B6 JISL are referred to as B4KL B5KL B6L in this manual The image of the display panel may be different depending on the installed options MartiniC1_GBzen2_FM book Page 7 Friday April 19 2002 2 18 PM ...

Page 15: ...hazardous electric shock or laser radiation exposure do not remove any covers or screws other than those specified in this man ual Turn off the power and disconnect the power plug by pulling the plug not the cable if any of the following occurs You spill something into the machine You suspect that your machine needs service or repair The external housing of your machine has been damaged Do not inc...

Page 16: ...de the machine Keep toner used or unused and toner bottle out of the reach of children For environmental reasons do not dispose of the machine or expended supply waste at household waste collection points Disposal can take place at an authorized dealer The inside of the machine could be very hot Do not touch the parts with a label indicating the hot surface Otherwise an injury might occur Our prod...

Page 17: ...NING and R R R RCAUTION This machine has labels and hallmarks for RWARNING RCAUTION at the positions shown below For safety please follow the instructions and handle the machine as indicated MartiniC1_GBzen2_FM book Page 10 Friday April 19 2002 2 18 PM ...

Page 18: ...11 MartiniC1_GBzen2_FM book Page 11 Friday April 19 2002 2 18 PM ...

Page 19: ...ically lowers its pow er consumption even further 90 minutes after the last copy or print job has fin ished Printing is still possible in Sleep Mode but if you wish to make copies press the operation switch first Reference For details about how to change the default interval see p 82 Auto Off Timer As an ENERGY STAR Partner we have determined that this machine model meets the ENERGY STAR Guideline...

Page 20: ...nce with the ENERGY STAR Program we recommend use of recy cled paper which is environmentally friendly Please contact your sales rep resentative for recommended paper Copying function only Multiple function printer with copying printing scanning functions Type 1 Type 2 Type 1 Type 2 Low Power Mode Power consumption 220 W or less 240 W or less Default interval 15 minutes 15 minutes Recovery Time 30...

Page 21: ...DF file on the CD ROM labeled Op erating Instructions Network Printing Guide Operating Instructions Describes procedures and provides information about setting up and using the machine as a printer in a network environment We recommend you read this manual first It is included as a PDF file on the CD ROM labeled Oper ating Instructions PostScript 3 Board Type 1075 Operating Instructions Supplement...

Page 22: ...o models which vary in copy speed To ascertain which model you have see the inside front cover Type 1 Type 2 Copy speed 60 copies minute A4K 81 2 11 K 75 copies minute A4K 81 2 11 K MartiniC1_GBzen2_FM book Page 15 Friday April 19 2002 2 18 PM ...

Page 23: ...16 MartiniC1_GBzen2_FM book Page 16 Friday April 19 2002 2 18 PM ...

Page 24: ...d also copy using more sophisticated techniques such as reduction enlargement or combining several originals onto one copy You can install several options for using sort staple and saddle stitch functions Printer Mode You can print documents under various environments Scanner Mode You can use this machine as a network scanner It is also possible to e mail the scanned image as an attached file via ...

Page 25: ... or you can see the docu ment s thumbnails on the PC 1 To see the document s thumbnails on a PC DeskTopBinder V2 Professional Lite must be installed p 19 Operation from a Computer Note You can save the following Data from documents scanned using the document feeder Data from documents scanned using the exposure glass Data sent from a computer Data from documents scanned using the scanner function ...

Page 26: ...cument Server you can print it out at any time with print settings such as duplex and stapling File Merge Printing You can merge documents such as those stored on the Document Server sent from the printer or scanned paper originals You can merge documents that were created with different applications or separately on different computers Operation from a Computer If you install DeskTopBinder V2 Pro...

Page 27: ...ge amounts for each user The functions you can limit are as follows 1 When you print the documents by pressing the Document Server key the copy counter shows the number of copies for the documents stored in copy mode and the print counter shows the number of documents stored in printer mode Reference p 90 User Code Management p 96 User Codes Function Mode Limitation Usage amount man agement Copy P...

Page 28: ...e down here for copy ing 3 Copy tray option Copied paper is delivered here 4 Copy tray guide When copying onto OHP transparencies and translucent paper raise the guide This prevents copies from curling when delivered 5 Main power switch If the machine does not operate after turning on the operation switch check if the main power switch is turned on p 32 Turning On the Power MartiniC1_GBzen2_FM boo...

Page 29: ...ay tray 1 3 Load paper here 1 Ventilation holes Prevent overheating Do not obstruct the ventilation holes by placing an object near it or leaning things against it If the machine overheats a fault might occur 2 Bypass tray Use when copying onto OHP transparen cies label paper adhesive labels trans lucent paper postcards and non standard size paper 3 Interface for network connections p 27 Connectin...

Page 30: ...2 Finisher shift tray 1 3 Finisher shift tray 2 4 Finisher 3000M 50 Sheet Staples Sorts stacks staples and punches copies 4 Finisher upper tray 5 Finisher shift tray 5 Finisher 3000B 100 Sheet Sta ples Sorts stacks staples and punches copies 6 Finisher upper tray 7 Finisher shift tray 6 Interposer Inserts cover or slip sheets into the cop ies 7 Large Capacity Tray LCT Holds 4000 sheets of paper Ma...

Page 31: ...ettings Counter Press to check or print the total number of copies made p 156 Counter Inquiry Press to check where to contact for machine repairs and ordering toner p 155 Inquiry 4 Job List key Shows the job list 5 Display panel Shows the operation status error mes sages and function menus 6 Check Modes key Press this key to check settings 7 Program key Copy mode Press to register frequently used ...

Page 32: ...s to check for poor copying or print ing before making multiple sets 14 Start key Press to start copying scanning or print ing documents stored on the Document Server 15 Clear Stop key Clear Press to delete a number entered Stop Press to stop a job such as scanning originals or printing in progress 16 key Press to enter a value 17 Number keys Use to enter the desired number of cop ies 18 Function ...

Page 33: ...panel it is highlighted like Keys appearing as cannot be used Common Key Operations The following keys are common to all screens Key list OK Acknowledges a selected function or entered values and then returns to the previous screen Cancel Deletes a selected function or entered values and then returns to the previous screen U U U UPrev T T T TNext Moves to the previous page or the next page when al...

Page 34: ...rence 1 2 10BASE T 100BASE TX port Port for connecting the 10BASE T or 100BASE TX cable 3 IEEE 1394 ports option Port for connecting the IEEE 1394 inter face cable 4 Wireless LAN port option Port for using the wireless LAN 5 USB port option Port for connecting the USB 2 0 interface cable Connecting the Machine in the Printer Reference 1 MartiniC1_GBzen2_FM book Page 27 Friday April 19 2002 2 18 PM...

Page 35: ...work environments Using the appropriate network management software and printer drivers Attaching the machine to a network computer set up as a server 1 Under Windows NT 4 0 only 86 CPUs are supported 2 For information about usable versions of the Mac OS see the Printer Reference 1 3 Connecting UNIX printing information please visit our web site or consult your au thorized dealer 4 Under Windows 9...

Page 36: ...here is 40 to 60 mm between the antennas so that they do not touch The exposure glass cover and Document Feeder ADF do not knock the antennas If the network area provides poor radio environment Where radio wave conditions are bad the network may not function due to interrupted or failed connections When checking the Wireless LAN Signal and the access point follow these steps to improve the situati...

Page 37: ...e the Printer Reference 1 Connecting to the Ethernet Interface Note Rating voltage of the interface connector Max DC 5V A A A A Turn off the main power switch B B B B Attach the Ethernet interface cable to the 10BASE T 100BASE TX port C C C C Turn on the main power switch Indicators on Network Interface Board 1 Indicator green Remains green when the machine is connected to the network cor rectly 2...

Page 38: ...E 1394 interface cable to the IEEE 1394 ports Note Two interface ports are available for attaching the IEEE 1394 interface ca ble Connecting to the USB 2 0 Interface option A A A A Attach the USB 2 0 interface cable to the USB port Important The interface cable is not supplied It is your responsibility to provide the interface cable appropriate for the computer that you are using Reference For mor...

Page 39: ...2 Energy Saver Timer Turning On the Main Power A A A A Make sure that the power cord is firmly plugged into the wall out let B B B B Open the switch cover and turn on the main power switch make sure that the Main Power indica tor lights up Important Do not turn off the main power immediately after it has been turned on Failure to observe this may result in damage to the hard disk or memory leading...

Page 40: ...tant Do not turn off the main power switch when the On indicator is on or blinking Failure to observe this may result in damage to the hard disk or memory leading to mal function Pull out the power cord after you turn off the main power switch Failure to observe this may result in damage to the hard disk or memory leading to malfunction A A A A Make sure the On indicator is off B B B B Open the sw...

Page 41: ... browser p 37 When using TCP IP p 39 When using the IEEE 1394 Interface option Making E mail Settings Scanner Reference Wireless LAN 4 IP Address Subnet Mask Gateway Address Network Boot Effective Protocol Inter face Select Communication Mode Channel WEP SSID The settings must be made from the PC Make the SMTP server name SMTP port number and DNS server set tings using a Web browser p 37 When usin...

Page 42: ...ect Communication Mode Channel 5 WEP SSID 6 Delivery Option p 37 When using TCP IP p 41 When using the Wireless LAN Interface option in Ad hoc Mode p 42 When using the Wireless LAN Interface option in Infrastructure Mode Printer TCP IP 1 IP Address Subnet Mask Gateway Address Network Boot Effective Protocol Inter face Select p 37 When using TCP IP p 38 Acquiring the IP Ad dress from the DHCP Serve...

Page 43: ...ribed For more details see the Network Printing Guide For default settings see p 75 Settings You Can Change with User Tools Interface Settings Network p 84 Interface Settings IEEE 1394 option p 87 Interface Settings IEEE 802 11b option p 88 File Transfer p 89 Network Settings The following describes the settings required to use the machine in a network For more information about the settings see p...

Page 44: ...Protocol key B Press the Effective or Invalid key for each protocol C Press the OK key The following operation will be different according to each protocol When using TCP IP A Make sure that the Network key is selected and then press the IP Ad dress key B Use the number keys to enter the IP address Note Press the or key to move in 3 digit increments Press the Clear key if the wrong address is ente...

Page 45: ...ress the DHCP key and then press the OK key When using NetWare To use the machine on NetWare be sure to select the type of NW Frame Type You can select the following frame types Auto Select Default Ethernet II Ethernet 802 2 Ethernet 802 3 Ethernet SNAP Note Make sure to select the frame type same as the file server When you select Auto Select the frame type detected upon startup is au tomatically...

Page 46: ...ve Reference When you use parallel printing see the Printer Reference A Make sure that the Network key is selected and then press the IEEE 1394 key B Press the IP Address key C Use the number keys to enter the IP address and then press the OK key D Press the Sub net Mask key E Use the number keys to enter the Subnet Mask and then press the OK key F Press the IP over 1394 key G Make sure that Activ...

Page 47: ...d for setting SSID are ASCII 0x20 to 0x7e which are case sensitive You can enter up to 32 characters You can also set 802 11 Ad hoc mode from the Web browser For details on settings see the Network Printing Guide A Make sure that Network is selected and then press LAN Type key B Press the IEEE 802 11b key and then press the OK key C Press the IEEE 802 11b key D Press the Communication Mode key E P...

Page 48: ...ide Characters used for setting SSID are ASCII 0x20 to 0x7e which are case sensitive You can enter up to 32 characters You can set the Ad hoc mode from the Web browser For details on set tings see the Network Printing Guide A Make sure that the Network key is selected and then press the LAN Type key B Press the IEEE 802 11b key and then press the OK key C Press the IEEE 802 11b key D Press the Com...

Page 49: ...can also set the Infrastructure mode from the Web browser For details on settings see the Network Printing Guide A Make sure the Network key is selected and then press the LAN Type key B Press the IEEE 802 11b key and then press the OK key C Press the IEEE 802 11b key D Press the Communication Mode key E Press the Infrastructure key and then press the OK key F Press the SSID Setting key G Press th...

Page 50: ... Press the Printer Features key B Press the Config Page key The system settings list is printed G G G G Press the User Tools Counter key The new settings become effective and the display returns to the main func tion menu File Transfer Settings The following describes the file transfer settings required for the scanner func tion For more information about the settings see p 89 File Transfer A A A ...

Page 51: ...P address through ScanRouter V2 Lite Professional You cannot set the address from the machine The delivery server IP address set through ScanRouter V2 Lite Profes sional will be displayed on the machine Setting the Recall Interval Time A Press the Scanner Recall Interval Time key B Use the number keys to enter the recall interval time and then press the OK key MartiniC1_GBzen2_FM book Page 44 Frid...

Page 52: ... delivery server press the ON key C Use the number keys to enter the number of recalls and then press the OK key D D D D Press the Exit key E E E E Press the User Tools Counter key The new settings become effective and the display returns to the main func tion menu MartiniC1_GBzen2_FM book Page 45 Friday April 19 2002 2 18 PM ...

Page 53: ...Basics 46 2 MartiniC1_GBzen2_FM book Page 46 Friday April 19 2002 2 18 PM ...

Page 54: ...llowing situations When accessing user tools During interrupt copying The default setting is to display the screen for copying when you turn the power on You can change the setting For details about settings see p 75 Function Priority MartiniC1_GBzen2_FM book Page 47 Friday April 19 2002 2 18 PM ...

Page 55: ...period of time This function is called System Reset Note You can change the System Reset time p 83 System Auto Reset Timer Auto Off The machine turns itself off automatically after your job is finished after a cer tain period of time This function is called Auto Off Note You can change the Auto Off time p 82 Auto Off Timer Auto Off Timer function will not operate in the following cases When a warn...

Page 56: ...e and Document Server mode are displayed When Print Priority in the system settings is set to Job order jobs reserved using copy mode printer mode Document Server mode or Net file mode are displayed The Netfile mode This function allows printing from a PC documents stored in Document Server of the machine using DeskTopBinder V2 Professional Lite Checking the List A A A A Press the Job List key B B...

Page 57: ...f the list E E E E Press the OK key The display returns to the job list menu Deleting Jobs A A A A Press the Job List key B B B B Select the job number to be deleted C C C C Press the Delete Job key D D D D Press the Yes key The display returns to the job list menu Job printed using copy mode Job printed using printer mode Job printed using Document Server mode Job printed using Netfile mode Marti...

Page 58: ...100 Sheet Staples is installed on the machine you can specify the output tray to which documents are to be delivered For more information about how to specify the output tray for each function see the following de scriptions p 77 Output Copier p 77 Output Document Server p 78 Output Printer What you can do with the Multi Access Function The multi access function enables you to do the operations be...

Page 59: ...ion ends The operation must be started once the preceding operation ends Simultane ous operations are not available Mode after you select Copy Interrupt Copying Printer Scanner Document Server DeskTopBinder V2 Professional Lite Data Reception Print Mode before you select Operations for Copying Stapling Sort Operations for Copying Copying Printing Stapling Operations for Scanning Scanning Operation...

Page 60: ...er 3 5 5 5 Mode after you select Copy Interrupt Copying Printer Scanner Document Server DeskTopBinder V2 Professional Lite Data Reception Print Mode before you select Operations for Copying Stapling Sort Operations for Copying Copying Printing Stapling Operations for Scanning Scanning Operations for Document Server Scanning a Document to Store in Document Server Printing from Document Server Print...

Page 61: ...nce you press the New Job key DeskTopBinder V2 Professional Lite Printing from Document Server 3 Mode after you select Copy Interrupt Copying Printer Scanner Document Server DeskTopBinder V2 Professional Lite Data Reception Print Mode before you select Operations for Copying Stapling Sort Operations for Copying Copying Printing Stapling Operations for Scanning Scanning Operations for Document Serv...

Page 62: ...ion Stapling cannot be used at the same time for multiple functions Note While printing is in progress scanning a document using another function may take more time MartiniC1_GBzen2_FM book Page 55 Friday April 19 2002 2 18 PM ...

Page 63: ...Combined Function Operations 56 3 MartiniC1_GBzen2_FM book Page 56 Friday April 19 2002 2 18 PM ...

Page 64: ...ayed 3 The numbers of originals copies and printed pages are displayed 4 The operation keys are displayed 5 The stored operation mode is dis played The icons below show the operation mode when documents have been stored in the Document Server Function name Where to store documents Displaying a list Printing documents Copy Copy Document Server Enabled Enabled Printer Personal computer Enabled Enabl...

Page 65: ... functions Important Data stored in the machine might be lost if some kind of failure occurs The supplier shall not be responsible for any damage that might result from the loss of data For long term storage of data we recommend the use of DeskTopBinder V2 Lite or DeskTopBinder V2 Professional option For more information please contact your local dealer Note Data stored in the Document Serv er is ...

Page 66: ...ame The saved documents are dis played on the Select Files to Print display If not displayed press the Scanning Finished key To register or change a user name A A A A Display the Scan Original dis play B B B B Press the User Name key If user names have already been registered the User Name dis play appears When pressing Non programmed Name unregistered names can also be used If no user names are r...

Page 67: ...C C C C Press the Delete All key to delete the old file name Note You can also use the Backspace key to delete unnecessary char acters D D D D Enter a new file name and then press the OK key Note A string of up to 10 characters can be entered as a file name Note that only eight characters of each file name are displayed in the document list Reference p 110 Entering Text To set or change a password...

Page 68: ... B B B B Select a document to be printed Note If a password has been set for the document enter it and then press the OK key You can search for a desired document by using the Search by User Name or Search by File Name key p 62 Searching Saved Documents You can sort document names in the list by user name file name or date To sort docu ments press the User Name File Name or Date key If you cannot ...

Page 69: ... Select Files to Print display appears Searching Saved Documents You can use either the Search by File Name or Search by User Name key to search for documents stored on the Document Server You can also list stored documents in the order you prefer Note If you install DeskTopBinder V2 Professional or DeskTopBinder V2 Lite on your computer you can search and rearrange documents from your computer Re...

Page 70: ...ist key Printing Saved Documents A A A A Select the document to be printed Note If a password has been set for the document enter it and then press the OK key You can print multiple docu ments p 61 Selecting a Doc ument B B B B If you need to change any print settings press the Print Settings key The Print Settings display ap pears User names file names and print order of documents appear Note The...

Page 71: ...Press the Select File key to re turn to the Select Files to Print display C C C C Enter the required number of cop ies using the number keys Note Up to 999 can be entered D D D D Press the Start key The machine starts printing Stopping printing A Press the Clear Stop key B Press the Stop key Changing the number of copies during printing Limitation The number of copies can only be changed when the ...

Page 72: ...the Sample Copy key The first set is printed C C C C Press the Print key Printing restarts Note Press the Suspend key to cancel printing and return to the Print Settings menu to change the settings Print First Page You can print the first page of the doc ument selected in the Select Files to Print display to check content If more than one document is select ed the first page of each is printed A A...

Page 73: ... Note You can delete multiple docu ments at once p 61 Select ing a Document You can search for a document using the Search by User Name or Search by File Name keys p 62 Searching Saved Docu ments You can sort document names in the list by user name file name or date To sort docu ments press the User Name File Name or Date key If you cannot find a desired doc ument using the file names you can prin...

Page 74: ...e 8 originals Document Server Storage Key F5 Create Margin General Features 5 5 Document Server Print Key F1 2 Sided Top to Top Document Server Print Key F2 2 Sided Top to bottom Document Server Print Key F3 Booklet Document Server Print Key F4 Magazine Document Server Print Key F5 Off Items Default settings General Features Warm Up Notice ON Copy Count Display Up Output Document Server OFF Tray P...

Page 75: ...Document Server 68 4 MartiniC1_GBzen2_FM book Page 68 Friday April 19 2002 2 18 PM ...

Page 76: ...9 Tray Paper Settings Default settings Copier Docu ment Server Printer Scanner Panel Tone ON Warm Up Notice ON Copy Count Display Up Function Priority Copier Print Priority Display mode Function Reset Timer 3 seconds Interleave Print 10 sheet s Output Tray Setting According to Function Setting Output Copier Copy Tray 1 Output Docu ment Server Copy Tray 1 Output Printer Copy Tray 1 2 ADF Original T...

Page 77: ...Auto Paper Select on Paper Type LCT No display 2 Sid ed Copy Auto Paper Select on Cover Sheet Tray Off Slip Sheet Tray Off Slip Sheet 1 Tray Off Slip Sheet 2 Tray Off Default settings Copier Printer Scanner Auto Off Timer 1 minute s Energy Saver Timer 15 minute s Panel Off Timer 1 minutes System Reset Timer 60 seconds Copier Document Server Auto Reset Timer 60 seconds Scanner Auto Reset Timer 60 s...

Page 78: ... 022 033 0 44 3 Sub net Mask 000 000 000 0 00 3 Gateway Address 000 000 000 0 00 3 Network Boot NONE 3 Effective Protocol blank all effective 3 NW Frame Type Auto select 3 LAN Type Ethernet 3 Ethernet Speed Auto select 3 Parallel inter face Parallel Timing ACK outside Parallel Communica tion Speed High speed Selection Signal Status High Input Prime Invalid Bidirectional Communica tion ON Signal Co...

Page 79: ...ddress 000 000 000 0 00 3 Sub net Mask 000 000 000 0 00 3 IP over 1394 Active 3 SCSI print SBP 2 Active Bidirectional SCSI print ON IEEE 802 11b 3 Communica tion Mode 802 11 Ad hoc 3 SSID Setting blank ASSID 3 Channel 11 3 WEP Encryption Setting Inactive 3 Wireless LAN Signal Transmis sion Speed Auto 3 Return to Defaults Default Copier Printer Scanner Delivery Option OFF 1 Scanner Recall Interval ...

Page 80: ...tor Code OFF Display Print Counter Display Clear Print Counter per User Code Address Book Management Address Book Program Change Delete Group Address Book Change Order Address Book Edit Title Address Book Select Title Title 1 Auto Delete File After 3 day s Delete All Files DisplayPassword with Stored File OFF Key Operator s E mail Address AOF Always ON ON MartiniC1_GBzen2_FM book Page 73 Friday Ap...

Page 81: ... set the key operator code entry dialog box appears Enter the code and then press the OK key p 90 Key Operator Code A A A A Press the User Tools Counter key B B B B Press the System Settings key C C C C Select the desired menu and then press the desired key D D D D Change settings by following in structions on the display panel and then press the OK key Note To cancel changes made to set tings and...

Page 82: ...d on Note Default setting ON If the Panel Tone setting is OFF the beeper does not sound whatever the Warm Up Notice setting Copy Count Display Copier Document Server The copy counter can be set to show the number of copies made count up or the number of copies remaining count down Note Default setting Up count up Function Priority You can specify the mode to be displayed immediately after the oper...

Page 83: ...om other functions interrupt ing the copy job Note Default setting 3 seconds The Function Reset Timer setting is ignored if Interleave is set for Print Priority p 75 When you select Set Time enter the time 3 30 seconds in one second in crements using the number keys Interleave Print You can set the timing for functions to switch when Print Priority has been set to Interleave Note Default setting 1...

Page 84: ...ivered Note Default setting Copy Tray Finisher Upper Tray The default settings of the tray set as output tray may vary depending on the installed optional finisher Output Document Server You can specify a tray to which documents are delivered Note Default setting Copy Tray Finisher Upper Tray For details about output trays see p 77 Output Copier The default settings of the output tray may vary dep...

Page 85: ...e in stalled optional finisher ADF Original Table Elevation You can set the timing for elevating the document feeder ADF original table Note Default setting When original is set Job List Display Time You can set the length of time the job list screen is displayed before returning automatically to the default screen Note Default setting 15 seconds When you select On enter the time from 10 to 999 se...

Page 86: ...Default setting Tray 1 LCT The default tray switches to LCT if the optional large capacity tray LCT is installed Tray Paper Size Tray 2 3 Select the size of the copy paper loaded in the paper tray The paper sizes you can load for trays when the paper size selector knob is set to the p mark are as follows A3L B4L A4K A4L B5K B5L A5K A5L 210 340 mmL 210 182 mmK 210 170 mmK 11 17 L 81 2 14 L 81 2 13 ...

Page 87: ...ou can see what type of paper is loaded in each of the trays This information is used by the print function to automatically select the paper tray Paper types you can set for trays are as follows Plain paper No Display Recycled Paper Special Paper Translucent Paper Letterhead Thick Paper Colour Paper 1 Colour Paper 2 Tab stock 2 3 tray Bond Paper Punched Paper Preprinted Paper Note Default setting...

Page 88: ...when the cover function or slip sheet function is selected You can set Copying Method in Duplex setting only when At Mode Se lected is selected Reference Cover in the Copy Reference Slip Sheet Tray Slip Sheet Tray 1 2 Allows you to specify and display the paper tray to set slip sheets After se lecting you can also specify the display timing and copy method for two sid ed copying Note Default setti...

Page 89: ...ge is displayed When the paper is jammed When the cover is open When Adding Toner message is displayed When the toner is being replenished When the User Tools Counter screen is displayed When fixed warm up is in progress When the printer or other functions are operating When operations have been suspended during printing When the Data In indicator is on or blinking When the sample print or confide...

Page 90: ...ier Document Server Auto Reset Timer Copier Document Server Specifies the time to elapse before copier and Document Server functions are reset Note Default setting 60 seconds If OFF is selected the machine will not automatically switch to the user code entry screen and you will not be able to limit who uses the machine The time can be set from 10 to 999 seconds in one second increments using the n...

Page 91: ...fig ure the IP address Note Default setting 011 022 033 044 Do not use an IP address that is used for another machine To get the ad dresses contact your network administrator If you install the IEEE 1394 Interface Board option and use the IEEE 1394 interface you must set the address of the domain different from the IP ad dress of IEEE 1394 If you intend to set the address for the same domain set a...

Page 92: ...strator Reference For details see the Network Printing Guide Effective Protocol Select the protocol to use in the network Note Default settings TCP IP Effective NetWare Effective NetBEUI Effective Ap pleTalk Effective NW Frame Type Select the frame type when you use NetWare Note Default setting Auto select LAN Type When you have installed the Wireless LAN board option select interface Wireless LAN...

Page 93: ...rime Specifies whether the prime signal is active or inactive when an input prime signal is sent Under normal circumstances you will not need to change this setting Note Default setting Invalid Bidirectional Communication Specifies the printer s response mode and so forth for a status request when using the parallel interface If you experience problems when using other manufacturers printers set t...

Page 94: ... for all ma chines on the network Note Default setting 000 000 000 000 When you use the IEEE 1394 interface on a network you cannot use the IEEE 1394 interface in the same domain To use in the same domain set a different value for the Sub net Mask Press the or key to move in 3 digit increments Press the Clear key when the wrong address is entered IP over 1394 When you use the IP over 1394 function...

Page 95: ...es the communication mode of the Wireless LAN Note Default setting 802 11 Ad hoc SSID Setting Specifies SSID to distinguish the access point in the Infrastructure mode Note Default setting blank ASSID If blank is specified in 802 11b Ad hoc mode or Ad hoc mode ASSID ap pears Channel Specifies a channel when you select 802 11b Ad hoc mode or Ad hoc mode Note Default setting 11 The channel can be se...

Page 96: ...hen you specify whether or not to use ScanRouter V2 Pro fessional Lite If you use you will have to reregister the I O devices in the ScanRouter V2 Professional Lite Scanner Recall Interval Time Specifies the interval the machine waits before resending data or a document if it could not be sent to ScanRouter V2 Professional Note Default setting 300 Seconds The interval time can be set from 60 to 99...

Page 97: ...its to control use of the Key Operator Tools settings for the key operator code Note Default setting OFF If you select ON enter the key operator code max 8 digits using the number keys and then select Partial or All Initial Settings to set the ac cess limit If you selected Partial An access code is only required for the Timer Setting Key Operator Tools initial settings MENU PROTECT will be set for...

Page 98: ...G Press the Exit key Display Clear Print Counter per User Code Allows you to view and print the various counters accessed with user codes and to set the values to 0 Note Press the U U U UPrev and T T T TNext keys to show all counters Print Counter for All User Codes Prints the counter values for all of the user codes Clear Counter for All User Codes Sets the counter value for all of the user codes...

Page 99: ... code available functions E mail Address E mail address register as a sender sender s password enter password Group Switch title registration number Delete Deletes a user Address Book Program Change Delete Group You can register multiple e mail addresses in a group Then you can easily control the registered e mail address for each group Program Change This registers new groups or changes a group n...

Page 100: ...ant to move to The user destination selected in step E moves to the place selected in step F and the keys for other users will shift Note You can select a user using the number keys Address Book Edit Title You can edit the title to search for a desired user easily A Press the User Tools Counter key B Press the System Settings key C Press the Key Operator Tools key D Press the Address Book Edit Tit...

Page 101: ... number of days in the range of 1 180 The default setting is 3 days which means documents will be deleted 3 days 72 hours after they are stored Delete All Files All documents stored in Document Server will be deleted Note Even if a password has been set all documents will be deleted A confirmation dialog box will appear To delete all documents select Yes Display Password with Stored File Specifies...

Page 102: ...an send an e mail in case of difficulty Specify whether or not to use this function Note Default setting blank AOF Always ON Specify whether or not to use Auto Off function Note Default setting ON For details about this function contact your service representative MartiniC1_GBzen2_FM book Page 95 Friday April 19 2002 2 18 PM ...

Page 103: ...user code as an accumulated fig ure Reference Select the Document Server function in User Code Manage ment p 90 User Code Man agement Printer When you set User Code Manage ment you can print documents from the printer driver using the user code registered The number of printed documents is counted for each user code You can check the usage of each user Note To register the printer driver automatic...

Page 104: ...he Change key on the right of the user name or key name The user name or key name en try dialog box appears B Entertheuser nameorkeyname and then press the OK key Note You can use the user name as the user name assigned to the documents in Document Server mode In this case en try of the user code is not re quired p 57 Document Server Reference p 110 Entering Text To Select the Title A Press the ke...

Page 105: ...e A A A A Press the User Tools Counter key B B B B Press the System Settings key C C C C Press the Key Operator Tools key D D D D Press the Address Book Manage ment key E E E E Select the registered user code you want to change or enter the registered number using the number keys F F F F Enter the new information for the item you want to change Changing a User Destination Name or Key Name A Press ...

Page 106: ... the deleted user code will be disabled A A A A Press the User Tools Counter key B B B B Press the System Settings key C C C C Press the Key Operator Tools key D D D D Press the Address Book Management key To clear a User destination A Press the Delete key B Select the user destination you want to delete Press the user destination key or enter the registered number using the number keys C Press th...

Page 107: ...layed Printing the Counter for Each User Code You can print out the counter for each user code using Print Counter or Scanner Counter Also you can print out using both of them together A A A A Press the User Tools Counter key B B B B Press the System Settings key C C C C Press the Key Operator Tools key D D D D Press the Display Clear Print Counter per User Code key To print the number of copies c...

Page 108: ...y operator Tools key D D D D Press the Display Clear Print Counter per User Code key E E E E Select the user code to clear To clear the number of copies counter for each user code A Select a user code from the left side of the display Note Press the Select all on the page key if you want to se lect all user codes on the page B Press the Clear key for Per User Code To clear the number of copies cou...

Page 109: ...nting Guide Registering an E mail Destination A A A A Press the User Tools Counter key B B B B Press the System Settings key C C C C Press the Key Operator Tools key D D D D Press the Address Book Manage ment key E E E E Press the New Program key Note To register an e mail destina tion to a registered user press the user key you want to regis ter or enter the registered number using the number key...

Page 110: ...the E mail Address key H H H H Press the Change key on the right of the E mail Address The e mail address entry dialog box appears I I I I Enter the e mail address Note You can use the e mail address as the Sender s address In this case you can set a password in order to prevent its use by other people Reference p 110 Entering Text Using as a Sender A Press the ON key on the right of the Register ...

Page 111: ... the number keys F F F F Press the E mail Address key G G G G Enter the items To change the e mail address A Press the Change key on the right of the e mail address B Enter the e mail address and then press the OK key Reference p 110 Entering Text To change the password A Press the Change key on the right of the password B Enter the new password using the number keys and then press the key H H H H...

Page 112: ...s the user key you want to clear or enter the registered number using the number keys B Press the E mail Address key C Press the Change key on the right of the E mail Address D Press the Delete All key and then press the OK key To clear all the informations for the user A Press the Delete key B Select the user you want to clear Press the user key you want to clear or enter the registered number us...

Page 113: ...he User Tools Counter key B B B B Press the System Settings key C C C C Press the Key Operator Tools key D D D D Press the Address Book Pro gram Change Delete Group key E E E E Press the New Program key F F F F Press the Change key on the right of the group name G G G G Enter the group name and then press the OK key H H H H When you want to change the key name and then press the Change key on the ...

Page 114: ...key that you want to register in a group F F F F Press the Group key G G G G Select a group to which you want to register the e mail destinations H H H H Press the OK key Deleting an E mail Destination from a Group A A A A Press the User Tools Counter key B B B B Press the System Settings key C C C C Press the Key Operator Tools key D D D D Press the Address Book Manage ment key E E E E Select the...

Page 115: ...Delete Group key E E E E Select a group where the data you want to confirm is registered F F F F Press the Programed Users key All the user names e mail destina tions are displayed G G G G Press the OK key Deleting a Group A A A A Press the User Tools Counter key B B B B Press the System Settings key C C C C Press the Key Operator Tools key D D D D Press the Address Book Pro gram Change Delete Gro...

Page 116: ...enter the item you want to change To change a group name or the key display A Press the Change key in Group Name or Key Dis play B Reenter the group name or key display and then press the OK key To change a title A Press the title key in Select Ti tle of the group you want to sort To change a registration number A Press the Change key in Reg istration No B Enter the registration number using the n...

Page 117: ...cter at the cursor position the entered character is shown before that character Available Characters Alphabetic characters ABCDEFGHIJKLMNOPQRSTUVWXYZabcdefghijklmnopqrstuvwxyz Symbols Numerals 0123456789 Keys Note When entering uppercase or lowercase letters continuously use the Shift Lock key to lock the case ZGVS838E MartiniC1_GBzen2_FM book Page 110 Friday April 19 2002 2 18 PM ...

Page 118: ... A Press the Shift key to switch between uppercase and lowercase B B B B Press the letters you want to enter Deleting characters A A A A Press the Backspace or Delete All key to delete characters MartiniC1_GBzen2_FM book Page 111 Friday April 19 2002 2 18 PM ...

Page 119: ...User Tools System Settings 112 5 MartiniC1_GBzen2_FM book Page 112 Friday April 19 2002 2 18 PM ...

Page 120: ...of the hard disk Press the Delete File key to delete unnecessary documents p 66 Deleting Saved Docu ments The function status indica tor is red The function associated with the red indicator has been interrupted Press the function key correspond ing to the indicator Follow the in structions displayed in the display panel The operation switch con tinues blinking and does not turn off when pressed T...

Page 121: ...ed When a misfeed message appears it remains until you open and close the cov er as required Clear misfed paper and open and close the front cover p 122 x Clearing Misfeeds Cannot duplex print You cannot use the paper in the bypass tray for du plex printing For duplex printing select Tray 1 3 in Copier mode or with the printer driver The setting for the Paper Type Tray 1 3 is 1 Side Copy Select 2 ...

Page 122: ... or time column in the Docu ment Server Files display Check the contents of the document by print ing the first page of it Press the desired docu ment in the Document Server Files display and press the Print 1st Page key followed by the Start key Memory becomes full frequently Press the Delete File key to delete selected documents thereby increasing available memory You want to check print before ...

Page 123: ...me do not pull out the tray Note You can load paper even while making copies using paper in tray 1 During copying you can pull out the left half of the tray A A A A Pull out the paper tray until it stops B B B B Square the paper and then load it in the tray When the whole tray is pulled out A Load the paper Important Align the right edge of the right copy paper stack to the right edge of the tray ...

Page 124: ...stops B B B B Square the paper and then load it in the tray Important Confirm that the top of the stack is not higher than the limit mark inside the tray Align the left edge of the copy paper stack to the left edge of the tray Note Shuffle the paper before load ing Straighten curled or warped pa per before loading C C C C Gently push the paper tray in un til it stops Loading Paper in the Large Cap...

Page 125: ...nt as front Load paper in the interposer in the same orientation as paper in the paper tray The staple or punching location will be on the left side of the paper when you are facing the machine Do not place anything on top of or leave documents on the sensor This may lead to the paper size not being correctly scanned or paper jams A A A A Load the paper Important Confirm the top of the stack is no...

Page 126: ...0B 100 Sheet Staples Note You can suspend copy only when the output tray is specified as the finisher shift tray p 77 Output Copier A A A A Press the Suspend Resume key The key lights up B B B B Remove the stack of paper from the finisher shift tray C C C C Press the Start key The key turns off and then copy ing restarts MartiniC1_GBzen2_FM book Page 119 Friday April 19 2002 2 18 PM ...

Page 127: ... Cartridge appear cyclically but replace toner early to prevent poor copy quality When the toner runs out D Add Toner will be displayed on the screen and printing will be disabled Reference For details about toner storage see p 150 Toner Storage Do not incinerate used toner or toner containers Toner dust might ig nite when exposed to an open flame Dispose of used toner containers in accordance wit...

Page 128: ...mes without removing the outer cap Remove the outer cap Note Do not remove the inner cap Place the toner bottle in position then push it in until the green lever clicks Note If you cannot get it to click in pull out the toner bottle a little slightly rotate it to the right by 10 20 then try again Return the lever under the toner bottle to its original position Close the front cover of the machine ...

Page 129: ... occur repeatedly contact your service representative Note More than one misfeed location may be indicated In such a case check every applicable area See the following charts A B C D E F P Q R U W You can find a sticker explaining how to remove misfed paper inside the front cover or finisher The fusing section of this machine might be very hot Caution should be tak en when removing misfed paper Ma...

Page 130: ...x Clearing Misfeeds 123 6 MartiniC1_GBzen2_FM book Page 123 Friday April 19 2002 2 18 PM ...

Page 131: ...Troubleshooting 124 6 MartiniC1_GBzen2_FM book Page 124 Friday April 19 2002 2 18 PM ...

Page 132: ...x Clearing Misfeeds 125 6 MartiniC1_GBzen2_FM book Page 125 Friday April 19 2002 2 18 PM ...

Page 133: ...Troubleshooting 126 6 MartiniC1_GBzen2_FM book Page 126 Friday April 19 2002 2 18 PM ...

Page 134: ...x Clearing Misfeeds 127 6 MartiniC1_GBzen2_FM book Page 127 Friday April 19 2002 2 18 PM ...

Page 135: ...Troubleshooting 128 6 MartiniC1_GBzen2_FM book Page 128 Friday April 19 2002 2 18 PM ...

Page 136: ...x Clearing Misfeeds 129 6 MartiniC1_GBzen2_FM book Page 129 Friday April 19 2002 2 18 PM ...

Page 137: ...Troubleshooting 130 6 MartiniC1_GBzen2_FM book Page 130 Friday April 19 2002 2 18 PM ...

Page 138: ...x Clearing Misfeeds 131 6 MartiniC1_GBzen2_FM book Page 131 Friday April 19 2002 2 18 PM ...

Page 139: ...r tray is not being used Then fully pull out the paper tray Remove the paper in the tray B B B B Press the lock button and then adjust the side fences and back fence to the new paper size while pushing the release lever C C C C Square the paper and load it in the paper tray and then press the lock button Important Confirm that the top of the stack is not higher than the limit mark inside the tray ...

Page 140: ...paper size selector knob to the p p p p mark on the left B Press the User Tools Counter key C Press the System Settings key D Press the Tray Paper Setting key E Press the Tray Paper Size key F Select the size and then press the OK key G Press the Exit key or press the User Tools Counter key to exit the User Tools Reference For details see p 79 Tray Paper Settings E E E E Gently push the paper tray...

Page 141: ...ccur if the machine staples using the Booklet Finisher with out the saddle stitch stapler cartridge Make sure the cartridge is set Reference For details about the type of finisher see p 23 External Options Finisher 3000M 50 Sheet Staples Booklet Finisher Open the finisher front cover Pull out the staple unit Pull out the cartridge gently Pull up the upper unit of the cartridge while holding both s...

Page 142: ...and the cartridge and then push in the refill until it clicks Push down the upper unit gently into the cartridge Pull out the ribbon Push the cartridge down until it clicks Return the staple unit to its original posi tion Close the finisher front cover MartiniC1_GBzen2_FM book Page 135 Friday April 19 2002 2 18 PM ...

Page 143: ...t cover Pull out the staple unit Pull lever S2 Pull out the cartridge gently Pull up the upper unit of the cartridge while holding both sides of the cartridge Take out the empty refill in the direction of the arrow MartiniC1_GBzen2_FM book Page 136 Friday April 19 2002 2 18 PM ...

Page 144: ...til it clicks Push down the upper unit gently into the cartridge Pull out the ribbon Push the cartridge down until it clicks Return lever S2 to its original position Return the staple unit to its original posi tion Close the finisher front cover MartiniC1_GBzen2_FM book Page 137 Friday April 19 2002 2 18 PM ...

Page 145: ...0 Sheet Staples Open the finisher front cover Pull out the cartridge lever Pull out the cartridge Put the cartridge down on a level surface Raise the cover up Set the new refill MartiniC1_GBzen2_FM book Page 138 Friday April 19 2002 2 18 PM ...

Page 146: ...er the cover until it clicks Pull out the ribbon Turn the cartridge around Reinstall the cartridge Push the cartridge until it clicks Close the finisher front cover MartiniC1_GBzen2_FM book Page 139 Friday April 19 2002 2 18 PM ...

Page 147: ...ng the paper over in the tray If there is no improvement change to paper with less curl When removing jammed staples staples might not be ejected the first few times you try to use the stapler Reference For details about the type of finisher see p 23 External Options Finisher 3000M 50 Sheet Staples Booklet Finisher Open the finisher front cover Pull out the staple unit Pull out the cartridge gentl...

Page 148: ...staples Pull down the face plate of the cartridge until it clicks Push the cartridge down until it clicks Return the staple unit to its original posi tion Close the finisher front cover MartiniC1_GBzen2_FM book Page 141 Friday April 19 2002 2 18 PM ...

Page 149: ...er Saddle Stitch Open the finisher front cover Pull out the staple unit Pull lever S2 Pull out the cartridge gently Open the face plate of the cartridge Remove jammed staples MartiniC1_GBzen2_FM book Page 142 Friday April 19 2002 2 18 PM ...

Page 150: ...cartridge down until it clicks Push the cartridge down until it clicks Return lever S2 to its original position Return the staple unit to its original posi tion Close the front cover of the finisher MartiniC1_GBzen2_FM book Page 143 Friday April 19 2002 2 18 PM ...

Page 151: ...the marks are aligned Pull lever R8 and pull out the staple unit completely Turn knob R9 to rotate the staple unit Pull out the cartridge lever Pull out the cartridge Push the buttons on the both sides of the cartridge and open the face plate MartiniC1_GBzen2_FM book Page 144 Friday April 19 2002 2 18 PM ...

Page 152: ...ples 145 6 Remove jammed staples Lower the face plate until it clicks Reinstall the cartridge Push the cartridge until it clicks Close the finisher front cover MartiniC1_GBzen2_FM book Page 145 Friday April 19 2002 2 18 PM ...

Page 153: ...displayed you cannot use the Punch function Finisher 3000M 50 Sheet Staples Booklet Finisher A A A A Open the finisher front cover B B B B Pull out the punch waste box and then remove punch waste C C C C Reinstall the punch waste box MartiniC1_GBzen2_FM book Page 146 Friday April 19 2002 2 18 PM ...

Page 154: ...r of the finisher Hole punch receptacle is full disappears Note If the message is still displayed reinstall the punch waste box Finisher 3000B 100 Sheet Staples A A A A Open the finisher front cover B B B B Pull out the punch waste box and then remove punch waste MartiniC1_GBzen2_FM book Page 147 Friday April 19 2002 2 18 PM ...

Page 155: ...do not Hole punch receptacle is full is still displayed D D D D Close the front cover of the finisher Hole punch receptacle is full disappears Note If the message is still displayed reinstall the punch waste box MartiniC1_GBzen2_FM book Page 148 Friday April 19 2002 2 18 PM ...

Page 156: ... the operation switch while copying or printing Make sure all copying or printing has finished The machine might fail to produce good copy images if condensation forms inside due to rapid temperature change Do not open the covers of the machine while copying or printing If you do misfeeds might occur Do not move the machine while copying or printing If you operate the machine improperly or a failu...

Page 157: ...ight Store on a flat surface Used Toner Note Toner cannot be re used Do not incinerate used toner or toner containers Toner dust might ig nite when exposed to an open flame Dispose of used toner containers in accordance with local regulations Keep toner used or unused and toner containers out of reach of children Our products are engineered to meet high standards of quality and function ality and ...

Page 158: ...m3 hr person Environments to avoid Locations exposed to direct sunlight or strong light more than 1 500 lux Locations directly exposed to cool air from an air conditioner or heated air from a heater Sudden temperature changes might cause condensation with in the machine Locations close to machines generating ammonia such as a diazo copy ma chine Places where the machine might be subjected to frequ...

Page 159: ...CAUTION R CAUTION Unplug the power cord from the wall outlet before you move the machine While moving the machine you should take care that the power cord will not be damaged under the machine Connect the machine only to the power source described on the inside front cover of this manual Connect the power cord directly into a wall outlet and do not use an extension cord Do not damage break or make...

Page 160: ...erted in the outlet Voltage must not fluctuate more than 10 The socket outlet should be installed near the equipment and should be easily accessible Access to the Machine Place the machine near the power source providing clearance as shown 1 Rear more than 5 cm 2 2 Right more than 4 cm 1 6 3 Front more than 70 cm 27 5 4 Left more than 5 cm 2 Note For required space when options are installed conta...

Page 161: ...hemical cleaner or or ganic solvents such as thinner or benzene If they get into the ma chine or melt plastic parts a failure might occur Do not clean parts other than those specified in this manual Such parts should be cleaned by your service representative Cleaning the Exposure Glass A A A A Clean 1 and 2 Cleaning the Document Feeder A A A A Clean the white sheet of the docu ment feeder B B B B ...

Page 162: ...ools Counter key B B B B Press the Inquiry key Inquiry information is displayed Printing inquiry information A Press the Print Inquiry List key B Press the Start key Inquiry information is printed C C C C Press the Exit key D D D D Press the Exit key Changing the Display Language You can change the language used on the display English is set as default setting A A A A Press the User Tools Counter ...

Page 163: ... You can display the total number of sheets used for all functions and the total number of sheets used for copy ing You can also print the counter list A A A A Press the User Tools Counter key B B B B Press the Counter key C C C C To print a counter list press the Print Counter List key D D D D Press the Start key A counter list is printed MartiniC1_GBzen2_FM book Page 156 Friday April 19 2002 2 1...

Page 164: ... roll pressure system Resolution 1200 dpi Exposure glass Stationary original exposure type Original reference position Rear left corner Warm up time Operation Switch Less than 300 seconds 23 C 73 F Low Power Mode Less than 25 seconds Originals Sheet book objects Maximum original size A3L 11 17 L Long length 1260 mm Minimum original size B6 51 2 81 2 when using document feeder MartiniC1_GBzen2_FM b...

Page 165: ...Duplex 64 127 9 g m2 17 34 lb Bond Non reproduction area Leading edge Less than 4 2 mm Trailing edge More than 1 mm Left edge More than 2 1 5 mm Right edge More than 0 5 mm First copy time 3 5 seconds or less face up feed A4K 81 2 11 K 100 feeding from tray 1 on the expo sure glass 5 3 seconds or less face down feed A4K 81 2 11 K 100 feeding from tray 1 on the ex posure glass Copying speed Type 1 ...

Page 166: ...550 sheets 80 g m2 20 lb Bond Bypass tray 100 sheets 69 g m2 18 lb Bond Power consumption Mainframe only Metric version Inch version Enlargement 400 400 200 200 141 155 122 129 115 121 Full Size 100 100 Reduction 93 93 82 85 75 78 71 73 65 65 50 50 25 25 Type 1 Type 2 Warm up about 1 20 kw about 1 20 kw Stand by about 0 30 kw about 0 30 kw During printing about 1 55 kw about 1 55 kw Maximum less t...

Page 167: ...Complete System consists of the mainframe finisher large capacity tray LCT and mailbox Weight Type 1 2 Approx 200 kg 440 9 lb Type 1 Type 2 Warm up about 1 25 kw about 1 25 kw Stand by about 0 32 kw about 0 32 kw During printing about 1 65 kw about 1 65 kw Maximum less than 1 70 kw less than 1 70 kw Type 1 Type 2 Stand by Less than 48 dB A Less than 48 dB A Copying Less than 70 dB A Less than 71 d...

Page 168: ...aximum number of stored documents 3 000 documents Maximum pages of stored documents 10 000 pages Maximum number of pages per document 2 000 pages Capacity Memory Sorting 4 5 GB A4 81 2 11 Approx 333 sheets 2000 sheets at maximum 2 Capacity Others 6 62 GB 1 Scanning Condition ITUT No 4 chart 200 dpi Text A4 MMR 2 The capacity will change when the multiple functions are used MartiniC1_GBzen2_FM book...

Page 169: ...ls Original weight 1 sided originals 40 128 g m2 11 34 lb Bond 2 sided originals 52 128 g m2 14 34 lb Bond Duplex Number of originals to be set 100 sheets 81 4 g m2 22 lb Bond or less than 12 mm 0 4 Maximum power consumption Less than 110 W power is supplied from the mainframe Dimensions W D H 680 560 180 mm 26 8 22 7 1 Weight Approx 18 kg 39 7 lb Note Specifications are subject to change without ...

Page 170: ...ts 80 g m2 20 lb Bond Paper weight 60 128 g m2 16 34 lb Bond Power consumption Approx 48 W power is supplied from the mainframe Dimensions W D H 540 600 660 mm 21 3 23 6 26 Weight Approx 15 kg 33 lb 1 These sizes cannot be detected automatically Note Specifications are subject to change without notice MartiniC1_GBzen2_FM book Page 163 Friday April 19 2002 2 18 PM ...

Page 171: ... 2 81 2 KL 12 18 L Paper weight 52 216 g m2 14 58 lb Bond Stack capacity 500 sheets A4KL B5KL A5K 81 2 11 KL 80 g m2 20 lb Bond 250 sheets A3L B4L 11 17 L 81 2 14 L 12 18 L 80 g m2 20 lb Bond 100 sheets A5L B6L 51 2 81 2 L 80 g m2 20 lb Bond Staple paper size A3L B4L A4KL B5KL 11 17 L 81 2 14 L 81 2 11 KL Staple paper weight 64 90 g m2 17 28 lb Bond Staple capacity Without Mixed Size mode 50 sheet...

Page 172: ... 11 17 L 81 2 14 L 81 2 11 KL 51 2 81 2 KL 12 18 L Paper weight 52 216 g m2 14 58 lb Bond Stack capacity 2 500 sheets A4K 81 2 11 K 80 g m2 20 lb Bond 1 250 sheets A3L B4L A4L B5KL 11 17 L 81 2 14 L 81 2 11 L 12 18 L 80 g m2 20 lb Bond 500 sheets A5K 80 g m2 20 lb Bond 100 sheets A5L B6L or 51 2 81 2 L 80 g m2 20 lb Bond Staple paper size A3L B4L A4KL B5KL 11 17 L 81 2 14 L 81 2 11 KL Staple paper...

Page 173: ... size A3L B4L A4L 11 17 L 81 2 11 L Saddle stitch paper weight 64 90 g m2 17 28 lb Bond Saddle stitch capacity 1 set 15 sheets Stack capacity after Saddle stitching 25 sets 2 5 sheets A4L 81 2 11 L 80 g m2 20 lb Bond 15 sets 6 10 sheets A4L 81 2 11 L 80 g m2 20 lb Bond 10 sets 11 15 sheets A4L 81 2 11 L 80 g m2 20 lb Bond 30 sets 2 5 sheets other paper size 80 g m2 20 lb Bond 20 sets 6 10 sheets o...

Page 174: ...1 2 KL 12 18 L Paper weight 52 216 g m2 14 58 lb Bond Stack capacity 3 000 sheets A4K 81 2 11 K 80 g m2 20 lb Bond 1 500 sheets A3L B4L A4L B5KL 11 17 L 81 2 14 L 81 2 11 L 12 18 L 80 g m2 20 lb Bond 500 sheets A5K 80 g m2 20 lb Bond 100 sheets A5L B6L 51 2 81 2 L 80 g m2 20 lb Bond Staple paper size A3L B4L A4KL B5KL 11 17 L 81 2 14 L 81 2 11 KL Staple paper weight 64 90 g m2 17 28 lb Bond Staple...

Page 175: ...10 30 sheets other size paper 80 g m2 20 lb Bond 150 sets 2 9 sheets other size paper 80 g m2 20 lb Bond With Mixed Size mode 50 sets 2 30 sheets A4K A3L B5K B4L 81 2 11 K 11 17 L 80 g m2 20 lb Bond Staple position 4 position Top Top Slant Bottom 2 Staples Power consumption Approx 72 W power is supplied from the mainframe Dimensions W D H 700 620 960 mm 27 6 24 5 37 8 Weight Approx 51 kg 112 4 lb ...

Page 176: ...L B5KL A5KL 11 17 L 81 2 14 L 81 2 11 KL 51 2 81 2 KL 12 18 L Paper weight 52 216 g m2 14 58 lb Bond Stack capacity 3 000 sheets A4K B5K 81 2 11 K 80 g m2 20 lb Bond 1 500 sheets A3L B4L A4L B5L 11 17 L 81 2 14 L 81 2 11 L 12 18 L 80 g m2 20 lb Bond 500 sheets A5K 51 2 81 2 K 80 g m2 20 lb Bond 100 sheets A5L 51 2 81 2 L 80 g m2 20 lb Bond Staple paper size A3L B4L A4KL B5KL 11 17 L 81 2 14 L 81 2...

Page 177: ...L 81 2 14 L 80 g m2 20 lb Bond 150 sets 2 9 sheets A3L B4L 11 17 L 81 2 14 L 80 g m2 20 lb Bond Staple position 4 position Top Top Slant Bottom 2 Staples Power consumption Approx 100 W power is supplied from the mainframe Dimensions W D H 800 730 980 mm 31 5 28 7 38 6 Weight Approx 65 kg 143 3 lb Note Specifications are subject to change without notice MartiniC1_GBzen2_FM book Page 170 Friday Apri...

Page 178: ...0 sheets B4 81 2 14 500 sheets A4 81 2 11 500 sheets B5 51 2 81 2 250 sheets Dimensions W D H 390 330 130 mm 15 4 13 5 1 Weight Approx 650 g 1 4 lb Note Specifications are subject to change without notice MartiniC1_GBzen2_FM book Page 171 Friday April 19 2002 2 18 PM ...

Page 179: ...d Paper capacity 4 000 sheets 80 g m2 20 lb Bond Power consumption Maximum 50 W power is supplied from the mainframe Dimensions W D H option unit 314 458 659 mm 12 4 18 25 9 Weight Approx 20 kg 44 lb Note Specifications are subject to change without notice MartiniC1_GBzen2_FM book Page 172 Friday April 19 2002 2 18 PM ...

Page 180: ...64 216 g m2 20 58 lb Bond Paper Capacity 200 sheets 80 g m2 20 lb Bond Power consumption Max Approx 48 W power is supplied from the mainframe Dimensions W D H 500 620 200 mm 19 7 24 4 7 9 Weight Approx 12 kg 26 5 lb Note Specifications are subject to change without notice MartiniC1_GBzen2_FM book Page 173 Friday April 19 2002 2 18 PM ...

Page 181: ...9 5 36 2 Weight Approx 2 9 kg 6 4 lb Finisher 3000B 100 Sheet Staples Punch unit type 2 4 holes type 2 holes L A3 A5 11 17 51 2 81 2 K A4 A5 81 2 11 51 2 81 2 4 holes L A3 B4 11 17 K A4 B5 81 2 11 4 holes type 4 holes L A3 A5 11 17 51 2 81 2 K A4 A5 81 2 11 51 2 81 2 2 3 holes type 2 holes L A3 A5 11 17 51 2 81 2 K A4 A5 81 2 11 51 2 81 2 3 holes L A3 B4 11 17 K A4 B5 81 2 11 MartiniC1_GBzen2_FM b...

Page 182: ... 4 holes Approx 2 4 kg 5 3 lb 2 3 holes 2 4 holes Approx 2 6 kg 5 7 lb Note Specifications are subject to change without notice Punch unit type 2 4 holes type 2 holes L A3 A5 11 17 51 2 81 2 K A4 A5 81 2 11 51 2 81 2 4 holes L A3 11 17 K A4 81 2 11 4 holes type 4 holes L A3 B5 11 17 81 2 11 K A4 A5 81 2 11 51 2 81 2 2 3 holes type 2 holes L A3 A5 11 17 51 2 81 2 K A4 A5 81 2 11 51 2 81 2 3 holes L...

Page 183: ...1 2 14 Tray Unit option You can load B4L A4L or 81 2 14 L paper in the large capacity tray LCT using this unit Tab Sheet Holder option You can use tab sheets with this holder Output Jogger option You can tidy the printout with Finisher 3000B 100 Sheet Staples MartiniC1_GBzen2_FM book Page 176 Friday April 19 2002 2 18 PM ...

Page 184: ...1 2 51 2 KL 8 13 L 71 4 101 2 L 8 101 2 L 550 sheets 4 B4L B5KL 11 17 L 81 2 14 L 81 2 11 KL 51 2 81 2 KL 8 13 L 71 4 101 2 L 11 15 L 10 15 L 81 4 14 L 8 101 2 210 340 mmL 210 182 mmK 210 170 mmK 8K 267 390 mm L 16K 195 267 mm KL 4 A3L B4L A4KL B5KL A5KL 81 2 13 L 81 4 13 L 11 15 L 10 15 L 81 4 14 L 210 340 mmL 210 182 mmK 210 170 mmK 8K 267 390 mm L 16K 195 267 mm KL Custom size Vertical 139 7 29...

Page 185: ...7 g m2 28 41 7 lb Bond 20 sheets 157 216 g m2 41 7 57 6 lb Bond 5 B4L A4K B5KL A5K B6L A6L 11 17 L 81 2 14 L 81 2 11 KL 51 2 81 2 KL 81 2 13 L 81 4 13 L 8 13 L 71 4 101 2 KL 11 15 L 11 14 L 10 15 L 10 14 L 81 4 14 L 8 101 2 KL 8 10 KL 5 B4L A4KL B5KL A5KL B6L A6L 81 2 11 KL 51 2 81 2 K 81 2 13 L 81 4 13 L 8 13 L 71 4 101 2 KL 11 15 L 11 14 L 10 15 L 10 14 L 81 4 14 L 8 101 2 KL 8 10 KL 6 Custom si...

Page 186: ... Do not use paper for inkjet printers When you load OHP transparencies check the front and back of the sheets and place them correctly or a misfeed might occur Set the paper direction to L Copying from the Bypass Tray in the Copy Reference When you use OHP transparencies shuffle them for each use If multiple sheet feeding occurs load sheets one by one When you load label paper set the paper direct...

Page 187: ...e of paper that has been already copied onto or a fault might occur Note Do not use the following kinds of paper or a misfeed might occur Bent folded or creased paper Torn paper Slippery paper Perforated paper Rough paper Thin paper with low stiffness Paper with a dusty surface If you copy onto rough grain paper the image might be blurred Do not use aluminum foil carbon paper or similar conductive...

Page 188: ...ere it will be exposed to direct sunlight Avoid storing paper in humid areas humidity 70 or less Store on a flat surface Do not store paper vertically In high temperature high humidity conditions or low temperature low hu midity conditions store paper in a vinyl bag MartiniC1_GBzen2_FM book Page 181 Friday April 19 2002 2 18 PM ...

Page 189: ... Bypass tray 22 C Changing Display Language 155 E mail Destination 104 File Name 60 61 Group Name 109 Modes 47 Paper Size 132 Password 61 User Code 98 User Name 61 User Tools 74 Changing the Paper Size Tray 2 132 Tray 3 132 Channel 88 Checking Job List 49 Stored Documents 62 Check Modes key 24 Cleaning Document feeder 154 Exposure glass 154 Clearing Counter 101 E mail Destination 105 Misfeeds 122 ...

Page 190: ...rinting 19 Operation from a Computer 19 Do s And Don ts 149 Duplex Priority 13 E Effective Protocol 85 E mail Destination 102 Changing 104 Clearing 105 Displaying 108 Registering 102 Energy Saver key 24 Energy Saver Timer 82 ENERGY STAR Program 12 Entering Text 110 Ethernet Interface Connecting 30 Ethernet Speed 85 Exiting User Tools 74 Exposure glass 21 External Options 23 F File Name Changing 60...

Page 191: ...7 Low Power Mode 48 M Machine Environment 151 Machine Network Connections Connecting 27 Machine Types 15 Mailbox 23 163 Mainframe 157 Main Power Turning Off 33 Turning On 32 Main power indicator 25 Main power switch 21 32 Maintaining Your Machine 154 Manuals for this Machine 14 Misfeeds Clearing 122 Moving 152 Multi Access 51 N Network Configuring 34 Network Boot 85 Network Cable Connecting 30 Net...

Page 192: ...ions to a Group 107 New Group 106 User Code 97 Registering or changing User Name 59 Remarks 149 Removing Jammed Staples 140 Punch Waste 146 Removing Jammed Staples Booklet Finisher Saddle Stitch 142 Finisher 3000B 100 Sheet Staples 144 Finisher 3000M 50 Sheet Staples Booklet Finisher 140 Removing Punch Waste Finisher 3000B 100 Sheet Staples 147 Finisher 3000M 50 Sheet Staples Booklet Finisher 146 ...

Page 193: ...Finisher 3000B 100 Sheet Staples 119 System Auto Reset Timer 83 System Reset 48 T Tab Sheet Holder 176 Text Deleting 111 Entering 111 Timer Setting 82 Toner 150 Adding 120 Handling 150 Replacing 121 Storing 150 Transmission Speed 89 Tray Paper Settings 79 Tray Paper Size Tray 2 79 Tray 3 79 Troubleshooting 113 Turning Off Main Power 33 Power 33 Turning On Main Power 32 Power 32 U USB 2 0 Interface...

Page 194: ...Up Notice Copier Document Server 75 Weekly Timer 84 Weekly Timer Code 84 WEP Encryption Setting 89 Where to Put Your Machine 151 Wireless LAN port 27 Wireless LAN Signal 88 MartiniC1_GBzen2_FM book Page 187 Friday April 19 2002 2 18 PM ...

Page 195: ...188 EE GB B064 MEMO MartiniC1_GBzen2_FM book Page 188 Friday April 19 2002 2 18 PM ...

Reviews: