Section 4
♦
Operating the CMN-41
CMN-41 Series Installation and Operation Handbook
57
Copyright © 2009, Harris Corporation
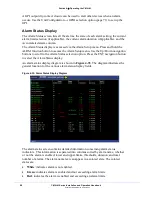
There is a two-second persistence for any alarm name color change.
Use the Up/Down navigation buttons to scroll through the Alarm Status list.
Video Alarms
Press and hold the ALRM button to access the Alarms Setup menu. If necessary, use
the Up/Down navigation arrows to select the Video Alarms selection option. Press the
ENT navigation button to show the available selection options.
For more information on the global Video Alarms Setup menu, see page 89. For
descriptions of Video Alarms selection options, see page 94.
Audio Alarms
Press and hold the ALRM button to access the Alarms Setup menu. If necessary, use
the Up/Down navigation arrows to select the Audio Alarms selection option. Press the
ENT navigation button to show the available selection options.
For more information on the global Audio Alarms Setup menu, see page 92. For
descriptions of Audio Alarms selection options, see page 94.
Time Code Alarms
Press and hold the ALRM button to access the Alarms Setup menu. If necessary, use
the Up/Down navigation arrows to select the Time Code Alarms selection option. Press
the ENT navigation button to show the available selection options.
For more information on the global Time Code Alarms Setup menu, see page 93. For
descriptions of Time Code Alarms selection options, see page 96.
GPI Alarms
Up to four general purpose interface alarms can be enabled. Press and hold the ALRM
button to access the Alarms Setup menu. If necessary, use the Up/Down navigation
arrows to select the GPI Alarms selection option. Press the ENT navigation button to
show the available selection options.
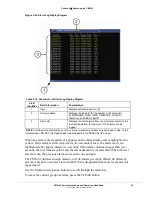
Timing Display
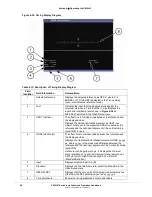
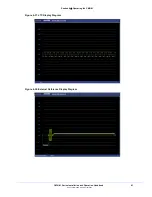
Press and release the TIME function button to access the Timing
display. A Timing display diagram is shown in
Figure 4-36
and
described in
Table 4-15
. The diagram illustrates the general location for
the various Timing display fields.
Press and hold the TIME button to access the Timing Setup menu. (Press the SETUP
or the EXIT button to clear the Timing Setup menu.)
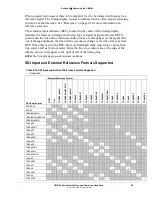
Relative timing of the inputs is compliant with SMPTE RP168.


