-S3 -112
The machine has an extensive error code list to aid in trouble-
shooting when problems occur, as listed below. Upon error,
press
to release the error and correct it according to
the list below.
When errors occur frequently, please contact your dealer.
Automatic errors backup
The machine recovers from some errors (E-050, E-190, E-193) automatically automatically after
detecting the error(s) by it self. In cases where the machine does not recover from the error au-
tomatically, follow the “Soluions” below according to the indicated error number.
24-1
ERRORS AND WHAT TO DO
24_1 U701
No. Display
Error
Solutions
Page
001 Circuit board
Abnormality detected in control circuit
board
Power down machine and, after 10
seconds, power on again.
002 Power source
Power failure or abnormal voltage
004 System memory System memory fault
015 Inverter trip
Sewing motor-related trouble.
Overload, short circuit, trouble with
motor drive unit
Cut power and turn main shaft by hand.
If turns normally, power on again.
Fig. 2
018 Main shaft
Main shaft will not turn.
Turn main shaft manually at least 1 full
turn & ensure that it turns freely, clearing
any jam. Then, re-initialize machine
system and speed.
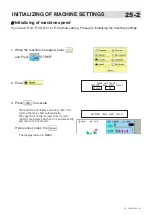
25-1
25-2
020 Needle detect
Machine not detecting current needle #
correctly, or needle bar selection unit is
off its stop position. Trouble with
position-detecting circuit board.
Turn needle bar selector to the fixed
position (marked area shown below in
Fig.1).
021
022
Needle move
Motor for needle bar selection unit has
stopped partway through its path.
No movement due to malfunction of
thread take-up lever or trouble of
position-detecting circuit board
After fixing malfunction of needle and
thread take-up lever, turn needle bar
selector shaft with wrench to have it set
at center of fixed position (range within
which needle bar selector doesn't move)
Fig. 1
024 Needle center
Needle bar stop position is off-center;
needle bar stop position is out of place.
Turn needle bar selector with 3mm hex
wrench to have it set at center of fixed
position (scope within which needle bar
selector doesn't move).
Fig. 1
025 Needle over
Needle # out of range of actual needles
on given machine.
026 Needle differ
Needle # differs between
030 Slow mismatch Improper speed adjustment at low
speed. Speed does not decrease below
100rpm at low speed.
Re-initialize machine system and speed.
25-1
25-2
050 C point
Main shaft is stopped in a position other
than "C" point
See Fig. 2 below.
24-4
25-1
25-2
051 L sensor
Timing detection board fault, or marred
photo-sensor. Malfunction of "Lowest
needle position" sensor [PH2] on
detection circuit board.
Improper adjustment of slit plate.
Check to see if photo sensor is clean or if
the slit plate contacts sensor.
Re-initialize machine system and speed.
25-1
25-2
052 C sensor
Timing board detection fault, or marred
photo-sensor. Malfunction of "Color
change position" sensor [PH1] on timing
detection circuit board.
Improper adjustment of slit plate.
055 Take-up cover
Take up lever cover is open.
Close the take up lever cover.
060 X limit
Frame/pantograph has moved beyond
sewing area along X-axis.
Return frame within sewing area using
the frame movement keys on the control
boxl.
Check pattern size and center mark to
ensure that it is within size range of
selected hoop and also properly
centered.
061 Y limit
Frame/pantograph has moved beyond
sewing area along Y-axis.
063 Drive Setup
During embroidery, preparation for frame
movement did not complete within
predetermined time.
Malfunction of "Lowest needle position"
sensor on detection circuit board,
Improper adjustment. Re-initialize
machine speed. If this condition occurs
frequently, contact your Dealer.
25-2
066 Frame drive
During embroidery, frame movement did
not complete within predetermined
moving time.
If this condition occurs frequently, contact
your Dealer.
090 Miss reception
Error has occurred during data transfer
(via cable) between machine and PC.
Try reading pattern data again. Verify
that transmission speed setting is correct
at (1) transfer software; (2) device
manager of PC and (3) RS-232C speed
of machine.
5-4
091 No send
Machine has not received data for > 10
seconds during data transfer.
103 Data format
Machine unable to determine format of
pattern data.
Verify format of pattern data and fix if
necessary.
14-1
104 Miss function
Timing to read pattern data does not
conform.
Read pattern data again from the start.
5-4
105 Dual function
Data has been detected in the pattern
that has ambiguous/dual function.
Read pattern data again from the start.
5-4
106 No function
Interval between start read time and
time of reception of actual pattern data
is too great.
Check quality of design data.
108 Improper read
While reading pattern data, error has
occurred in internal processing.
Read pattern data again from the start.
5-4
110 Memory full
Memory has filled while reading in a
design.
Delete unnecessary patterns from
machine memory and try again.
5-B
111 Change over
While reading pattern data, # of color
changes (color No.) has exceeded 250.
Divide pattern data such that number of
color changes of each segment is less
than 250.
112 Data error
Pattern data of current design is
damaged.
Delete pattern and re-load.
5-B
114 Id over
# of patterns in control panel memory
has exceeded the maximum of 250.
Delete unnecessary patterns from
machine memory and try again.
5-B
116 Not found Id
Specified pattern does not exist.
Check setting.
118 Trace data over Over 1024 stitches trace data were
created during reading of pattern data.
Set maximum stitch length to embroidery
area of pattern data within 2m
(lengthwise) x 2m (sideways).
120 Memory error
Fault in retaining contents of pattern
memory.
If this occurs frequently, it is likely that
LCD-CE board is faulty.
Contact your Dealer.
130 Disk error
Unable to communicate continuously
with memory media or data disk.
Power down machine and after a 10
seconds, power on again.
If error remains, contact your Dealer.
131 Device no ready Memory media or data disk is not set.
Check if memory media or data disk is
properly set.
5-5
133 Bad disk
Improper or faulty memory media or
data disk.
Memory media that media reading unit
can't read or faulty media or un-initialized
media.
Data disk that disk drive unit can't read or
faulty data disk or un-initialized disk.
5-5
141 Not found name Designated pattern is not found.
Memory media is not correct.
5-5
142 Disk full
Memory media is full to capacity.
Clear unnecessary patterns or use a
different memory media.
143 Multi name
Another pattern with same name has
been detected while attempting to write
to memory media.
Change name, use a different memory
media, or overwrite existing pattern.
190 Cut blade
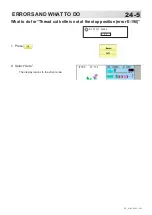
Thread cut knife is not at stop position. Follow the instructions below.
24-5
191 Cut Sensor
Thread cut knife is not at stop position.
Check if threads are jammed around
the thread cutting knife.
Press the thread cutting button 2~3 times.
If error remains, contact your Dealer.
23-2
23-4
193 Catcher
Thread catch hook is off its position.
Limit switch to detect position is not
"OFF".
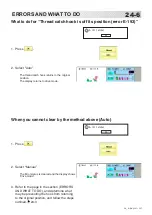
Please follow the example below:
1. Check whether thread was actually cut
by thread cutting knife. If not, cut thread
and return catch hook to its normal
position.
2. If thread is actually cut, check if thread
catch hook on head has returned to its
position completely.
24-6
203 Install data
Error has occurred during update of
program.
Check an update program.
215 Frm. drive err
Frame movement did not complete
during normal movement. (Time over)
If this condition occurs frequently, contact
your Dealer.
217 Frm.drive data
Frame movement data loose.
255 Default Error
During embroidery, frame movement did
not complete until main shaft reach
"Lowest needle position".
Re-initialize machine speed setting.
Check adjustment of upper shaft timing.
(C point / L point)
If this condition occurs frequently, contact
your Dealer
25-2
CAUTION: To prevent accidents.
In case of “Automatic errors backup”, the machine’s sudden movement might be caused with-
out showing errors or messages after its stoppage.
Fig. 1
Fig. 2
C
Turn the disk
with 3mm hex-
agonal driver
Turn the needle bar
selection knob to the
marked area with
hand.
Marked area
E-050 C point
OK
Summary of Contents for HCS3
Page 2: ......
Page 136: ... D2 117 13 6 FRAME CONFIRMATION 20_5 NB01 11 Press Press to return to Drive mode ...
Page 263: ... RA 110 26 3 BUILT IN FONT LIST 26_3 P401 Basic script Diacritic script ...
Page 264: ... RA 111 26 3a BUILT IN FONT LIST 26_3a P401 ...
Page 309: ......
Page 323: ......
Page 350: ...HCH HCS HCD HCU ONE TOUCH FRAME 7 1 FOPC01 1 12 13 14 2 6 3 B 11 C 9 4 E A 3 4 D C 8 7 5 10 ...
Page 363: ......


