background image

– 43 –

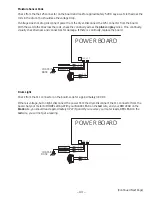
3

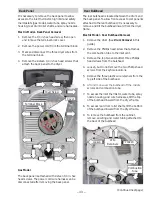
POWER BOARD

J11

J25

1

R-20

B-20

UPPER ROD

LOWER ROD

S-20

P-20

GY-20

CHASSIS

BASE

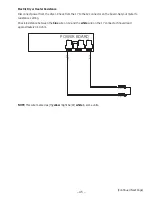
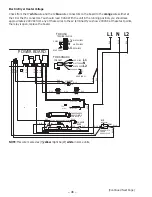
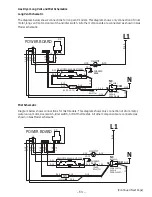
Moisture Sensor Rods

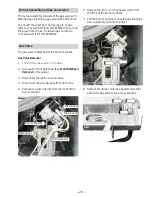
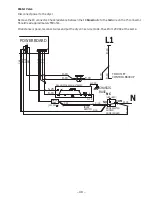
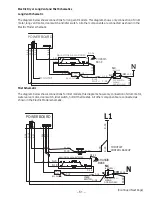
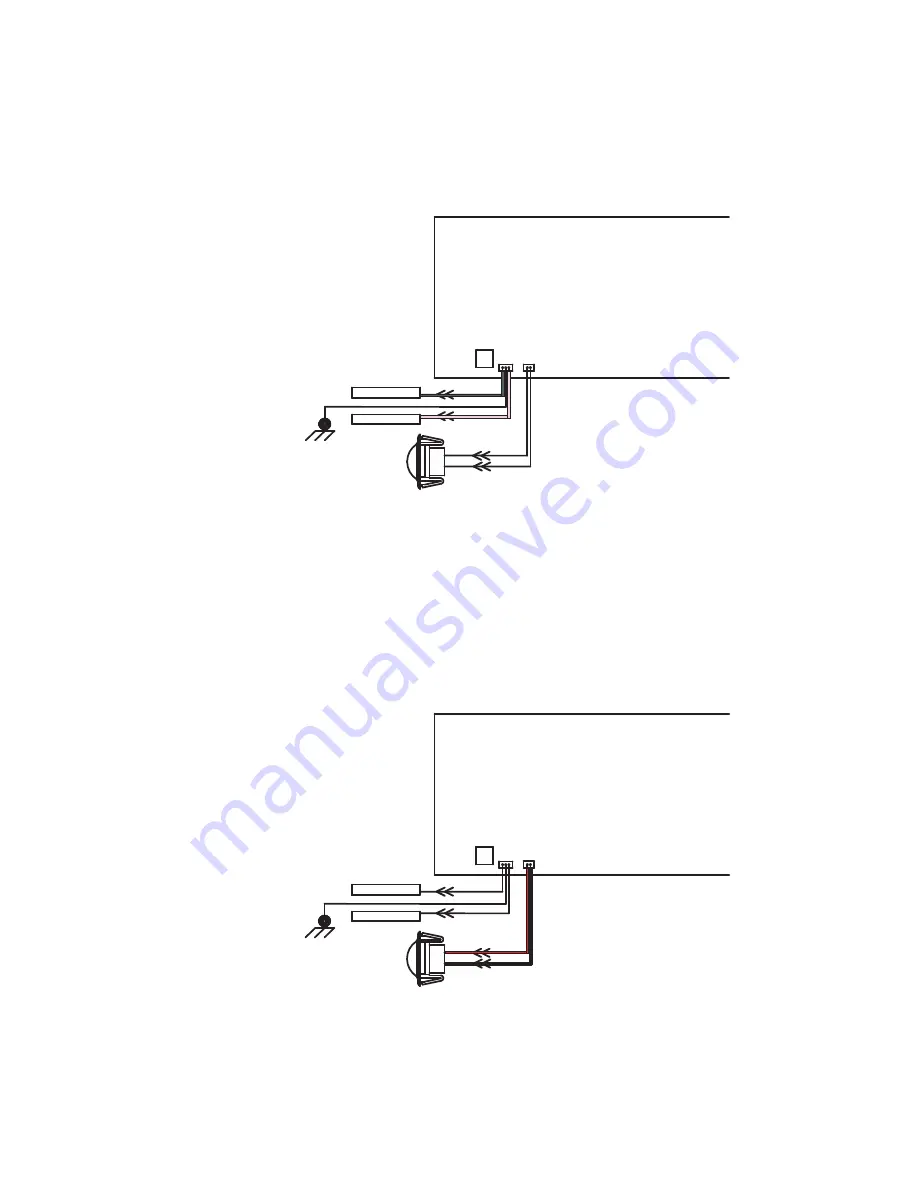
Check from the the J25 connector on the board and look for approximately 5 VDC. Lay a wet cloth across the 
rods in the drum. You should see the voltage drop. 

If voltage does not drop, disconnect power from the dryer. Disconnect the J25 connector from the board. 
With the wet cloth still across the rods, check the continuity across the pink and gray wires.  If no continuity, 
visually check harness and connectors for damage. If there is  continuity, replace the board.

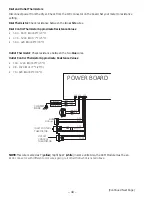
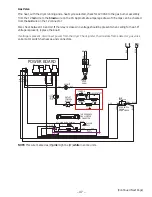
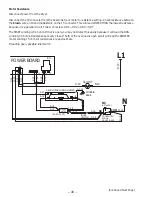
Drum Light

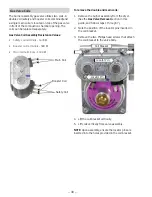
Check from the J11 connector on the board. Look for approximately 3.8 VDC. 

If there is voltage, but no light, disconnect the power from the dryer. Disconnect the J11 connector from the 
board. Set your meter to DIODE setting. With your BLACK LEAD on the red wire, and your RED LEAD on the 
black wire, you should read approximately 0.727 if good. If you reverse your meter leads, RED LEAD on the 
red wire, you will not get a reading.

3

POWER BOARD

J11

J25

1

R-20

B-20

UPPER ROD

LOWER ROD

S-20

P-20

GY-20

CHASSIS

BASE

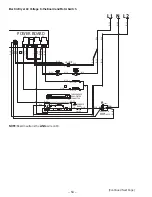
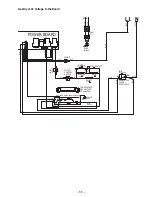
(Continued Next Page)

Summary of Contents for CleanSpeak GTD81ESPJMC

Page 1: ...tric Company Louisville Kentucky 40225 31 9243 Technical Service Guide August 2015 GE Appliances GTD81ESPJMC GTD81GSPJMC GTD81ESSJWS GTD81GSSJWS GTD86ESPJMC GTD86GSPJMC GTD86ESSJWS GTD86GSSJWS GE CleanSpeak Wi Fi Connect Dryers ...

Page 2: ...t in personal injury and property damage The manufacturer or seller cannot be responsible for the interpretation of this information nor can it assume any liability in connection with its use WARNING To avoid personal injury disconnect power before servicing this product If electrical power is required for diagnosis or test purposes disconnect the power immediately after performing the necessary c...

Page 3: ...Component Locator Views 16 Electric Model 16 Gas Model 17 Control Board Connector Locator View 18 Dryer Components 19 Control Panel 19 Control Board Assembly 20 Top Panel 21 Front Panel 21 Door Switch 22 LED Drum Light 22 Front Bulkhead 22 Drive Belt and Drum 23 Drum Rollers 24 Moisture Sensor 25 Belt Switch 26 Blower Wheel 26 Drum Motor 27 Long Vent Motor 28 Heater Assembly 28 Burner Assembly and...

Page 4: ...r Bulkhead 33 Inlet Safety Thermostat 34 Inlet Control Thermistor 35 High Limit Thermostat 35 Outlet Control Thermistor 36 Outlet Control Thermostat 36 Steam Components 37 Misting Nozzle 37 Water Valve 38 Troubleshooting 39 Schematics and Wiring Diagrams 50 Index 56 Warranty 57 GE Dryer Warranty 58 ...

Page 5: ...l Number The nomenclature tag is located on the front panel inside the door Brand G GE H Café M Moffatt G T D 8 6 G S S J 0 W W Product Type R Riser A 2 Cover Top Load B 4 Cover Top Load S Stationary P Portable Fuel Type Dryer E Electric G Gas P Propane Configuration F Front Load T Top Load Rear Control N Top Load Front Control U Unitized Engineering Digit 0 9 Model Year F 2015 Platform W Washer D...

Page 6: ... Dryer Cycles 2ȺHU HQKDQFHG GU LQJ SHUIRUPDQFH DQG IDEULF FDUH QHUJ 6WDU 4XDOL HG 0HHWV RU H FHHGV IHGHUDO JXLGHOLQHV IRU HQHUJ HȻFLHQF IRU HDU URXQG HQHUJ and money savings HE SensorDry Allows the control to monitor the fabric for moisture content and end the cycle at the desired moisture level My Settings Selection saves a favorite cycle for future use Cycle Countdown Display with LED Indicators...

Page 7: ...l across the LCD To continue the cycle press Start again To stop the cycle hold the button for 3 seconds C Display and Status Lights The display shows the approximate time remaining until the end of the cycle In addition this display will scroll the dryer status PAUSE The message PAUSE will scroll across the display when the dryer s cycle is paused The cycle may be re started by pressing the Start...

Page 8: ...els and linens RWWRQV For cottons and most linens NOTE Energy Star models are tested on cottons with default settings 0L HG RDGV For loads consisting of cottons and poly blends HDQV For jeans DVXDOV DV DUH For wrinkle free permanent press delicate items and knits Active Wear For sports and exercise wear Delicates For delicate items special care fabrics and knits Steam Refresh RU VOLJKWO ZULQNOHG G...

Page 9: ...HUWL HG E 16 QWHUQDWLRQDO IRUPHUO 1DWLRQDO 6DQLWDWLRQ Foundation to NSF Protocol P154 Sanitization Performance of Residential Clothes Dryers Operating Instructions continued NSF Protocol P154 Sanitization Performance of Residential Clothes Dryers E Settings Individual settings for Timed Dry cycle minutes Time dryness level Level and temperature Temp can be set from the minimum lowest in column to ...

Page 10: ...e delay time or terminates a delaying cycle Extended Tumble Use this option to minimize the wrinkles in clothes It provides 1 hour of no heat tumbling after the clothes are dry If you are using the cycle Volume and you select the Extended Tumble option a signal will sound at the end of the drying time and every 5 minutes during the Extended Tumble cycle This will remind you that it is time to remo...

Page 11: ... not set in Use the Variable Signal especially when drying fabrics like polyester knits and permanent press These fabrics should be removed so wrinkles will not set in Drum Light The drum light will go on if the Drum Light button is pushed or the door is opened It will stay on until the door is shut or the Drum Light or Power button is pushed Control Lock You can lock the controls to prevent any s...

Page 12: ...ems such as tennis shoes Hook the rack over the lint OWHU VR WKH UDFN H WHQGV LQWR WKH dryer drum NOTE The drying rack must be used with the Timed Cycle Do not use this drying rack when there are other clothes in the dryer To use the drying rack 1 Insert the drying rack into the dryer opening with the two leg side toward the back and four leg side toward the front 2 Place the two back legs on the ...

Page 13: ...andard Cat 5e Ethernet cable with RJ45 male connectors not included This cable may be purchased separately Order on line at GEApplianceParts com today 24 hours a day or by phone at 800 626 2002 during normal business hours Part Number Accessory DR07X10005 6 cable CleanSpeak communication PBX10W00Y0 Wi Fi ConnectPlus module At the end of the wash cycle the washer sends a signal to the dryer to indi...

Page 14: ...hem into the top left side hinge holes NOTE All four front panel hinge screws will now be in the top hinge holes two on the left and two on the right Plastic Cover 4 Left side of front panel 3 Loosen the bottom two right side hinge screws Remove the door and place it on a protected ÀDW VXUIDFH WR DYRLG DQ GDPDJH 5HPRYH ERWK the Blind Plate and the Strike Plate and install them in opposite position...

Page 15: ...nges on the side opposite of the handle 7 Mount the assembled door on the two upper left side hinge screws installed in step 2 Move the hinge screws loosened in step 3 into the lower left side screw holes Tighten those screws enough to hold the door but still allow a slight adjustment Close the door Adjust the door so there is equal gap on all sides Carefully open WKH GRRU DQG UPO WLJKWHQ DOO IRXU...

Page 16: ...d on back of blower housing Located behind rear bulkhead Misting Nozzle Drum Back Idler Pulley Motor Blower Wheel Outlet Control Thermistor Outlet Control Thermostat Heater Assembly High Limit Thermostat Rear Bulkhead Inlet Safety Thermostat Inlet Thermistor Water Valve ...

Page 17: ...ing Located behind rear bulkhead Misting Nozzle Drum Back Idler Pulley Motor Blower Wheel Outlet Control Thermistor Outlet Control Thermostat Rear Bulkhead Inlet Thermistor Water Valve Inlet Safety Thermostat High Limit Thermostat Burner Assembly ...

Page 18: ...ctric J7 Inner Coil Electric J8 L1 Neutral Door Switch Motor Centrifugal Switch J10 Outlet Control Thermistor Inlet Control Thermistor ACM Module Ground GEA 12 VDC J11 Drum Light J25 Sensor Rods Earth Ground K1 Outer Coil Relay Electric Gas Valve Relay K2 Drum Motor Relay K3 Inner Coil Electric Relay SW1 UI Control J25 J11 J10 J8 J7 J6 J5 J4 J2 K4 K1 K3 ...

Page 19: ...f the control panel bottom front Control Panel Removal 1 Disconnect the electrical power supply to the GU HU DQG WXUQ RȺ WKH JDV VXSSO 2 Remove the three 1 4 in hex head screws from the top rear backsplash 3 Grasp the front control panel bottom Push down slightly and back at the same time allowing the control panel to roll forward 4 Disconnect the RJ45 connector and carefully lay the control panel...

Page 20: ...can be checked by using the service test mode See the Service Test Mode section in this guide DXOW FRGHV WKDW DUH VSHFL F WR WKH FRQWURO ERDUG can initiate fault codes F05 and E06 See the Service Test Mode section in this guide Control Board Assembly Removal 1 Disconnect the ACM Appliance Communication Module wire harness from the control panel rear cover 2 Disconnect the wire harnesses from the c...

Page 21: ... panel to the dryer cabinet 5 Remove the four Phillips head screws that attach the front panel to the front frame Metal Clip Disconnect Disconnect Screw Top Panel Removal of the top panel provides access to the drum light Top Panel Removal 1 Remove the control panel from the top panel see Control Panel Removal in this guide 2 Remove the two Phillips head screws one from underneath each front corne...

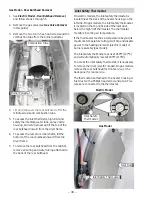
Page 22: ... top panel It is necessary to disconnect the drum light wire harness and squeeze both clips to remove the LED drum light The LED drum light receives approximately 3 8 VDC from the control board J11 connector Front Bulkhead 7KH IURQW EXONKHDG KRXVHV WKH OLQW OWHU KRXVLQJ WZR sensor rods two front rollers and drum light It is located behind the front panel Front Bulkhead Removal 1 Remove the control...

Page 23: ...then lock the idler arm into the top indentation on the idler arm bracket See photo drum removed for clarity Non Long Vent Model Long Vent Model 4 Remove the belt from the motor pulley and idler pulley 5 Guide the belt out from the dryer cabinet Drive Belt Installation 1 Place the belt in position around the circumference of the drum 2 Reach under the left side of the drum and place the belt in po...

Page 24: ...er Removal 1 Remove the front bulkhead to access the front drum rollers Remove the drum See Drum Removal in this guide to access the rear drum rollers 2 Each drum roller is held in place by a plastic triangular clip Remove the triangular clip with a VPDOO ÀDW EODGHG VFUHZGULYHU DQG VOLGH WKH GUXP UROOHU RȺ WKH UROOHU VKDIW To remove the left side drum roller shaft from the front bulkhead 1 Remove ...

Page 25: ...m side of the front bulkhead NOTE The two sensor rods in the front bulkhead are not replaceable To replace the sensor rods replace WKH OLQW OWHU KRXVLQJ 6HH WKH Drum Rollers section of this guide The sensor rods are connected to the main control board The rods are spaced approximately 1 2 inch apart creating an open circuit to the control The control board utilizes a low voltage capacitor that cha...

Page 26: ...m section in this guide Shown with exhaust tube removed for clarity Blower Wheel The blower wheel is held to the motor shaft with a 15 16 in 24 mm molded nut To remove the blower wheel it is not necessary to remove the motor from the dryer Blower Wheel Removal NOTE The non long vent model is shown below The procedure for the long vent model is similar 1 Remove the drum See Drum Removal 2 On non lo...

Page 27: ...he motor and cannot be replaced separately Drum Motor Removal 1 Remove the drum See Drum Removal in this guide 2 Unlock the idler arm from the idler arm bracket 3 Disconnect the motor wire harness Non Long Vent Model Long Vent Model 4 On non long vent models remove the blower wheel see the Blower Wheel Removal section in this guide 5 8VLQJ D ÀDW EODGH VFUHZGULYHU FRPSUHVV DQG then remove the front...

Page 28: ... assembly is located below the drum on the right side of the chassis It consists of two open wire elements each fastened inside a single housing The elements are wired in parallel with each other and controlled by a relays on the control board When energized each element draws approximately 12 5 amps at 240 VAC Each element KDV D UHVLVWDQFH YDOXH RI DSSUR LPDWHO When both are energized the element...

Page 29: ...lve Removal 1 6KXW RȺ WKH JDV VXSSO WR WKH GU HU 2 Remove the front bulkhead See Front Bulkhead Removal in this guide 3 Disconnect the ignitor wire harness 4 Disconnect the wire harness from both coils 5 Remove the wire retainer from the front of the burner bracket 6 Remove the two 1 4 in hex head screws from the front of the burner bracket 7 Pull the burner and the connected gas inlet pipe as an ...

Page 30: ... To remove the double and main coils 1 Remove the burner assembly from the dryer See the Gas Valve Removal section in this guide and follow steps 1 through 7 2 Note the position of the locator pins inserted in the coil bracket 3 Remove the two Phillips head screws that attach the coil bracket to the valve body 4 Lift the coil bracket vertically 5 Lift coils vertically from valve assembly NOTE Upon...

Page 31: ...steps 1 through 7 NOTE When installing the ignitor make sure the ignitor wiring harness is routed through the opening in the burner bracket CAUTION The ignitor is very fragile To prevent breaking the ignitor care must be taken when installing the burner assembly Flame Detector 7KH ÀDPH GHWHFWRU LV DWWDFKHG WR WKH ULJKW VLGH RI the combustion chamber Flame Detector Removal 1 Remove the front bulkhe...

Page 32: ... booster coil outlet control backup inlet safety thermostats to L1 3 N through safety coil and outlet control backup inlet safety thermostats to L1 When the glo bar is heating the booster and safety coils are both energized and will open the safety valve 7KH PDLQ YDOYH LV FORVHG DV LWV FRLO LV E SDVVHG E WKH 1 ÀDPH GHWHFWRU KHQ WKH JOR EDU UHDFKHV LJQLWLRQ WHPSHUDWXUH LQ DSSUR LPDWHO VHFRQGV RU OH...

Page 33: ...bulkhead it is necessary to remove and tilt the bulkhead inward from the dryer frame Electric Model Rear Bulkhead Removal 1 Remove the drum See Drum Removal in this guide 2 Remove the Phillips head screw that attaches the combustion tube to the inlet vent 3 Remove the top two and bottom three Phillips head screws from the bulkhead 4 Loosen but do not remove the two Phillips head screws from the ke...

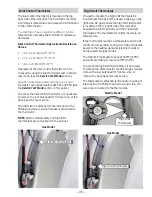
Page 34: ...c models the inlet safety thermostat is located near the back of the heater housing on the left side On gas models the inlet safety thermostat is located on the top right side of the inlet duct below the high limit thermostat The thermostat monitors incoming air temperature If the thermostat reaches a temperature beyond its maximum temperature rating it will trip and disable power to the heating e...

Page 35: ...tor NOTE Electric model safety and high limit thermostats are not located on the air duct Gas Model High Limit Thermostat On electric models the high limit thermostat is located near the back of the heater housing on the right side On gas models the high limit thermostat is located on the top right side of the inlet duct between the inlet thermistor and the inlet safety thermostat The thermostat m...

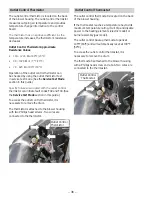
Page 36: ... the Service Test Mode section in this guide To access the outlet control thermistor it is necessary to remove the drum The thermistor is attached to the blower housing with two Phillips head screws Two wires are connected to the thermistor Outlet Control Thermostat The outlet control thermostat is located on the back of the blower housing If the thermostat reaches a temperature beyond its maximum...

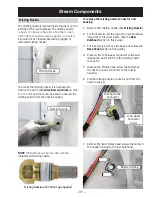
Page 37: ...ement misting nozzle To remove the misting nozzle connector and housing 1 Remove the misting nozzle See Misting Nozzle 2 For front service tilt the top of the rear bulkhead inward from the dryer frame See the Rear Bulkhead section in this guide 3 For rear service remove the back panel See the Back Panel section in this guide 4 Press on the John Guest connector collar and release the water line fro...

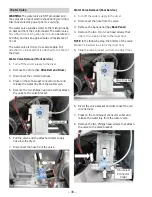
Page 38: ... water valve 5 Remove the two Phillips head screws that attach the valve to the valve bracket 6 Pull the valve and the attached water supply hose into the dryer 7 Disconnect the hose from the valve Water Valve Removal Rear Service 1 7XUQ RȺ WKH ZDWHU VXSSO WR WKH GU HU 2 Disconnect the hose from the valve 3 Remove the back panel See Back Panel 4 Remove the two 1 4 in hex head screws that DWWDFK WK...

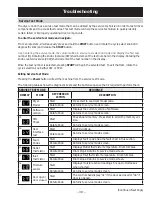
Page 39: ...l shall display dc if the door as closed or do if door is opened Rotate Knob Returns to service mode screen Troubleshooting Continued Next Page The dryer control has a service test mode that can be utilized by the service technician in order to test critical components and to access fault codes This test mode will help the service technician to quickly identify certain failed or improperly operati...

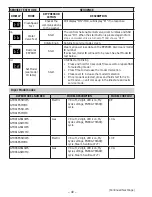
Page 40: ...old for 3 seconds Time Level to prepare SSD for selecting model Press Time to decrease the model selection Press Level to increase the model selection Once model is selected press and hold start for 3s to set model unit comes up in the idle state and exits service mode Continued Next Page Dryer Model Codes DRYER MODEL NUMBER MODEL DESCRIPTION MODEL CODE ID GTD81ESSJ0WS GTD81ESPJ0MC GTD81ESSJ1WS GT...

Page 41: ...greater than or equal to 36 F clear fault F05 EEPROM Error Replace the board F06 Stuck button If a button is pressed longer that a minute this fault is set if no button stuck clear fault F07 Mis wire Neutral wire improperly connected Please ensure proper Neutral to center terminal If connection has been corrected clear code as necessary F08 Door Switch Stuck Closed Set when door has not opened for...

Page 42: ...en the J8 and J4 wires If continuity replace the board Continued Next Page L1 N L2 3 3 TAB SEQUENCE DRUM MOTOR CONNECTOR Y 14 N 14 V 14 B 14 S 20 B 18 G 1 2 4 6 5 POWER BOARD J8 J5 J4 J2 J7 J6 1 K4 K1 K3 K2 1 B 14 R 14 W 18 O 14 V 14 R 18 R 14 DOOR SWITCH SHOWN DOOR CLOSED NOT USED W 18 C 18 S 20 Y 14 O 14 O 18 R 18 O 14 R 14 B 14 R 14 N 14 O 18 W 18 C 18 O 18 O 18 B 18 W 18 V 14 5 6 4 G P 18 DRUM...

Page 43: ...ray wires If no continuity visually check harness and connectors for damage If there is continuity replace the board Drum Light Check from the J11 connector on the board Look for approximately 3 8 VDC If there is voltage but no light disconnect the power from the dryer Disconnect the J11 connector from the board Set your meter to DIODE setting With your BLACK LEAD on the red wire and your RED LEAD...

Page 44: ...between the two blue wires Outlet Control Thermistor Approximate Resistance Values DW DW DW NOTE This wire marked as Y yellow might be W white in some units Also the ACM Module must be an 5 FRQQHFWRU ZLWK GLȺHUHQW FRORU ZLUHV JRLQJ WR LW RWKHU WKDQ ZKDW LV OLVWHG DERYH Continued Next Page OUTLET CONTROL THERMISTOR INLET CONTROL THERMISTOR N 20 N 20 Y 20 POWER BOARD DSM MODULE O 20 GY 20 N 20 J10 1...

Page 45: ...r to resistance setting Check resistance between the blue wire on J2 and the white wire on the J7 connector Should read approximately 41 9 ohm NOTE This wire marked as Y yellow might be W white in some units Y 14 N 14 POWER BOARD J5 J4 J2 J7 J6 K4 K1 K3 K2 1 Y 14 N 14 21 18 19 95 SEE NOTE 1 SEE NOTE 1 21 18 19 95 Continued Next Page ...

Page 46: ... L1 N L2 L1 N L2 L1 N L2 3 3 TAB SEQUENCE DRUM MOTOR CONNECTOR Y 14 N 14 V 14 B 14 S 20 B 18 G 1 2 4 6 5 FOR USA FOR CANADA POWER BOARD J8 J5 J4 J2 J7 J6 1 K4 K1 K3 K2 1 B 14 R 14 W 18 O 14 V 14 R 18 R 14 DOOR SWITCH SHOWN DOOR CLOSED NOT USED W 18 C 18 S 20 Y 14 O 14 O 18 R 18 O 14 R 14 N 14 O 18 W 18 C 18 O 18 O 18 B 18 W 18 V 14 5 6 4 G P 18 DRUM MOTOR SHOWN STOPPED CHASSIS BASE GY 14 IDLER SWI...

Page 47: ... YDOYH coils motor switch harnesses and connectors NOTE This wire marked as P pink might be W white in some units Continued Next Page 3 POWER BOARD J8 J5 J4 J2 J7 J6 1 K4 K1 K3 K2 1 B 18 W 18 Y 18 P 18 P 18 V 18 V 18 V 18 Y 18 O 18 5 6 4 G P 18 S 20 R 18 DRUM MOTOR CHASSIS BASE GY 16 IDLER SWITCH C 18 V 18 R 18 TAB SEQUENCE DRUM MOTOR CONNECTOR G 1 2 4 6 5 V 18 R 18 V 18 V 18 V 18 REAR PANEL CORD ...

Page 48: ...n you may not detect this easily because it will read the RUN winding 3 36 ohm Resistances are very close If both or the overload is open also it will read the BLOWER motor winding 15 ohm All resistances are approximate If reading open possible idler switch Continued Next Page 5 6 4 G S 20 R 18 DRUM MOTOR SHOWN STOPPED CHASSIS BASE GY 16 IDLER SWITCH C 18 DOOR SWITCH SHOWN DOOR CLOSED NOT USED W 1...

Page 49: ...stance is good reconnect wires and put the dryer in service mode Check for 120 VAC at the same L1 N R 18 B 18 WATER VALVE O 18 O 18 O 18 O 18 B 18 J5 1 POWER BOARD C 18 W 18 R 14 R 18 5 6 4 G B 18 DRUM MOTOR SHOWN STOPPED CHASSIS BASE GY 14 S 20 S 20 IDLER SWITCH C 18 DOOR SWITCH SHOWN DOOR CLOSED NOT USED C 18 C 18 W 18 W 18 R 14 TO OUTLET CONTROL BACKUP J8 1 533 590 R 18 P 18 3 NC NO COM ...

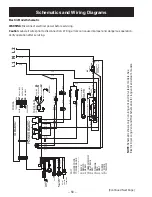
Page 50: ...OR OUTLET CONTROL THERMISTOR INLET CONTROL THERMISTOR N 20 N 20 Y 20 Y 14 N 14 V 14 B 14 S 20 B 18 G 1 2 4 6 5 FOR USA FOR CANADA POWER BOARD UI BOARD DSM MODULE O 20 GY 20 N 20 J10 1 1 J11 1 J25 1 R 20 B 20 UPPER ROD LOWER ROD S 20 P 20 GY 20 CHASSIS BASE J8 J5 J4 J2 J7 J6 1 K4 K1 K3 K2 1 B 14 Y 20 R 14 W 18 O 14 V 14 R 18 R 14 DOOR SWITCH SHOWN DOOR CLOSED NOT USED W 18 C 18 S 20 Y 14 O 14 O 18 ...

Page 51: ...t thermostat All other components are connected as shown in the Electric Model schematic Continued Next Page N 5 6 4 G S 20 B 18 DRUM MOTOR SHOWN STOPPED CHASSIS BASE GY 14 IDLER SWITCH C 18 DOOR SWITCH SHOWN DOOR CLOSED NOT USED W 18 C 18 W 18 BLOWER MOTOR P 18 P 18 S 18 S 18 J5 1 POWER BOARD C 18 B 18 P 18 J8 1 O 18 W 18 S 20 TO HI LIMIT 14 25 15 75 3 NC NO COM L1 N R 18 B 18 WATER VALVE O 18 O ...

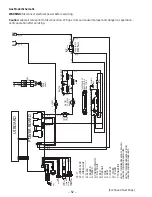
Page 52: ...N STOPPED CHASSIS BASE GY 16 IDLER SWITCH C 18 V 18 R 18 TAB SEQUENCE DRUM MOTOR CONNECTOR G 1 2 4 6 5 V 18 R 18 V 18 V 18 V 18 REAR PANEL CORD SET L1 N W 18 B 18 B 18 DOOR SWITCH SHOWN DOOR CLOSED NOT USED C 18 C 18 W 18 W 18 2 1 C 18 C 18 C 18 580 1400 W 18 V 18 S 20 40 400 75 F XX YY XX WIRE COLOR YY WIRE GAUGE B BLACK C BROWN G GREEN GY GREEN YELLOW N NAVY BLUE R RED O ORANGE P PINK S GRAY V P...

Page 53: ...nts are connected as shown in Gas Model schematic Continued Next Page 5 6 4 G S 20 R 18 DRUM MOTOR SHOWN STOPPED CHASSIS BASE GY 16 IDLER SWITCH C 18 DOOR SWITCH SHOWN DOOR CLOSED NOT USED W 18 C 18 W 18 WATER VALVE C 18 R 18 J5 1 POWER BOARD R 18 J8 1 C 18 W 18 J4 J2 K3 V 18 V 18 S 20 V 18 V 18 V 18 B 18 B 18 R 18 V 18 V 18 P 18 C 18 533 590 3 V 18 NC NO COM HI LIMIT L1 N 5 6 4 G S 20 R 18 DRUM M...

Page 54: ...4 6 5 POWER BOARD J8 J5 J4 J2 J7 J6 1 K4 K1 K3 K2 1 B 14 R 14 W 18 O 14 V 14 R 18 R 14 DOOR SWITCH SHOWN DOOR CLOSED NOT USED W 18 C 18 S 20 Y 14 O 14 O 18 R 18 O 14 R 14 B 14 R 14 N 14 O 18 W 18 C 18 O 18 O 18 B 18 W 18 V 14 5 6 4 G P 18 DRUM MOTOR SHOWN STOPPED CHASSIS BASE GY 14 IDLER SWITCH C 18 2 1 B 14 C 18 21 18 19 95 21 18 19 95 3 19 3 53 2 98 3 30 O 14 3 SEE NOTE 1 SEE NOTE 1 HI LIMIT NC ...

Page 55: ...6 IDLER SWITCH C 18 V 18 R 18 TAB SEQUENCE DRUM MOTOR CONNECTOR G 1 2 4 6 5 V 18 R 18 V 18 V 18 V 18 REAR PANEL CORD SET L1 N W 18 B 18 B 18 DOOR SWITCH SHOWN DOOR CLOSED NOT USED C 18 C 18 W 18 W 18 2 1 C 18 C 18 C 18 580 1400 W 18 V 18 S 20 40 400 75 F 3 3 19 3 53 2 98 3 30 R 18 SEE NOTE 2 SEE NOTE 2 HI LIMIT OUTLET CONTROL BACKUP IGNITOR INLET SAFETY FLAME DETECT 1300 MAIN BOOSTER SAFETY NC NO ...

Page 56: ...del Back Panel Removal 33 Electric Model Rear Bulkhead Removal 33 34 Electric Model Schematic 50 F Fault Codes 41 Flame Detector Removal 31 Front Bulkhead Removal 22 23 24 29 31 G Gas Dryer AC Voltage 55 Gas Model 17 33 34 35 52 53 Gas Model Rear Bulkhead Removal 34 Gas Valve 18 29 30 31 34 47 Gas Valve Removal 29 30 31 34 H Heater Assembly Removal 28 I Inlet and Outlet Thermistors 44 Inlet Thermi...

Page 57: ...emedy is product repair as provided in this Limited Warranty Any implied warranties including the implied warranties of merchantability or WQHVV IRU D SDUWLFXODU SXUSRVH DUH OLPLWHG WR RQH HDU RU WKH VKRUWHVW SHULRG DOORZHG E ODZ This warranty is extended to the original purchaser and any succeeding owner for products purchased for home use within the USA If the product is located in an area where...

Reviews: