background image


225 

Nynja Build manual 1.0 

The  console  should  fix  to  the  angle  with  srews  each  side 

–  use  the 

4mm captive lugnut clips and self tapping screws. 


Figure  288  lower fixing angles 

f) 

Confirm full and free movement of the stick and open up the hole as required 
for clearance


 Note that the rear edge should be cut up the side of the recess. 
 
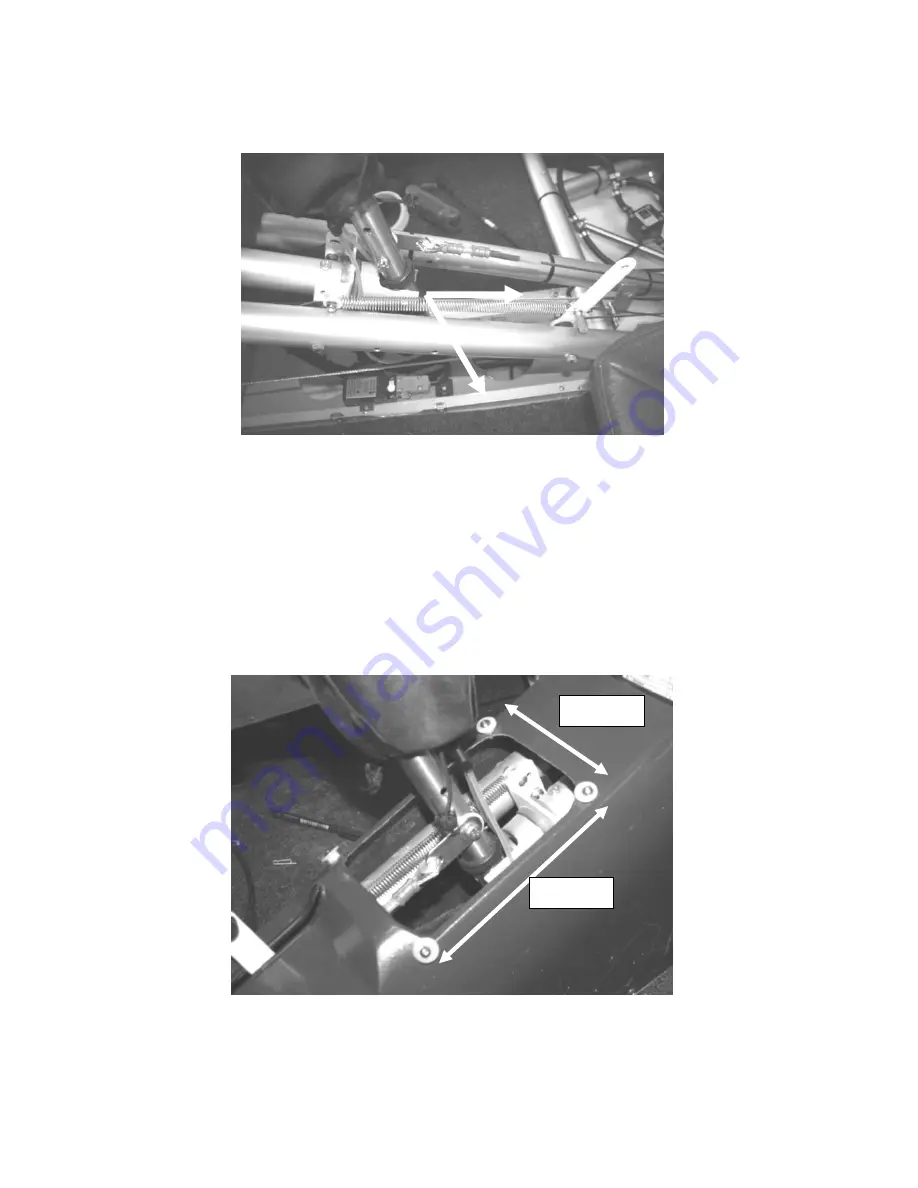
Drill and fix the top hat bushes that form the retaining points for 
the controls stick gaiter using the dimensions shown below.. 
These fit with 4x16mm stainless screws, nuts and washers.  


Figure 289 Control stick  gaiter fixings. 


155mm 

115mm 

Summary of Contents for Nynja Build

Page 1: ...1 Nynja Build manual Version 1 0...

Page 2: ...2 Figure 1 tube numbering scheme...

Page 3: ...3 Figure 2 Basic frame Skyranger...

Page 4: ...4 Figure 3 uncovered Skyranger frame...

Page 5: ...5 Figure 4 Uncovered Nynja frame Figure 5 Nynja fuselage with rear fairings removed...

Page 6: ...6 Figure 6 Nynja fuselage with rear fairings removed rear view Figure 7 simply assemble thus...

Page 7: ...s 58 3 5 Tailplane Front Mounting 63 3 6 Fuel Tank Support and Flap Handle 64 Not Tightening the Bolts and cables 66 4 Undercarriage 67 4 1 Wheels 67 4 2 Main Undercarriage 69 4 3 Nose Gear 73 4 4 Bra...

Page 8: ...3 Battery 188 17 Windscreen and rear windows 190 17 1 Windscreen 190 17 2 Rear windows 195 18 Doors 198 18 1 Keeping out the drafts 198 18 2 One Piece Door 200 18 3 Two Piece Door 206 19 Tail surfaces...

Page 9: ...6 4 Baggage Bag 246 26 5 Controls 247 26 6 Powerplant 250 26 7 Weight and Balance 252 26 8 Placards 253 26 9 Test Flying 253 27 Additional Information 255 27 1 Example BMAA Homebuilt Registration Form...

Page 10: ...o fly in your finished aircraft Instructions however are never as good as they could be and so corrections and suggestions for improving the instructions are welcome preferably in writing by email The...

Page 11: ...you ll get through when you really are stuck This number should be used rather than Flylight s lesson booking line Email is preferred and more convenient than the telephone as it makes it simple to co...

Page 12: ...nature on the form at the time just in case He can be a very useful source of knowledge and advice and should be your mentor during the build Also a second pair of eyes and an experienced mind can oft...

Page 13: ...rk and your inspector to allow you to do so However this short delay can be used very productively to familiarise yourself with the instructions and the components and prepare them for use Modificatio...

Page 14: ...boxes so don t throw any boxes or packaging away until you have ascertained for certain that you have all the parts we have stories of unloading skips to retrieve parts that have gone with the rubbis...

Page 15: ...r 4mm holes Dremel Multi tool or equivalent small cutting sanding tool Soft faced clamps Products needed for assembly Loctite 243 to be used on all bolts Silicon grease Oil for general use Oil for eng...

Page 16: ...r on their unthreaded lengths not on the threaded portions It is also important that nuts are not screwed on so far as to become threadbound by reaching the limit of the threaded portion You can use a...

Page 17: ...t may be covered in anti reflection black coatings or plastic sleeving if desired Scotchbrite pads can be used to provide a pleasing even cosmetic finish Coverings Handle the coverings with care pay a...

Page 18: ...mall remaining marks prior to leaving the factory Some light scuff marks may be present as a result of storage and transit This is normal Deep scratches or dents are not acceptable ask you inspector f...

Page 19: ...rmation Advantages are stronger colours and a sealed shiny finish which allows oil etc to be wiped off without leaving marks Disadvantages include extra weight and the loss of the ability for the cove...

Page 20: ...ing weight for this class of aircraft Below is an approximate guide to the weight of specific options Wheel spat kit 4 0Kg Nynja wingtip fairings 2 0Kg Skyranger wing tip fairings alternative to above...

Page 21: ...nuts can be used in the initial construction to be replaced with Nylocs when the time comes to tighten the nuts up However note that it is often beneficial to have the nuts loose anyway to ease any a...

Page 22: ...22 Figure 13 forward fuselage from front quarter Figure 14 Cabin upper rear corner...

Page 23: ...2 2 Fuselage frame assembly overview Lower triangle assembly Attaching TU14 Upper triangle assembly Attaching upper triangle to TU14 Attaching rear cabin uprights TU6 Attaching Upper triangle to uprig...

Page 24: ...Cabin diagonals TU27 attached Twin TU19 tubes in position Front seat support TU15 and braces Forward engine mount assembly fitted Assembling tailcone Tailcone fitted to cabin Figures 15 assembly overv...

Page 25: ...es of the lower cabin triangle to the main undercarriage cross beam a Assemble the aluminium linking plates 9 onto the pair of lower cabin triangle tubes tu12 including the seat support brackets Figur...

Page 26: ...rriage cross beam tu9 using the fourth set of holes inwards from the ends of tu9 The front ends of the lower cabin triangle tubes tu12 should have the cut outs on the inside visible in Figure 19 Bolt...

Page 27: ...e slightly different from those used elsewhere in the kit with the holes on the side parts further from the end 16mm from the end to the hole centre The front vertical tu14 has a row of three 6mm hole...

Page 28: ...28 Figure 21 forward end of lower cabin triangle Note Stud shown may also be supplied as a bolt and should be fitted head up...

Page 29: ...cabin triangle tubes tu12 Note the use of a spacer sleeve in the tubes The studs should be long end downwards to mount the bottom of the firewall and the front of the fuselage covering later If the b...

Page 30: ...of the wing These linking plates are drilled at one end with an 8mm hole and at the other with two 6mm holes The row of small holes should point forwards whilst the bolts point rearwards The bolts wi...

Page 31: ...t the tubes themselves are not the same The cut outs at the front of the upper cabin triangle tubes tu10 should face outwards Figure 24 rear of upper cabin triangle tube tu10 2 4 2 Assembling the top...

Page 32: ...32 8 SKR 94 SB 24 WASHER 8 30 CASTLENUT 8 31 SAFETY PIN 8 SKR 94 SB 24 WASHER 8 30 CASTLENUT 8 31 SAFETY PIN Figure 25 forward end of upper cabin triangle Figure 26 forward end of upper cabin triangle...

Page 33: ...n aluminium saddle washer under each against the rear cabin uprights tu6 The rear cabin uprights tu6 have inner sleeves at their upper end and are handed in that the holes that connect the upper rear...

Page 34: ...an 8mm diameter bolt c Secure the bolts through the rear cabin uprights tu6 and the upper cabin triangle tubes tu10 including the proper spacers etc This is easier now the upper cabin triangle is in...

Page 35: ...e is also shown on Figure 30 as well as the small bracket piece The Nynja should be supplied with round peg support as per picture below Figure 29 seat support peg d Stiffen the cabin back with the tw...

Page 36: ...the lower ends to the rear of the main undercarriage cross beam tu9 Assemble the rear cabin frame cross tube tu40 and attach to the rear of the rear cabin uprights tu6 but in front of the rear cabin...

Page 37: ...m model aircraft shops an enjoyable but potentially expensive visit c Assemble the wooden fuel tank load spreading pieces on the rear end of these bolts and tighten but do not crush the wood excessive...

Page 38: ...38 Figure34 Rotax 912 mounting bracket note position of TU310 is reversed for Nynja as shown correctly below Fig 35 Nynja engine mount assembly...

Page 39: ...7 liaison of TU19 s TU14 and SKR8 a Locate the two central cabin tubes tu19 onto the front vertical tu14 including the steel engine mounting bracket 98 between them Loosely bolt in place using the was...

Page 40: ...tach the two central cabin tubes tu19 onto the main undercarriage cross beam tu9 Remove the pulley set from the assembly and put to one side for now This makes fitting the TU19 s to the undercarriage...

Page 41: ...reasonably tight without ovaling the tubes This should result in thread protruding from the Nylocs If no thread is showing the washers shown under the bolt heads may be omitted Check the alignment of...

Page 42: ...nt plates 298BK TU310 upper triangulation tubes TU24 s and lower triangulation tubes TU23 Note arrangement of plastic washers only fit them where shown Figure 41 upper engine mount triangulation tubes...

Page 43: ...u310 slack enough to rotate it out of the way when fitting the engine Figure 43 lower triangulation tubes TU23 and lower engine mounts g Loosely fix the two stainless steel lower triangulation tubes t...

Page 44: ...e on the mount itself before tightening the bolts holding the top and bottom ends of the triangulation tubes Leave the bolt holding tu310 loose enough to turn it i Check engine mount plates spacing th...

Page 45: ...ed into position with a 6mm bolt The TU310 upper edge should be approximately 0 5mm from the upper edge of the engine mounting plate Check that the distance between the plates has not changed during t...

Page 46: ...front Figure 48 TU15 assembly b The forward ends of the steel under seat diagonal tubes tu42 which were attached to the main undercarriage cross beam should be attached to the bottom of the bolts sec...

Page 47: ...p Keep it light It is recommended that the entire floor be lightly varnished to seal the surface and prevent absorption of moisture oil etc even if carpet is to be fitted Figure 51 view of installed f...

Page 48: ...it with four bolts with penny washers h Fit the webbing strap passing right around the box through the slots in the side of the box with the buckle at the top Leave fitting the battery until later 2...

Page 49: ...put pieces of prop tape on the lower cabin triangle tubes tu12 beneath the rudder pedals to protect the tubes from abrasion from the pedals when under load f Cut off any protruding ends of the rudder...

Page 50: ...t and split pin b When all is in final position this should be done up tight enough to remove excess play but without discernable friction c Fit the stick to the stick pivot fork with thin nylon washe...

Page 51: ...d lightly until a smooth action is achieved h The torque tube can now be fitted onto the front pivot attached to the aileron horn and the rear pivot can be bolted to the central cabin tubes tu19 Note...

Page 52: ...n the bolts The tubes should not be visibly distorted Remember the bolts are not relying on their tightness to stay done up they only need to be tight enough to avoid the parts rattling against each o...

Page 53: ...53 Figure 55 central bracing pieces Note the bolts should be the other way around as shown in photo fig 56 Figure 56 central bracing pieces...

Page 54: ...the lower bolt Some difficulty may be encountered with access to the various nuts in this area A useful trick to hold a nut to the end of a spanner is a piece of sticky tape placed over the end of th...

Page 55: ...pair of tubes on it whilst they are attached to the bracing frame and the rudder post is attached to the lower pair of tubes Figure 58 rear end of upper rear fuselage tubes Figure 59 rear end of lower...

Page 56: ...ately mid way down the tubes b Check the orientation of this frame against the drawing below as examples have been delivered assembled the wrong way around Figure 60 rear fuselage bracing frame Note o...

Page 57: ...e tubes Note upper tubes have brackets orientated at 90 degrees from that shown and cables are arranged differently on Nynja See Figure s 62 c Mount the front ends of the upper tubes onto the TU6 tube...

Page 58: ...2mm 1578 Both straight Cable C 3 6mm 1262 Both straight Cable D 3 6mm 1647 Forward bent rear straight Cable E 3 6mm 1472 Both bent Cable F 3 6mm 1645 Both bent Lengths taken from tang hole centers Ca...

Page 59: ...59 C cable tang under A cable tang E cable tang over D cable tang C cable tang under F cable tang Figure 64 fuselage cable ends detail Note both pairs of rear cables cross at rearmost attachment point...

Page 60: ...60 Figures 65 cable arrangement further overview...

Page 61: ...e arrangement lower port side of central frame Forwards Forwards A cable E cable D cable F cable C cable B cable 1mm plastic washers above and below tang 1mm plastic washer between tangs and tube 1mm...

Page 62: ...slack at this stage as much as possible and it still be possible to attach them Final tensioning of these E and F cables is achieved by tightening the rear attachment nuts e Upper bracing cables A Sho...

Page 63: ...t the tailplane halves between this front mount and the rear mounts There should be a thin plastic washer at the rear and a small saddle washer at the front If the bolt head at the front of the tailpl...

Page 64: ...el tank support flap handle mount a Fit the fuel tank support tu20 to the lower rear fuselage tubes tu4 with the U bracket located towards the port side of the fuselage and facing upwards Figure 69 an...

Page 65: ...gure 71 Figure 71 flap handle pivot Do not space the detent lever away from the handle use only one thin plastic washer or a single saddle washer between them It is permissible to bend the lever sligh...

Page 66: ...Bolts and cables Do not finally tighten the bolts or cables around the rear fuselage at this stage this will be detailed later after the landing gear is attached Fit this bolt the other way around or...

Page 67: ...in the wheel half Figure 75 tyre and inner tube c Place the other wheel halve onto the first wheel half so that the tyre and inner tube are positioned between the two wheel halves d Take a hub put a d...

Page 68: ...s both wheel halves and into the threaded holes on the hub f Tighten the bolts and inflate the tyre to 26psi If the tyre does not slip easily into position a little squirt of neat washing up liquid ar...

Page 69: ...result in a handed pair of callipers b If not already done drill an 8mm diameter hole in each undercarriage leg 18mm above the upper rear stub axle mounting holes as shown in Figure 78 Mark carefully...

Page 70: ...e flange figure 80 Use the longer bolts supplied in the spat kit Excess bolt threads can be trimmed off b Fit the brake mounting piece to the forward upper stub axle bolt and tighten the stub axle bol...

Page 71: ...spat mount c Fit the undercarriage legs to the main undercarriage cross beam tu9 Make sure that the legs are on the correct sides to place the brake callipers towards the rear Figure 81 main gear leg...

Page 72: ...to add another washer under the nut to achieve this balance Bolts should be fitted head down as shown Note the bolt that attached the TU144 is longer than the rear bolt check they are correctly orien...

Page 73: ...le friction If the nose leg is stiff to turn due to a slight misalignment between the upper and lower brackets try turning it around 180 If the nose leg still does not easily align with the upper brac...

Page 74: ...chieved make a sleeve to go over the top of the nose leg and drill it for the securing bolt at the required position to hold the nose leg firmly in place Ensure that the fitting is not squeezing the r...

Page 75: ...e forks Check that the tyre does not rub against the side of the forks The fit can be adjusted by filing the holes in the spacer tubes so that the wheel can be moved sideways Once in a perfect central...

Page 76: ...re that you have fitted these as otherwise the steering will not operate properly Do not tighten the bolts so much that you completely squash the rubber grommets d Temporarily fit the pushrods to the...

Page 77: ...ble with a little grease b Slide the callipers over the brake discs Figure 89 The callipers must be handed to sit behind the undercarriage legs by swapping the bolt which holds the calliper halves tog...

Page 78: ...s fitted it will be necessary to put a small stop in front of the lever to limit its forward movement This may be a small bolt chopped off and screwed into place or some other chocking device An alter...

Page 79: ...t will be necessary to push enough fluid upwards in one go to fill the calliper and the brake lines and flood fluid out of the master cylinder use plenty of rags and a catch tray to prevent fluid spil...

Page 80: ...opposite side to the turnbuckle that requires the greatest tension will help To do this slacken the turnbuckles and undo one end of the D cable to make the twists replace and re tension turnbuckles d...

Page 81: ...any chance of the hinge pin falling out as it wears over time e If not already done rivet the elevator trim tab hinge to the trim tab f Rivet the trim tab to the lower side of the trailing edge of the...

Page 82: ...end of the tab with the flanges for bolting to the tab towards the outboard end They should be positioned in the vicinity of the inboard end of the straight section of the tab trailing edge as per the...

Page 83: ...the forward and rear mounts on the rear fuselage c Fig 97 The nut securing the front of the tailplane halves may be tight against the structure of the tailplane If so hold it flat against the structur...

Page 84: ...inner eyebolt on the horizontal stabilizer has a saddle washer and one plastic spacer behind it to match the spacing of the outer eyebolts where the bracing cable tangs attach There are no saddle was...

Page 85: ...ator joiner are perpendicular to the elevator halves so that the joiner is properly centred then using the joiner as a jig drill through the tube in the following sequence g Drill the top side first t...

Page 86: ...86 Figure 100 Nynja elevator joiner with integral control horn...

Page 87: ...s so that the rear 4mm hole is just in front of the rear tube This will be on the trailing edge of the rudder c Burn a hole both sides of the fabric to accept the 4mm securing bolt d Bolt this end tog...

Page 88: ...he central part of the horn where it presses against the rudder leading edge tube to allow it to be positioned slightly further forwards i Rivet the horn in position with 4mm diameter steel rivets Tak...

Page 89: ...e elevators are moved up and down 25 or so If it is touching you will need to put an additional spacer washer under the lower two eyebolts on the rudder c Make sure the fit of the eyebolts is easy and...

Page 90: ...with turnbuckles one at the rear end and one in the middle and tangs with a single mounting hole Note that the cables will have to be disconnected later when the covering is fitted so do not bend the...

Page 91: ...Note Nynja pulley arrangement is different 5 5 2 Pulleys Figure 107 Nynja central pulley block arrangement loking rearwards Rudder cables Elevator cable to lower left side of stick Elevator cable to u...

Page 92: ...l washer should be in position on both sides of each pulley to provide a small amount of clearance from the side plate not more than 1mm A spacer tube should be in position on the pivot bolt to keep t...

Page 93: ...ard when you pull the stick back toward the rear of the aircraft e Tension the turnbuckles by hand keeping the elevator central when the stick is at 90 to the cabin central tubes tu19 not vertically u...

Page 94: ...andle will push the cables downwards when you deflect the flaps j Attach the rudder cables to the rudder horn crossing them on the way back in the rear fuselage so that the starboard cable at the peda...

Page 95: ...are likely to be asymmetric due to the offset in the rudder pedal pivots Fine adjustments can be made by twisting up the cables in the same manner as was used for tensioning the rear fuselage The posi...

Page 96: ...es crossing the cable fitted to port side pair of pedals should fit on the starboard side of the rear stick pivot and vice versa A thin nylon washer should be placed between the tang and the rear stic...

Page 97: ...ect position Do not do this up too tight as it will distort the cable f If you have access to a Nicopress swaging tool crimp the ferrule remove the wire clamp and trim the excess cable Use a hot air g...

Page 98: ...s too close for comfort a piece of prop tape can be placed on the tube to act as a fairlead If it touches the starboard central cabin brace piece this may be shimmed out with plastic washers between i...

Page 99: ...d the rudder cables may touch one another where they cross but this is acceptable The cables are supplied with lengths of heatshrink tubing on them Place these where they will best protect the cables...

Page 100: ...be taken to protect them from being scratched and to support them appropriately when working on them off the aeroplane Flexing them too far can result in surface cracking b The fairings are marked wi...

Page 101: ...irings with 80 grit or similar sandpaper b It is very important the following sequence for fitting is followed otherwise the fairings can be damaged Fit the starboard right fairing first Fit at an ang...

Page 102: ...g The halves should line up together and the front side edges should align with the rear cabin vertical TU6 tube so that the moulded joggle step is paralell and the middle of the joggled edge meets th...

Page 103: ...d A rivet will be put in this hole later after all other fixings are done Figure 121 positioning hole f The staps can now be tensioned until all the top and bottom seams align When a final verificatio...

Page 104: ...se 5 white 4mm aluminium rivets h Then fix the top and bottom fairing seams using the white 4x10mm plastic screws and plastic self locking nuts Use a 4x16mm stainless steel screw and nyoc nut for the...

Page 105: ...rocedures c Remove the carburettors and air filters by loosening the screw clamping the carburettors into the rubber mounts and sliding them out Cover the exposed holes with tape or similar When reins...

Page 106: ...of this it will be much easier if you grind off a generous amount Remove the inlet manifold to get good clear access but protect the opening to the cylinder heads with tape or similar to prevent swarf...

Page 107: ...nch such as a workmate chock it up to the correct height and offer the fuselage up to it An engine hoist which can be hired from your local hire shop or some other method of lifting the engine may be...

Page 108: ...bolt e Fix the lower port rubber engine mount between the two washers with a short 60mm bolt A good tip to make this less fiddly is to fix the penny washers to the rubbers in advance with a dab of sup...

Page 109: ...emove the water pump housing Heat the area where the outlet pipe screw in with a plumber s gas blowlamp in order to soften the Loctite used to secure the outlet elbow into the threads When seal is bro...

Page 110: ...tings onto the tubes as per the following drawings in this section Tighten the fittings except for the aileron eyebolts the outer 3 eyebolts as per the rest of this section Important Do not over tight...

Page 111: ...111 c Join the leading and trailing edge tubes with the oval tube tu37 at the tip Figs 142 143 144 Figure 131 Front of tip Figure 132 rear of tip...

Page 112: ...tip The orientation of the bolts should be head downwards to maximise clearance from the jury struts when they are fitted at the very end of this manual They must not be fitted sooner as their length...

Page 113: ...113 Figure 135 front jury strut attachment Figure 136 rear jury strut attachment...

Page 114: ...e turnbuckle to the trailing edge using the end without the turnbuckle and the one without the turnbuckle to the leading edge Note the altered arrangement of the aileron pulleys Figure 138Figure A spa...

Page 115: ...d UK MOD pulleys The bolts holding the pulleys and the tu37 should point upwards to avoid pressing against the coverings Alternatively they may point downwards but then nutcaps must be used to protect...

Page 116: ...e over the other cable If the sleeving on the cables is not in the correct location it may be slid along the cable by heating it first with a heatgun If this does not work protect the tube where the c...

Page 117: ...117 Figure 141 front and rear of tensioning tube File edge of this saddle washer 2 3mm to clear U bracket on fuselage...

Page 118: ...118 Figure 142 tensioning tube fittings front in left photo note bolt through compression tube rear in right photo...

Page 119: ...le c Lightly bolt into position the upper and lower angles Use the 6mm bolt with 45mm shank length The long brace goes underneath with horizontal edge facing the inboard end of the aileron placing the...

Page 120: ...the opposite aileron against the upper surface as a guide to melt the upper slot This slot should be 50mm long measured from the centre of the leading edge spar Figure 145 slot for the aileron horn in...

Page 121: ...shers between the strut ends and the main beam shown in Figure 146 are not required Figure 146 lift strut attachments d With two people attach the wing to the fuselage One person should hold the tip u...

Page 122: ...g on all the hinges even if no friction is present at this stage as when the coverings are fitted they tend to build some stress into the wing and cause the ailerons to bind slightly which spoils the...

Page 123: ...tering the wing If these are fitted then the cables attach to the driving horn using the shackles as supplied and as shown in drawing figure 147 above and the following down to j can be disregarded If...

Page 124: ...a shackle pin and a nappy pin or split ring h Attach the stainless steel plates on the port aileron cable to the port side of the aileron horn using a shackle pin and nappy pin or split ring i Attach...

Page 125: ...e plate for bends and check for the proper washers between the pulley and the plate o Tension the cables by hand to check that all the cable lengths are accurate p Check the angle of the lower pulley...

Page 126: ...n down and vice versa t Check for any stiffness and binding u Small pieces of prop tape can be applied to tubes where the cables may occasionally touch them but the cables should not be rubbing contin...

Page 127: ...he slightly longer flap pushrod and the longer spacer tube goes on the starboard side of the rear end of the flap handle e Attach the push rods from the flap handle to the plates on the flap roots The...

Page 128: ...128 Figure 153 flap handle looking rearwards and flap rods note Nynja flap rods have slight bend in upper ends not shown in this drawing...

Page 129: ...Remove the lift struts from the wings followed by the fuselage then remove the wings from the fuselage and lay them down flat in a very clean place Do not place the wings on concrete as it will scuff...

Page 130: ...coverings to keep your hands and any tools etc you may handle clean at all times i Remove the turnbuckle from the drag cable Make sure that the cable with the turnbuckle is over the top of the fixed c...

Page 131: ...s well as the strut attachments exit through their respective holes in the fabric p Stand the wing up with the trailing edge on the clean surface and the leading edge up q Attach a small rope through...

Page 132: ...ce It may be necessary to apply a sharp tap or to use a blunt screwdriver to push the cam straight There is no need to bolt the cam in place Ensure that the two large holes on the compression tube are...

Page 133: ...ly they are there not through the holes further forwards Push the battens in as far as they will go and slip them into the wing root side of the pocket so that they are held securely in place Figure 1...

Page 134: ...ed rod To turn a threaded rod put two nuts on the end and tighten against each other Turn the rod with a spanner on the outermost nut whilst holding the nut behind the tensioning tube with another spa...

Page 135: ...tight in the same manner as before Look for the wrinkles just near the leading edge root section of the wing Tension the fabric with the rope until you see these wrinkles pull out This will require a...

Page 136: ...use two hands Use one smooth motion to insert the batten all the way into the wing Stopping in the middle can cause the batten pocket to rip when you try to continue Wear a glove on your pushing hand...

Page 137: ...Next do the same with the lower surface battens d After the fabric has settled for a few weeks any remaining minor wrinkles can be taken out using a heat gun to shrink the fabric Great care must be t...

Page 138: ...ld then be used a Attach the bottom of the cabin uprights tu34 to the outer edges of the rudder pedal mounting bar as shown above Note that the bolt fixing the lower bracket to the upright tube tu34 h...

Page 139: ...p tubes match the curve of the large innermost wing battens to get a good fit between the Lexan windscreen and the wing Use a long straight edge for this It may be necessary to tweak the stainless ste...

Page 140: ...and fitted to verify the position of the TU34 s as shown above If for pressing logistic reasons the wings can t be constructed and fitted at this time it is possible to check fit using the measurement...

Page 141: ...tu34 tubes relative to the centre of the aircraft to verify they are still at 900mm g Mark the positions for the heat shrink rings to centre them on the tu34 tubes h Remove the wings and heat shrink t...

Page 142: ...142 system using aluminium tube and brackets The aim is to securely locate the tubes Figure 170 measuring and holding the frame in position...

Page 143: ...ure 171 dual throttle parts Note Nynja has slightly different plates than those shown as SKR 736 in drawing see photos above Note Assembly on pivot has a nylon washer either side of the mounting plate...

Page 144: ...the plates Check correct position of cabin upright spacing Torque tube is supplied over long so offer it up mark and cut to length c Rivet the port lever pivot into the torque tube using eight 3 2 x...

Page 145: ...an arm that will be hidden in the instrument console Figure 174 throttle cable arm h This arm has a threaded insert in its base The throttle torque tube must be drilled to fix this arm Mark the positi...

Page 146: ...n to the cabin uprights tu34 using 4mm steel rivets m Adjust the throttle friction by tightening the lock nuts on the port side torque tube spindle The starboard side should be done up just enough to...

Page 147: ...the underneath rear edge where it joins the rear fuselage shells and the cabin uprights see figures below Figure 176 rear edge Figure 177 forward positioning c Note in figure 177 above the joggled edg...

Page 148: ...by a steel penny washer before the nut on each of the forward fixing points g Drill and fix the rear under floor edge with Clecos Skinpins starting from the middle and with spacing around 80mm h Offe...

Page 149: ...before final riveting Fig 181 final fixing j Fix the front to the door pillar tubes TU34 using three 4mm aluminium rivets each side Countersink the rivets using a 10mm drill bit to countersink the gla...

Page 150: ...npins for initially fitting b Firewall should fit in position as shown below Firewall should sit behind the reference bolt shown and top edge should be 95mm above its centre Attach the small rubber ed...

Page 151: ...by the arrow Firewall top edge should be positioned 35mm below this mark as shown Figure 185 position of firewall relative to scuttle moulding e Fix the firewall edges to the scuttle using 3mm counte...

Page 152: ...ill be fitted when the exact position of the cowling screws are determined to ensure even spacing g Dont trim or fix the scuttle to the door pillars just yet as some final adjustment will be required...

Page 153: ...the position where the cowling changes angle as shown below and 10mm up from the upper cowling edge Cleco Skinpin together then mark the other holes starting with the rear one which should be 50mm for...

Page 154: ...outside 30mm from the angle chage as shown below The others shoudl be evenly spaced from the centre approx 140 150mm apart The lower cowling has three fixings each side Start with the upper one 25mm b...

Page 155: ...required during the next steps d Cowlings need to be aligned with the spinner note that cowlings are made for spinners of around 20 23cm diameter alignment with larger or smaller ones may not be poss...

Page 156: ...ification that all alignment is good When completely happy drill through the scuttle to fix it to the door pillar tubes Use a 4mm drill and fix with Clecos Skinpins as you go Check alignment hasnt shi...

Page 157: ...er sides of the scuttle to the floor Use 4mm white rivets Some trimming will be required to get a nice smooth fit Figure 195 fixing lower edges of Scuttle moulding i Remove cowlings at this stage and...

Page 158: ...nto the muffler and secure with springs A touch of Copaslip high temperature grease should be applied to the ball joint ends of the exhaust pipes Use string to pull the springs on not pliers which can...

Page 159: ...d pipes will not seal properly This will result in an exhaust blow or tick When happy with the fit tighten the mounting bolts and the clamping bolt Do a final check with a good firm wiggle you should...

Page 160: ...mounting b The oil cooler piggybacks behind the water radiator and attaches to it with three brackets The water radiator itself fixes to the cowling with 4 brackets attached to the 4 mounting lugs on...

Page 161: ...on the lower brackets in turn fixed to the water radiator now offer up the upper bracket Check the upper spacing remains at 2 3mm from water radiator matrix bend bottom brackets to achieve this if re...

Page 162: ...ng now and Install the hose from the sump connection beneath the engine passing beneath the lower cylinder head water pipes but above the exhaust pipes to connect with the inlet on the oil tank the an...

Page 163: ...ngine Figure 207 Hose routings from oil cooler outlets Figure 208 Routing of oil hose from Sump connection to inlet of oil tank It should be cabletied up to the small water pipes under the engine in t...

Page 164: ...hoses between the expansion tank and the elbows on the port side cylinder heads d Remove the elbows from the port side cylinder heads and swap them over between the front and rear cylinder heads This...

Page 165: ...l piece of rubber hosing to prevent wear h When satisfied with the positioning refit the manifold using a torque setting of 10Nm 1kgm 7ftlb on the 6mm diameter bolts i The intake manifold balancing tu...

Page 166: ...square of self adhesive hook and loop Velcro between overflow bottle and firewall This will ensure no fretting An optional different style of overflow bottle may be supplied with integral bracket Not...

Page 167: ...a Fit fuel lines from carburettors and a T piece in the pipe as shown in Fig 216 Remember to slip the appropriate pipe clips over the pipes The fuel pipe joining the two carburettors can be convenien...

Page 168: ...nding on fuel line wall thickness should be used The fuel supply pipe and the fuel return pipe both pass behind the gearbox and back over middle of the engine and under the centre piece of the engine...

Page 169: ...rear corner The left tank has one right angle push in fitting on the top and one underneath Push the rubber part in first and then insert the metal part Use some lubrication light oil a touch of greas...

Page 170: ...nks onto the cross bar in the rear fuselage with the filler caps forwards You may find it easier to fit the pipework to the tank fittings with the fuel tanks sitting loosely in place before strapping...

Page 171: ...uel drain tap is fitted through the fuselage fairing just behind the port undercarriage leg Fit from below with a nylon washer either side of the fairing Fitting the fuel pipe pushed down firmly clamp...

Page 172: ...attached to its fitting in the top of the starboard tank e Both breather fittings should have individual lengths of tubing attached routing forwards then downwards passing through the fuselage floor...

Page 173: ...t alignment is found c The fitting can now be secured to the fuselage by drilling and using 4mm nuts and bolts d The flexible hose can now be cut to size and fitted secured with two jubilee clips e Fi...

Page 174: ...and dashboard supports shown below Figure 217 dashboard supports and instrument panel framing angles b Start with fixing the angle part 443 to the firewall as shown in Fig 218 below Use 2x 4mm alumin...

Page 175: ...below Fix it at the front using the 4mm bolt and nut through 411 and 443 and again with a 4mm nut and bolt mid point of 411 Figure 219 triangular dash top panel e Fit the angles to the instrument pan...

Page 176: ...rallel the edges of the Triangular dash top as shown below Overlap by around 25mm It will also need cutting to allow for the dual throttle torque tube When happy with the fit mark up and drill the sec...

Page 177: ...clear of it and the choke cable pair passes outside and clear of it Don t forget to drill the holes in the firewall for the cables before riveting the plate Figure 222 Cable guide viewed from engine...

Page 178: ...outers to the carburettors d The throttle arm incorpoartes a spring to help balance the pull of the springs on the carburettor It fits as shown in Fig 225 below Figures 225 throttle balance spring Ho...

Page 179: ...226 choke cable route to starboard carburettor in white Figure 227 route of choke cable to port carburettor in white f The choke inner cable is a simple loop of cable covered with plastic tube where...

Page 180: ...the centre pushed out makes a neat cable guide for the choke cables passing through the instrument panel Secure the rivets with a small piece of tubing pushed over the rear of them or with a touch of...

Page 181: ...ine bottle neck is also a good way to finally ease the holes to size remember to leave plenty of time between consuming the contents and performing such delicate operations 15 1 Pitot Static System Th...

Page 182: ...182 16 Electrical System Figure 230 overall wiring schematic Rotax 912 and standard analogue instruments ensure all colours are visible when printed out...

Page 183: ...183 Figure 231 heavy duty power wiring schematic Rotax 912...

Page 184: ...184 Figure 232 low current wiring schematic Rotax 912...

Page 185: ...185 Figure 233 instrument wiring schematic Rotax 912...

Page 186: ...plins electrical and car accessory shops etc Secure the wiring with cable ties P clips or similar ensuring that it remains clear of all moving and vibrating parts and is protected from chafing against...

Page 187: ...as the magnetos are grounded to prevent operation On the 912 the master switch is a double pole single throw DPST type to allow it to turn off the power from both the battery and the regulator as the...

Page 188: ...ight k Additional systems such as GPS radio etc should be individually protected by fuses of the appropriate size 16 3 Battery a All high current cables should be kept as short as possible b The batte...

Page 189: ...late g Ensure that the regulator is properly earthed If fitting regulator and solenoid to the firewall beware that the aluminium firewall is not a good earth it may work initially but could break down...

Page 190: ...protective covering film this will help later to ensure everything is straight and centred A good tool for cutting lexan is straight tin snips as shown in the picture below Edges cut with tin snips sh...

Page 191: ...for the rear mounting bolts Check that the lexan as fitted is centred and not on at an angle Adjust the holes if required e The lexan is normally a little oversized in width Mark the sides remove and...

Page 192: ...osition carefully mark a cut line aiming for a neat overlap of 25mm Take care that the tubes tu34 supporting the windscreen do not get knocked out of position check them regularly and check that the s...

Page 193: ...ly fix the dome nuts use a drop of superglue inside as threadlock don t do this until you are ready for a final fixing it may be rather permanent we have managed to unscrew them but they might need cu...

Page 194: ...cowling piece the lexan and through the batten Fig 242 screen centre batten n With the left over Lexan cut a triangular piece to fit in the corners of the windscreen and tube tu34 Secure in place with...

Page 195: ...ip of aluminium We also used an H section moulding model shop item painted black to join left and right halves Fig 244 windscreen rear edge rear window interface UK demonstrator 2 Now used on the manu...

Page 196: ...fixing the windows will need carefully cutting and dressing to fit Clecos skinpins very useful during the fitting fixing process d On the side the windows will need carefully marking and cutting to fi...

Page 197: ...o the cabin rear upright TU 6 Trim the edge of the lexan to be flush with forward edge of tube Use the trim beading over the exposed edge The rivet line should be covered with a strip of 3mm self adhe...

Page 198: ...t closures and gaps seals extending to the wing undersurface However they weight around a total 1kg installed 500g each In the UK demonstrator to save weight we did not use these We extended the angle...

Page 199: ...upper surface to cut marks to fit as shown in fig 249 above It sits against the TU34 upper tube and rivets to it with 4mm aluminium rivets Before final trimming and riveting Fit the wings and position...

Page 200: ...200 Nynja Build manual 1 0 18 2 One Piece Door Figure 250 one piece door frame...

Page 201: ...ill the centre of the angle in these positions 4mm diameter in TU34 and 5mm in TU6 c Offer it up again mark and drill the TU34 and TU6 to match and temporarily fix into position d When using the one p...

Page 202: ...ames and cut just below the hinge line Drill the hinge and door tubes with 4mm holes and secure with cleco s skinpin s h Fit the central curved tube The curve should go towards the rear of the door li...

Page 203: ...h point to clear the rivet heads It is advisable to fix with cleco s skin pin s first before rivetting Work from the upper front corner and rivet the front edge first Follow this by riveting the lower...

Page 204: ...can be filed a little to achieve a slight indent to prevent the lever from inadvertently rotating to the open position or an aluminium piece can be riveted on to protect the fibreglass from wear c Pos...

Page 205: ...surface with two screws cut these to length with spreader plates made from two rectangles of scrap Lexan 30mm X 150 15mm radius at each end either side of the wing fabric This job will require two pe...

Page 206: ...er that the doors open outwards and forwards so the hinge bulge needs to be on the outside Hinge should be fitted so top edge is 25mm below the top edge of the glassfibre cowling This should then matc...

Page 207: ...en fit inside the opening spaced 10 15mm make up some spacers this size and tape them around strategically around the opening so you can rest the tube in position and achieve this Figure 259 tube spac...

Page 208: ...o cut the tube to fit Figure 262 rear gusset plate and rear end of lower door g Drill the front end of the tube and hinge and secure with a cleco skinpin Make sure the tube is in exactly the correct p...

Page 209: ...ome adjustment by carefully bending the tubes may be required Leave the clecos in position holding the tubes to the hinge for now They are not riveted to the hinge until the lexan is fitted 18 3 2 Upp...

Page 210: ...inside Lower pictures show front of port door outside and inside Angle is white plastic in pictures kit supply is 20x20 aluminium angle e Fix the hinges to the angle Use 4mm aluminium rivets f Drill...

Page 211: ...y with the fit and with the frame taped into position Drill through the hinge and the tube ends and fix with clecos h Cut a top rail tube to fit inside the tubes and fix into position Use 2 x 3mm coun...

Page 212: ...can be trimmed later c Before riveting mark the position of the holes to be drilled on the doorframe Use a nominal rivet spacing of 60mm adjusted where required to provide an even spacing on each sid...

Page 213: ...f Refit the lower door Using a chart pen or similar accurately mark the lexan for trimming It should fit evenly just inside the joggle on the glassfibre door sill and overlap the rear window by 25mm a...

Page 214: ...through the hole in the doorframe c On the inside fit a thin plastic washer followed by the plain nut hooped shape handle and Nyloc nut d Tighten the nuts against one another to lock the parts into p...

Page 215: ...two 4mm steel rivets and snug down firmly so that it fits tightly with no movement Determine the best position for the latch ensuring maximum engagement when closed Mark the position and drill and ri...

Page 216: ...en keeper i Now check final fit of the lower door when closed and latched then fit the front gusset plates We didnt fit these parts earlier becuase it is difficult to gurantee a nice fit between the l...

Page 217: ...1 Trimmer cable a Pass the trimmer cable outer through the hole in the fairing at the starboard tailplane forward attachment and feed down the fuselage Figure 275 trim tab cable b Fit the trim tab cab...

Page 218: ...t the heat away from them and check they don t get hot Figure 277 aft end of trimmer cable e Melt a hole in the upper surface of the elevator fabric for the inner cable 230mm forwards of the trailing...

Page 219: ...surface g Thread the inner trim cable through the holes in the fabric and into the outer cable and push it steadily all the way through h Attach the loop at the end of the trimmer cable to the trim t...

Page 220: ...her c Adjust the trim lever friction with the first nut and lock it with the second nut Movement should be smooth but tight enough to prevent the lever slipping due to the trim tab loads This can be c...

Page 221: ...282 spring fitting and control stop f Attach the inner cable to the lever The cable wraps around the top hat bush and is secured using two solderless nipples The holes in these need to be drilled out...

Page 222: ...uld be level with the lower surface of the elevator Coarse adjustment can be made by feeding the inner cable though the solderless nipples and fine adjustment by winding the adjuster on the forward ou...

Page 223: ...the way for initial console fitting b If using the centre stick cut an opening in the centre console around the stick position as shown in Figure 285 below Figure 285 stick opening c Put it loosely in...

Page 224: ...e fairing are where to trim for the dual stick option Figure 286 console trimming It will also need trimming around the front upper corners as shown below Figure 287 front corner trimming e Use thin A...

Page 225: ...full and free movement of the stick and open up the hole as required for clearance Note that the rear edge should be cut up the side of the recess Drill and fix the top hat bushes that form the retain...

Page 226: ...below Edge the hole with the rubber beading strip applied with a dabs of superglue When console is finally fixed the top of the trim lever can be fitted with a knob made from a skiffy cap fitted each...

Page 227: ...oles in the front of the side tubes to set the seat position Figure 301 seat base b Rest the glassfibre part of the seats on the base and drill and fix them Front is fixed passing the SKR 0 27eyebolt...

Page 228: ...crossmember may be fitted as shown below Figure 304 optional second cross member e Attach the two strips of Velcro to match the Velcro in the inside of the seat covers and then put on the seat covers...

Page 229: ...t the front of the seat or can be fitted under the TU15 if a lower position is desired At the rear the inboard rest peg on the TU27has two positions The oter rest is an L bracket It attaches directly...

Page 230: ...lts should be looped around the main undercarriage cross beam Take a double wrap around the beam to prevent the strap slipping under side loads Figure 309 lap strap looped around undercarriage beam c...

Page 231: ...trument panel link drilling and finishing with a flap wheel Cutting a little oversize and finishing the hole with rubber edging super glued into place gives a good effect Spat should be positioned wit...

Page 232: ...raft down whilst you slide the nose leg out The spat was not fitted earlier to protect it from all the parts which you dropped whilst fitting the engine d Drill the spat and the nose leg for a 4mm dia...

Page 233: ...he ends Position them to be flush with the end of the tube Drill through the lower surface of the tube only and attach with the M5x20 bolt supplied d Refit the retaining tubes Figure 313 and 314 spat...

Page 234: ...fairing at the rear where it slips over the fin leading edge tube This will help ensure a smooth non abrasive surface where the two meet Additionally apply some clear protective tape over the fin in t...

Page 235: ...th two rivets on the fin leading edge centreline one 20mm from the lower edge of the fairing and the other 140mm Make the holes in the glassfibre slightly oversize to avoid splitting the gel seam when...

Page 236: ...fficient Make sure the outermost on the top is not drilled too close to the wing root batten where the nut might foul it For best effect against the tinted screen viewed from the inside we painted the...

Page 237: ...plastic panhead screw at the front and taped on their edges to hold at rear In position they hide the tailplane front mounting bolt It is a good idea to cut a hole on the underside of the fairing so t...

Page 238: ...ip fairings a These attach with 5 rivets on the top and 5 below Use the white 4mm aluminium rivets These should fix the wingtip fairing to the TU37a tip tube Take care not to drill through the U brack...

Page 239: ...rill the wingtip fairing 35mm from its edge After verifying where to drill drill the wingtip fairing first Then offer it up and drill through the holes into the tip tube Figure 325 marking drilling an...

Page 240: ...aintain the wings profile at speed Figure 326 wing profile support blocks a Cut the 10mm wide foam strip supplied into 155mm lengths Cut 2 for the very end battens 110mm b Using some 80 grit sandpaper...

Page 241: ...blocks into position The best technique appears to be to slot against the upper batten first and push upwards then push the lower surface batten down with a free thumb or second hand if you can squeez...

Page 242: ...the outlet at the rear of the exhaust heater jacket The higher pressure air in the engine compartment provides impetus for heater airflow Figure 328 Heater control valve a Cut a 50 52mm hole in the fi...

Page 243: ...the exhaust heater jacket outlet Just slide it into position no hose clips are necessary d Fix the heater control cable into the instrument panel and connect it up to the valve There is no hard and fa...

Page 244: ...remains slack whilst the other is tight it may be that the covering is not properly seated on the leading edge requiring removal of the wing covering and refitting as per the instructions 26 2 Aerofo...

Page 245: ...luminium spacer over the bolt Washers should be used both under the head of the bolt and under the nut Figure 328 Aerofoil jury strut overview Fig 329 Rear and front lower fittings Note orientation lo...

Page 246: ...l electrical connections are properly made with no risk of short circuiting d Check that all fuel oil and water pipe clips and other connections are properly tightened and sealed 26 4 Baggage Bag a Re...

Page 247: ...ect the lower straps to the rear securing straps using the click in buckle Note that the lower fixing do not go around the rear cabin uprights TU6 The baggage bag should be free to move upwards and ba...

Page 248: ...erential built into the system If necessary restrict the movement by increasing the diameter of the stops at the torque tube horn using tape around the tube to pad out the stops f Check the tension in...

Page 249: ...operation of the elevator The elevator should be horizontal with the lower half of the stick at 90 to the central cabin tubes not vertical Elevator movement should be 25 each way If necessary file th...

Page 250: ...prop is set on its recommended starting pitch then the RPM guage may not be indicating accurately and may need calibrating with an optical tachometer your inspector or local engine service facility sh...

Page 251: ...outers at the carburettor Carburettors should also be balanced at this time specialist engine balance tools exist for this you can buy them yourself a good investment if you intend to maintain the eng...

Page 252: ...ow rates than this minimum are normally found An alternative method is to arrange a separate fuel tank to supply the engine by gravity feed whilst measuring the amount of fuel the pump supplies into a...

Page 253: ...Ensure that all paperwork is complete In particular the AW029 needs to be signed by the BMAA Chief Technical Officer and then finally by your inspector Check that the airfield you intend to fly from...

Page 254: ...end the extra one lying at the bottom of your pile of leftover parts Lockwire lockwire pliers and side cutter pliers General tools Screwdrivers spanners etc Propeller pitch setting tool Fuel in cans...

Page 255: ...255 Nynja Build manual 1 0 27 Additional Information 27 1 Example BMAA Homebuilt Registration Form...

Page 256: ...256 Nynja Build manual 1 0...

Page 257: ...257 Nynja Build manual 1 0 27 2 Wire locking...

Page 258: ...258 Nynja Build manual 1 0...

Page 259: ...259 Nynja Build manual 1 0...

Page 260: ...260 Nynja Build manual 1 0...

Page 261: ...itor 187 carpet 47 central brace 52 central cabin tubes tu19 39 compression tubes tu38 132 control stick 49 Copaslip 158 covering 129 door catch 204 214 door frame 201 earth bolt 187 earth cable 189 e...

Page 262: ...der horn 87 rudder pedals 48 76 rudder pedals position 95 rudder post 54 rudder stops 51 96 seat front support tube tu15 46 seatbelts 230 seats 227 self adhesive foam strip 190 Skyranger Hotline 11 so...

Page 263: ...dercarriage 67 UP for ON 187 upper cabin triangle tubes tu10 31 upper rear cabin cross piece tu7 30 31 varnish 47 vertical fin 80 water overflow tank 166 water pipe 164 water pump inlet 105 wheels 67...

Page 264: ...accept flap detent lever Page 154 change to figure 190 caption Page 161 162 change to oil cooler fitting measurements and instructions to correct clearance issues Page 175 change to jubilee clip secu...

Page 265: ...265 Nynja Build manual 1 0...

Reviews: