background image


www.exacq.com


+1.317.845.5710 
+5255.56080817 
+44.1438.310163 
 

USA (Corporate Headquarters) 
Mexico 
Europe/Middle East/Asia 


25 


NOTE:

 The following settings on the Camera Settings page are not available on RTSP interfaces, and they vary on 

ONVIF and certain proprietary interfaces. 


7.


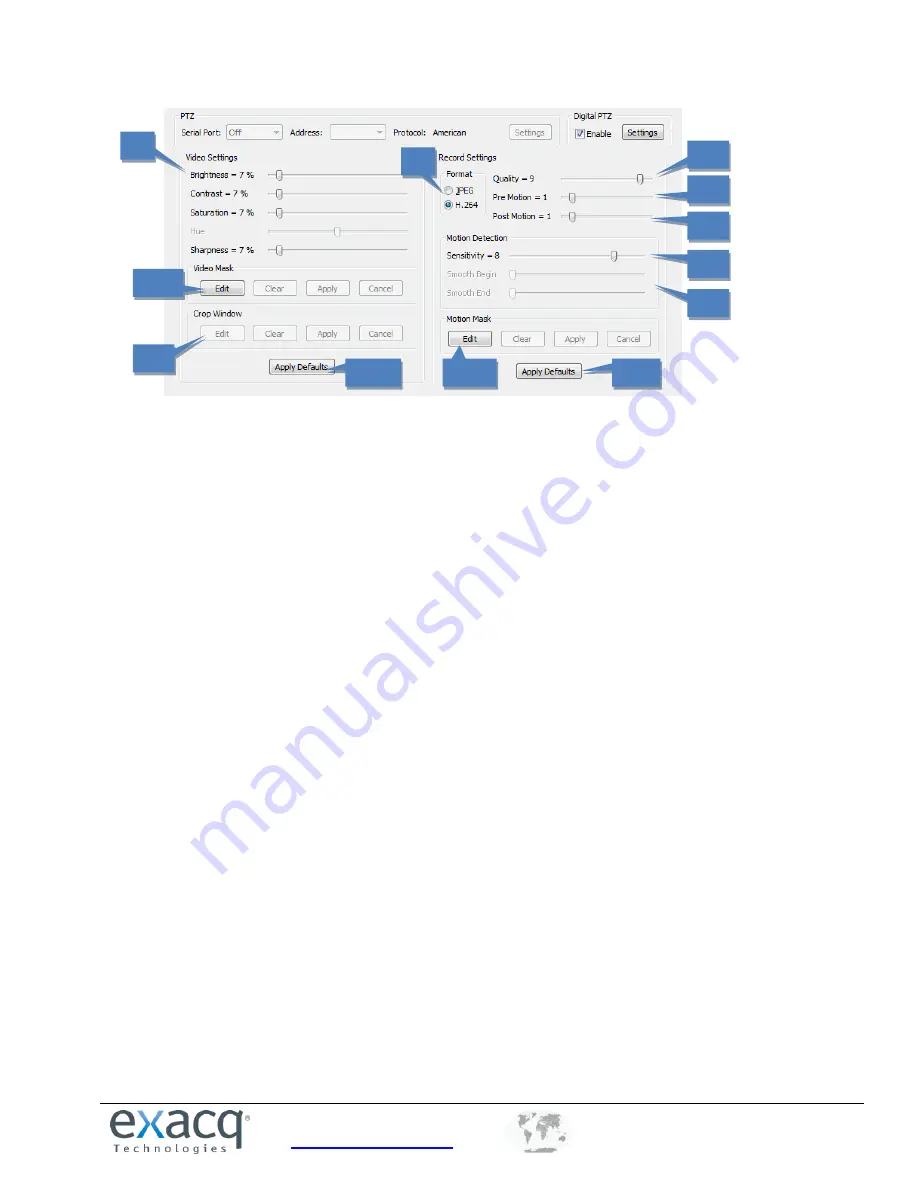
The Video Settings sliders allow you to adjust the image as it is displayed on your screen. 

8.


The Format section allows you to select the compression format. 

9.


The Quality slider allows you to modify the image quality by increasing or decreasing its size. Decreasing 
image quality saves disk space by reducing the size of the video that’s being recorded. 

10.


The Pre Motion slider adjusts the number of seconds of video that are saved before the motion event 
occurs. For example, suppose Pre Motion is set to 5; when you play back motion video from that camera, 
you will see five seconds of video that was recorded before the motion event occurred, followed by the 
motion event itself. 

11.


Post Motion is the same as Pre Motion, except that the slider adjusts the number of seconds of video that 
are saved after the motion event has completed. 

12.


The Sensitivity slider allows you to configure how much motion must occur in the camera’s view to trigger 
motion recording (if enabled on the Schedule page). A low sensitivity setting can reduce false motion 
created by video noise or shadows. If the page includes a Motion Window section (available with certain 
IP cameras), you can also change a percentage slider, which determines how much of the camera view 
must change to trigger motion recording. 

NOTE:

 See the following section, “Motion Masks, Video Masks, and Motion Windows,” for more details. 


13.


Smooth Begin and Smooth End prevent the undesired recording of certain motion events. Smooth Begin 
requires a minimum amount of time for motion to occur before motion recording begins; this prevents 
things such as a blinking light of a laser bar code scanner in a dark room, or cars passing on a road in the 
distance, from triggering motion recording. Smooth End determines how much video the system 
continues recording after the motion is no longer detected; this prevents the recording of choppy 
segments of frequent motion video. 


NOTE:

 Smooth Begin and Smooth End are available only on analog cameras. 


14.


Crop Window, available on certain IP cameras, allows you to crop unimportant portions of a camera 
image in order to save disk space. Click Edit and then use the mouse cursor to draw a box on the video 
window. This box will be the portion of the camera’s view that will be recorded and displayed (the rest of 
the view will be ignored). Click Apply to activate the crop; click Edit, Clear, and Apply to deactivate the 
crop. 

15.


The Defaults buttons restore factory settings to their respective sections. One Defaults button restores 
the Video Settings, and the other Defaults button restores the Record Settings. 

16.


See the following section, “Motion Masks, Video Masks, and Motion Windows” for more information 
about those portions of the Camera Settings page. 

7


8


10


9


11


12


16b


13


15a


15b


16a


14


Summary of Contents for exacqVision Start

Page 1: ...mes or their products Exacq Technologies Inc disclaims any proprietary interest in trademarks and trade names other than its own Exacq Technologies makes no warranty of any kind with regard to this ma...

Page 2: ...www exacq com 1 317 845 5710 5255 56080817 44 1438 310163 USA Corporate Headquarters Mexico Europe Middle East Asia 2...

Page 3: ...w 10 Client Server Architecture 10 Logging In 11 Updating exacqVision Client Software 12 Main Pages 13 exacqVision Help 13 4 Config Setup Page Overview 14 Add Systems 15 System 16 Add IP Cameras 21 IP...

Page 4: ...0 Camera Views 72 6 Search Page Overview 74 Searching for Video and Other Data 76 Video Playback 78 Searching Views 80 Search Serial 81 Exporting Files 82 A Technical Support 86 B Regulatory Notice 87...

Page 5: ...http www exacq com support specsheets html Config Setup Page see Chapter 4 System Set exacqVision server for static IP address Configure the system name time and time zone Storage Ensure all disks ar...

Page 6: ...on is recorded by default Change any cameras to continuously record or stop recording as needed Audio is not recorded by default Schedule audio recording if necessary Users Add user accounts for the p...

Page 7: ...at it can connect to the exacqVision Server using the static IP address and one of the configured user accounts Search Page see Chapter 6 Search Connect after 24 hours Connect after 7 days Search to e...

Page 8: ...rored operating system drive Servers should always be UPS powered to avoid data corruption during power failure Operating System Requirements See the Exacq website for minimum operating system require...

Page 9: ...username and password on all cameras by following the manufacturer s instructions or the exacqVision IP Camera Quickstart Guide found at https www exacq com downloads ev ip quickstart 0311 pdf 5 Test...

Page 10: ...to client computers over the TCP IP network An exacqVision server receives and stores video from cameras provides audio video and data as requested by thick clients and hosts a web server if enabled f...

Page 11: ...ecording or communication with client PCs All third party servers start the exacqVision service on startup but user accounts and automatic login must be manually configured The user account functional...

Page 12: ...To check for software updates click Connect to the Internet and Check for Updates If you have already installed the most recent version of the software a message is displayed click OK to return to th...

Page 13: ...ows users the ability to search for recorded video Config Setup Page allows Administrators and Power Users the ability to configure systems Clicking on any of these icons changes the mode of operation...

Page 14: ...Configuration Tree This tree allows you to open the various configuration pages for each connected system Each of the pages are described in detail in the following sections 3 Systems This default Co...

Page 15: ...cted 8 To disconnect or reconnect a system select its box in the System List 9 To find a system and its address on your network enter the IP address range in the Find Systems area The first three boxe...

Page 16: ...r is used to generate a license key To obtain a license key online provide the system MAC address to your dealer Unlicensed exacqVision servers can connect to only one IP device at a time 2 After the...

Page 17: ...mation for the server s location 2 On systems with Internet access select Enable Time Server and enter a valid Internet time server On systems without Internet access select Enable Time Server and ent...

Page 18: ...tem 1 Select a network connection from the Network Interface Settings drop down list to display its information Systems with multiple NICs have more than one entry in the list 2 Enter the IP Configura...

Page 19: ...installed watchdogs if available The watchdogs can restart systems or capture cards if they lock up The information on the tab is not configurable The Hardware Monitoring tab available only on certai...

Page 20: ...ion field which contains a network share location accessible by the client and server Copy the update list and all server software updates to the location specified Please note the following additiona...

Page 21: ...you are installing right click the camera in the IP Camera List or Find IP Cameras list to access the camera s website and view a video image 2 Select a camera in the Find IP Cameras list to add it t...

Page 22: ...ther camera entries are hidden To display the rest of the cameras that match the Filter criteria delete the text in the Search field 4 The Enable column contains check boxes that allow you to enable o...

Page 23: ...match the Filter criteria delete the text in the Search field 4 The Enable column contains check boxes that allow you to enable or disable recording from that camera By default the check box is selec...

Page 24: ...guration tree to select the camera that you want to configure 2 A live view of the selected camera is displayed 3 Basic information about the camera is listed 4 The Camera Name field allows you to cha...

Page 25: ...in IP cameras you can also change a percentage slider which determines how much of the camera view must change to trigger motion recording NOTE See the following section Motion Masks Video Masks and M...

Page 26: ...beside the IP Address field it could be for one of two reasons A You are not logged in to the operating system with administrative privileges You must log in to operating system account with administ...

Page 27: ...ed at a room that has a moving ceiling fan in the field of view you can avoid continuous motion recording by masking out the fan while still recording motion that occurs in the rest of the camera s fi...

Page 28: ...for example To create a video mask complete the following steps 1 On the Camera Settings page click Edit in the Video Mask section This displays a yellow grid over the live video from the camera 2 Dr...

Page 29: ...when the transaction has ended For example you could enter the last line shown on a receipt This entry is case sensitive 6 The Font button allows you to select the font you want to be displayed on th...

Page 30: ...both cases as selected The String Replacements tab allows you to modify serial data to a human readable format In the String column enter information as it appears in the serial data in the Replace co...

Page 31: ...t serial port listed is the built in RS 485 port 2 Enter a unique name in the Name field 3 The Status column displays the current status of the serial port 4 The Port is automatically selected by the...

Page 32: ...er the IP address of the source device 7 Enter the TCP port of the source device as defined by the device manufacturer s documentation 8 Enter the maximum number of characters per line sent by the sou...

Page 33: ...ich is described on the following page 4 To enable digital PTZ functions on the Live and Search pages select the Digital checkbox This is available even if the camera is not mechanically capable of PT...

Page 34: ...ect a preset from the Presets list and click Add to show it in the Preset Tour list Repeat for each remaining preset that you want to include in the tour You can re order the presets in the Preset Tou...

Page 35: ...1 Use the Pan Tilt buttons to point the camera at the desired preset location If the camera moves too quickly or too slowly move the Speed slider left slower or right faster 2 Adjust the Zoom setting...

Page 36: ...n some jurisdictions You may want to seek legal guidance prior to recording any audio inputs 1 Enter a name for the audio input channel 2 Select Enabled to enable audio recording on the input 3 Repeat...

Page 37: ...cameras with alarm inputs These triggers can be configured to trigger video recording or a relay using the Event Linking page 1 Enter a name for each trigger input in the Trigger Name column 2 Configu...

Page 38: ...systems and certain IP cameras 1 Enter a name for each alarm output in the Alarm Name column 2 Configure the alarm output s Normal State as Hi 5VDC or Lo 0VDC 3 The Status column indicates whether th...

Page 39: ...og video cameras in various display modes 1 Select the cameras that you want to include in the tour from the Camera in Tour check box This displays video from the camera in the video window 2 Select a...

Page 40: ...ves for video storage and monitor the health of drives and RAID arrays Up to three tabs are available on the Storage page The Drive tab displays all the installed drives their capacity available stora...

Page 41: ...that can be used for data storage adjust the Video Space slider for each storage drive NOTE Performance can decrease if you set the Video Space slider greater than 85 5 Used Space displays how much o...

Page 42: ...ration Configuration area For example if you configure a camera s video to be stored for at least 30 days the Days of Recorded Video indicator should be at least 30 assuming the system has been record...

Page 43: ...for informational purposes only details about SMART attributes are available at http en wikipedia org wiki S M A R T 4 The Thresholds section allows you to modify the temperature thresholds for a hard...

Page 44: ...2 occurs on an associated Event Source 3 Action Type 4 is triggered on an Action Target 5 These events are then stored in a database if Log is selected in the Event List to provide easy search capabi...

Page 45: ...rver The system defaults to a device and input number but these can be customized on the Trigger Input page See the Trigger Inputs section of this manual for details Serial Port Any of the serial port...

Page 46: ...to a CD DVR based on an Auto Export profile See the Auto Export section of this manual for details PTZ Preset The camera will be pointed in a specific direction See the Camera Settings section of this...

Page 47: ...tes or Hours from the drop down list Click Apply Time lapse recording is not associated with the schedule configured in the grid on the Schedule page There are two scheduling tabs Days and Sources On...

Page 48: ...o Europe Middle East Asia 48 On the Sources tab you can configure a separate recording schedule for each device Select the device from the tree and schedule it in the same way as described for the Day...

Page 49: ...Address field enter the path to the shared network folder Include the subdirectory in the shared folder used in the configuration of the archiving task 2 Enter a valid Username and Password required...

Page 50: ...ive until the start time on the next day User Defined Archiving will end at the specified end time Enter the time desired If the archive period is not long enough to archive all applicable data the re...

Page 51: ...6080817 44 1438 310163 USA Corporate Headquarters Mexico Europe Middle East Asia 51 The Status section of the Target tab displays information about the current archive task Click Details to view addit...

Page 52: ...a square note the details displayed in the Information section NOTE The Record Setting and the Archiving Setting do not have to be configured for the same type of data For example you could record Fr...

Page 53: ...e Middle East Asia 53 On the Sources tab you can configure a separate archiving schedule for each device Simply select a device from the tree and then configure archiving the same way as described for...

Page 54: ...ord Password and Confirm fields 3 Select a permission level from the User Group drop down list Restricted User can view live video and search recorded video Power User User has administrative permissi...

Page 55: ...umber and serial number information for a system right click the system name To view a MAC address and license key for a system and copy it to the clipboard right click its information in the License...

Page 56: ...f the physical connection between the client computer and server is interrupted while you are connected to the server in exacqVision Client the Connection Status will be displayed as Network Activity...

Page 57: ...t the compression board installed in exacqVision hybrid video servers that manages the analog video cameras connected to the systems If a compression board is installed in the system the Device Inform...

Page 58: ...s captured in 16x9 all video windows are shown 16x9 Window uses the aspect ratio of the entire Live Page to determine the aspect ratio of the video windows 16x9 displays all video windows in 16x9 4x3...

Page 59: ...n video displayed in exacqVision Client Deblocking is available only on certain cameras It is recommended that you select By Device which enables deblocking on all cameras that stream deblocked video...

Page 60: ...he Views page allows you to do the following 1 Change the name or description 2 Search for cameras groups and maps and drag and drop them into the view 3 Select a video window configuration 4 View a l...

Page 61: ...ion for the tour 3 Select a view from the Available Views list 4 Click Add to include the view in the Views In Tour list Repeat for additional views 5 Drag and drop views to change their order in the...

Page 62: ...heir functions You can add or delete columns or rows merge or split panels and more You can also merge two windows by clicking a corner of a panel and dragging it 5 For each selected panel select the...

Page 63: ...ays the version numbers for each exacqVision system file This information can be useful when contacting technical support 3 To view the system log select the start and end date and select the type of...

Page 64: ...display cameras views and more on compatible systems 5 Messages Read system messages and information about operating the system Click to cycle information 6 Date and Time See the current date and time...

Page 65: ...sted in the site tree The system displays that camera in the upper left video and fills the rest of the windows in order below that camera in the list Drag and drop a camera from the site tree into a...

Page 66: ...gs page directly from Live Page by selecting Properties and then clicking the OK button NOTE To view the video window panel in the largest area possible press Alt and Enter simultaneously on the keybo...

Page 67: ...ar of the panel to move it anywhere on your screen 1 To move a camera to a preset click the preset name 2 To control pan and tilt click the arrow buttons Adjust the pan tilt Speed slider if necessary...

Page 68: ...www exacq com 1 317 845 5710 5255 56080817 44 1438 310163 USA Corporate Headquarters Mexico Europe Middle East Asia 68...

Page 69: ...click the video window and select Digital PTZ NOTE On supported fisheye enabled cameras Digital PTZ is replaced by a Fisheye menu that can be used to de warp video For directions on how to set up a P...

Page 70: ...r all cameras that are currently being viewed You can review the most recently recorded video in increments of 5 or 30 seconds or 1 5 or 15 minutes To do this complete the following steps 1 Right clic...

Page 71: ...use video play 7 This button allows you to play video forward in normal speed 8 This button allows you to play video forward in fast double speed 9 This button allows you to play video forward one fra...

Page 72: ...view to display video from the cameras saved in the view Notice how the camera names and systems included in the view are displayed when you hover over the view name in the site tree My Event Monitors...

Page 73: ...POS data into the video windows then click the Save View button at the top of the site tree This opens the Save View window Enter a name and description and click Save You can further configure a view...

Page 74: ...u to search for video from one camera by viewing thumbnail images captured at specified intervals in a time range 4 Export Buttons These buttons available only in Timeline Search Mode include Save Pic...

Page 75: ...nd time of the timeline click the green left or right arrow buttons 13 Stop Download Button Click this button to stop downloading video Note that the download status indicator disappears when you pres...

Page 76: ...ed in different time zones the Client Time and Server Time options are also available Search result listings are applicable to the selected time zone and the time offset between the time zones is show...

Page 77: ...earch to display thumbnails of images captured at constant intervals during the search period 5 The capture time of each thumbnail is represented on the timeline by vertical orange lines 6 To display...

Page 78: ...r shows how much of the total video has been downloaded The number of frames downloaded and the total number of frames are also displayed in the status bar 6 The area between the recorded video bars t...

Page 79: ...data from each device is displayed on separate tabs Unprintable characters are automatically deleted from the serial data display In some cases wind or some other invisible motion sets off the camera...

Page 80: ...as in a specific view Select Views from the Navigation Pane and then select the View you want to search by clicking the appropriate checkbox Select the date and time you would like to search by using...

Page 81: ...a Key Word tobacco 3 On the Event Linking page create an Event with a type of Serial Profile or Serial Port Select Register 1 tobacco as the source Record Video as the action and the camera pointed a...

Page 82: ...window select Export from the pop up menu and select Mark Export Start A green line on the timeline indicates the Export Start location 2 Locate the end of the video clip Right click the timeline or...

Page 83: ...Headquarters Mexico Europe Middle East Asia 83 NOTE See the chart on the following page for information about file compatibility on each operating system Also an exe file can be created using any oper...

Page 84: ...Quicktime MPEG4 with ASP with 3ivx MPEG4 decoder with 3ivx MPEG4 decoder Quicktime H 264 WMP Windows Media Player Download players at the following URLs Windows Media Player http www microsoft com wi...

Page 85: ...y clicking the Edit Disc Name button 2 The Disc Contents list displays all of the video clips in your directory Select the clips you want to burn 3 To review a video clip select the file and click Ope...

Page 86: ...engineering support When you need help with your exacqVision product please be ready with a complete description of the problem including any error messages or instructions on re creating the error T...

Page 87: ...and on users are encouraged to try to correct the interference by one or more of the following measures Reorient the television or radio receiving antenna and or relocate the Exacq product and the ra...

Page 88: ...ANY IMPLIED WARRANTIES OF MERCHANTABILITY FITNESS FOR A PARTICULAR PURPOSE TITLE OR NON INFRINGEMENT OR ANY OTHER WARRANTIES THAT MAY ARISE FROM USAGE OF TRADE OR COURSE OF DEALING EXACQ DOES NOT WARR...

Page 89: ...y Clarified the procedures in the Camera Setup and Motion Masks Video Masks and Motion Windows sections Clarified the procedures in the Users Setup section Revised System Setup section for clarity and...

Page 90: ...PTZ sections for clarity Updated Add IP Cameras section to include new layout Updated Add Systems section to include new layout and Import Export buttons Updated System section to include modified Sy...

Reviews: