www.exacq.com
+1.317.845.5710
+5255.56080817
+44.1438.310163
USA (Corporate Headquarters)
Mexico
Europe/Middle East/Asia
31
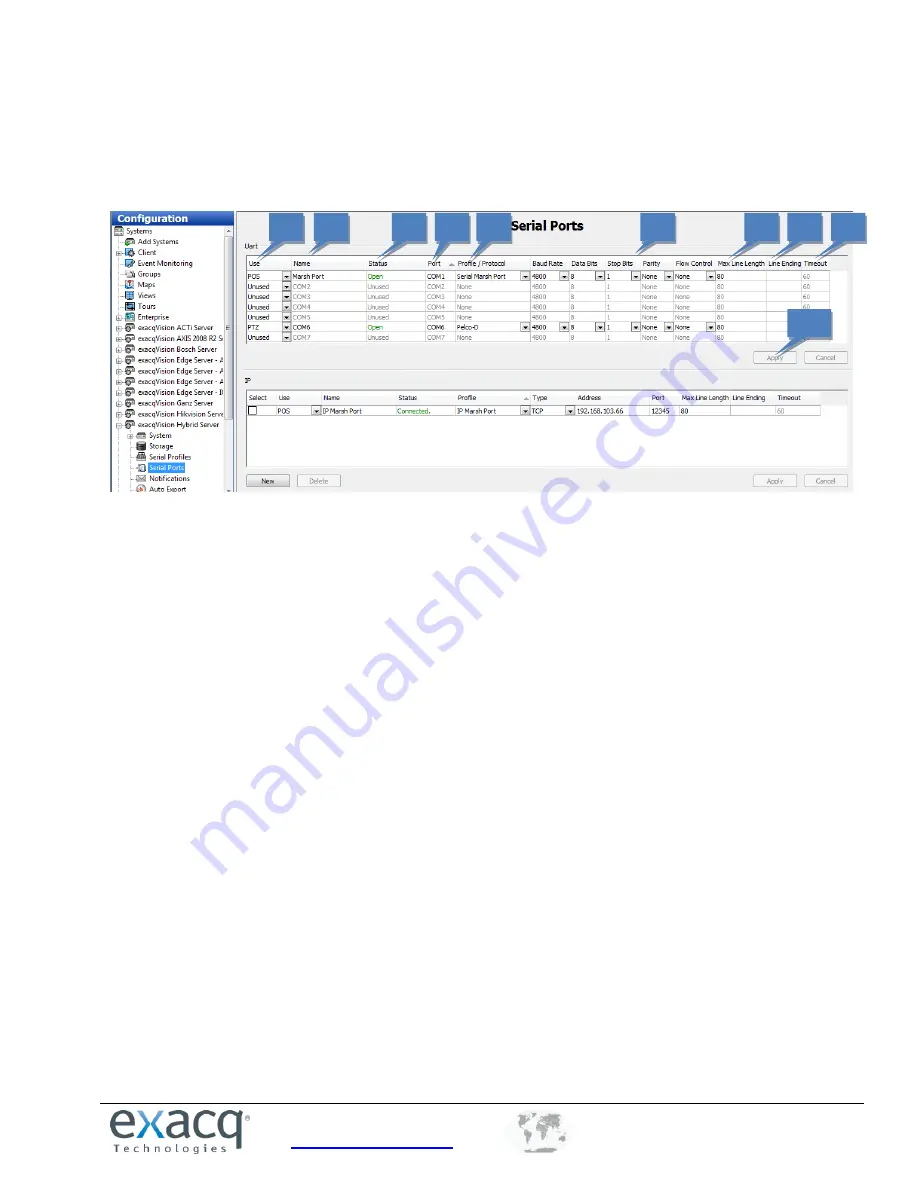
Serial Ports
The Serial Ports page allows you to configure serial ports on your exacqVision system so that they can be used to
communicate with serial devices such as POS terminals or pan-tilt-zoom (PTZ) cameras. There are two Serial Ports
sections — one for standard UART (Universal Asynchronous Receiver/Transmitter) and one for serial ports over IP.
For a UART serial port, connect the wires to the serial port and then configure the port. The system automatically
detects and displays the serial ports. You can configure the following settings on each port:
1.
Select the intended use of the serial port from the drop-down list in the Use column. The choices are
unused, PTZ (pan/tilt/zoom), POS (point of sale), ATM (automatic teller machine), or Access Ctrl.
Generally, the POS mode is used to record transactions at a cash register. By default, the last serial port
listed is the built-in RS-485 port.
2.
Enter a unique name in the Name field.
3.
The Status column displays the current status of the serial port.
4.
The Port is automatically selected by the Operating System.
5.
The Profile/Protocol column allows you to select one of the profiles configured on the Serial Profile page.
6.
The Baud Rate, Data Bits, Stop Bits, Parity, and Flow Control must match the device you are connecting to.
See the device’s documentation for more information.
7.
The Max Line Length is 80 by default. Generally, you should not change this.
8.
Line Ending is the number of characters received before an end-of-line character is inserted automatically.
This prevents lines from becoming extremely large.
9.
Timeout is the number of seconds after which an end-of-line character is entered if a serial device has not
sent text. This is useful if the serial data does not have an end-of-line character but it hasn’t reached the
number of characters entered in Line Ending.
10.
When you are finished, save the settings by clicking the Apply button at the bottom of the page.
The IP section is explained on the following page.
1
2
3
1
4
5
6
7
10
8
9


