Service Manual_AVA1_ENG-20220922_I
24
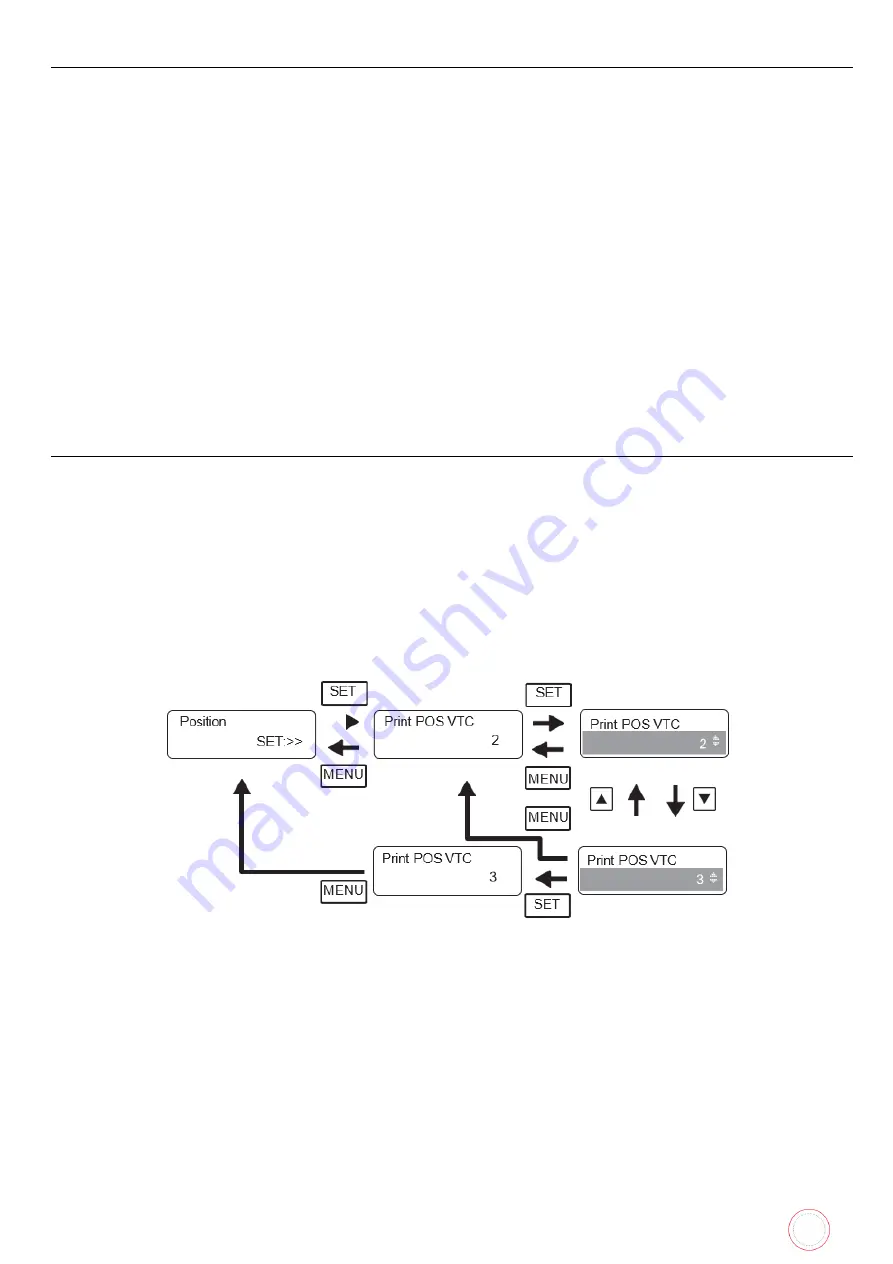
Switching Menus
Service mode and option connection mode have a tree structure classified according to the contents of
each menu. Refer to the service mode list or option connection mode list for menu configuration and
classification.
•
Switching menus of the same level
Each press of the
▼
or
▲
key will change the menu display.
•
Moving to a lower-level menu
When pressing the SET key in the menu where [SET:>>] is displayed on the LCD second line, it will
move to the lower-level menu.
•
Moving to a higher-level menu
To return one level up from the current level, press the MENU key in any menu to move to the
upper-level menu.
•
Exiting service mode or option connection mode (return to normal mode)
If the MENU key on any top-level menu is pressed, [Exit Menu?] is displayed. Select [YES] with the
▼
or
▲
key and press the SET key. Exit service mode, and switch to normal mode.
Select [NO] to return to the original menu.
Changing Settings
By pressing the SET key, the menu that displays the printer settings and adjustment values changes to
the change settings screen. On the change settings screen, the setting change target item (LCD second
line) is highlighted.
1.
Press the SET key in the change settings menu. It will switch to the change settings screen.
2.
Press the
▼
or
▲
key to change the setting values.
3.
Press the SET key to determine the setting values. It will switch to the change settings menu.
If you press the MENU key before determining the setting value of 3., the setting value change is
canceled. It will return to the setting change menu display, and the setting value is not changed.
Summary of Contents for AV1H0000BD
Page 1: ...Service Manual_AVA1_ENG 20220922_I 1 AVANSIA SERVICE MANUAL...
Page 73: ...Service Manual_AVA1_ENG 20220922_I 73 Drawing 9 HEAT ROLLER CP011845 HEAT ROLLER MODULE S10248...
Page 74: ...Service Manual_AVA1_ENG 20220922_I 74 Drawing 10 DECURL MODULE CP011976 DECURL SPRING CP011978...
Page 76: ...Service Manual_AVA1_ENG 20220922_I 76 Drawing 12 PACKAGING BOX AND FOAM S10205...
Page 109: ...Service Manual_AVA1_ENG 20220922_I 109 Tools required...
Page 118: ...Service Manual_AVA1_ENG 20220922_I 118 6 Move the hinge outwards 7 Remove the two screws...
Page 133: ...Service Manual_AVA1_ENG 20220922_I 133 8 Unplug the two sensors 9 Remove the three screws...
Page 135: ...Service Manual_AVA1_ENG 20220922_I 135 12 Remove the heat roller horizontally...
Page 139: ...Service Manual_AVA1_ENG 20220922_I 139 6 Remove the V ring 7 Remove the axis...
Page 158: ...Service Manual_AVA1_ENG 20220922_I 158 7 Remove the two screws...
Page 167: ...Service Manual_AVA1_ENG 20220922_I 167 13 Unplug these cables 14 Open the cables holder...
Page 221: ...Service Manual_AVA1_ENG 20220922_I 221 8 Close the front cover...
Page 275: ...Service Manual_AVA1_ENG 20220922_I 275 Printer details Ribbon details...
Page 286: ...Service Manual_AVA1_ENG 20220922_I 286 BLOCK PLAN FOR ELECTRIC PARTS...
Page 287: ...Service Manual_AVA1_ENG 20220922_I 287...
Page 288: ...Service Manual_AVA1_ENG 20220922_I 288...
Page 289: ...Service Manual_AVA1_ENG 20220922_I 289...
Page 290: ...Service Manual_AVA1_ENG 20220922_I 290...
Page 291: ...Service Manual_AVA1_ENG 20220922_I 291 MAIN BOARD PLAN...
Page 293: ...Service Manual_AVA1_ENG 20220922_I 293 www evolis com...


