


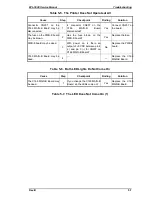


3.2.3.10 Paper Take-Up Roller Removal
1.
Remove the main motor. (Refer to Section 3.2.3.8.)
2.
Remove the paper guide assembly. (Refer to Section 3.2.3.9.)
3.
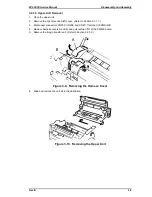
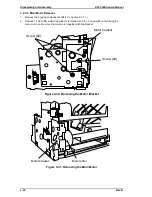
Remove the 6 screws (#4:2, #5:4), and remove the left frame.
4.
Remove the 2 gears (GEAR 29/65T, GEAR 22/57T), specified in the figure below.
5.
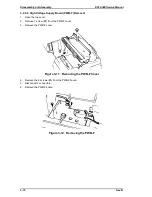
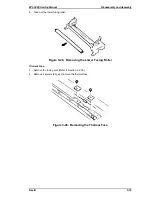
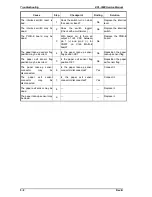
At the bottom of the printer, remove the E-ring fixing the paper take-up roller shaft.
6.
Unhock the paper take-up roller and slide the shaft to the end of the shaft where the driven
gear is attached, then remove the paper take-up roller.
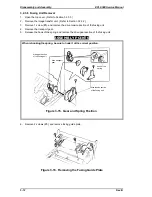
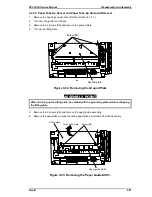
ASSEMBLY POINT
When removing the paper take-up roller from the shaft, be sure not to lose the pin.
Remove Gears (2)
Paper Take-up Roller Shaft
Slide out
Figure 3-34. Removing the Gears
Paper Take-up Roller
E-Ring
Paper Take-up Roller Shaft
Figure 3-35. Removing the Paper Take-Up Roller
Disassembly and Assembly
EPL-5500 Service Manual
3-22
Rev. B
Summary of Contents for EPL-5500
Page 1: ...EPSON TERMINAL PRINTER EPL 5500 SERVICE MANUAL EPSON 4005431 ...
Page 2: ... ii ...
Page 12: ...Rev A 1 iii ...
Page 62: ...EPL 5500 Service Manual Operating Principles Rev B 2 11 ...
Page 122: ...6 ii Rev A ...
Page 125: ...EPL 5500 Service Manual Maintenance Rev B 6 3 ...
Page 142: ...Figure A 8 C169 MAIN B Component Layout Rear EPL 5500 Service Manual Appendix Rev A A 17 ...
Page 144: ......
Page 145: ...EPSON ...