background image

List Views

4-8

About List Views

To access the Find window:

1. Open or activate the List View that you wish to search.

2. Select 

Edit—>Find

 from the primary window menu bar.

or

Click 

 on the List View toolbar.

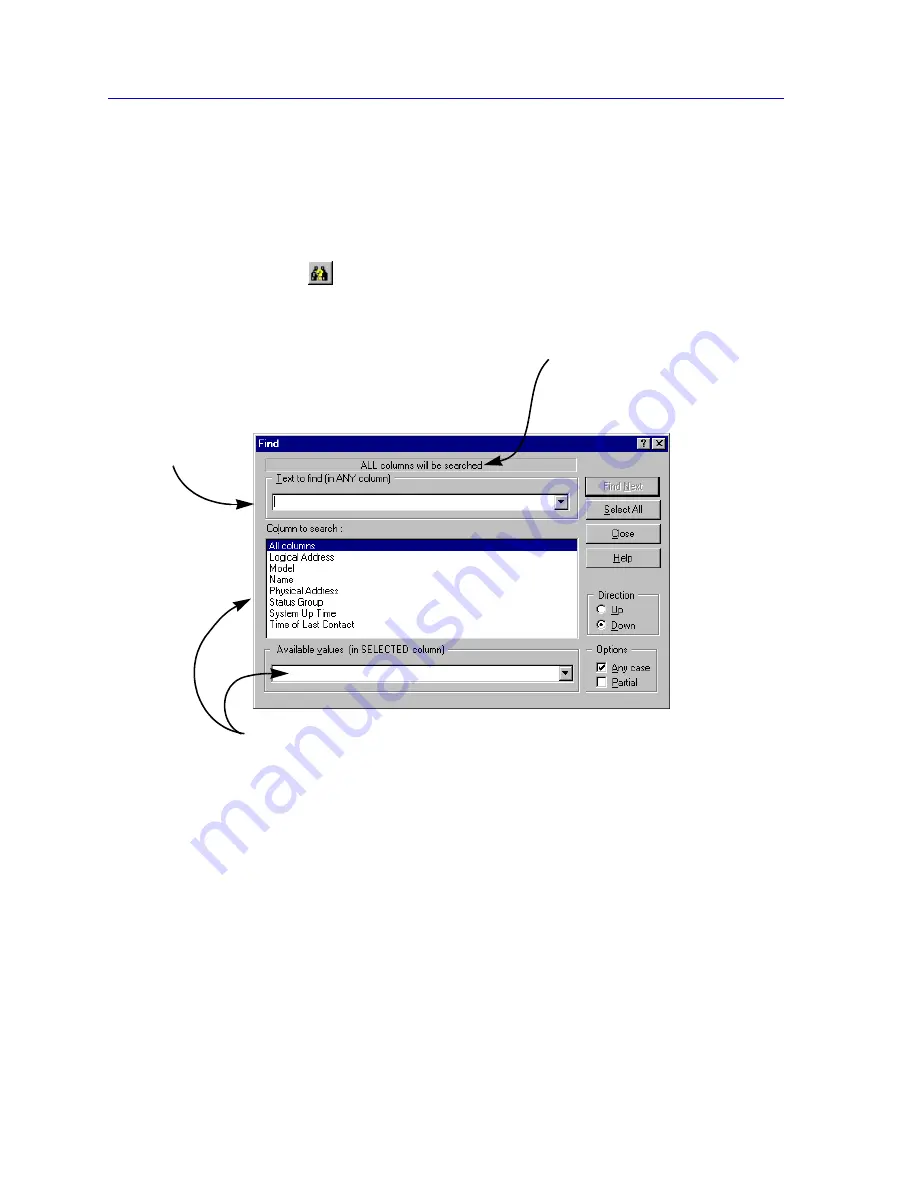
The List View Find window, 

Figure 4-7

, opens.

Figure 4-7. List View Find Window

You can perform two different kind of searches with this window: you can enter any text 
string you wish to match fully or partially in any column (using the top text box); or you 
can search for any one of the available values in a selected column (using the lower text 
box).

To search for a value in ANY column:

1. In the 

Column to search

 list box, make sure the 

All columns

 option is 

selected. 

Use this text box to enter a string you wish 
to match in 

any 

available List View column. 

You can specify a case-sensitive search, or 
allow for a 
partial match 
of the string.

The status bar displays the type 
of search currently in effect.

If you select a 

specific 

column to search, use this 

drop-down list to select which of the available 
strings to search for.

Summary of Contents for Netsight

Page 1: ...User s Guide...

Page 2: ......

Page 3: ...e protect and then verify that the Licensed Software prior to installing it is virus free with an anti virus system in which you have confidence Enterasys Networks makes no representations or warranti...

Page 4: ...X Window System is a trademark of Consortium Inc CTERM DECnet and ULTRIX are registered trademarks and DEC DEC C DECnet DOS DECstation VAX DOCUMENT VMA and VT are trademarks of Digital Equipment Corp...

Page 5: ...except as provided in paragraph b of this Notice or as otherwise expressly stated in the contract b This computer software may be 1 Used or copied for use in or with the computer or computers for whic...

Page 6: ...ions regarding the use duplication or disclosure of this computer software are to be expressly stated in or incorporated in the contract e This Notice shall be marked on any reproduction of this compu...

Page 7: ...kspace 2 5 List Views 2 6 Tree Views 2 7 Map Views 2 9 Log Views 2 10 Excluding Nodes 2 10 Alarm and Event Handling 2 11 The NetSight Element Manager Tool Suite 2 11 Remote Administration Tools 2 12 S...

Page 8: ...Discover in Progress 3 17 Restarting a Completed Discover 3 17 Scheduled Discovers 3 18 Deleting a Discover Script 3 18 Starting the Discover Wizard 3 19 Launching the Scheduler Application 3 19 Using...

Page 9: ...4 34 Editing Poll Settings for Multiple Nodes 4 36 Editing Node Class Properties 4 37 Selecting a New Model Class Enterprise or Topology Symbol 4 39 Changing Management Application Information 4 40 Ch...

Page 10: ...ols 6 27 Placing a Symbol Icon 6 27 Editing Symbol Properties 6 28 Using Connections 6 33 Using Lines and Shapes 6 34 Using Text 6 37 Adding Object Notes 6 39 Adding Notes to Multiple Nodes 6 42 Chang...

Page 11: ...Appendix A 3 Comma Separated Variable CSV Format Appendix A 3 Tag Data Format Appendix A 3 Executing the AddTool Command Appendix A 4 Using the AddImage Utility Appendix A 5 Creating an AddImage Inpu...

Page 12: ...Contents xii...

Page 13: ...and printing Chapter 3 Discovering Nodes provides details on how to use the Discover application to discover nodes on your network It describes how to build scripts that will discover IP devices by a...

Page 14: ...ng the AddTool AddImage and AddDevType tools to expand the capabilities of NetSight Element Manager Other manuals in your documentation set including the device specific User s Guides Tools Guide Remo...

Page 15: ...n the World Wide Web To locate product specific information refer to the Enterasys Web page at the following address http www enterasys com Global Technical Assistance Center If you have additional qu...

Page 16: ...Introduction 1 4 Getting Help Mailing Address Enterasys Networks Inc Technical Support 35 Industrial Way Rochester NH 03867 FTP ftp cabletron com Login anonymous Password your email address...

Page 17: ...feedback regarding the status of devices on your network through the central NetSight Element Manager user interface via the List Views Tree Views and Maps Node status is propagated right up through...

Page 18: ...ribes this powerful tool suite Among its features are A primary window where you can navigate between the Map View List View Tree View and Log View workspaces to activate windows to monitor and manage...

Page 19: ...to a device group in Remote Administration Tools Toolbars can be undocked to become floating tool palettes either inside or outside the main window or be docked to a different place Hint text displays...

Page 20: ...scovery The Discover application provides several key features among these are Discover Script Capability By creating Discover scripts you can store the parameters of a discovery from one management s...

Page 21: ...to the first discover This process allows you to use a discover script to periodically survey a subnet domain or range of IP addresses for any nodes that might have been down or simply not present dur...

Page 22: ...t View Workspace and Window List View features include Multiple List Views You can create multiple List Views to view portions of your node database The read only All Nodes List View displays every vi...

Page 23: ...Management information Classes functional class supported by the node e g router switch ATM etc Enterprise vendor Topologies supported by the node e g token ring FDDI Ethernet etc and Events whether a...

Page 24: ...information You can use a Tree View window to glean basic information about each node and its polled interface without bringing up its management window or by double clicking on a node icon you can o...

Page 25: ...al representation of your network by allowing you to show not only relationships between devices but relationships between groups of devices Individual Map Views can be linked to other Map Views to cr...

Page 26: ...clicking on a Log View icon will open the associated Log View window For more on alarm and event management refer to Alarm and Event Handling page 2 11 Figure 2 6 Sample Log Views Workspace and Assoc...

Page 27: ...e can operate without NetSight Element Manager running receiving and where appropriate acting on traps issued by your networking devices or events issued by one of NetSight Element Manager s component...

Page 28: ...ess community names on selected devices For more information about these tools see the Remote Administration Tools User s Guide included in your documentation set Scheduler Tool The Scheduler tool all...

Page 29: ...ation about these nodes A Preferences option which lets you view and change configuration settings for the MIB Tools suite Customizing NetSight Element Manager There are a number of ways you can adjus...

Page 30: ...pear when you initialize NetSight Element Manager Selecting this option will cause the screen to be displayed deselecting it will suppress the screen Show Tooltips Tooltips are small pop up windows th...

Page 31: ...used when you attempt to add entries into the node database either manually or through a discovery Community Name The Community Name is a basic security mechanism implemented in SNMP It acts as both a...

Page 32: ...name however you can always enter a specific community name on a case by case basis in any of the windows that require one To set the default community name 1 Click in the Community Name text field a...

Page 33: ...nager polls for IP devices during a Network Discovery The appropriate address mask depends upon your network configuration If your network contains subnets entering the appropriate subnet mask in this...

Page 34: ...he contact status of nodes in the List Views Tree Views and Map Views since there will be 10 iterations of the 5 second polling cycle to determine the contact status with all 100 nodes You can configu...

Page 35: ...eld and type in the number of seconds you want NetSight Element Manager to wait between each set of polling packets The range is from 1 to 60 seconds the default is 5 seconds Packets The number of pol...

Page 36: ...kes NetSight Element Manager to poll every device in the database Figure 2 10 The Node Options In general it is advisable to leave the Default Poll Settings at their initial values if you have a few s...

Page 37: ...e issued to an individual device before declaring a contact unavailable status The range is from 0 to 100 retries the default is 3 retries Timeout sec This field determines the default duration betwee...

Page 38: ...efault Be sure the directory already exists or the change will not be accepted or Click Browse A standard Microsoft Browse window opens Use the directory tree to select the directory folder which you...

Page 39: ...action taken from within NetSight Element Manager or one of its component applications like RMON regardless of the export file type csv txt htm etc The default directory is NetSight Element Manager x...

Page 40: ...of polls which must fail after the initial poll failure before Chassis Manager declares that contact is unavailable The range is from 0 to 10 retries the default is 2 retries Event Log Options The Ev...

Page 41: ...on Clear acknowledged and closed events hourly Checking this option will activate an hourly purge of all events that have been administratively acknowledged or closed during the previous hour If this...

Page 42: ...event cache e g all normal and informational events will be deleted and from that point the cache will be updated hourly as configured Note that each time you make and set a change in the Event Log Op...

Page 43: ...can use these same fields to edit any existing entry in the toolbar or menu Adding a Tool Entry When you add an entry to the Tools menu you must also add a corresponding icon to the Tools toolbar and...

Page 44: ...image will be cropped to fit b Click the Small Image radio button then move the resulting square selection cursor around on the image to select the portion you wish to display for the toolbar icon an...

Page 45: ...ng Directory field to locate the appropriate directory The directory name cannot be entered directly into the field you must select it via the Browse window TIP Clicking on the Build button will launc...

Page 46: ...1 Open the Customize window by selecting Tools Customize from the primary NetSight Element Manager window 2 In the Menu Items list box click to select the item you wish to remove then click on Delete...

Page 47: ...for configured background actions actions that are executed automatically in response to specific events ae_log mdb Alarm and Events log database Classes dat Contains definitions for node classes Disc...

Page 48: ...ate 2 Select the Data File Manager icon in your NetSight Element Manager program group The Data File Manager window opens as illustrated in Figure 2 16 Figure 2 16 Accessing the Data File Manager Wind...

Page 49: ...ion File or of a type map listed in the file files must also be present in one of the five directories To view or edit the list of data files that will be backed up click on Edit Configuration File A...

Page 50: ...s database files etc Performing a Backup 1 In the main Data File Manager window click on Backup A window opens Figure 2 18 prompting you to specify the directory path in which to copy the backup files...

Page 51: ...ata files and reset much of your configuration to default values 2 Click OK Two pop ups open in quick succession one to indicate that the files are being restored and a second to indicate the procedur...

Page 52: ...Overview of NetSight Element Manager 2 36 Backing Up Data Files...

Page 53: ...base and consequently displayed as appropriate in any List or Tree Views see Chapter 4 List Views and Chapter 5 Tree Views for more information The Discover application operates using scripts which ar...

Page 54: ...uler application For more information about the Scheduler application see the Tools Guide Creating and Modifying Discover Scripts Discover scripts are created and modified using the Discover Propertie...

Page 55: ...n the Discover Manager window highlight the script to be modified and click Properties or Click the right mouse button on the script to be modified and select Properties from the resulting menu The Di...

Page 56: ...ies The General page of the Discover Properties window is used to name and describe your Discover script as shown in Figure 3 3 The script s name and description will be listed in the Discover Manager...

Page 57: ...Define your remaining Discover script parameters as explained in the following sections or click OK to save your entries and return to the Discover Manager window Setting Device Discovery Parameters A...

Page 58: ...ress Ranges group box and select New from the resulting menu To modify an existing IP address range highlight the IP Address range that you wish to change and click Properties or click the right mouse...

Page 59: ...of 255 255 0 0 would identify the first two octets 132 177 as the network portion of the address 5 Click OK when your entries are complete The information you entered displays in the appropriate field...

Page 60: ...s group box and select New from the resulting menu To modify an existing subnet highlight the subnet entry that you wish to change and click Properties or click the right mouse button on the subnet en...

Page 61: ...s for the fourth byte Since each discover script is limited to querying a maximum of 2000 addresses this kind of incorrect mask setting would prevent you from completing your script By default the Sub...

Page 62: ...subnet displays in the Subnets group box on the Device page of the Discover Properties window 8 Repeat Steps 2 8 to define additional Subnets for your script 9 To include a defined subnet in your Disc...

Page 63: ...s on to the next one To select a community name for use in your Discover script 1 To define a new community name click New to the right of the Community Names group box or click the right mouse button...

Page 64: ...ropriate filter All Devices the script will discover and add to the central node database all devices in the specified subnet s or IP address range s that respond to either an SNMP or a PING query Thi...

Page 65: ...Manager application is closed To set an interval for your Discover script 1 In the Discover Interval field enter the desired number of minutes between automatic executions of your Discover script Thi...

Page 66: ...cover scripts they are listed in the Discover Manager window as shown in Figure 3 11 and can be executed at any time 1 In the Discover Manager window click to highlight the name of the Discover script...

Page 67: ...hidden behind the main NetSight Element Manager window wait for the active discover session to complete or stop it as described in Stopping a Discover in Progress page 3 17 close the Network Discover...

Page 68: ...uding status model name and IP address appears in the Discover window A footer message at the bottom of the window indicates the total number of IP addresses which will be queried during the discover...

Page 69: ...dow A message window like the one illustrated in Figure 3 13 opens Figure 3 13 Cancel Discover Confirmation Window 2 Click Yes to stop the discover and add any discovered nodes to the database click N...

Page 70: ...cover window open a scheduled discover will close this window for you so that it can execute And if a manually executed script is still in progress when a scheduled discover interval expires the sched...

Page 71: ...er scripts you can use the Scheduler application to automatically execute selected scripts at scheduled times and dates To launch the Scheduler application from the Discover Manager window 1 Click Sch...

Page 72: ...ld enter the host name of the device whose IP address you wish to locate 3 If you wish to ping the device once its IP address is located click to select the Ping found devices option in the text field...

Page 73: ...address cannot be resolved a message window appears indicating that the selected IP could not be found Locating the MAC Address for a Host Name IP Pair Once you have resolved a host name IP pair you c...

Page 74: ...d to enter the number of devices that will be located between prompts The default value is 10 5 If you wish to ping each found device once it is located select the Ping found devices option in the tex...

Page 75: ...address and or Ping options these results will also be displayed in the list box If no device is found at a specified IP address question marks display in place of a host name Once the search is comp...

Page 76: ...Unpingable IPs to select specific groups of IPs Note that these buttons only activate when IPs of the noted kind are displayed in the list box 2 Click Copy IPs to copy the selected IP addresses to the...

Page 77: ...cause searching an entire subnet can be time consuming you can configure the Locator Tool to stop at pre defined intervals asking if you want to continue the search To activate this option click to se...

Page 78: ...selected address could not be found Figure 3 19 Find MAC Address Search TIP You can use the Copy IP buttons to paste any located IP addresses to any text document you can also paste found IPs directl...

Page 79: ...that this is a Class B network with a subnet mask of 255 255 255 0 If you have manually added a device to a view or a map a subnet entry will be listed for that device s subnet as well For example if...

Page 80: ...ription is provided Creating and Modifying a Subnet Entry To create a new subnet entry or modify an existing one 1 To define a new subnet click New or click the right mouse button anywhere in the Subn...

Page 81: ...click the right mouse button on the subnet to be deleted and select Delete from the resulting menu The selected subnet entry will be deleted from the Subnets window as well as from the Subnets group b...

Page 82: ...Discovering Nodes 3 30 Using the Subnets Window...

Page 83: ...hat you wish to display the order in which that information will be displayed and the font used to display it you can also choose which nodes you wish to display in a list by configuring a filter whic...

Page 84: ...as well as additional folders Note that folders are a workspace display convention only and they can only be created from within the workspace itself To create a folder 1 Display the List View page o...

Page 85: ...rated in Figure 4 3 and the existing name will be highlighted Figure 4 3 Changing a Folder Name 2 Click again to place the cursor anywhere in the name and edit as desired or simply begin typing to rep...

Page 86: ...folders by type is also provided these views can be used as is edited to better suit your needs or deleted entirely Each of these views includes a pre set filter which excludes all nodes not of the t...

Page 87: ...List View Toolbar The appearance of the list views you create can be changed according to which information needs to have priority in the view and how you want it displayed The List View toolbar and...

Page 88: ...iew selection is made once NetSight Element Manager is closed and re opened however all views will revert back to the default Small Icon Detail format The List View toolbar also contains the Find icon...

Page 89: ...ied Note that the multi level sort mixes ascending and descending orders in the different columns Figure 4 6 Sorting Nodes Searching a List View Using the Find feature you can search a List View for a...

Page 90: ...in any column using the top text box or you can search for any one of the available values in a selected column using the lower text box To search for a value in ANY column 1 In the Column to search l...

Page 91: ...y highlight all matches If the selected value is not found a message window will notify you of the failure To search for a value in a SELECTED column 1 In the Column to search list box click to select...

Page 92: ...information about those nodes will be displayed To create a new list view 1 Select Window New List View from the primary window menu bar or Click on the toolbar or In the List View Workspace click the...

Page 93: ...at will be displayed for each node and select the order in which it will be displayed To set up or modify a list view 1 By default a new list view will be named New List View X where X will increment...

Page 94: ...se the Font option described in Selecting a Display Font page 4 14 Node Information Options List views can include up to 13 columns of information about the nodes they display Information available fo...

Page 95: ...node indicates that polling has been disabled and the node s current status is not known Name This column displays the user defined name of the node You can assign a name for the node in the General...

Page 96: ...model type Classes Displays the functional classes supported by the selected node Router Bridge Switch ATM etc represented by the appropriate class icon s Enterprise Displays the enterprise or vendor...

Page 97: ...pecific Subnet Status Group Enterprise Class and or Topology attributes To open the View Filter window 1 Click on Filter from the New List View or List View Properties window The View Filter window Fi...

Page 98: ...n this list box You can choose to display only those nodes which are part of one or more selected status groups or those which are part of any defined status group Enterprises The Enterprise category...

Page 99: ...functional class is unknown Topologies Lists the topologies that NetSight Element Manager will recognize Topologies listed include Regular 1822 HDH 1822 Local Talk RFC 877 X 25 Ethernet CSMACD ISO 88...

Page 100: ...xcluded Nodes NetSight Element Manager s architecture which stores all node information in a central database and lets you choose how to view it provides you with great flexibility in the management a...

Page 101: ...clude a node from a specific view only 1 Open or activate the view which contains the nodes you wish to exclude and click or use shift click or ctrl click to select the appropriate node entries 2 Sele...

Page 102: ...hen click OK to confirm the deletion The selected nodes will no longer be displayed in the selected view window and will be listed in the view s properties window Excluded Nodes list NOTE Using Edit C...

Page 103: ...appropriate list view open and active select View Properties from the primary window menu bar or In the List View Workspace area click the right mouse button on the name or icon associated with the vi...

Page 104: ...in the Excluded Nodes database are not polled by NetSight Element Manager and are no longer displayed in any List Tree or Map View they can only be viewed via the Excluded Nodes window To access the...

Page 105: ...the Excluded Nodes database can also be re added to the central node database at any time should the need arise For more information about the Discover application see Chapter 3 Discovering Nodes To...

Page 106: ...des can also be either re included in the database or deleted entirely To Re include a Node into the Central Node Database To move an excluded node back into the central node database 1 Select View Ex...

Page 107: ...database if they are discovered Deletion from the database cannot be undone except by re discovering or re inserting the nodes you want To delete a single node or group of nodes directly from a view...

Page 108: ...elete the selected item s 3 Click Yes to confirm The node or nodes will be permanently deleted from the database 4 Click Close to close the excluded nodes window Adding Network Elements to the Node Da...

Page 109: ...must be placed in the map before it is added to the database if no view is open the insert device options will not be available For more information on maps see Chapter 6 Creating Network Maps To add...

Page 110: ...to change or configure the device s display properties as described in the following sections then click on OK If the device cannot be contacted the Insert Device window will expand to display the Ti...

Page 111: ...ccess the properties window for a device which as already been added to the database or to a map window 1 Open and or activate the list tree or map view which contains the device whose display propert...

Page 112: ...the device The value set in this field will be displayed in the Name column in all list views which contain one and will also be used to label device icons in Map View windows Description By default...

Page 113: ...ddress assigned to the device This field is not editable Community Name The community name used to contact the device This will default to the community name used by the discover script or the communi...

Page 114: ...Figure 4 25 page 4 34 that allows you to view display properties for the contact interface and to configure poll settings for the device See Configuring Node Interface Poll Settings page 4 34 for more...

Page 115: ...e code For more information on configuring these settings see Editing Node Class Properties page 4 37 Figure 4 24 Class Properties Click on the Node Classes button to display the Node Classes window w...

Page 116: ...ll take 1000 seconds 100 poll cycles x 10 seconds or about 16 5 minutes to poll the entire database During that time the contact status of each polled device will only be updated once the last known c...

Page 117: ...conds 3 In the Retries field enter the number of unsuccessful polls that must occur before NetSight Element Manager changes the node status to critical and logs an event The valid range is 0 to 100 4...

Page 118: ...can click and drag to select multiple icons 2 In the primary window menu bar select Edit Properties or In the toolbar click the Properties icon or Right click on any one of the selected nodes and on...

Page 119: ...opriate device Properties window by selecting the node in any view and selecting Edit Properties from the primary window menu bar clicking the Properties icon or selecting Properties from the right mo...

Page 120: ...that appears The Node Class Properties window Figure 4 28 opens Figure 4 28 The Node Class Properties Window CAUTION Keep in mind that changes made in the Node Class Properties window will apply to al...

Page 121: ...ciated with any of the symbols provided To select a new symbol click on the Select button in the appropriate property area of the window a Select Symbol window opens displaying the default set of symb...

Page 122: ...application that will be launched for all nodes assigned to a given node class You specify this via the Command field in which you enter the path and filename of the appropriate executable EXE file th...

Page 123: ...efault bin directory you must also enter the full path To enter a new command you can either click in the Command text box and type in the name and path if necessary of the executable file you want as...

Page 124: ...ment Application area click on Build The Build window Figure 4 31 opens Figure 4 31 The Build Window 2 To add an argument symbol from the pre defined list provided click on the down arrow located to t...

Page 125: ...rom database O inserts Device s sysOID from database N inserts Device Name from database C inserts Community Name from database H inserts the window handle value of the active window Flags accepted by...

Page 126: ...g directory you can either click in the Working Directory text box and type in the path of the appropriate directory or you can use the Browse button as follows 1 Click on the Browse button next to th...

Page 127: ...type in a name for the node class The value entered here is displayed in the Model field of the Node Classes window 2 In the Description field enter a description for the node class 3 If there are any...

Page 128: ...t are not located on an open map will be highlighted in the list view To delete orphans 1 Activate the desired list view and select Edit Delete Orphans from the menu bar 2 The standard Node Delete win...

Page 129: ...from the resulting menu If the selected node is associated with a map which is open the correct map window will be activated and the selected node will be highlighted If the selected node is associate...

Page 130: ...List Views 4 48 List Views and Maps...

Page 131: ...each node icon displays the first level of available information device level status model and name information Clicking on any displayed sub folders topologies classes or interfaces supplies additio...

Page 132: ...ill be contained within the root Tree Views folder and each can contain one or more tree views as well as additional folders Note that folders are a workspace display convention only and they can only...

Page 133: ...se name you wish to change then after a brief pause click again The folder name will be enclosed in an editable text box as illustrated in Figure 5 3 and the existing name will be highlighted Figure 5...

Page 134: ...Interfaces and most of the available Interface information including Topology Status Address Interface Number Poll Method Poll Interval and Poll Retries Label Description Time of Last Contact System...

Page 135: ...el and Enterprise the Topologies view displays the name and icon associated with each topology supported by the selected node Navigating a Tree View There are several means you can use to navigate thr...

Page 136: ...r model icons Using the Keyboard Once you have displayed and activated a tree view you can also navigate with the arrow keys and the SPACE BAR The UP and DOWN arrow keys allow you to move one item at...

Page 137: ...folder or in any blank area and select New View from the menu that appears The New Tree View window Figure 5 6 opens Figure 5 6 The New Tree View Window NOTE When you add a new tree view by any of th...

Page 138: ...odes by their IP address or host name To set up or modify a tree view 1 By default a new tree view will be named New Tree View X where X will increment sequentially as necessary to provide a unique na...

Page 139: ...p from the node The icon will remain yellow until the trap is acknowledged TIP You can use the Select All and Unselect All buttons to either select or unselect all available Node and Interface items T...

Page 140: ...name displayed at the root of the tree see Selecting Node Information to Display page 5 8 for more information Label Displays a user set alias for a node no default label is provided Description Disp...

Page 141: ...ement Manager is communicating with the selected node The specific interface information that can be selected for display via the Interface Items list box is described in the following section Notes D...

Page 142: ...iled Notes Displays the text of any notes you have assigned to the interface These notes can also be edited via the General tab in the Interface Properties window For more information on Notes see Cha...

Page 143: ...lter window Figure 5 8 will be displayed Figure 5 8 View Filter Window Filter Categories Available filter categories are Subnets NetSight Element Manager automatically creates a subnet entry each time...

Page 144: ...Element Manager can detect Classes available for filtering include Repeater Router Generic Bridge Router Gateway Ethernet Token Ring Bridge Switch Ethernet FDDI Bridge Ethernet WAN Bridge PBX Multi T...

Page 145: ...t to display Filter categories are linked by logical ANDs and attributes within categories are linked by logical ORs this means that in order to be displayed in a filtered view a node must match at le...

Page 146: ...e views and your maps by helping you locate the map on which a node has been placed Using the Go To Map Function You can use the Go to Map function to locate a node on the map on which it has been pla...

Page 147: ...which are present on multiple maps only one map will be selected even if all related maps are open To locate a node on more than one map open all maps use the Go to Map option to locate the node on on...

Page 148: ...Tree Views 5 18 Tree Views and Maps...

Page 149: ...them in from any existing view you can also add a variety of symbols to your map and take advantage of Microsoft s Object Linking and Embedding OLE technology to add objects created by other applicat...

Page 150: ...mer submaps at the root of the workspace hierarchy All of these changes will be reflected in the Map View workspace Figure 6 1 The Map View Page Each element in the nested submap hierarchy reports its...

Page 151: ...alled BUILDING_A and a second map called FLOOR_1 you can link those two maps into a hierarchical structure by adding a submap icon representing FLOOR_1 to BUILDING_A that submap icon will change color...

Page 152: ...te a more free form relationship among maps one that can also be linked and unlinked at will Placing a GoTo symbol into a map provides a quick and easy means of accessing the map represented by the sy...

Page 153: ...rom the right mouse menu temporarily turns a node icon blue while the status query is being made Normal Green No elements in the map are reporting warning or critical conditions a map with no elements...

Page 154: ...a series of maps you can add a folder to the Map View page of the workspace each folder you create will be contained within the base Map View folder and each can contain one or more maps submaps and...

Page 155: ...the designation New Folder X where X represents a sequential index you can rename your folders as follows 1 Highlight the folder whose name you wish to change then after a brief pause click again The...

Page 156: ...h to add the new map If you want to add the new map to the top level of the Map View hierarchy select the main Map Views folder or highlight any existing map 2 In the primary window menu bar select Fi...

Page 157: ...illustrated in Figure 6 4 above or at any time after a map or submap has been created via the Map View Properties window described in Editing Map Properties page 6 12 Among the properties that you ca...

Page 158: ...ft mouse button on the Add to Custom Colors button to create a new entry in the Custom Colors palate then click the left mouse button to select the custom color you wish to use for the map background...

Page 159: ...agination appear in your map window To do so 1 Click the Show Page Lines option When you open the Map window dashed yellow and red lines display to indicate the pagination for the map Each area bounde...

Page 160: ...ame of a map or submap via the Map View Properties window which is essentially a duplicate of the New Map View window described in the previous section To change the properties of an existing map 1 Fr...

Page 161: ...teps outlined in the previous sections to change any of the properties of the selected map Adding a Submap To create a nested hierarchy of maps as displayed in the Map View workspace you must add Subm...

Page 162: ...ap closing the New Map View window changes the arrow cursor to a crosshair cursor click this cursor in your root map to place the submap icon If you have selected an existing map it will be opened and...

Page 163: ...devices to your central node database Once you have added your network devices to the central node database you can automatically create a map hierarchy as follows 1 Select File New Subnet Mapping fr...

Page 164: ...s in the associated subnet are not displayed in the automatically generated map hierarchy though they will still be present in the central node database 4 Click to select the Display Subnets option if...

Page 165: ...op or cut and paste by placing a submap icon in a new map or by deleting a submap icon altogether you can also change the name assigned to a submap without breaking any existing submap links Just reme...

Page 166: ...nsert GoTo Map or In the toolbar click the Insert GoTo Map icon The Insert Map GoTo window Figure 6 12 opens Figure 6 12 The Insert Map GoTo Window CAUTION If you use the Cut command to remove a subma...

Page 167: ...chosen to create a new map closing the New Map View window changes the arrow cursor to a crosshair cursor click this cursor in your root map to place the submap icon If you have selected an existing...

Page 168: ...re not yet in the database NetSight Element Manager will try to re discover them either individually or as a group depending on the import option you have selected If you import an MRM file which cont...

Page 169: ...t Manually Insert Devices 3 Click OK The configured option will be used for all MRM imports until a new option is selected Importing a Map 1 In the Map View window select the folder into which you wis...

Page 170: ...o be used in the discover process or click Cancel to remove the noted device from the import To stop an import in progress select Stop Import A message window opens indicating that the import has been...

Page 171: ...directly into the central node database and the appropriate views To move a single device from a view onto a map use the left mouse button to click on the device you wish to add and drag it into the...

Page 172: ...ld enter the IP address assigned to the device you wish to add 4 In the Community Name field enter a community name that will provide at least Read access to the device you are adding For full managem...

Page 173: ...rt of the database a message window displays after you close the Properties window indicating that the selected node already exists Click OK and a crosshair cursor displays allowing you to place the i...

Page 174: ...to the manageable nodes described in the sections above your maps can also contain a variety of non manageable graphical objects that can help you create a better visual display of your network config...

Page 175: ...dditional bitmap images Symbols even those which look just like device icons do not report status and do not provide access to management Placing a Symbol Icon To add an existing symbol to your map 1...

Page 176: ...el To change the label see Editing Individual Symbol Properties page 6 29 These symbols do not report node status nor provide access to node management Editing Symbol Properties If you wish you can ed...

Page 177: ...r or Select the symbol then select the Properties icon from the toolbar or Click the right mouse button on the symbol then select Properties from the resulting menu Figure 6 22 Editing Symbol Properti...

Page 178: ...use the buttons at the top of the window to change the display if desired or use the scroll bar to view all available symbols Once you have selected your symbol icon click the Properties button The sy...

Page 179: ...image will be cropped to fit b Click the Small Image radio button then move the resulting square selection cursor around on the image to select the portion you wish to display for a small 16 x 16 pixe...

Page 180: ...atabase you can create your own new symbol as follows 1 If necessary open or activate a map window Remember none of the Draw toolbar options will be available unless at least one map is open and activ...

Page 181: ...lay for a large 32 x 32 pixels symbol icon and click again to make the selection The image portion you have selected will be displayed below the Large Image radio button Move the cursor and click agai...

Page 182: ...the Connection tool again Once you have added your connection you can move either one of the two connected symbols and the connection will be re drawn as appropriate You can also add multiple connect...

Page 183: ...d at the end of each line segment you can either change directions and draw an additional attached line segment or double click to complete the line Note that once your line is complete the crosshair...

Page 184: ...ure 6 5 page 6 10 and clicking OK to return to the Line Properties window 4 The Sample portion of the window will display your changes as you make them when the sample displays the look you want to ac...

Page 185: ...esizing the cursor will display as a dual headed arrow 3 Click on the handle and drag horizontally vertically or diagonally to resize the shape 4 Release the mouse and move the cursor off the handle t...

Page 186: ...nge the style or font of the text in the selected text element 1 Double click on the text or Select the text then select Edit Properties from the primary window menu bar or Select the text then select...

Page 187: ...appear in a List or Tree View Object notes are simply additional descriptions that are associated with the selected element they have no other function You can add an Object Note to any element in a m...

Page 188: ...to Paste You can also use this menu to Copy text to the clipboard for pasting to another location 5 When you have finished entering text click OK to save your changes and close the Object Note window...

Page 189: ...ave your changes if applicable then click OK to close the Properties window TIP When an annotated object is duplicated either in the same map or in other maps the notes will be duplicated along with t...

Page 190: ...roperties window will overwrite any existing notes on the selected nodes without warning Once you have added a note to multiple nodes it will be displayed in each individual node s Properties and Obje...

Page 191: ...e the object back one layer select the toolbar button or Layout Layer Step Backward on the primary window menu bar Align Left Right Top or Bottom 1 If necessary open or activate the map which contains...

Page 192: ...not arrange the objects in a straight line for that you will need to use the Align Top Bottom Left or Right tools described above 1 If necessary open or activate the map which contains the objects yo...

Page 193: ...th height or overall size will be applied to the other selected objects 3 Once you ve selected the objects you wish to align release the Ctrl key and click on the appropriate sizing tool as follows To...

Page 194: ...whole by clicking and holding the mouse button and dragging the grid of objects to the desired map location Align Objects in Ring Using the Ring tool you can arrange selected objects into a single rin...

Page 195: ...nclude in the ring are selected if they re not use the mouse to select them 2 Right click the mouse button on any of the selected elements and select Move Create Ring from the resulting menu The arrow...

Page 196: ...ta and the size of the map file will increase correspondingly to the amount of embedded information An object that has been linked references data created from a source document that was created and s...

Page 197: ...E For more information regarding Object Linking and Embedding as well as the Microsoft Object Packager refer to the Microsoft Windows User s Guide for the Windows Graphical Environment NOTES This sect...

Page 198: ...ct as an icon within a border or change the icon that will be associated with the embedded or linked object a Click to check the Display As Icon selection box in the Insert Object window shown in Figu...

Page 199: ...ll initialize with a blank document window in which to enter new object data for embedding into the map c Enter in the data as desired d When you are finished entering the data update the file to save...

Page 200: ...nsert Object window Figure 6 33 before closing the window If you do not select the Link option when first placing the object the object will be embedded and you cannot change an embedded object to a l...

Page 201: ...t s data in the source application that created it or to launch the contents of a packaged object so that you can edit or update the object data if necessary 1 Double click within the object s border...

Page 202: ...inks window Figure 6 35 opens Figure 6 35 Sample Links Window The Links window will display each link object in the active map The specifics of each link will be shown in a panel in the window There a...

Page 203: ...this button is clicked the object s appearance will be revised to reflect the latest saved version of the source document To open the source document for a link so that you can edit its data 1 Click...

Page 204: ...her This is useful if you intend to be sharing data between machines in one form or another For example you might copy a map with an embedded spreadsheet from one machine and then install a copy of th...

Page 205: ...to specify that the source document be opened in the new application type but retain its original format when it is updated and closed The Result message text will reflect your selection 5 Click OK to...

Page 206: ...Ctrl key while dragging and dropping to copy rather than move an object These functions perform the way you would expect them to for any object icon symbol text link or graphic element in your map How...

Page 207: ...the MAP file represented by the submap icon will be deleted as will the submap icon itself If you select No only the submap icon and the link will be removed Third when a map window is the current ac...

Page 208: ...a special paste cursor you can move this paste cursor around on the map or onto another map then click again to paste the element And finally note that the Edit menu contains two selection options Se...

Page 209: ...opriate directory if necessary then double click the appropriate file name or click to select the file name then click OK You can also open a map by double clicking the appropriate Submap or GoTo symb...

Page 210: ...either of these procedures only the current active map will be saved To ensure that all changes to all maps are saved you must activate each map in turn and save it via one of the options above or us...

Page 211: ...without further confirmation Note that deleting a map deletes only the MAP version of the map file the MRM version remains intact in the assigned directory and can be re imported at any time To remov...

Page 212: ...Creating Network Maps 6 64 Managing Maps and Folders...

Page 213: ...tion this section provides some brief introductory information Launching Device Management The primary interface NetSight Element Manager provides for device management is the Device View also called...

Page 214: ...rface that provides you with immediate feedback on device configuration and status and lets you access further device management windows For devices which NetSight Element Manager specifically support...

Page 215: ...u or the Device Type available from the Device menu are taken directly from SNMP MIB II information stored at the device and management is limited to the Generic SNMP application Refer to your Generic...

Page 216: ...ce address naming you can create a text file which will add names to correspond to the source addresses that appear in any device or port specific Source Addresses window To add source address names t...

Page 217: ...x bin 3 Save and close the ctron ini file 4 Exit and re start NetSight Element Manager so that the changes to ctron ini will take effect Once you have configured this file any Source Address window l...

Page 218: ...he PING Window There are two ways to access the PING tool in NetSight Element Manager 1 Select the node you want to contact via PING in a list tree or map view 2 Choose Tools Ping from the primary win...

Page 219: ...nagement Overview Figure 7 4 The PING Window NetSight Element Manager sends a PING request to the selected device and the response if any is displayed in the PING window A successful ping and one whic...

Page 220: ...Node Management Overview 7 8 PING...

Page 221: ...lowing sections Using the AddTool Utility The AddTool utility allows you to add Tools menu options and Toolbar icons to the NetSight Element Manager framework as described in Customizing the Toolbar i...

Page 222: ...ode is selected inserts its sysOID N if a node is selected inserts its assigned name Note that for a device this will be either the sysName value set at the device or the Name value set via the node s...

Page 223: ...e first line of your file can contain a comma separated list of the available field names if you choose not to include this line you must launch your CSV file with a special switch as described in Exe...

Page 224: ...Command MIBMGR EXE Arguments ip I comm C Working directory D NetSight Element Manager x x DATA Small image file smlLeaf bmp Large image file lrgLeaf bmp Menu text Notepad Hint text Launch Notepad Bub...

Page 225: ...additional ones you might need The AddImage tool performs the same function as creating a new image via the Node Class Properties window as described in Editing Node Class Properties in Chapter 4 Lis...

Page 226: ...file in one of two formats multi line tag data format or single line comma separated variable CSV format Each method is described below Comma Separated Variable CSV Format To create an input file usi...

Page 227: ...he tag data format for your input files you must launch the AddImage utility with a special switch as described in Executing the AddImage Command page A 8 The following tag data formatted file would a...

Page 228: ...escriptive line input_filename specifies the path and filename of your input file 3 Click OK to launch the utility If the tool did not run successfully an error message will appear indicating the sour...

Page 229: ...de class You must select a Model image which has already been defined and you must be sure to specify the name of the model image using the correct case Enterprise This field specifies the Enterprise...

Page 230: ...equired or allowed you can also add a specific argument string or one or more of several available substitutions I inserts the IP address of the selected node C inserts Community Name associated with...

Page 231: ...to add extra lines are ignored Note that the filename cannot contain spaces If you wish the first line of your file can contain a comma separated list of the available field names if you choose not to...

Page 232: ...d file would create a node class called Famous_MV This sample demonstrates that optional fields you do not wish to use need not appear in the tool entry it also demonstrates how to assign multiple val...

Page 233: ...led information about the processing of the selected input file and its success or failure will be written to the NetSight Element Manager x x Log PostInst log file You can view this log file via Note...

Page 234: ...Batch Customization via AddTool AddImage and AddDevType A 14 Viewing the Log File...

Page 235: ...roperties 4 32 Classes 4 14 4 17 5 11 5 14 Classes View 5 5 Clear acknowledged and closed events hourly 2 25 Clear deleted events hourly 2 25 Clear normal and informational events hourly 2 25 Communit...

Page 236: ...nfiguring for text elements 6 38 G General Node Class Properties 4 44 General Properties 4 30 Get MAC address 3 21 Getting Help 1 2 Using On line Help 1 2 graphical objects in maps 6 26 graphical prop...

Page 237: ...3 status reporting 6 1 Method 4 35 Model 4 14 5 11 Module View window 7 2 N Name 4 13 4 30 4 45 5 10 Network options 2 15 Node Class page 4 40 node database polling 2 18 Node options 2 20 Notes 4 30 4...

Page 238: ...s Group 4 14 5 11 Status Groups 4 16 5 14 status propagation desktop 4 12 5 9 6 5 Submap icons cutting pasting moving deleting 6 59 submap relationships creating 6 4 submap relationships restrictions...

Reviews: