Digi Digi CM 16 User Manual Download Page 134

Port clustering

Configure port clustering

Digi CM User Guide

134

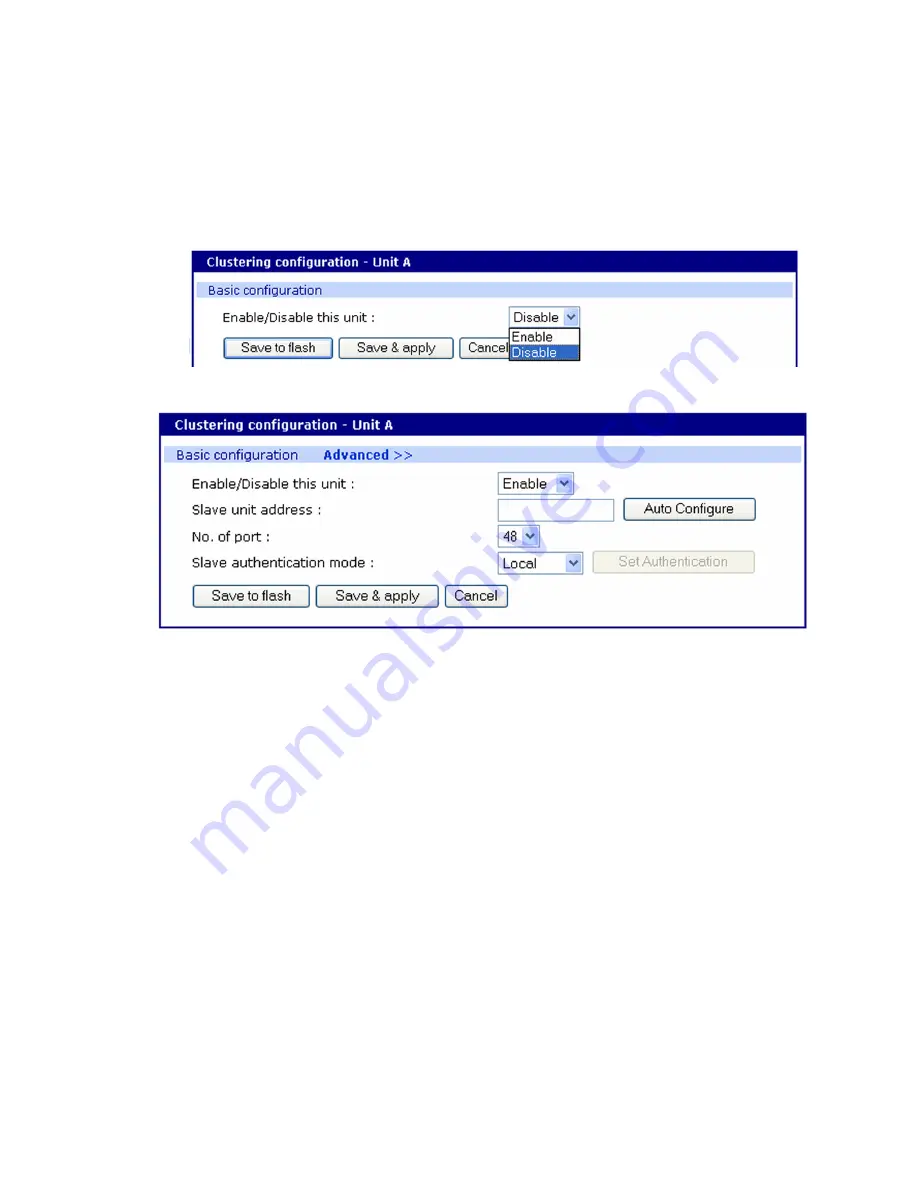
Advanced clustering configuration

To refine a cluster environment, use the following parameters for advanced configuration of a 

cluster. To access the Advanced menu follow the proceedure listed below.

1

Select Clustering > Configuration > Master > Save & apply.

2

Select the port number > Enable > Save & apply.

3

Select Advanced from the Clustering >Master mode. 

Enable

 - This shows whether the port is enabled or disabled. All ports are enabled by default.

Slave unit address

 - IP address of slave.

No. of ports

 - Number of ports on slave. 

Slave authentication mode 

- To specify if your database is controlled by the master unit, or 

locally by the slaves themselves.

Update Master on Changes

 - Automatically updates port name changes, port settings, and user 

permission settings to the master unit. Generally, Update Master on changes should be yes. 

Connect to slave unit to change configuration 

- A quick access method to connect to the slave.

Source port 

- This is the port number that you would access to get to the slave on the master 

unit. The first slave port defaults to 7100 for the port access menu and the port numbers increase 

according to the number of ports on the Digi CM unit. 

Destination port 

- The destination port is the corresponding port number on the slave unit. On a 

32-port slave unit, the destination port numbers range from 7001 to 7032.

Protocol 

- The four options are N/A (not available), SSH, Telnet, and RawTCP.

Base source port 

- If you choose not to use AutoConfig, you can set these ports manually. Base 

source port is the first port number on a master unit. By default the base source port on the 

master unit is 7001. The base source ports extend the master’s ports via the slave ports. For 

example, starting the base source port number with 7101 results in a 32-port unit being 

numbered from 7101 to 7082. Port number 7100 is the port access menu of the slave. If you 

configure the device manually, the port access menu must also be configured separately.

Summary of Contents for Digi CM 16

Page 1: ...User Guide Digi CM 8 port 16 port 32 port and 48 port...

Page 2: ...d warranties of fitness or merchantability for a particular purpose Digi may make improvements and or changes in this manual or in the product s and or the program s described in this manual at any ti...

Page 3: ...cape menu 17 Description of fields 19 SNMP 19 Save and apply changes 19 One step save and apply changes 19 Two step save to flash and then apply changes 20 Locater light 20 Getting started Introductio...

Page 4: ...47 Host mode configuration 48 Console server mode 48 Terminal server mode 49 Dial In modem mode 49 Dial In terminal server 50 Configure host mode 51 Supported protocols 52 Serial port parameters 52 DT...

Page 5: ...o a menu 86 Default menu 86 Port Access menu 86 Microsoft SAC support About the Digi CM Unit s support for Microsoft Windows Server 2003 89 Setup overview 89 Setup the Windows Server 2003 port 90 Comm...

Page 6: ...d a PC modem 118 Configure for Dial In Terminal Server access 118 Power Controller Introduction 121 Install Power Controller 122 Configure Power Controller 122 Configure the serial port parameters to...

Page 7: ...u 155 Access the configuration menu 155 Configure SSH 155 Add edit and remove users 156 Add and configure a PC card 156 Host Mode Configuration 157 Port parameters 158 Port Access Menu 158 System logg...

Page 8: ...2 DB 25 Female console adapter 183 DB 25 Female to RJ 45 pin assignments 183 DB 25 Male modem adapter Digi 8 pack reorder P N 76000670 184 DB 25 Male modem to RJ 45 pin assignment 184 DB 9 Male modem...

Page 9: ...and passwords 12 Adding port administrators and users 12 Access lists 12 Ways to configure the Digi CM 12 Ways of accessing the Digi CM ports overview 14 Web interface access menu 14 Port Access Menu...

Page 10: ...led browser It is the first console server to provide a secure graphical user interface for easy out of band management of Microsoft Windows Server 2003 systems It connects to serial console ports usi...

Page 11: ...g NFS PC card Port Access Telnet SSH Reverse Telnet SSH HTTP HTTPS Port escape menu PC Card Support CompactFlash memory card Wireless LAN adapter 802 11b Ethernet LAN adapter PSTN CDMA modem card See...

Page 12: ...h two default users root and system admin The user names of the the Digi CM unit are case sensitive Adding port administrators and users The system administrator and root user can add port administrat...

Page 13: ...Configure network settings on the left navigation bar Directly entering the IP address You can enter the IP address directly into the URL address bar of your browser Of course the IP address must alre...

Page 14: ...he command line interface Ways of accessing the Digi CM ports overview There are multiple ways to access the native serial ports on the Digi CM unit Web Interface Port Access Menu Direct Port Access C...

Page 15: ...er Management units or Rackable Systems Management Card The of User column shows how many users are actually connected to the port and the username of the read write user 1 If you are conducting a spe...

Page 16: ...access menu Access type Permissions Procedure Web interface Any user can use this method 1 Access the web interface 2 Choose Serial port Connection Port access menu connection 3 Log in Telnet Any user...

Page 17: ...iff sessions Every connection method accommodates port escape You configure the escape sequence per port Follow the procedure to configure the port escape sequence 1 Serial Port Configuration Select t...

Page 18: ...escape menu Digi CM User Guide 18 To open a sniff session 1 Click Serial port Connection 2 Select the port you want to access 3 Log in with your user name and password 4 Enter the letter of the port e...

Page 19: ...ves changes but the changes do not take effect until you choose Apply changes The following topics describe how to do each of these operations One step save and apply changes To save and apply changes...

Page 20: ...ial ports This allows you to receive an e mail or SNMP trap if there is a change in the expected response from the device connected to the serial port If the device goes down or is disconnected for an...

Page 21: ...Digi CM User Guide 21 Getting started Introduction 22 Assigning IP settings from the console port 22 Configure for SSH 23 Add edit and remove users 25...

Page 22: ...on the rear panel of the Digi CM unit to a serial port on a workstation using the Ethernet console cable and the appropriate console adapter packaged with the the Digi CM unit The arrow in the follow...

Page 23: ...s for SSH Options The Port Access Menu and individual ports can be configured for SSH Configure the Port Access Menu for SSH 1 Access the web interface 2 Log in as root admin or a member of the port a...

Page 24: ...ows one log in directly to the port 5 Click Save apply Configure a Port for SSH 1 Access the web interface 2 Log in as root admin or a member of the port administration group The default password for...

Page 25: ...s The root user and system administrator can add remove or edit users from the web interface Procedure 1 Access the web interface 2 Log in as root or admin The default password for root is dbps and th...

Page 26: ...from the system For more information about configuring access rights for specific users see Configure user access privileges About shell options The shell program selection determines the interface y...

Page 27: ...Digi CM User Guide 27 Install and configure PC cards Introduction 28 Compatible PC cards 28 Add a compact flash card 28 Add a network card 29 Add a wireless LAN card 30 Add a serial modem 31...

Page 28: ...cards that have been tested with the Digi CM unit visit the Digi support site at digi com products consoleservers digicm productsupport Add a compact flash card A PC card slot is located on the front...

Page 29: ...IDE Fixed Disk Card The options are EXT2 or FAT formats Select the format option and then select the Format button 5 Enter the appropriate parameters on the configuration page 6 Click Save to flash or...

Page 30: ...Under the PC card heading click Configuration Note The card is automatically discovered and a configuration menu is displayed 4 Click Configure the detected card 5 Enter the appropriate parameters in...

Page 31: ...wireless network administrator for the wireless encryption key string 6 Click Save to flash Add a serial modem The modem must first be inserted and installed on your system before it can be used To c...

Page 32: ...Install and configure PC cards Add a serial modem Digi CM User Guide 32 3 Click Configure the detected card 4 Edit any appropriate parameters and Click Save apply...

Page 33: ...Digi CM User Guide 33 System status and port logging Introduction 34 System status log 34 Enable the log storage location 35 Configure system logging 39 Configure port logging 40...

Page 34: ...For basic system information click System status log The parameters for the system status are described in the following list System Information Model No Identification of Digi device Serial No Serial...

Page 35: ...ory to primary NFS server Primary NFS timeout Interval in seconds before timeout 5 3600 Primary NFS mount retrying interval Interval in second between attempts to connect 5 3600 Enable Disable encrypt...

Page 36: ...t up an email alert and or an SNMP trap configuration for an NFS server disconnect To configure this feature use this procedure 1 Farther down the NFS Configuration screen at the Email alert configura...

Page 37: ...erver and select the syslog facility from the drop down menu 5 Click Save apply Enable a compact flash card The compact flash card must be installed and configured on the Digi CM unit before it can be...

Page 38: ...is dependent on the port count of the Digi CM unit used The log file sizes shown in the following table are maximum settings See also Configure system logging Total flash card size Digi CM System log...

Page 39: ...ory choice is always available System logging Enable or Disable System log storage location Memory or NFS server System log to SYSLOG server Enable to store system logs to a SYSLOG server System log b...

Page 40: ...power is turned off You can also define alarm keywords for each serial port and send email alerts or SNMP traps to enable unattended serial data monitoring The following steps configure a serial port...

Page 41: ...This parameter defines the action taken if a NFS partition of a CF card is mounted or re mounted Enable rename the existing log file by adding a xx with xx being an incremented number Disable keep wri...

Page 42: ...ons of the system logs To view the port logs on the NFS server for port number 5 enter the following command more mnt nfs port5data Partial logfiles can also be viewed on the web interface by going to...

Page 43: ...ort 44 Resetting ports 45 Port title 45 Configure Automatic Device Recognition 46 Apply all ports settings 47 Host mode configuration 48 Configure host mode 51 Supported protocols 52 Serial port param...

Page 44: ...on the host and allows applications to talk to devices across a network as though the devices were directly attached to the host In actuality the devices are connected to a Digi device server or term...

Page 45: ...ber 2 Click Reset this port Reset Reset individual port settings Individual ports can be reverted to factory defaults 1 Click Serial port Configuration Port number 2 Click Set this port as factory def...

Page 46: ...t recognized immediately by the Digi CM unit add a rule to the file If Passive detect is selected no probe string is sent to the attached device but the port buffer is analyzed The script tmp cnf pass...

Page 47: ...esult of the Active or Passive detection process Device detection method If Active is selected a probe string is periodically sent to the device and the response is analyzed If Passive is selected the...

Page 48: ...Digi CM unit provides four modes of communication between serial devices and remote hosts Console server terminal server dial in modem and dial in terminal server These are described in the following...

Page 49: ...access servers on the network from a serial terminal RawTCP is also supported with the Terminal Server Mode Dial In modem mode In this mode the Digi CM unit assumes an external modem is attached to t...

Page 50: ...e dial in terminal server mode the Digi CM unit assumes the serial port is connected to an external modem and is waiting for a dial in connection from a remote site When you dial in using terminal app...

Page 51: ...ver The options are MS SAC English and MS SAC International which you use to provide a graphic user interface to the Windows Server 2003 Special Administration Console see Microsoft SAC support and Ot...

Page 52: ...rotocol options The three protocols available are RawTCP SSH and Telnet Choose SSH as the protocol when logging in from an SSH client program to access a port Choose RawTCP when connecting directly to...

Page 53: ...ing the TCP IP protocol However if it is not full the Digi CM unit will also transfer data dependent on the timeout value selected Specialty Use of Port When Data is Processed in Chunks Some applicati...

Page 54: ...very user transaction on the remote system Keyword monitoring and alarm while connection is up Configure remote ports To configure a remote port use the following procedure 1 Access the Digi CM unit s...

Page 55: ...the port number the specific port number is defined on the Host mode configuration page SSH to the port name SSH to the IP and the port number the specific port number is defined on the Host mode conf...

Page 56: ...s and notifications Introduction 57 Configuring SMTP alerts 57 SNMP information 58 Traps 58 Configure SNMP 59 Manage the SNMP protocol 60 Configure port event handling 60 Configure alerts for Automati...

Page 57: ...nit supports both versions 1 and 2 of the SNMP protocol The main function of SNMP on the Digi CM unit is to allow a system administrator to query remote devices for information Configuring SMTP alerts...

Page 58: ...the port level The following table shows where the trap is under Serial port Configuration on the web interface trap name configure options and the trap functions The MIBs for login traps can be foun...

Page 59: ...ach time the network connection comes up EnableLoginTrap Determines whether the SNMP agent generates a trap for each login Note Trap values override all other configuration information meaning all oth...

Page 60: ...S or SNMP browser However before the NMS or SNMP browser can access the data the Access control settings must list the IP address of the host from which the browser is executed See the preceding graph...

Page 61: ...Alerts and notifications Configure port event handling Digi CM User Guide 61 5 Choose Save apply 6 Choose Port event handling The following page appears...

Page 62: ...is any text string that will trigger an alert when it traverses the serial port Configure alerts for Automatic Device Recognition ADR Before configuring the alerts for Automatic Device Recognition be...

Page 63: ...Digi CM User Guide 63 User administration Administer users 64...

Page 64: ...iguration Access lists allow access to the ports and are created by defining the privileges of the lists Access Lists manage rights of multiple users at the same time Multiple users with the same righ...

Page 65: ...Spelling is not verified against the local user database This allows you to add externally configured users that only exist in the RADISU LDAP or other central databases Remove a user 1 Check the box...

Page 66: ...er is assigned Groups include Root System Admin Port Admin and User See User groups for more information Password Password to assign to the user This must conform to the rules stipulated above for a u...

Page 67: ...and authentication Introduction 68 Configure network IP filtering 68 Configure User Access Control 72 Security Profile 76 Authentication 78 Configure authentication methods for port access 79 Configu...

Page 68: ...ity parameters per network port or password The Digi CM unit supports several authentication methods including Local RADIUS TACACS LDAP Kerberos The Kerberos module is not part of the normal firmware...

Page 69: ...IP Filtering rules Telnet console TCP IP port 23 SSH console TCP IP port 22 Web configuration TCP IP port 80 The fields are described next Interface The name of the network interface through which a...

Page 70: ...her hosts try to access You can specify either one port using a single value or a range of ports in this form port1 port2 where port1 defines the lowest port and port2 the highest port Chain rule Dete...

Page 71: ...rt23 The Invert option specifies that the rule applies to all addresses except those listed The rule says to Drop traffic from all addresses not listed 3 Define access to the Digi CM unit using HTTP p...

Page 72: ...ding users see User administration Note Users do not need to be authenticated locally they can be users on any configured authentication server Using Access lists you can add rights to a single user o...

Page 73: ...e on the remote authentication server or configured locally The username is case sensitive In the next example three users are configured on the Digi CM unit Jeff Tim and Paul To give Tim and Paul rea...

Page 74: ...tice that Everyone has more access than Jeff does Note The usernames and passwords on the Digi CM unit are case sensitive Notice Everyone has access to Port Monitor and Power while Jeff has access to...

Page 75: ...e else is using the port The Digi CM unit supports multiple concurrent sniff sessions Type of users Access types How to permit or restrict Only specific users have access Permitted Users Access type i...

Page 76: ...erial port Display data direction arrows Enable Disable Displays arrows to indicate the direction of data to or from the server When the second user accesses the port the global Port escape menu is di...

Page 77: ...n hard wired serial dial up modem or both In such situations the Ethernet connection is used only for reports and alerts SSHv1 SSHv1 Secure Shell Version 1 SSHv1 uses server and host keys to authentic...

Page 78: ...gth passwords can be 8 255 characters long and must include three of these four categories of characters English uppercase characters A Z English lowercase characters a z Base 10 digits 0 9 Non alphab...

Page 79: ...To configure the Digi CM unit for authentication do the following 1 Access the web interface 2 Under the Serial port heading choose Configuration 3 Choose All or an Individual port Authentication 4 F...

Page 80: ...you to ports and the configuration LDAP authentication The Digi CM unit supports authenticating against an LDAP based database including LDAP systems running on Linux servers as well as Microsoft Act...

Page 81: ...usr 2 on the Digi CM unit 2 Use an scp client like WinSCP to copy data to the usr2 directory or download the ftp client for the Digi CM unit from support digi com 3 Make sure the module is flagged to...

Page 82: ...Digi CM User Guide 82 Custom and default menus Introduction 83 Make custom menus 83 Default menu 86...

Page 83: ...ports Custom menus can only be configured via the web however they can only be accessed via the shell command line Make custom menus Before making custom menus plan the kind of menus and menu items yo...

Page 84: ...dd users Create menu names To make a custom menu do the following 1 Access the web interface 2 Custom Menu Configuration 3 Enter the Menu Name to assign and click the Add Menu button The menu is added...

Page 85: ...reate new submenu Assign a name for a new submenu that this menu item will be assigned or linked to Go to existing submenu Choose an existing submenu from the drop down menu that this menu item will b...

Page 86: ...d 3 Choose a menu for a user by selecting a menu from the drop down Assigned Menu list 4 Choose Save apply Default menu Port Access menu The Port Access menu is a flat one level menu showing all ports...

Page 87: ...port to connect to the Digi CM unit initiates a connection to this port using the appropriate protocol Telnet of SSH You can also change your own password by using the P Key If the Digi CM unit is co...

Page 88: ...C support About the Digi CM Unit s support for Microsoft Windows Server 2003 89 Setup the Windows Server 2003 port 90 Setup the Digi CM Unit for SAC support 90 Access the Windows Server 2003 Console p...

Page 89: ...and line are available from a graphical user interface GUI SAC features accessible from this interface include Reset and shutdown Show performance values like memory utilization Show and configure IP...

Page 90: ...ort com id baud 115200 where com is the COM port to which console traffic will be redirected is the is the number of the boot entry The port speed is set to the recommended rate although you can use a...

Page 91: ...ply 8 Configure serial port communication settings by doing the following a Choose Serial port parameters from the menu b Adjust settings as required This includes ensuring that the Baud rate matches...

Page 92: ...Choose Serial port Connection A screen similar to the following appears 3 Click on the title of the port to which the Windows Server 2003 console port is connected Note If support for Windows Server 2...

Page 93: ...2003 Shutdown Shuts down the Microsoft Server 2003 Caution This switches off the server and you can no longer access it remotely Performance Provides access to Microsoft Server 2003 status informatio...

Page 94: ...KVM Introduction 95 Use Virtual KVM with Remote Desktop protocol 96 Use Virtual KVM with VNC protocol 99 Use Virtual KVM with X Window System Protocol and XManager software 102 Virtual KVM Assistant 1...

Page 95: ...iguration This diagram shows the Digi CM managing a Linux SuSE 9 2 system a Windows 2003 system and an HPUX system Virtual KVM protocols This table lists the Virtual KVM protocols and the client softw...

Page 96: ...stem through Virtual KVM using Remote Desktop Protocol Configure To set up Virtual KVM with Remote Desktop protocol follow this procedure 1 Access the Digi Passport Web interface and log in 2 Choose S...

Page 97: ...rogram drop down list select Windows remote desktop connection 7 If you are not using IP automatic detection enter the IP address 8 Click the Save Apply button Note If you are using Remote Desktop con...

Page 98: ...icon 2 Click OK in each of the three Java confirmation request windows The applet first checks whether the optional Virtual KVM Assistant is installed on the system Then If the applet is installed it...

Page 99: ...cation is in the search path on your server See Install programs for Virtual KVM Use Virtual KVM with VNC protocol This section describes how to Configure Virtual KVM with VNC Protocol Connect to a sy...

Page 100: ...e Virtual KVM with VNC protocol Digi CM User Guide 100 3 Double click the port you want to configure A window similar to this one opens showing the serial port number and title 4 Select the Virtual KV...

Page 101: ...connect through the Connection window and a Virtual KVM connection is configured you now see The terminal monitor button which connects to the serial console A mouse button next to the monitor icon wh...

Page 102: ...normal behavior if the applet does not find the Virtual KVM assistant The application starts and you see a message that the connection succeeded The Virtual KVM VNC Connection opens 3 Enter your user...

Page 103: ...th X Window System Protocol and XManager Software follow this procedure 1 Access the Digi Passport Web interface and log in 2 Choose Serial Port Configuration You see this window 3 Choose the port you...

Page 104: ...tor button which connects to the serial console A mouse button next to the monitor icon which connects to the Virtual KVM graphical interface To connect through Virtual KVM using X Window System Proto...

Page 105: ...nter your user name and password and click OK If the application does not start check to make sure that the application is in the search path on your server See Install programs for Virtual KVM Virtua...

Page 106: ...indows XP 2000 NT Linux Users need to download the program to use it The Digi Passport java applet automatically detects the program if it is present and in your path Install programs for Virtual KVM...

Page 107: ...ream To get to the VGA video stream do either of these steps Install additional software tsmmc msc on your XP system At the command line change the command in Virtual KVM from RDC to tsmmc msc The VGA...

Page 108: ...ry Usage notes Follow the distribution specific instructions for enabling VNC support on your Unix or Linux Server Xmanager Client software needed The Xmanager software is available for free 30 day ev...

Page 109: ...Digi CM User Guide 109 Rackable Systems management card Introduction 110 Setup the Digi CM Unit to support the Rackable Systems management card 110...

Page 110: ...offers a graphical web based user interface to manage the Rackable Systems Management Card Setup the Digi CM Unit to support the Rackable Systems management card To set up the serial port to provide a...

Page 111: ...om the Digi CM Unit s User Interface 1 Access the Digi CM unit s web interface 2 Under the Serial Port heading choose Connection A screen similar to the following appears 3 Click on the icon in the M...

Page 112: ...er by sending a 500ms reset signal to the server Connect Spawn the Java Telnet applet or the local Telnet SSH application to connect directly to the port LED Mgmt LED Management To control the LED in...

Page 113: ...rrent temperature inside the Rackable Systems Server Power delay Time in seconds before the server starts up after applying power 0 98 seconds 99 means no power on delay Power sense The power sense op...

Page 114: ...Digi CM User Guide 114 Rackable Systems management card Introduction 115 Configure for dial in modem access 115 Add a PC modem 118 Configure for Dial In Terminal Server access 118...

Page 115: ...elnet or SSH client to a pre defined server RawTCP is also an option for dial in users For more information on the different types of Host mode configuration see Host mode configuration Configure for...

Page 116: ...See your modem user manual for more information Callback For security reasons the callback feature can be activated If callback is enabled the Digi CM unit does not accept any incoming calls After th...

Page 117: ...st started Calling to 1234444567 07 16 2004 12 45 22 Modem connected through Port 15 07 16 2004 12 45 22 Port 16 Modem Test succeeded In this example a modem connected to port 16 is calling another mo...

Page 118: ...The host mode Dial In Terminal Server is identical to the host mode Terminal Server but allows you to configure a modem init string In this mode an incoming modem connection is automatically connected...

Page 119: ...accessed is automatically connected to a system on the network Protocol The protocol that will be used to establish the connection to Destination IP port The options are SSH RawTCP and Telnet Inactivi...

Page 120: ...r Introduction 121 Install Power Controller 122 Configure Power Controller 122 Set alarms and thresholds 123 Outlet configuration 124 User access for Power Controller 125 Power Controller management 1...

Page 121: ...gured through the Digi CM unit for non serial devices The second scenario is a serial device such as a router or server managed through a port on the Digi CM unit with its power supply mapped through...

Page 122: ...turn it on Note The DIP switches on the Digi RPM unit are used for cascading Make sure that the dip switches of the first unit are set to off For more information about cascading refer to Cascade mult...

Page 123: ...the port number it is connected to You have the ability to change this title in step 5 if needed 4 Click Add controller 5 After the controller is detected automatically you can correct the number of p...

Page 124: ...controller click Outlets 2 Click the outlet number to configure 3 Select the serial port number that controls the device connected to the Digi CM unit if any If the port number has a title it will app...

Page 125: ...ontroller The Digi CM unit can be configured to allow all users or specific users access to the power controller feature as well as restricting specific users to the power controller feature User Acce...

Page 126: ...entered Note The screen above shows outlets 1 2 control power to the Sun Server configured on port 1 of the Digi CM unit Outlets 3 and 4 are not serial devices Gilligan has been designated the specif...

Page 127: ...pply Note Gilligan does not have access to Outlet 4 Power Controller management The Power Controller Management option allows you to change outlet settings or get a quick update of the power controlle...

Page 128: ...pending on what you want the outlet to do Cascade multiple Digi RPM units The Digi RPM power controllers can be cascaded when used with the Digi CM unit The DIP switches on the front panel of the Digi...

Page 129: ...Power Controller Cascade multiple Digi RPM units Digi CM User Guide 129 The following table shows all possible IDs that can be configured on the Digi RPM unit...

Page 130: ...Power Controller Cascade multiple Digi RPM units Digi CM User Guide 130...

Page 131: ...Digi CM User Guide 131 Port clustering Introduction 132 Configure port clustering 132...

Page 132: ...figuration To set up the Digi CM unit for port clustering you will need to Configure all the Digi CM serial ports Assign one Digi CM unit as the master clustering device all other Digi CM units defaul...

Page 133: ...n mode Local authentication is the slave independently authenticating all port access Master authentication is the master performs port authentication Users do NOT need to be defined on the slave unit...

Page 134: ...unit to change configuration A quick access method to connect to the slave Source port This is the port number that you would access to get to the slave on the master unit The first slave port default...

Page 135: ...Access the cluster ports You can connect to the slave port using the web Telnet or SSH client You can access the port access menu or custom menu of each slave device or connect directly to each slave...

Page 136: ...ring Digi CM User Guide 136 SSH 1 Click on the port with SSH protocol 2 Login 3 Enter the port escape sequence listed on the page Depending on your access rights you can sniff read only or monitor rea...

Page 137: ...ration Introduction 138 Upgrade the firmware 138 Configuration management 138 Automatically upgrade the Digi CM Unit s firmware or configuration using TFTP 140 Reset factory defaults 143 Set the date...

Page 138: ...al machine or CF card if configured 4 Choose the Browse button and locate the firmware download 5 Choose Upgrade The Digi CM unit will automatically reboot when the upgrade is complete Note Do not pow...

Page 139: ...tion Periodic used to set the save option per your time frame 10 minutes after last change as described Location CF card Primary NFS server User space Send via email options for where to save the conf...

Page 140: ...sm During boot the Digi CM unit can verify a hash file and determine if it needs to download upgrades from the TFTP server There are multiple ways to configure the TFTP upgrade function DHCP The DHCP...

Page 141: ...figuration file with one line per entry Each entry defines one upgrade action There are three actions defined 1 Upgrade firmware 2 Upgrade configuration 3 Upgrade any file 4 Execute an application The...

Page 142: ...The file tmp cnf cnfversion is a hidden file Example config tar gz DigiPassport48 v1 6 0 After the firmware configuration is upgraded the Digi CM unit boots again A sample hash file can be downloaded...

Page 143: ...face The web interface provides the option of retaining the IP settings To use the web interface to reset the Digi CM unit do the following 1 Access the web interface 2 System administration Configura...

Page 144: ...NTP server choose Enable the NTP server s IP address the Time offset and the Date and Time fields or To use the internal battery fill in the Date and Time fields only Note If you change your time zone...

Page 145: ...System administration Configure a host name Digi CM User Guide 145 3 Enter the name you want to assign the Digi CM unit 4 Choose Save apply...

Page 146: ...Digi CM User Guide 146 Command line interface Introduction 147 Linux commands 147 Important file locations 148 Example scripts 150 User administration 152...

Page 147: ...listing of commands and does not detail what the commands do or give their particular parameters If you need more information see the man pages on a Linux system Two commands that are very important f...

Page 148: ...and unmounts the cnf file If the configuration files are modified in the tmp cnf file and the configuration is saved to flash saveconf the unit mounts the cnf file and compresses the tmp cnf to cnf cn...

Page 149: ...os information keywords Keywords for alert configuration menu All custom menu information xml files pap secrets PAP auth via PPPoE passive detect Passive auto detection of serial devices passwd User p...

Page 150: ...Disabling Telnet is just shown as one example 1 Create a new script file usr2 run user that includes the commands you want iptables A INPUT p tcp dport 23 j DROP 2 Run the following command to make t...

Page 151: ...null do sleep 5 done usr sbin inetd 4 Reboot reboot Note If you factory default the unit the usr2 rc user script file is moved to usr2 rc user old and the default rc user file will be restored Example...

Page 152: ...ptions are CLI Command Line Interface Config menu Port access menu or Custom menu bin bash CLI bin editconf Configuration menu bin vts master Port access menu bin menu Custom menu These are the four t...

Page 153: ...ve the locator feature without a Find Me LED To identify another Digi CM unit all the LEDs blink when the feature is activated The file and syntax for the locator LED is bin blinkled start stop Exampl...

Page 154: ...iguration 157 Port parameters 158 Port Access Menu 158 System logging 159 Configure SNMP 160 Configure SMTP 161 Network IP filtering 161 Port IP filtering 162 Sniff sessions 163 Authentication 165 Upl...

Page 155: ...ministrator can only change serial port parameters The configuration menu enables the authorized users to configure the Digi CM unit with the same functionality as is available with the web interface...

Page 156: ...nistration and then choose an operation to perform Add Remove or Edit 2 Configure the user as required 3 Use the ESC key to return to the main configuration menu 4 Choose Exit and apply changes Add an...

Page 157: ...searches for the card and displays information on the product model number and type of card 4 Use the ESC key to back out to the main configuration menu 5 Choose Save Changes Host Mode Configuration...

Page 158: ...2 Choose Serial Port Configuration an individual port number or 0 zero for all ports 3 Enter the desired parameters for each menu item 4 Use the ESC key when all parameters are entered to return to th...

Page 159: ...part process First the device being used to record the system logs must be configured Secondly system logging must be configured for the system under System status and log System logs can be saved to...

Page 160: ...Enter the desired parameters for the menu items 4 Use the ESC key when all parameters are entered to return to the main menu 5 Choose Save changes Configure SNMP To configure SNMP from the configurat...

Page 161: ...2 Choose Network configuration SMTP configuration 3 Enter the desired parameters for the menu items 4 Use the ESC key when all parameters are entered to return to the main menu 5 Choose Save changes N...

Page 162: ...ey to return to the main menu 5 Choose Save changes Port IP filtering To configure the Digi CM unit for Port IP filtering do the following 1 Access the configuration menu 2 Choose Serial port configur...

Page 163: ...ss the configuration menu 2 Choose Serial port configuration 3 Choose an individual port number or 0 zero for all ports User access control 4 Choose User Access Control 5 Choose Enable Disable Sniff M...

Page 164: ...next user with port access rights to enter the port will be given the option to take over the main session This user is given the option to take over the main session by either terminating the first...

Page 165: ...cation 4 Choose Authentication type 5 Use the ESC key to return to the main menu 6 Choose Save changes r reboot device using power switch only if power management is available on this port p power dev...

Page 166: ...cate for the HTTPS interface OpenSSL SSLeay Simple CA Usage Install Openssl 1 Download latest openssl package 2 Install openssl package cd work tar xvzf openssl 0 9 7c tar gz cd openssl 0 9 7c config...

Page 167: ...me full name Your State Minnesota Locality Name eg city Minneapolis Organization Name eg company Digi International Organizational Unit Name eg section Enter Common Name eg YOUR name Bob Alou Email Ad...

Page 168: ...following extra attributes to be sent with your certificate request A challenge password Press Enter Do not enter any other characters An optional company name Press Enter Do not enter any other chara...

Page 169: ...erify signed certificate newcert pem is generated ls demoCA key pem newcert pem newreq pem req pem Make certificate for the Digi CM Unit 1 Removing headings in newcert pem file cd work openssl 0 9 7c...

Page 170: ...onfigured for a dial in modem To configure a serial port for a dial in modem do the following 1 Access the configuration menu 2 Choose Serial Port Configuration 3 Choose an individual port number and...

Page 171: ...ges Clustering By default clustered slave devices are configured using the Telnet protocol and port parameters of the following bps 9600 data bits 8 parity none stop bits 1 flow control none When the...

Page 172: ...Select Enable configuration 9 Select Auto Configuration 10 Choose Exit and apply changes Firmware upgrade Before upgrading firmware from the configuration menu you should have Downloaded the firmware...

Page 173: ...store the unit to its factory defaults The options are restoring all factory defaults or restoring all factory defaults except IP settings To restore your unit to the factory defaults do the following...

Page 174: ...hernet cable packaged with the Digi CM unit and attach the DB 9 adapter The arrow in the following graphic points to the Console Port 2 Set up a terminal emulation program such as HyperTerminal using...

Page 175: ...w control none 3 Reboot or power on the Digi CM unit 4 Press the ESC key within three seconds of applying power to the device 5 The following screen appears 6 Choose Firmware upgrade by entering 3 The...

Page 176: ...Configuration menu Access the Boot Loader program Digi CM User Guide 176 10 Choose Exit and boot from flash...

Page 177: ...de 177 Hardware information Introduction 178 Hardware specifications 178 LED indicators 180 About serial port cabling 180 Serial port pinouts 181 Cable adapters 181 Ethernet pinouts 185 Rack mounting...

Page 178: ...10 to 90 non condensing 10 to 90 non condensing Power supply Internal 100 240VAC 50 60 Hz 1 2A max Internal 36 72 Vdc 1 2A max Power consumption 0 37A 120VAC 45W typical 150W max 0 4A 48Vdc 19W typic...

Page 179: ...at embedded SDRAM 64 megabytes 64 megabytes Flash memory 8 megabytes 8 megabytes Dimensions unpackaged 17 x 8 5 x 1 75 431 8 cm x 215 9 cm x 44 5 cm 17 x 8 5 x 1 75 431 8 cm x 215 9 cm x 44 5 cm Dimen...

Page 180: ...25 male adapter provides a modem connection See the cable adapter information that follows later in this chapter Note The cable length restrictions common to RS 232 cables apply to the Digi CM serial...

Page 181: ...ions show cable adapter pin outs Additional adapters can be purchased from Digi in quantities of 8 DB 25 Male console adapter Digi 8 pack reorder P N 76000672 DB 25 Male to RJ 45 connector pin assignm...

Page 182: ...ts 6 TxD Connected to 3 RxD 7 DTR Connected to 6 DCD 8 DSR 8 RTS Connected to 5 CTS RJ 45 Signal DB 9F Signal 1 CTS Connected to 7 RTS 2 DSR Connected to 4 DTR 5 DCD 3 RxD Connected to 3 TxD 4 GND Con...

Page 183: ...ck reorder P N 76000673 DB 25 Female to RJ 45 pin assignments RJ 45 Signal DB 25M Signal 1 CTS Connected to 4 RTS 2 DSR Connected to 20 DTR 5 DCD 3 RxD Connected to 2 TxD 4 GND Connected to 7 GND 6 Tx...

Page 184: ...P N 76000670 DB 25 Male modem to RJ 45 pin assignment RJ 45 Signal DB 25M Signal 1 CTS Connected to 5 CTS 2 DSR Connected to 6 DSR 3 RxD Connected to 3 RxD 4 GND Connected to 7 GND 5 DCD Connected to...

Page 185: ...unit uses a standard Ethernet connector that is a shielded and compliant with AT T 258 specifications RJ 45 Signal DB 9M Signal 1 CTS Connected to 8 CTS 2 DSR Connected to 6 DSR 3 RxD Connected to 2 R...

Page 186: ...A 70 Connect equipment to a DC supply source reliably earthed that is electrically isolated from the AC source Directly connect the equipment chassis to the DC supply system grounding electrode conduc...

Page 187: ...Digi CM User Guide 187 Certifications Safety 188 Power and ground Digi CM 48 single and dual power 190 Emissions 190 Immunity 190 Solaris ready 190...

Page 188: ...informations de date et d heure Si vous devez r initialiser plusieurs reprises les informations d heure et de date apr s avoir allum l unit Digi CM remplacez la batterie ATTENTION Une nouvelle batteri...

Page 189: ...elsewhere Locate the DC supply source within the same premises as the equipment Route away and secure all DC input wiring from sharp edges to prevent chaffing as well as provide strain relief Provide...

Page 190: ...tective earthing connection Emissions US FCC part 15 Class A Canada ICES 003 Class A Europe EN55022 Japan VCCI Australia AS3548 Immunity Europe EN55024 1998 EN61000 3 2 2000 EN61000 3 3 1998 Solaris r...

Reviews: