background image

Making Phone Calls

April 15, 2003

T-Mobile Sidekick Owner’s Manual

 67

3

You can end the conference by dropping the two calls individually by selecting the 

End Call 

buttons in turn, 

or by selecting the 

 button.

Answer a Call

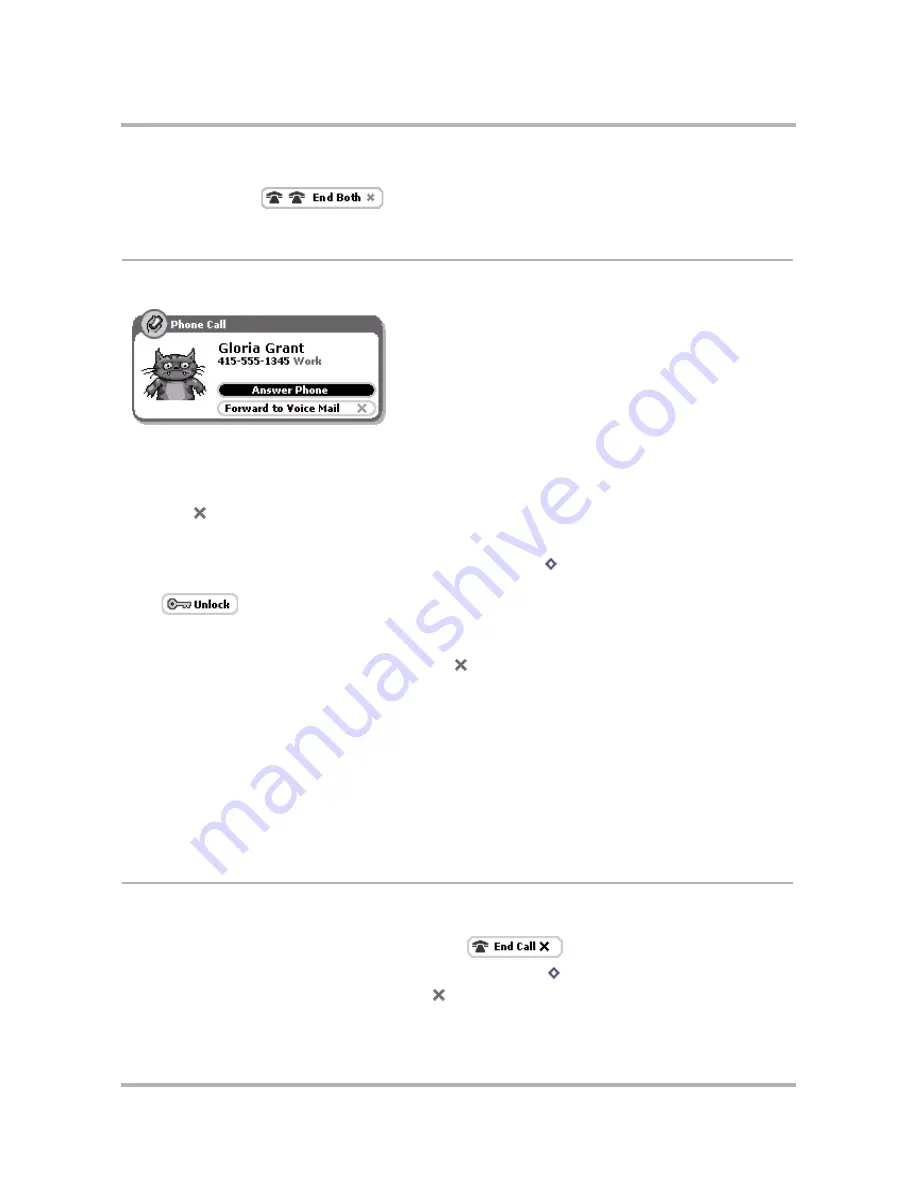
When you receive a new incoming phone call, you will see a notification screen like the following:

Since the 

Answer Phone

 button is highlighted by default, all you have to do is press the wheel to answer the 

call.

To send the call directly to voice mail

, highlight and select the 

Forward to Voice Mail

 button, or simply 

press 

Back

  .

There are a couple of special cases you should know about:

If your device is locked when a call comes in

, press 

Menu

   to unlock the wheel, then press the 

wheel to answer the call. Once you’re on the call, the phone screen will include a button that allows you to 

 the device so you can use the Menu, Back, and Jump buttons.

If you are already in a call when another call comes in (call waiting)

, the notification screen will 

include a button to 

Switch Calls

. If you press this button, the first call will be put on hold. Alternatively, 

you can press the 

Forward to Voice Mail

 button   to send the incoming call straight to voice mail.

About Caller ID

If your caller does not have Caller ID blocked on their phone account, then the incoming call notification screen 
will include the caller information. In addition, if you have the caller in your Address Book, the notification screen 
will be further personalized with the label on the phone number and an identity icon, if you have stored this 
information.

For example, in the case that the caller does 

not

 have Caller ID blocked and you have the caller in your Address 

Book, you could get a notification screen that looks like the one in the illustration above for caller Gloria Grant.

End a Call

There are a few ways you can end your phone call:

If you are in the Phone application

, select the 

 button.

If you are in an application other than Phone

, press 

Menu

   then select 

End Call

.

Regardless of where you are

, press 

Back 

.

Summary of Contents for T-Mobile Sidekick

Page 1: ...elease 1 0c April 15 2003 Copyright 2002 2003 Danger Inc All rights reserved Confidential material of Danger Inc 124 University Avenue Palo Alto CA 94301 May not be duplicated or copied without the pr...

Page 2: ...tons 19 Wheel 22 Terminology Used in This Manual 22 Headset Camera Jack 25 Power Jack 25 Infrared Port 25 USB Mini B Port 26 Typing and Navigating in Text Fields 26 3 About Your SIM Card 27 What Is a...

Page 3: ...e Page 53 Search the Web 53 Use Bookmarks 54 See Recently Viewed Web Pages 55 View History 56 Refresh a Web Page 56 Stop a Web Page from Loading 56 Web Browser Settings 57 7 Making Phone Calls 59 Phon...

Page 4: ...mail Accounts 98 Send a Photo 101 Manage Email Folders 102 Email Settings 104 Space Limitations 107 10 Phone Messaging 108 Phone Messages Splash Screen 108 Browse Messages Screen 109 Status Indicators...

Page 5: ...nts 132 Upcoming View 134 Day View 135 Week View 136 Month View 137 Year View 138 Trash View 138 Go To a Specific Day 139 13 Taking Photos 140 Camera Splash Screen 140 Keyboard Shortcuts 141 Insert th...

Page 6: ...een 160 Bubbles 161 Code Monkey 162 Shuffle 163 Lab Ratz 164 18 The Desktop Interface 166 Signing In To the Desktop Interface 166 Jump Page 167 The T Mobile Sidekick Owner s Manual 167 More About the...

Page 7: ...ent 202 Discard an Event 202 Manage Your Trash 203 Import Contacts 204 22 Camera Gallery on the Web 205 Opening Camera Gallery on the Web 205 Sort Your Photos 206 Rename Your Photos 206 Discard a Phot...

Page 8: ...Contents April 15 2003 T Mobile Sidekick Owner s Manual 8 25 Settings on the Web 215 Opening Settings on the Web 215 Account Information 216 System Information 216...

Page 9: ...e Reference Guide T Mobile service introduction guide If you find that anything is missing please contact T Mobile Customer Care by calling 1 800 937 8997 or by going to www t mobile com help Before y...

Page 10: ...5 characters can include both letters and numbers but no spaces single quotes semicolons backslashes or percent signs You will be asked to type your password twice for confirmation Note that your pass...

Page 11: ...taking any actions such as receiving emails To avoid additional charges while roaming go to Jump Settings Wireless Options and clear the GPRS Data Roaming On check box If you do roam with GPRS Data R...

Page 12: ...r device for one day In power saving or even key guard mode the battery should last seven days These times are approximate however battery operation times vary according to how you use your device sig...

Page 13: ...required press and hold the keyboard On Off Power key for four seconds To turn off the radio press the Jump button then press Menu and select Settings Select the Wireless Options button then on the di...

Page 14: ...ttons are exposed so you can use your device When you open the display lid by rotating it clockwise the display automatically flips 180 degrees Read more details below Warning The hinge in the swivel...

Page 15: ...pring smoothly into position 2 To close the display reverse the motion to pivot the lid counter clockwise and lock it into the closed position Standard Display Screen Indicators The display screen is...

Page 16: ...old this thermometer indicator flashes over the battery Wireless signal strength The more signal bands showing the stronger the signal strength of the wireless connection at your current location No w...

Page 17: ...ing you that there s a message waiting In the example above there s an email message waiting to be read Other icons you might see notify you of the following New email waiting New text message SMS wai...

Page 18: ...t directions or positions The topics below describe the keyboard in more detail Directional Pad D Pad The D pad is the round navigational device in the lower right corner of the keypad that you can ro...

Page 19: ...ceive messages or phone calls Incoming calls are forwarded to voice mail To power your device on and off use the On Off button It is located just to the left of the Z key on the keyboard and is marked...

Page 20: ...t keys User definable Read more in Jump Shortcuts on page 38 System defined You ll find the system defined shortcuts listed in the menus to the right of a given option For example in the Email applica...

Page 21: ...h the applications To go to an application you have highlighted press the wheel Read more in the Wheel on page 22 and The Jump Screen on page 48 Back Button The Back button is located in the lower rig...

Page 22: ...open a pop up menu Press and hold the wheel to open pop up context menus Terminology Used in This Manual The instructions in this manual use many terms that may be confusing To help you understand exa...

Page 23: ...are presented in the documentation as follows K Press the Menu button and hold while pressing the K key Press the Menu button first then the Back button in succession So if two keys or buttons are sep...

Page 24: ...ts it Press hold Push down on a key or control button and hold it down for at least one second Rotate Used to describe the push wheel s rotational movement You can rotate the push wheel up away from y...

Page 25: ...arning Be sure to remove the camera from the jack when you re not using it especially when you re storing your device in a backpack pocket bag or purse Power Jack The power jack is located at the top...

Page 26: ...o navigate within a text box Press the up down and left right arrows to move in those directions among characters in a text box Press the ALT button while using the D pad up and down arrows to jump to...

Page 27: ...a up to 10 digit mobile subscriber identify number Mobile Subscriber ISDN MSISDN Number Your mobile telephone number ISDN stands for Integrated Services Digital Network SIM PIN A Personal Identificati...

Page 28: ...data that has been cached in the device memory If you find you must remove your SIM please follow the directions that follow How to Remove Your SIM 1 To avoid seeing error messages turn off your devic...

Page 29: ...ur SIM card very carefully since the card and gold contacts can be easily damaged by scratches or bends Be sure to keep SIM cards out of reach of small children What Happens If I Lose My SIM Call T Mo...

Page 30: ...mize your device for your personal use Use the tables below to guide you through the screens For more details on each screen follow the links in the first column Device Settings The Settings Screens o...

Page 31: ...ar Keyboard repeat rate slider bar Network on page 44 Scan for other networks Sound on page 45 Device sound music volume slider bar Mute Un mute button System Sounds check box and volume slider bar Ke...

Page 32: ...k box Ring for receipt of new email check box Ringtone pop up menus Automatic Message Management Save outgoing messages in Sent folder check box Empty Trash every night check box Auto discard msgs whe...

Page 33: ...menu Select Controls The Controls Settings From the Controls you can do the following Mute button Quickly switch to quiet mode by pressing this button Press again to un mute Volume slider Adjust the...

Page 34: ...ct it a check will appear in the box 4 If you want the replacement rules listed on the screen to be in effect use the wheel to highlight then select the Automatic Word Replacement check box 5 To disca...

Page 35: ...ss one of the control buttons or keyboard keys You can also set backlighting to never automatically turn on 1 From the Jump screen press Menu then select Settings 2 On the Settings menu scroll to high...

Page 36: ...cond section Backlight you can set your backlighting options If you want backlighting to turn on automatically after you press a control button or key or open the display then select the Automatically...

Page 37: ...Override System Date Time Settings on page 38 1 From the Jump screen press Menu then select Settings 2 On the Settings menu scroll to highlight Date Time then press the wheel to open the Date Time scr...

Page 38: ...up selector collapses 4 Rotate the wheel to move to the next selectable field then press to open the pop up selector 5 Proceed until all fields are set as you wish 6 Press Back to save your settings...

Page 39: ...highlight the application name then press the Delete key Key Guard Security The device s Key Guard and Security screen allows you to do the following Set Up Key Guard Turn On Off Privacy Lock Lock Yo...

Page 40: ...ard mode for 2 hours a screen saver will appear The screen saver is a small image that moves To dismiss the screen saver press any key or open the device Unlock Your Device To unlock your device take...

Page 41: ...ination dialog box opens 5 Enter a three digit code using the keyboard or the dial After you do so a Verify Your Combination dialog box will appear 6 Re enter the three digits to verify 7 A security e...

Page 42: ...lines in your Identification Tag 4 If for some reason you do not want to display your Identification Tag delete the text in the Identification Tag box by pressing ALT SHIFT 5 Press Back to save your s...

Page 43: ...dialog box opens 3 In the text boxes type your old PIN the new PIN 4 8 digits and then your new PIN again to confirm 4 Select Submit to dismiss the dialog box and save your new PIN You will receive a...

Page 44: ...ng move the slider to the right 5 When the slider is where you want it to be press the wheel The settings are saved as soon as you make them Network If you wish to change the network to which your dev...

Page 45: ...ce has connected to the network you selected the Network screen will reflect your selection Sound You control your device s sound on the Sound settings screen You can set sound volume as well as mute...

Page 46: ...following Decide if you want to be notified by a flashing wheel or vibration even if your device is muted select the appropriate check boxes To have your device mute automatically at a regular time se...

Page 47: ...n a hospital or anywhere where wireless connectivity may interfere with the environment 4 In the Roaming section of the dialog box check the box to allow GPRS data roaming clear the check box to disal...

Page 48: ...ens on the right You use the Jump screen by scrolling through the applications by rotatating the wheel until the application you want to open displays Then press the wheel to open the application The...

Page 49: ...mp screen wheel Some splash screens contain application status information For example in the illustration of the Jump screen above the Phone splash screen shows the device owner that her total phone...

Page 50: ...more in Controls on page 33 Settings Opens the Settings screen from which you can make device wide settings Read more in 4 Customizing Your Device on page 30 Key Guard Hold Puts your device into key...

Page 51: ...en when you ve highlighted the Web Browser application icon Status Indicators When a Web page is being loaded you will see at the bottom of your screen the following status indicators Browser Splash S...

Page 52: ...igate or change your view when using the Web Browser Scroll down a page Press down arrow on D pad or Rotate wheel toward you or Hold down while rotating wheel to scroll down screen by screen Scroll up...

Page 53: ...l a search for that entry will conducted by the search engine you ve specified in Set Your Search Engine on page 57 The Edit option only appears if the current page s URL contains a match for your Go...

Page 54: ...ty to get back to it later quickly create a bookmark for it Read how in Add Bookmarks on page 54 View Bookmarks While in the Web Browser you can see the bookmarks you have already set by doing either...

Page 55: ...o discard a bookmark select Discard Bookmark You will be asked to confirm your action before the bookmark is actually removed Add Edit Delete Bookmark Folders You can organize your bookmarks into fold...

Page 56: ...ew History To see a chronological list of Web pages you have visited up to 100 open the History screen while in the Web Browser application 1 From the Web Browser screen press Menu then select History...

Page 57: ...ect Settings 2 On the Settings screen scroll to the Home Page text field and type the URL of your preferred home page Alternatively you could select the Use Current Page button if you want to use the...

Page 58: ...The device allocates up to 800 KB for the cache This speeds up the display of pages you frequently visit or have already seen because the browser can open them from your device memory rather than the...

Page 59: ...n the right side of the screen when you ve highlighted the Phone application icon The splash screen shows the total call time elapsed since you last reset the counter read more in Total Call Timer and...

Page 60: ...annot be reassigned Once you store a speed dial number you can easily dial that number by pressing and holding the shortcut number for at least two seconds Very convenient You can always check your Sp...

Page 61: ...As you type the name possible matches from your Address Book contacts will appear in a pop up menu for easy selection 4 Select Create Your speed dial number is saved Editing an Existing Speed Dial Num...

Page 62: ...se the headset Handset Make sure the display lid is in the closed position Hold the phone as a receiver speaking into the microphone located between the Menu and Jump buttons Tip The listening sound i...

Page 63: ...ng from the Call Log on page 64 Dialing from the Look Up Screen on page 65 Dialing from Contact Information on page 65 Dialing Method Instructions Keyboard Dialing With the device display lid open typ...

Page 64: ...the pop up menu Scroll to highlight the number you want to call then press the wheel to send the call The symbols to the left of the name number tell you the category of the recent call Incoming Outg...

Page 65: ...hen finished Dialing from the Look Up Screen You can open a Look Up view into your Address Book that just lists your contacts and phone numbers To use this screen to dial a number Scroll to highlight...

Page 66: ...s described in Place a Call on page 63 4 Your first call still appears on your screen in the lower panel 5 To switch between callers select the button highlighted by default in the lower panel After y...

Page 67: ...another call comes in call waiting the notification screen will include a button to Switch Calls If you press this button the first call will be put on hold Alternatively you can press the Forward to...

Page 68: ...ecause you can view your calls by category if you want Your Log holds a history of your last 100 calls first in first out method of storing Here s how you can set your Call Log view 1 Press Menu then...

Page 69: ...priate entry will appear 3 Either the Edit Speed Dial Entry or New Speed Dial Entry dialog box appears as appropriate 4 Type or edit the Shortcut Name and Number information 5 Select Create to dismiss...

Page 70: ...Listen to Voice Mail There are several ways you can call your voice mailbox to retrieve your voice mail From a land line call your voice mailbox number Using your device keyboard press and hold the 1...

Page 71: ...up by doing the following while in the Phone application 1 From the main Phone screen press Menu then select Settings The Phone Settings screen appears 2 In the Settings section scroll to highlight Ca...

Page 72: ...ou can set up your device so that you re notified of an incoming call or new voice mail by a ringtone you select You do this from the Phone Settings screen 1 From the main Phone screen press Menu then...

Page 73: ...see the ringtones available from that category in the pop up menu 6 Press Back to save your settings Set Up Speed Dial You can store up to eight speed dial numbers 2 9 Shortcut 1 is permanently reserv...

Page 74: ...sations along with the buddy screen name and the conversation number The screen also tells you how many of your buddies are online at the time and the screen name you re currently using Note You must...

Page 75: ...en Name pop up then select the Sign On button 2 The New User dialog box opens Select the Create New Screen Name button you ll be taken to the new AIM Registration page via the device Web Browser 3 Com...

Page 76: ...rd is also pre populated If you want to use this screen name select the Sign On button 3 If you want to use a different screen name to sign on either type a screen name and password directly in the fi...

Page 77: ...creen name from the list You can always add the name back in later by typing it in Screen Name Password fields and then signing in It s easy to remove a name 1 From the Sign On screen open the Screen...

Page 78: ...ith the group contents expanded to the far left of each buddy screen name you ll see their open conversation number if you have a conversation open with them and to the left there is an availability s...

Page 79: ...the group s name 1 If your Buddy List isn t displayed press Menu then select Buddy List 2 Scroll to highlight one of the existing groups then press Menu and select Rename E The Rename Group dialog box...

Page 80: ...in which you want to file the buddy 4 Select Done The buddy is added to your list Tip If you re having a conversation with a person not on your Buddy List you can add them to your list quickly by pre...

Page 81: ...ard Otherwise to cancel the action and keep the buddy on your list press Cancel Block Unblock Buddies If you want to block messages from a particular buddy you can easily do so while in the IM applica...

Page 82: ...with whom you want to message then press the wheel A conversation screen opens Tip If you have a long Buddy List to find a buddy s screen name quickly start typing the first few characters of the bud...

Page 83: ...tions The easiest way to switch between conversations is to press Menu conversation number Set an Away Message Tip To create new custom away message categories you must go to your Web browser client o...

Page 84: ...nt Messaging until you press the I m Back button 7 While you re away other device users will see the Away icon next to your name in their Buddy List 8 To change your status from away to available sele...

Page 85: ...ed when you receive a message from someone not on your Buddy List you ll get an alert like the following 4 Choose from the following courses of action Block User The sender of the message will be bloc...

Page 86: ...buddy screens Read more in Edit a Buddy on page 80 Manage Blocked Users List If you do not want to receive messages from an individual on your Buddy List you can block messages from them The instructi...

Page 87: ...u will see the Email splash screen on the right side of the screen when you ve highlighted the Email application icon The splash screen is handy because it shows all your unread messages sorted first...

Page 88: ...ved folder is shown collapsed The Sent folder contents are collapsed as are the Drafts folder contents empty folders are always shown collapsed of course The Trash folder is shown in expanded view and...

Page 89: ...s an error when sending this email A few errors include the message was not sent at all the message was sent but could not be saved to the Sent folder because you reached your mailbox quota the messag...

Page 90: ...Shortcuts Settings Menu Shortcuts Accounts Menu Shortcuts New Message N Reply R Reply All L Forward J Add Contact Move O Discard Check for New Email U Mark Read Unread K More options in Email Read vi...

Page 91: ...iew Scroll to highlight the folder name then press the wheel to expand collapse the emails contained in the folder 2 Scroll to highlight the message you want to read then press the wheel to open it Yo...

Page 92: ...e you want to mark as read unread then press K The message changes status Unread messages appear in bold read messages appear in regular font From the Browse Email screen scroll to highlight the messa...

Page 93: ...You can move messages to different folders by doing the following while in the Email application 1 From the Browse Email screen scroll to highlight the folder that holds the email you want to move th...

Page 94: ...or you can type a new one directly in the To field To create a new line so you can add more recipients do one of the following type a semicolon type a comma press RETURN press the spacebar press Menu...

Page 95: ...oll to highlight the email to which you want to reply Open the email if you wish by pressing the wheel 2 Press Menu then select one of Reply R to address your reply only to the individual who sent you...

Page 96: ...following while in the Email application 1 From the Browse Email screen press Menu then select New Message N 2 Compose the new message at least to the point where you have listed the recipients 3 Save...

Page 97: ...dit a Contact on page 121 Note If you add an entry that is already listed as a contact in your Address Book you will create a duplicate entry for that contact Discard Email Messages To discard an emai...

Page 98: ...lect Accounts The Email Accounts screen appears Select the account from which you want to send email messages by default in the Primary Account pop up menu Note that if you discard the account you ve...

Page 99: ...se for your POP3 account 7 Select Save Folder Open the pop up menu by pressing the wheel then scroll to highlight the folder in which you would like all retrieved mail to be placed Press the wheel to...

Page 100: ...u want to edit then press the wheel to open that account s Edit Account screen The account name is displayed in the title bar Note For your primary account you ll only be able to edit the fields shown...

Page 101: ...e you send from this account Reply To Address The email address that you want used when people reply to messages sent from this account 6 When you are finished making your edits select Done To cancel...

Page 102: ...at messages from POP3 accounts be dropped into folders you create Read more in Manage Email Folders on page 102 Sent As you send an email message the message is displayed in the Sent folder expanded v...

Page 103: ...sting Email Folder Name Note You cannot edit the Inbox Saved Sent Drafts or Trash folders names as they are system folders To edit any other folder name do the following while in the Email application...

Page 104: ...erences on the Email Settings screen Here s how to open Email Settings screen while you re in the Email application From the Browse Email screen press Menu then select Settings The Email Settings scre...

Page 105: ...ight columns on the Browse Email screen When this check box is not turned on the view will look similar to the illustration in Browse Email Screen on page 88 Set Up Email Ringtones You can select if a...

Page 106: ...this limit if you don t have any of the automatic message management options checked new email will bounce be returned to sender To set automatical message management do the following while in the Ema...

Page 107: ...ls you must check the boxes for the attachment types you want removed Note that the attachments that are viewable on the device are grouped at the top of the list 5 Press Back when you re finished wit...

Page 108: ...sages in the order received with the message received most recently on top If you press the wheel to open the Phone Messages application open any of the unread messages then return to the splash scree...

Page 109: ...hold your messages only until they have been sent Then they disappear from the Outbox and are not stored on your SIM The Trash folder is empty and shown collapsed Individual messages are grouped in c...

Page 110: ...ssages screen appears listing all your messages You have replied to this message You forwarded this message There was an error when sending this message It wasn t sent You will only see this status in...

Page 111: ...isplayed in the Sent folder expanded view with its status just to the left Possible status indicators include message is being sent message is waiting to be sent and message was not sent due to a deli...

Page 112: ...Phone Messages application will communicate with the Address Book and offer you completion suggestions based on your existing Address Book contacts The suggestions appear in a pop up menu Use the whee...

Page 113: ...you wish by pressing the wheel 2 From either the Read or Browse Messages screen press Menu then select Forward J 3 The Forward screen opens ready for you to address The message is appended to the end...

Page 114: ...tion to call the sender of an SMS message do the following 1 From the Browse Messages screen scroll to highlight the message from the person you wish to call back Open the message if you wish by press...

Page 115: ...n select Settings The Settings screen appears 2 The Ring when new message arrives check box is selected by default If you would rather not be notified by a ringtone when a new message arrives remove t...

Page 116: ...pplication first press Jump then scroll to highlight the Address Book icon in the left hand ring of applications You will see the Address Book splash screen on the right side of the screen when you ve...

Page 117: ...e category of contacts Read more in Filter Contacts by Category on page 118 and Sort Contacts on page 119 T Mobile Contact Information Your device comes with T Mobile Customer Care contact information...

Page 118: ...Contacts screen do the following 1 From the Browse Contacts screen press Menu 2 Scroll through the menu items until you find the list of categories Individual categories are listed after All The cate...

Page 119: ...select 3 Highlight the Sort order field again hold the wheel down to open the pop up menu Then scroll to highlight either the A to Z or the Z to A order press to select 4 Select Done when finished or...

Page 120: ...add information scroll the wheel to highlight the appropriate button and press A screen opens in which you can add the information For example the following illustration is of the Phone Number screen...

Page 121: ...t s name then press the wheel The contact s information appears for editing 2 Edit information as you wish then press Menu and select Done Discard Retrieve a Contact To remove an existing contact from...

Page 122: ...ntact If you have a large number of contacts in your Address Book you can easily search and find a specific contact by using the Match dialog box The Match search is limited to the category of contact...

Page 123: ...stored in a category By default your Address Book contains four categories Work Family Friends You can edit the names of these categories delete them and create new ones up to ten total To edit an exi...

Page 124: ...s well as use it to filter sort messages Read more in Filter Contacts by Category on page 118 To discard a category 1 From the Browse Contacts screen press Menu then select Settings The Settings scree...

Page 125: ...cel To add a label 1 From the Browse Contacts screen press Menu then select Settings The Settings screen appears 2 Scroll down and select Labels The Labels screen appears showing all existing labels 3...

Page 126: ...low the instructions below to do this 1 Follow the instructions provided in How to Remove Your SIM on page 28 to remove your T Mobile supplied SIM from your device 2 Follow the instructions in How to...

Page 127: ...n Event An event is anything you want to schedule on your Calendar An event can be a doctor s appointment a birthday or anniversary a tennis game with a friend a dinner date anything you want to sched...

Page 128: ...when setting up events so these instructions are rather long and complicated But then so is your schedule Add an Event from Scratch 1 From any Calendar view press Menu then select New Event N A blank...

Page 129: ...or use the wheel to open the pop up and select a date and so on through the year selector You can also use the calendar date selector to select the event start date Highlight the calendar icon then pr...

Page 130: ...st Day of Every Month 1st Sunday of Every Month Yearly on June 4th Other 7 Depending on your choice you ll have to decide how long how often etc If you selected Other the Other Repetition Options dial...

Page 131: ...ghlight the event you want to duplicate then press the wheel to open its Events Details screen 2 Press Menu then select Duplicate Event The screen appears to remain unchanged however you are really lo...

Page 132: ...existing event by doing the following while in the Calendar application 1 From an Upcoming Day or Week view scroll to highlight the event you want to discard 2 Press Menu then select Discard Event 3...

Page 133: ...l Week View A table showing the current week The days of the week starting with Sunday are shown as column headings and one hour time slots are shown down the left side of the screen Events are grey b...

Page 134: ...can edit the details if you want To dismiss the screen and return to the view press Back Year View A grid of the year grouped by month with the current month and day selected Navigate between months...

Page 135: ...elect Views Day 1 Day View Features The full day will not display on your screen not enough room so the Day view always opens with the events occurring at the current time centered on the screen All d...

Page 136: ...d like Jun 4 in the example above An event you ve highlighted is shown with a black background Events in the past expired events are shown in blocks with a white background If you have overlapping eve...

Page 137: ...you have at least one event scheduled for a given day that day contains a little square icon in the lower right corner of the day block To drill down to an Event Details screen highlight the day then...

Page 138: ...interested in then press Now you can rotate the wheel to highlight a specific day Once you ve highlighted the day you want press the wheel The Day view opens to your selected date From there you can...

Page 139: ...ppears on the screen stating The Trash is empty Go To a Specific Day Regardless of where you are in a particular view you can always return to the current day today by pressing Menu then selecting Go...

Page 140: ...cs in this chapter Camera Splash Screen To open the Camera application first press Jump then scroll to highlight the Camera icon in the left hand ring of applications You will see the Camera splash sc...

Page 141: ...ng to a key chain or cord To remove the case hold the camera with both hands one hand on each end and twist the case 90 degrees then pull to expose the lead 2 Insert the lead firmly into the device he...

Page 142: ...appears with the image currently in focus in the viewfinder 3 You must now select a capture mode Read more in About Capture Modes on page 142 By default the Capture screen opens in Preview mode indic...

Page 143: ...ur photo a name other than the default Photo scroll to highlight the name text field then edit the name as you wish If you keep the photo you can always rename it later from the Gallery 8 Select eithe...

Page 144: ...ell An image is considered highlighted if it is currently in full view on the screen How to Select Photos In order to perform an action on one or more photos you must first select the photos Note You...

Page 145: ...om either the Thumbnail or Full Screen view Note You can attach all the images in your Gallery if you want up to 36 1 From the Gallery screen scroll through your photos When you find a photo you want...

Page 146: ...tos at start Older photos at start Photo Name A Z Z A 3 When finished select Done to save changes or select Cancel to dismiss the dialog box with no changes Discard Photos You can always delete photos...

Page 147: ...n the right side of the screen when you ve highlighted the To Do application icon The splash screen lists seven of your tasks that are either overdue or due today If you have more tasks a note at the...

Page 148: ...in regular font face Overdue tasks are shown in bold font and include the overdue indicator Opposite each task name is the due date or Today or Tomorrow if applicable Completed tasks are shown with a...

Page 149: ...press The details screen opens Here s an example Create a New Task Follow these steps to create a new To Do task while in the To Do application 1 From the Browse Tasks screen press Menu then select N...

Page 150: ...6 To save your new task press Menu then select Done Your new task appears in your Browse Tasks screen Edit a Task You can edit any of your tasks by opening the task s detail screen 1 From the Browse...

Page 151: ...let Discard a Task You can discard a task from the Browse Tasks screens or the Task Details screen From the Browse Tasks screen scroll to highlight the task you want to discard then press Menu and sel...

Page 152: ...vailable To Do tasks empty your Trash 1 From the Browse Tasks screen press Menu then select Trash T The Browse Trashed Tasks screen opens 2 Press Menu then select Empty Trash 3 A confirmation dialog b...

Page 153: ...tes splash screen on the right side of the screen when you ve highlighted the Notes application icon The splash screen lists the first four of your notes as they appear in alphabetical order The total...

Page 154: ...age Your Notes Trash on page 157 The Browse All Notes Screen The Browse All Notes screen lists all your notes in the order your specify in the Sort Options dialog box read more in Sort Your Notes on p...

Page 155: ...rough the list of notes 3 At any time if you want to fold a notes contents first highlight the note then press the wheel The contents of the note collapse but the note is still highlighted 4 To re fol...

Page 156: ...returns To create a new note follow these steps while in the Notes application 1 From the Browse All Notes screen press Menu then select New Note N 2 A blank note opens Type your note using the keybo...

Page 157: ...scarded are stored in the Trash just in case you want to retrieve them later 1 From the Browse All Notes screen press Menu then select Trash T The Browse Trashed Notes screen opens 2 Scroll to highlig...

Page 158: ...rst press Jump then scroll to highlight the Rock Rocket icon in the left hand ring of applications You will see the Rock Rocket splash screen on the right side of the screen when you ve highlighted th...

Page 159: ...d Also minor detail if you re hit by the Alien Antagonist you die baby Scoring Each time you make a hit you ll score Alien 25 points Large rocks 50 points Medium rocks 100 points Small rocks 150 point...

Page 160: ...me games from UI Evolution You ll find these games in the Arcade Arcade Splash Screen To find the Arcade scroll through the applications on the Jump screen until you see the Arcade splash screen Arcad...

Page 161: ...anks in the row at the top of the tank You can also shift the formation to the left or right Once you fill a row with bubbles the bubbles pop and disappear Scoring Each time you pop a row of bubbles y...

Page 162: ...le through the options then press the wheel or Return key to enter your guess The Code Monkey won t divulge the Monkey Code unless you guess it right But the Code Monkey will give you feedback on your...

Page 163: ...ey Code in five moves or fewer But sometimes even the most seasoned banana cryptologists can t outsmart the Code Monkey Hints Use logic to solve the Monkey Code Try starting your guesses with only one...

Page 164: ...s it s better to push a different box out the other side then to circle all the way around with the current one Controls Lab Ratz Don t let the Lab Ratz escape The Object The object of Lab Ratz is to...

Page 165: ...D pad to position the next piece on the grid The white Ratz will escape when the timer runs out Don t let them hit the floor or the game is over Scoring For each tunnel piece that the Ratz move throug...

Page 166: ...g Calendar events To Do list and Notes 6 To make the Desktop Interface your default entry point to the T Mobile Web site after signing in click Set My T Mobile Start Page this link appears in the uppe...

Page 167: ...if you have received any new emails what events are coming up on your Calendar tasks that need taking care of and your notes The T Mobile Sidekick Owner s Manual This manual the T Mobile Sidekick Owne...

Page 168: ...these chapters 19 Sending Email from the Web on page 169 20 Using Address Book on the Web on page 182 21 Using Calendar on the Web on page 194 22 Camera Gallery on the Web on page 205 23 Keeping a To...

Page 169: ...n To the Desktop Interface on page 166 Then open the Email application by clicking on the Jump Page button bar or by clicking the Email icon in the Email section of the Jump page By default your Inbox...

Page 170: ...er ascending or descending order Open an individual message by clicking either the From or Subject of the message Discard email by checking the box to the left of the email then clicking Discard Check...

Page 171: ...want to include in the forwarded message by first checking the attachment and then clicking the Remove Checked button Discard the message by clicking Discard Move the email to a different folder by h...

Page 172: ...which address you want to use to send the email from the drop down list in this field To field Type in the email address of the person to whom you are sending the email CC and BCC fields Optional fie...

Page 173: ...exceed 3 MB Note that these limits do not apply to messages with attachments that you forward If you have selected the Email setting to Save copies of outgoing messages in Sent folder then your attach...

Page 174: ...see illustration above 5 From the New Message page if you want to remove any of the attached files check the filename s and then click Remove Checked 6 When you ve finished composing your message cli...

Page 175: ...want copies of your sent mail saved to your Sent folder the box is not checked by default If you do not want copies of your sent mail saved clear the check box 3 Click Save at the bottom of the page...

Page 176: ...older than seven days in all your folders except Saved and Drafts folders will be automatically deleted not moved to Trash first Automatically discard messages of any age Selecting this option means...

Page 177: ...r list of folders To edit an existing email folder 1 Click Settings and Folders in the Email sidebar to open the Settings page then select the Folders tab 2 The names of editable folders are displayed...

Page 178: ...y default you can always manually change the From field in a new email message In the example above the device email is the primary account since the option Send mail from your device address by defau...

Page 179: ...er right corner of the page The POP Account page opens 3 Type your Login name in the box provided 4 Type your email POP server name If you do not know the server name you can obtain this information f...

Page 180: ...to fix the error or to delete the account To edit a POP3 email account 1 Click POP Accounts in the Email sidebar This opens the POP Accounts page 2 Click Edit this Account opposite the account you wa...

Page 181: ...in the Email sidebar Check the box opposite the email you want to retrieve then highlight a folder from the Move checked to box and click Go This will move the message back to the selected folder To...

Page 182: ...the instructions in Signing In To the Desktop Interface on page 166 Open your Address Book by clicking on the Jump page button bar By default the Browse Contacts view is displayed all contacts are li...

Page 183: ...ail addresses Three Web addresses URLs Three Street addresses One Note Browse Contacts Page The Browse Contacts page contains a summary view of your contacts You can set how you view these contacts by...

Page 184: ...in Create Edit and Delete Categories on page 184 1 Highlight a category from the View category list box 2 Click Go to the right of the box The page will refresh and only contacts that are assigned to...

Page 185: ...f you do not wish to use the assigned color Remember categories describe a group of contacts for example you might have a number of medical doctors you want to group into a category named MDs 3 If you...

Page 186: ...page appears with Categories selected by default 2 Click Discard Category to the right of the category you want to delete The category is deleted any contacts assigned to the category are moved to the...

Page 187: ...etical order A new blank box is added at the bottom in case you want to add another label 5 After saving you will be able to assign contact information to this new label as well as view it on the Brow...

Page 188: ...ls you how many contacts you ve stored To discard them all click Discard All Contacts 3 You will be asked to confirm your deletion and warned that proceeding will permanently delete all contacts from...

Page 189: ...Using Address Book on the Web April 15 2003 T Mobile Sidekick Owner s Manual 189 Add a New Contact from Scratch 1 On the Address Book sidebar click New Contact The New Contact Summary page opens...

Page 190: ...u want to edit The contact s information displays 2 Click Copy at the top or bottom of the page An editable form of the contact s information will appear the page is labeled Copying Contact Name 3 Edi...

Page 191: ...prompt 3 You can also remove a contact from the Browse Contacts page by checking the box for the contact then clicking Discard Checked To retrieve a discarded contact 1 Click Trash in the sidebar The...

Page 192: ...rom other programs into your Address Book Note that you must first save that contact information in the form of a flat tab delimited file 1 Click Import in the sidebar The Import page opens This page...

Page 193: ...he message form then click Send You can also choose to Save as Draft or to discard the message by clicking Cancel 3 Once you take action on the message your Email Inbox opens You are not returned to t...

Page 194: ...chapter Opening Calendar on the Web First open your Jump page by following the instructions in Signing In To the Desktop Interface on page 166 Open the Calendar application by clicking on your Jump p...

Page 195: ...left side of the page you see the sidebar In addition to links to the various Calendar pages you ll see the current and next month displayed To go to the Day view for any day in these two months clic...

Page 196: ...n the following two options when setting the event schedule Use duration If selected the New Event page will ask you to specify an event start time and duration rather than a start time and end time U...

Page 197: ...irm the discard because the events will be permanently discarded not moved to Trash Click Discard to continue or click Cancel to return to Managing Events 3 To save any change you make to your setting...

Page 198: ...leted by clicking the check box Also you can open the Task Information page by clicking the task name On that page you can mark a task as completed by clicking Mark Completed Month View In the Month v...

Page 199: ...formation is displayed If you want to edit the event click Edit to open the event in an editable form Add an Event From the Calendar sidebar click New Event This opens the New Event page Tip From the...

Page 200: ...e DATE box select the date for the event By default the current day is selected 3 In the TIME section set the start time and duration of the event or the start and end time of the event which option i...

Page 201: ...tion select a repeat interval from these choices Just this once that is no repetition this is selected by default Every day Every day of the week where day of the week equals the day of the week on wh...

Page 202: ...nt 6 If you wish to set up reminders or if the event is a repeating event click the Reminder Repetition tab 7 In the REMINDER section specify whether or not you want to be reminded when the event is g...

Page 203: ...click Trash in the Calendar sidebar All discarded events are displayed on the right side of the page 2 To remove the events from your system completely click the Empty Trash button You ll be asked to...

Page 204: ...rmation from other programs into your Calendar Note that you must first save that information in the form of a flat tab delimited file 1 Click Import in the sidebar The Import page opens 2 This page i...

Page 205: ...Camera Gallery on the Web First open your Jump page by following the instructions in Signing In To the Desktop Interface on page 166 Open the Camera application by clicking in your Jump page button ba...

Page 206: ...r jpg with a default name Since the default names are non intelligent e g Photo 5 jpg you may want to change the name to something more descriptive Photo names are displayed in editable text boxes to...

Page 207: ...to your email 2 Click Send Checked This opens the Compose Email page with the selected photo s already attached 3 Write your email then send it From the Email Compose page 1 Click Attach Photos this o...

Page 208: ...pen your Jump page by following the instructions in Signing In To the Desktop Interface on page 166 Open the To Do application by clicking in your Jump page button bar or by clicking the To Do icon in...

Page 209: ...Upcoming How many tasks can I store You can store up to 50 tasks at one time including the tasks you ve moved to the Trash By clicking the Discard Completed button at the bottom of any of the To Do B...

Page 210: ...ake your changes to the task s Basic Information or Notes sections When finished click Save If you decide to discard your changes click Cancel If you want to discard the task click Discard Mark a Task...

Page 211: ...to your list of tasks 1 To open your Trash click Trash in the sidebar on the To Do page All discarded tasks are displayed on the right side of the page in descending order of due date 2 To remove the...

Page 212: ...Web First open your Jump page by following the instructions in Signing In To the Desktop Interface on page 166 Open the Notes application by clicking on your Jump page button bar or by clicking the N...

Page 213: ...note click Save If you decide not to keep the note click Cancel to return to the Browse Notes page 4 After clicking Save you are returned to the Browse Notes page with the note you just created added...

Page 214: ...n your Trash click Trash in the Notes sidebar All discarded notes are displayed on the right side of the page in alphabetical order 2 To remove the notes from your system completely click the Empty Tr...

Page 215: ...ing Settings on the Web First open your Jump page by following the instructions in Signing In To the Desktop Interface on page 166 Open your Settings on the Web by clicking Settings on the Jump page s...

Page 216: ...and the Daylight Saving Time status is displayed To change your home time zone do the following 1 Select the option button opposite one of the time zone options time zone in the United States time zo...

Page 217: ...adding a label 125 default categories 123 default labels 125 discarding a category 124 discarding a label 126 editing a category 123 editing a label 125 editing existing category 123 filtering contac...

Page 218: ...us indicator 89 attachments to email incoming opening 91 supported 91 attachments to email outgoing attaching files from your computer 174 attaching photos 173 limits 173 AutoSave capture mode 142 Aut...

Page 219: ...6 setting default event duration 196 setting default view 196 viewing an event 199 views about 197 call forwarding setting up 71 turning off 72 Call Log about 68 clearing 70 views 68 call timer Phone...

Page 220: ...ng 122 number you can store 117 retrieve 121 searching for 122 sorting 119 context menus about 20 contrast screen adjusting 33 control buttons about 19 Back button 21 illustration 19 Jump button 21 Me...

Page 221: ...ail message 97 photo 146 text message 113114 To Do task 151 Web Browser bookmark 55 display icons 15 display opening and closing 15 displaying 42 dots in title bar meaning 16 D pad about 18 using 18 d...

Page 222: ...ting mail from POP3 accounts 180 discarding an email 181 editing folders 176 editing POP3 accounts 178 managing your mailbox size 175 moving messages to folders 180 opening an attachment 171 reading a...

Page 223: ...achments 91 groups adding to IM 79 discarding 79 renaming 79 H handling a SIM 29 handset using as phone 62 headset jack 25 using with phone 62 highlighting a note 154 home page opening in browser 53 s...

Page 224: ...group 79 settings 84 signing off 77 signing on 76 starting an AIM conversation 82 switching AIM conversations 83 switching screen names 77 unblocking a buddy 81 Instant Messaging Service keyboard shor...

Page 225: ...mber of calls held in Phone Log 68 Look Up screen in Phone application 65 lost SIM what to do 29 M managing Calendar events on the Web 197 managing your Speed Dial list 60 map a contact s address 122...

Page 226: ...ce off 13 Offline group AIM 81 on off button 19 one dot in title bar meaning 16 opening a Web page 53 an email attachment on the Web 171 Email message 91 Jump screen menu 50 phone message 111 sound di...

Page 227: ...g 144 renaming 145 renaming on the Web 206 selecting 144 selecting all 145 sorting 146 sorting on the Web 206 PIN for SIM card 42 placing phone calls placing a second call 66 placing telephone calls p...

Page 228: ...51 an Address Book contact 121 ringtones setting for email 105 setting up for Phone 72 roaming charges about 47 Rock Rocket how to play 158 S safety while using device 13 Save Folder field Accounts sc...

Page 229: ...ing 28 lost what to do 29 removing 28 what you can do on device without a SIM 28 SIM card about 27 importing contacts from 126 lock unlock 42 SIM ID where to view number 46 SIM Lock Code where stored...

Page 230: ...a discarded task on the Web 211 title To Do size limit 149 viewing all on the Web 209 viewing details 149 views in To Do application 151 Task Details screen To Do application about 149 adding a note 1...

Page 231: ...folding all notes 155 single note 155 unlocking Alt key 18 device 40 shift key 18 SIM card 28 your SIM card 42 un mute button 33 unread emails listed on splash screen 87 unread text messages listed o...

Page 232: ...s 58 Web Browser application reporting a bad URL 53 Web Browser settings 57 Web pages opening 53 refreshing 52 reporting a problem with displaying a page 53 scrolling 52 status indicators 51 Web setti...

Reviews: