63
Intelect® Neo Clinical Therapy System
SAVING TO USB FLASH DRIVE/PATIENT DATA
Patient treatment data can be saved to the USB
fl
ash
drive for viewing/printing on a PC as well as for retrieving
for later use on the unit or multiple units. Complete the
following steps to view and
access patient data:
1. Press the Patient Data icon on the Home screen. The
screen will display a list box of all previously saved
patient data sessions found on the USB flash drive
connected to the unit.
2. Select the patient ID from the list box by using the Up
and Down arrows or Previous Page/Next Page icons
to locate the patient ID information. Select the patient
ID you wish to view and access by pressing the “
√
”
symbol.
3. Select the treatment date desired from the list box by
using the Up and Down arrows or Previous Page/Next
Page icons to locate the treatment date information.
Select the treatment date you wish to view and access
by pressing the “
√
” symbol.
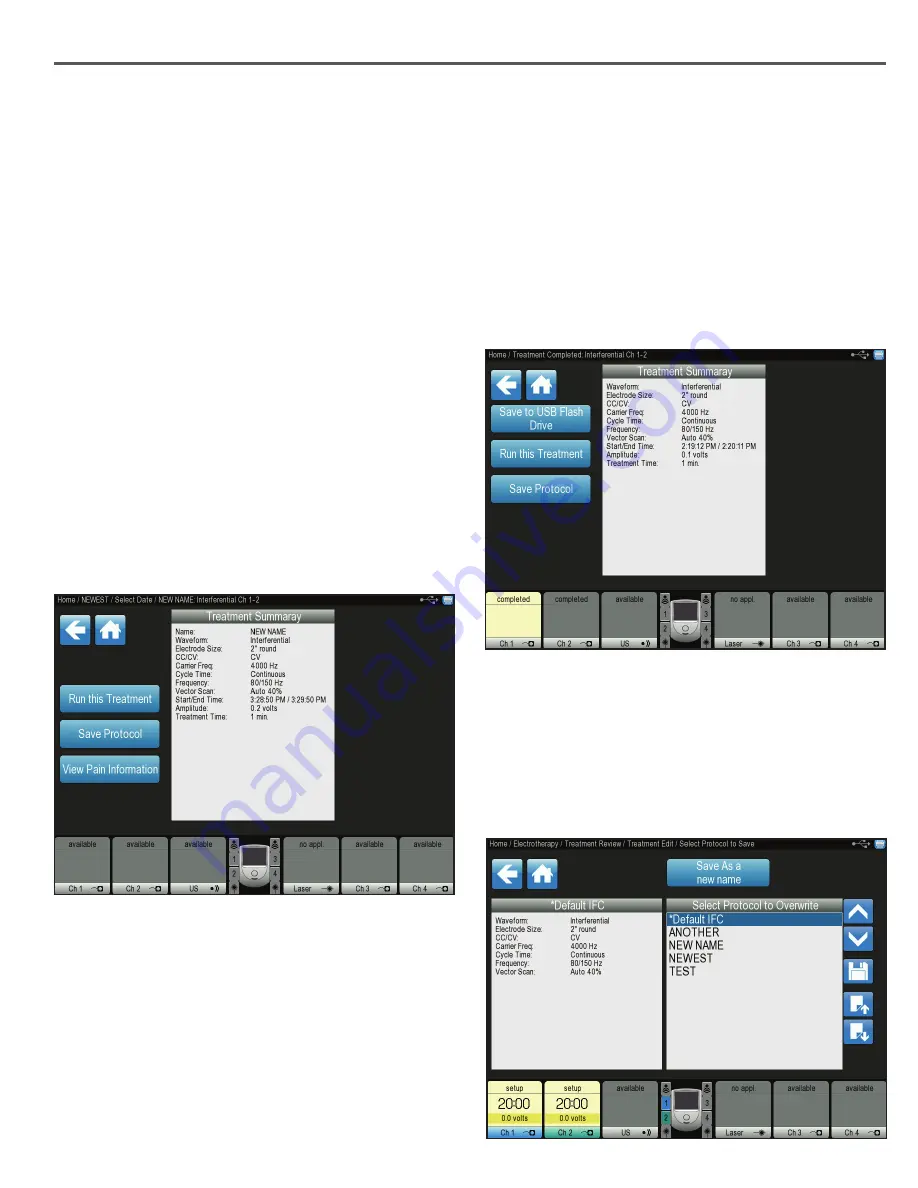
4. The Treatment Summary list box will appear with
detailed information about the specific treatment.
5. Choose one of the following options from the
Treatment Summary screen:
• Run the treatment by selecting the Run the Treatment
icon.
• Save the treatment protocol by pressing the Save
Protocol icon. Refer to the CUSTOM PROTOCOLS
section for detailed instructions for saving customized
settings.
• View the pain information by selecting the View Pain
Information icon.
• Save therapy information to USB Flash drive by
inserting a USB Flash drive and press SAVE.
CUSTOM PROTOCOLS
A new custom protocol may be saved at either the
Treatment Edit or Treatment Complete screen. The
Intelect® Neo Clinical Therapy System will allow a
maximum of 200 custom protocols to be de
fi
ned, and the
Home screen will allow for 5 custom protocol shortcut
assignments.
Complete the following steps to save a customized
protocol created from a Treatment Summary screen:
1. Press the Save Protocol icon from either the Treatment
Edit or the Treatment Complete screen.
2. Save the new protocol by pressing the “Save as a New
Name” icon and typing in a name for the protocol, or
overwrite a currently saved protocol by scrolling to the
protocol using the Up ad Down arrow icons. Press the
Save icon when finished typing in the protocol name.
A yellow text box will appear confirming the newly
saved protocol and name.
DATA


