


13-6
August 2003
Access Navigator - Release 1.8
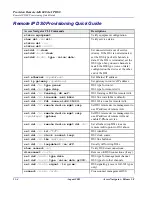
Provision Remote Adit 600 via IP DS0
Router Provisioning Quick Guide
Configure Trunk Connections:
1. Select
Configuration
<
Profile Directory
> from Router Main Menu and press Enter key.
2. Select
Router
<
Profile Setup
> and press Enter key.
3. Select
Trunk
<
Configure
-> and press Enter key.
4. For all WAN port numbers already assigned a DS0 for management,
select <
Frame Relay 1490
> as the WAN connections Type
5. Select the
PVC Management
as <
Disabled
>.
6. Press Escape key to Exit and <
Yes
> to save changes. This will return you to the
Trunk
Configure
window. For these configuration changes to take effect, you must Reinitialize the
Router as described later.
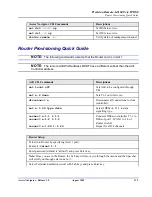
Configure the Local Adit Profile:
1. Select
LocalAdit LAN
<
Setup
-> and press Enter key.
2. Set the following on this screen:
Select the
IP Protocol Eth II
(with an X), all others should not be selected.
Set the
LAN Networks Updates
for
IP
and
IPX
to <
Neither
>.
Set the
LAN IP Address
to the required Router IP Address along with the
Subnet Mask.
3. Press Escape key to Exit and <
Yes
> to save changes.
Create a Remote Adit Profile for all Remotes:
1. Select
RemoteAdit WAN
<
Setup
-> and press Enter key.
2. Set the following on this screen:
Rename
RemoteAdit
(default name) to
Adit1.
Set
WAN Networks Updates
for
IP
to <
Never
>.
Set
WAN IP: Numbered
to <
No
>.
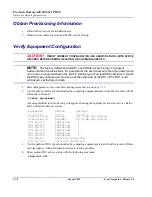
3. Tab to
Setup
: <
Static/VPN Networks
> (scroll to this selection if it is not displayed).
4. Set
Setup Static
: to <
IP Networks
> (scroll to this selection if it is not displayed).
5. Press Ctrl A to add a Static IP Address.
6. Set
Device Name
to
Adit1.
Set the
IP Address
to the Adit1 WAN address.
7. Press Escape key to exit and <
Yes
> to save changes.
8. Select
Setup
: <
Trunk Port
> and press Enter key.
9. Select the following on this screen:
At the
Select WAN Port Number
: <
None
>, scroll
None
to
1
(which is the remote Adit1).
Set
DLCI
to
16.
10. Press Escape key to exit the
Trunk Port
configuration window.
11. Press Escape key to exit and <
Yes
> to save changes.
Reinitialize the Router:
1. Select
Exit
<
Reinitialize
> from the
Router
main window and press Enter key.
2. Select <
YES
> and press Enter key to reinitialize the Router Card. This will save all the changes
recent made to the router.
Router Setup (Continued)
Summary of Contents for Access Navigator
Page 1: ...Access Navigator USER MANUAL Part Number 770 0079 AP Product Release 1 8 August 2003 ...
Page 170: ...6 66 August 2003 Access Navigator Release 1 8 Electrical Installation Exit Management Session ...
Page 214: ...9 20 August 2003 Access Navigator Release 1 8 Provision DCS Service Test DS1 and DS0 Circuits ...
Page 342: ...14 22 August 2003 Access Navigator Release 1 8 Alarm Clearing Ethernet Link Status LED ...
Page 634: ...18 178 August 2003 Access Navigator Release 1 8 CLI Language Reference CLI Command List ...
Page 658: ...B 6 August 2003 Access Navigator Release 1 8 FDL Interface Access Bank II Capabilities ...
Page 668: ...C 10 August 2003 Access Navigator Release 1 8 SNMP Interface SNMP Trap Reports ...
Page 682: ...GlossaryGlossaryGlossaryGlossary 14 August 2003 Access Navigator Release 1 8 Glossary ...
Page 704: ...Index 1 22 August 2003 Access Navigator Release 1 8 Index ...


