


552
:
3.
Choose other options and click OK.
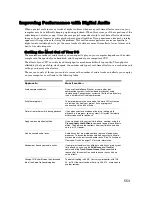
Bit Depths for Rendering Audio
You can choose the bit depth that SONAR uses for such operations as bouncing tracks, freezing tracks,
and applying effects. This bit depth is set at 32 by default, which is a good place to leave it. With 32-bit
resolution (floating point), you can drastically change dynamic levels of your original files without
clipping, and with greater dynamic range, especially in soft parts of your music.
To Choose a Rendering Bit Depth
1.
Use the
Options-Global
command to open the Global Options dialog.
2.
On the Audio Data tab, under File Bit Depths, change the Render Bit Depth field to the desired
number.
3.
Click OK.
Preparing Higher-quality Audio for CD Burning
If your project uses a different sampling rate than 44,100, or contains files that are not 16-bit, use this
procedure to prepare your project for CD-burning:
To Prepare Higher-quality Audio for CD Burning
1.
Use the
File-Export Audio
command to open the Export Audio dialog. Choose RIFF Wave in the
Files of Type field, Export to Stereo File(s) in the Format field, and 16 in the Bit Depth field.
2.
After exporting the audio, close SONAR and open up your sound card control panel (for Midiman
cards, usually the Delta Control Panel, for Echo Audio, usually the Echo Console, for MOTU it's
the 324 console, etc.) Once the control panel is open, change the setting for your sampling rate to
44.1 kHz.
3.
Next launch SONAR and use the
Options-Audio
command to open the Audio Options dialog. In
the General section change the Audio Driver Bit Depth to 16. Change Default Settings for New
Projects to 44100 Hz for the Sampling Rate.
4.
After making these adjustments, click the Wave Profiler button in the Audio Options dialog. In
some instances, with certain audio hardware configurations you may be prompted with an audio
driver error dialog during this process. This is nothing to be concerned about. You will have to exit
SONAR, re-launch, verify the settings you made in the Audio Options dialog, and click the Wave
Profiler button again. When you can successfully run the Wave Profiler without an audio driver
error, proceed to the next step.
5.
Create a new project (
File-New
command). The Normal option is fine for this.
6.
Import the mixed down audio by using the
File-Import Audio
command.
7.
Confirm the bit depth and sample rate of the imported audio by using the
File-Info
command, and
clicking File Stats. The File Stats dialog lists the correct sample rate and bit depth.
8.
Final step: use the
File-Export Audio
command. Be sure to select 16 for the Bit Depth and
uncheck all Mix Enables.
Now you can burn your exported audio file to CD, using Cakewalk Pyro, or other software.
Summary of Contents for Cakewalk SONAR
Page 1: ...Cakewalk SONAR User s Guide ...
Page 2: ......
Page 4: ......
Page 22: ...xxii ...
Page 50: ...50 ...
Page 102: ...102 ...
Page 182: ...182 ...
Page 302: ...302 ...
Page 420: ...420 English ...
Page 466: ...466 ...
Page 502: ...502 ...
Page 574: ...574 ...
Page 580: ...580 ...
Page 608: ...608 ...


