


377
Engl
ish
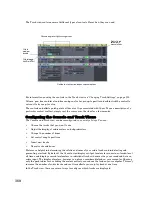
Surround Buses (Producer Edition Only)
Surround buses are useful for mixing and adding effects to create a surround mix.
To Patch a Track Through a Bus
1.
Open the Console view (
View-Console
) or the Track view (
View-Track
).
2.
If you want to add effects to the bus, right-click in the FX bin of a bus (if it is not in use already)
and choose an effect from the effects popup menu. (If you are working in the Track view, you may
first need to display the Bus pane by clicking the Show/Hide Bus Pane button
located at the
bottom of the Track view.)
The name of the effect you have chosen appears in the bus FX bin.
3.
Set the effect’s parameters and close it.
4.
Repeat steps 2 and 3 for any additional effects you want to use.
5.
In a track module that you want to patch through the bus, do the following:
•
Drag the Bus Send Level control for the bus to the approximate level you want.
•
Drag the Bus Send pan to the approximate setting you want.
•
Click the Bus Enable button for the appropriate bus.
6.
Repeat step 5 for all the tracks you want to patch through the bus.
7.
In the bus, adjust the Input Gain and Output volume controls to the approximate level you want.
8.
In the bus, drag the Input pan and Output pan controls to the approximate positions you want.
9.
Play your tracks and adjust the Send Level controls, the pan controls, etc.
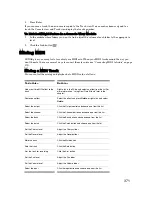
To Mute or Solo a Bus
Each bus has a Mute button and a Solo button. These controls act like the Mute and Solo buttons in a
track, but they affect all the signal routed through the bus.
1.
Open the Track view or the Console view.
2.
Click the Mute or Solo button in the bus you want to mute or solo.
To Display the Audio Waveform of a Bus
•
Enable the bus’s Waveform Preview button
. This displays the waveform of the audio that is
flowing through the bus.
Set the Send Pan to be the same as the
bus that the bus feeds into
Right-click the Send Pan control and choose
Follow Bus
Pan
from the popup menu. This setting is only active when
the send has the same interleave as the bus it feeds into,
and is set to "Post Fader." If enabled, the Send Pan control
no longer affects the output.
Select the output
Click the Output button and choose one from the list
Summary of Contents for Cakewalk SONAR
Page 1: ...Cakewalk SONAR User s Guide ...
Page 2: ......
Page 4: ......
Page 22: ...xxii ...
Page 50: ...50 ...
Page 102: ...102 ...
Page 182: ...182 ...
Page 302: ...302 ...
Page 420: ...420 English ...
Page 466: ...466 ...
Page 502: ...502 ...
Page 574: ...574 ...
Page 580: ...580 ...
Page 608: ...608 ...


