Configuring X.25
8-3
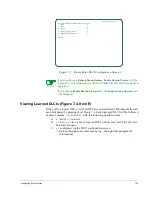
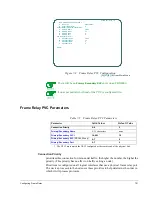
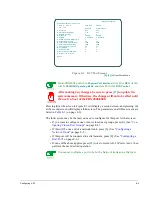
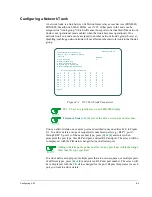
Figure 8-1 X.25 Port Screen 1
[A],[C],[A]
from Main Menu
On an FRX4000 port when
Physical Port Interface
(item B) is
DSU
, item L
will be
CSU/DSU Operating Mode
, and item M will be
RTS Control
.
After making any changes, be sure to press
[F7]
to update the
system memory. Otherwise, the changes will not take effect until
the next re-boot of the FRX4000/6000.
Pressing
[N]
at the screen in Figure 8-1 will display a second screen, and pressing
[N]
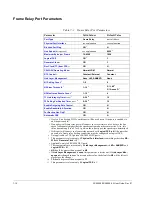
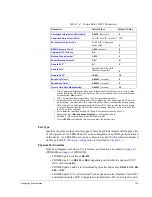
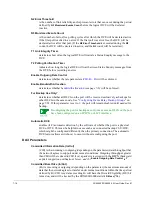
at the second screen will display a third screen. The parameters on all three screens are
listed in
Table 8-1
(on page 8-6).
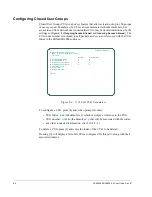
The third screen may be the last you need to configure for this port. At that screen:
●
If you want to configure one or more closed user groups, press
[N]
. (See "
Con-
figuring Closed User Groups
" on page 8-4)
●
If this will be one end of a network trunk, press
[O]
. (See "
Configuring a
Network Trunk
" on page 8-5.)
●
If this port will be connected to a dial modem, press
[P]
. (See "
Configuring a
Dial Port
" on page 8-6.)
●
If none of the above applies, press
[F3]
twice to return to X.25 Port screen 1, then
perform the next desired operation.
You cannot configure a port to be both a Network trunk and a Dial port.
Node Name=nodexyz
X.25 Port Parameters (screen 1 of 6)
*
RLP: 0
Port: 5
Link State:
Linkup
*
I/O: V.35
Database
System Memory
A Port Type
X25
X25
B Physical Port Interface
V.35
V.35
C Blocked Port Flag
N
N
D Line Speed
64k bps
64k bps
E Modulo
0 Modulo 8
0 Modulo 8
F
Maximum LAPB Window Size
7
7
G N2 Retransmit Count
20
20
H T1 Retransmit Period (msec)
2000
2000
I
T2 Wait Ack Period (msec)
1000
1000
J
T3 Link Alive Period (sec)
10
10
K Logical DCE
Y
Y
L Generate Clock
Y
Y
M Rcv Clock (TT) from DTE
N
N
N X.25 Level 3 - Screen 2
Option:
Summary of Contents for Netlink FRX4000
Page 2: ......
Page 16: ...xiv FRX4000 FRX6000 4 0 User Guide Rev 01 ...
Page 17: ...Section I Getting Started ...
Page 18: ......
Page 24: ......
Page 37: ...Section II Configuration ...
Page 38: ......
Page 52: ......
Page 78: ......
Page 106: ...7 24 FRX4000 FRX6000 4 0 User Guide Rev 01 ...
Page 142: ...8 36 FRX4000 FRX6000 4 0 User Guide Rev 01 ...
Page 186: ......
Page 216: ......
Page 266: ......
Page 273: ...Section III Operation ...
Page 274: ......
Page 296: ......
Page 324: ......
Page 376: ......
Page 377: ...Section IV Appendices ...
Page 378: ......
Page 384: ......
Page 390: ......
Page 396: ......
Page 400: ......
Page 405: ...Menu Structure E 5 ...
Page 406: ...E 6 FRX4000 FRX6000 4 0 User Guide Rev 01 ...
Page 425: ......
Page 426: ......

