ADVANCED EMBROIDERY
107
3
e
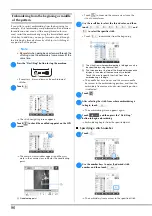
Rotate the pattern so that it is aligned with the chalk
reference lines, and then touch
to display the
embroidering screen.
1
The screen where the pattern can be moved appears
again.
f
Touch
to unlock the machine, and then
press the “Start/Stop” button to embroider the first
pattern.
g
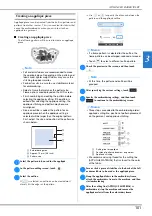
When embroidering is finished and the following
message appears, touch
.
The next pattern to be embroidered appears.
h
Position each pattern and embroider it according to
the on-screen instructions.
You will be prompted to align the starting point, rotate
the design, and rehoop the fabric when necessary. For
details, refer to “Rehooping the fabric” on page 108.
1
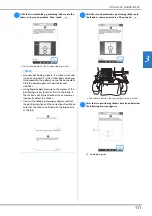
When embroidering the edge pattern
If the fabric has just been rehooped, use the move pattern keys
to align the start point on the screen with the end point of the
previous pattern, and then touch
.
Then, rotate the pattern to align the corner with the reference
line, and then touch
.
2
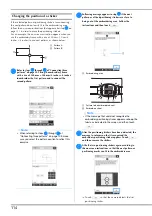
When embroidering the pattern immediately before a
corner
If the fabric has just been rehooped, use the move pattern keys
to align the start point on the screen with the end point of the
previous pattern, and then touch
.
Then, align the point of the pattern (inner corner of the next
pattern to be embroidered) with the corner of the reference
lines. If the pattern is not angled correctly, rotate it. If the length
of the pattern does not match, enlarge or reduce the pattern so
that the point of the pattern is at the corner of the reference
lines.
* Inner corner of next pattern to be embroidered
After making adjustments, touch
.
Select whether or not to display the needle
drop point
Each touch of this key changes the
brightness of the camera image.
1
a
b
b
a
c
a
d
a
b
c
c
Note
• For the accurate start point, turn the handwheel
toward the LCD panel to lower the needle. Check
the needle drop point, and then turn the handwheel
again until the needle is raised to its highest
position.
*


