Installation and Operations Manual
AT&T Proprietary (Internal Use Only)
—124—
6.3.2 Wi-Fi IP Camera Installation (Not Evaluated by UL)
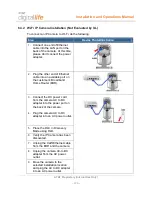
To connect an IP Camera to Wi-Fi, do the following:
Step
Device Photo/Illustration
1.
Connect one end of Ethernet
cable into the LAN port on the
back of the camera. At this time,
please don’t connect the power
adapter.
2.
Plug the other end of Ethernet
cable into an available port on
the customer’s Broadband
Home Router (BHR).
3.
Connect the DC power cord
from the camera AC to DC
adapter into the power port on
the back of the camera.
4.
Plug the camera AC to DC
adapter into an AC power outlet.
5.
Place the DLC in Discovery
Mode using DLD.
6.
Verify the IP Camera has been
discovered.
7.
Unplug the Cat5/Ethernet cable
from the BHR and the camera
8.
Unplug the camera AC-to-DC
adapter from the AC power
outlet.
9.
Move the camera to the
selected installation location
and plug the AC to DC adapter
into an AC power outlet.


