background image

           Fuel System                                 Argo Service Manual

Ontario Drive & Gear Limited                                                                                               www.odg.com
PH.(519)- 662-2840   FAX (519)- 662-2421

FS-5A

2.

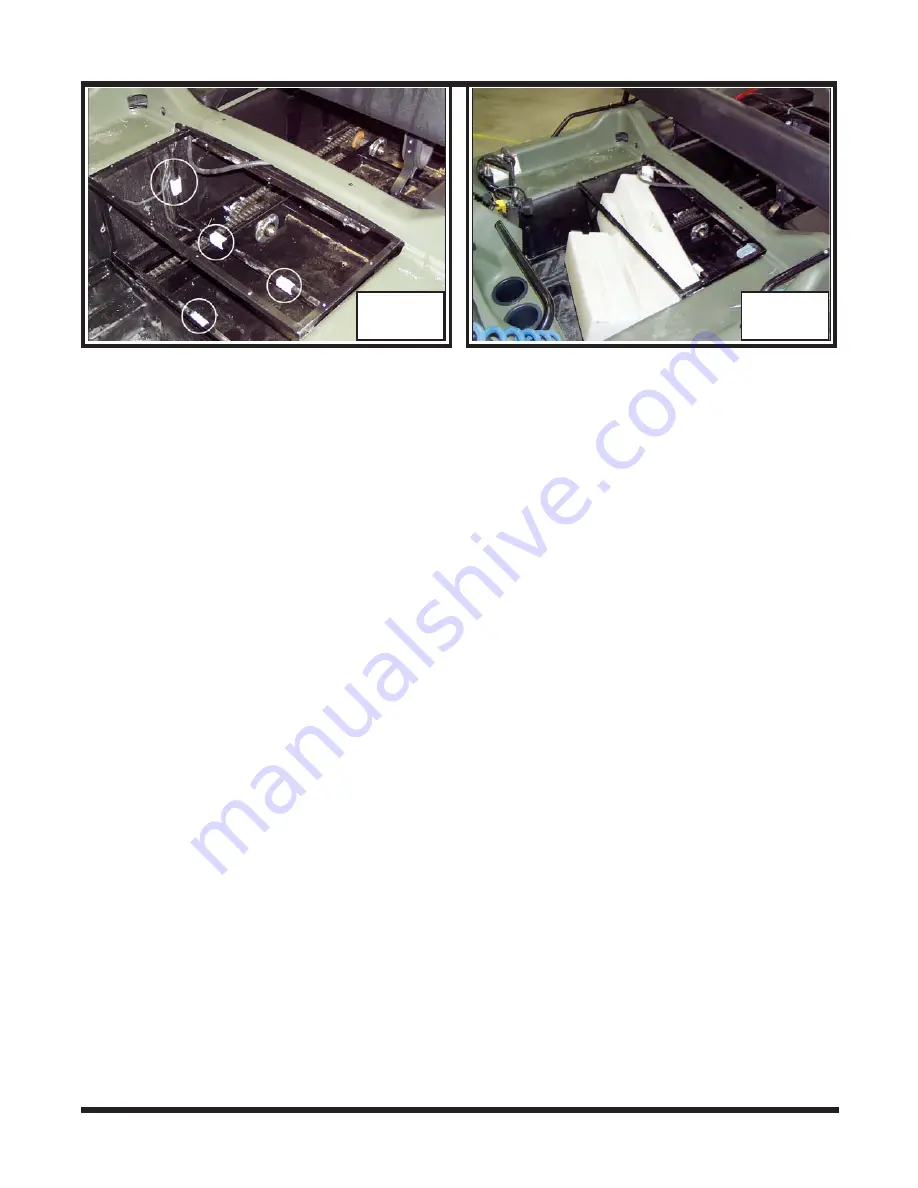
Slip the new or cleaned tank into the vehicle from the drivers compartment, recon-

necting  the filler hose to the tank at the same time and secure it with the gear clamp.

Be sure to reconnect the fuel vent hose at the filler neck and ensure that it is facing
up and not kinked or pinched in any way.

3.

With the tank in place, reinstall the tool box and secure with rivets.

4.

Replace the fuel filter with a new one.

6.

Place the front seat back into the vehicle.

loose or broken clamps

loose connection in pick-up pipe

IMPOR

IMPOR

IMPOR

IMPOR

IMPORT

T

T

T

TANT

ANT

ANT

ANT

ANT

5.

Reinstall the battery

 FS-3

 FS-4

Summary of Contents for 1997 BF

Page 1: ...Ontario Drive Gear Limited Part 673 04 1 05 06 www odg com PH 519 662 2840 FAX 519 662 2421 Service Manual Models S SN BF RB C CB V A B N R...

Page 2: ...General Information Argo Service Manual Ontario Drive Gear Limited www odg com PH 519 662 2840 FAX 519 662 2421 GI 28...

Page 3: ...TR How to use this manual This manual is divided into general sections which are identi fied by a 2 letter designation Find the section you want in the guide on this page and then turn to the Table o...

Page 4: ...Argo Service Manual Ontario Drive Gear 519 662 2840 FAX 519 662 2421 www odg com...

Page 5: ...acity GI 5 Model Identification early models only GI 6 7 Identification and Location of Controls GI 8 9 Argo Model Specifications GI 10 11 Information Labels GI 12 Argo Torque Specifications GI 13 14...

Page 6: ...refer to this Service Manual before performing any servicing procedure on any of the above vehicles This ARGO Service Manual provides information on maintenance procedures service operations and on t...

Page 7: ...e identified in the text by the following symbol This manual is based on the latest product information available at the time of printing Ontario Drive Gear Limited reserves the right to make changes...

Page 8: ...5 the 18 H P V Twin Briggs Stratton Vanguard engines were introduced to our vehicle line up Also covered is the 8x8 Conquest model powered by the 20 H P Kawasaki FD620D Liquid cooled engine which was...

Page 9: ...n equipped with a snow plow Do NOT use an Argo 6x6 in water when equipped with a ROPS The in creased weight of the snow plow out front or the top heavy weight of the ROPS on the 6x6 will make the Argo...

Page 10: ...onquest V899 46 22 Rawhide III Tires MU List of Earlier Models Tecumseh V688 20 Conquest V894 37 V888 20 Mid 1999 V894 38 V888 21 Briggs Stratton Twin V888 22 Vanguard V693 22 V688 22 V693 36 Magnum V...

Page 11: ...699 55E Bearing Extensions HU Vanguard 2 V699 56 MU Transmission Vanguard 2 V699 57 Horn Parking Brake HU Bigfoot V698 58 HU Transmission Bigfoot V698 59 MU Transmission Bigfoot V698 60 Horn Parking B...

Page 12: ...ormation Argo Service Manual Ontario Drive Gear Limited www odg com PH 519 662 2840 FAX 519 662 2421 GI 8 Identfication and Location of Controls Prior to serial N14708 B14700 R22452 Prior to serial C2...

Page 13: ...Argo Service Manual General Information Ontario Drive Gear Limited www odg com PH 519 662 2840 FAX 519 662 2421 GI 9 From serial N14708 B14700 R22452 From serial C22453 A14743...

Page 14: ...ic ignition Speed Land 32 km hr 20mph Water 3 km h 2 mph Load Capacity Land 6 persons or 522kg 1150lbs SEE SECT 1 4 1 Water 4 adults or 317kg 700lbs Tires 25x11 5 9NHS 2 ply Dry Weight 542kg 1195lbs A...

Page 15: ...2 mph Load Capacity Land 4 persons or 317 kg 700 lbs Water 2 adults or 158 kg 350 lbs Maximum Rear Capacity Land and Water 63 kg 140 lbs Tires 22x10 00 8NHS 2 ply Dry Weight 348 kg 765 lbs ARGO Model...

Page 16: ...Information about the use of the holding brake system the use of the vehicle in water correct fueling procedures and placement of the floorpans has been provided on distinctive coloured labels fastene...

Page 17: ...tch Bolt to Kaw Engine 50 FT LBS 67 8Nm Driven Clutch Bolt to Input Shaft 15 FT LBS 20 3Nm Spring Cover Cap Screws 85in lbs 9 6Nm ARGO Torque Specifications Powerpak Assembly Engine to Powerpak Frame...

Page 18: ...BS 16 4Nm Axle Bearing Set Screws 10 15 IN LBS 1 1 1 6Nm Axle Retaining Bolt 35 FT LBS 47 5Nm Wheel Stud Extensions 45 FT LBS 61 0Nm Fuel System and Seat Assembly Handrail Assembly to UpperbodyHand Ti...

Page 19: ...CHANGE TRANSMISSION OIL CLEAN AIR PRE CLEANER Briggs Kaw only CHECK CLEAN REPLACE AIR FILTER REPLACE FUEL FILTER LUBRICATE DRIVEN CLUTCH SERVICE DRIVER DRIVEN CLUTCH LUBRICATE DRIVE CHAINS REMOVE CLEA...

Page 20: ...vehicle to a factory authorized engine repair outlet 8 Improperly operating electric fuel 8 Check that electric fuel pump is pump or fuel shut off solenoid operating Make sure fuel shut off KAWASAKI...

Page 21: ...move tire from rim and repair the hole with a radial tire patch or install a tube in the tire 2 Tire is not properly seated on bead 2 Deflate tire and carefully push tire bead off the rim Clean the ri...

Page 22: ...00 Driver Clutch Re Re 6 6 6 6 6 6 3200 Driver Clutch Re Re Overhaul 1 4 1 4 1 4 1 4 1 4 1 4 3500 Driven Clutch Re Re 3 3 3 3 3 3 3700 Driven Clutch Re Re Overhaul 8 8 8 8 8 8 Powerpack Assembly 4000...

Page 23: ...0 5 6700 Trailer Hitch Re Re 2 2 2 none none 2 Hood 0 5 0 5 0 5 0 5 0 5 0 5 6800 Lower body Re Re 25 6 20 6 22 6 18 2 18 2 30 0 Frame Drive System 7000 Front Axle Re Re 1 5 1 5 1 5 1 5 1 5 1 5 7100 Re...

Page 24: ...ne 3 none none 5 9200 Coolant Gauge Re Re Includes Testing 5 none none none none 5 9300 Battery Re Re Service 4 4 4 4 4 3 9400 Wiring Harness Re Re 2 5 1 3 1 3 1 3 1 3 9500 Headlight Re Re 2 2 2 2 2 9...

Page 25: ...esponse 1 0 622 80 Winch Kit Avenger 3 0 622 96 Receiver Winch Kit 1 0 624 00 Dual Tail Light Kit 5 624 10 Brake Tailight Kit 1 5 625 42K 6 Wheel Super Track Set Assembly 2 0 Installation 1 0 Removal...

Page 26: ...nge kit 1 0 825 55 Hinge Kit 2 0 839 20 Hand Rail Kit 8x8 1 2 839 30 Hand Rail Kit 8x8 Avenger 1 2 848 10 Heater Kit Conquest 3 5 848 32 Heater Kit Avenger 7 0 848 40 2 ROPS Kit 8x8 c w 2 Seat belts 4...

Page 27: ...rench Drive Impact Wrench 3 8 Drive 15 16 Pivot Socket Air Gun Med Ball Peen Hammer 15 16 Socket Ext Retaining Ring Plyers 4R Ext Retaining Ring Plyers 490R Side Cutters Channel Lock Plyers Flat Head...

Page 28: ...Nut Driver Flat Head Screw Driver small Deburrer Router With Drill Bit Valve Stem Remover Calking Gun 3 32 Hex Key long 10mm Nut Driver 8mm Combination Wrench 6mm Hex Socket short 10mm Socket 13mm Com...

Page 29: ...small 1 4 Nut Driver Retaining Ring Plyers 2R Angled Air Ratchet 3 8 Box End Air Ratchet Wrench 1 4 1 2 Tapping Socket 21 Drill Bit 13 64 Drill Bit 29 64 Drill Bit 3 32 Drill Bit 3 4 Drill Bit 9 16 Dr...

Page 30: ...Grips is required to hold the ends of the drive chain together while inserting the connecting link This tool can also be used to hold the ends of the idler chain together while inserting the connecti...

Page 31: ...Argo Service Manual General Information Ontario Drive Gear Limited www odg com PH 519 662 2840 FAX 519 662 2421 GI 27 Starter Removal...

Page 32: ...General Information Argo Service Manual Ontario Drive Gear Limited www odg com PH 519 662 2840 FAX 519 662 2421 GI 28...

Page 33: ...Oil EN 4 Changing the Engine Oil EN 5 Draining the Engine Oil EN 5 Oil Filter Replacement EN 6 Refilling the Engine EN 7 Air Filter EN 7 Spark Plugs EN 7 Removing the Engine Kawasaki FD620D L C EN 8 A...

Page 34: ...go Service Manual Ontario Drive Gear Limited www odg com PH 519 662 2840 FAX 519 662 2421 EN 2 Briggs Stratton V Twin OHV 16 18 23 H P Kawasaki FD620D Liquid Cooled Kohler Aegis 20 H P OHV 26H P Carbu...

Page 35: ...his her satisfaction that personal injury or vehicle damage will not result from the servicing procedure or tools selected All engine service work should be performed by a qualified mechanic Severe d...

Page 36: ...be between the marks If the level has dropped add oil to bring the level up to the FULL mark DO NOT OVERFILL EN 2 Do not run the engine if the oil level is above the FULL mark or below the ADD mark P...

Page 37: ...Argo Service Manual Engine System Ontario Drive Gear Limited www odg com PH 519 662 2840 FAX 519 662 2421 EN 5 Briggs Stratton API Service Class SE SF or SG...

Page 38: ...ation for Briggs Stratton and 20 hours of operation for the Kawasaki After the break in period change the engine oil every 50 operating hours or more frequently if the vehicle is operated in dusty or...

Page 39: ...in plug MAKE SURE it is properly tightened before refilling the engine 5 See Oil Filter Replacement Below PLEASE DISPOSE OF WASTE OIL PROPERLY TO CONSERVE OUR ENVI RONMENT Oil Filter Replacement Durin...

Page 40: ...ges to the Cylinder Heads Head composition spark plugs of the FD620D The newer spark plugs are longer and will cause damage if used in an older spec engine All ARGO engines are equipped with a foam pr...

Page 41: ...cess opening using an overhead hoist You may prefer to remove the transmission first before lifting engine and frame through the hood area 2 Locate and remove the engine access cover Photo EN 3 3 Sepa...

Page 42: ...f the engine 9 Remove the engine air filter cover and air element Photo EN 7 10 Remove the 7 fasteners securing the plastic base of the air filter housing Photo EN 8 EN 7 EN 8 When removing the 3 fast...

Page 43: ...steps 1 6 on page DE 3 models prior to C19672 or steps 1 2 on page DE 7 mod els from C19672 15 Disconnect the intake hose at the brake cooling duct Photo EN 11 16 Remove the front pivot mounting bolt...

Page 44: ...ng and master cylinder assembly to the transmission and remove them Photo EN 13 21 Disconnect the wiring at the igniter box which is mounted to the steering assembly Photo EN 14 EN 13 EN 14 22 Unfaste...

Page 45: ...f the idler shaft the other behind Photo EN 17 26 Loosen off the dash support and turn it 90 degrees Photo EN 18 28 Attach an overhead hoist to the front engine hook only This hook is located on the e...

Page 46: ...he engine to the frame These bolts are threaded into the engine block from below Photo EN 22 31 Using the overhead hoist remove the engine from the power pack frame Photo EN 23 EN 22 EN 23 If the engi...

Page 47: ...EN 24 IMPORTANT As the power pack is lowered into the vehicle position yourself inside the drivers compartment Lift up on the transmission and align the power pack frame with the vehicle main frame 4...

Page 48: ...ct seal at the radiator is properly seated back up against the face of the radiator assembly Photo EN 30 EN 30 8 Reconnect the hose at the brake cool ing duct 9 Perform the servicing procedure Install...

Page 49: ...ect the main engine wire harness located between the engine and transmis sion 16 Reconnect the starter cable at the electric starter and cover with the rubber boot 17 Secure the main engine harness to...

Page 50: ...ake Pads Hydraulic if necessary EN 33 EN 34 24 Reconnect the ignition system at the ig niter box 25 Reinstall the clutch guard Apply blue 242 LOCTITE to the threads of the 2 bolts that secure it to th...

Page 51: ...Perform the servicing procedure Removing the Firewall in section CS of this service guide 2 Remove the hood 3 Disconnect and remove the battery 4 Perform the servicing procedure Re moving the Air Inta...

Page 52: ...4 mounting bolts at the lower frame The engine is secured with 4 ny lon locknuts 19 Lift the engine out of the vehicle using an overhead hoist Photo EN 38 EN 37 EN 38 On vehicles manufactured prior to...

Page 53: ...t of holes is used for clutch offset and belt alignment Use the holes as illustrated in Photo EN 40 41 below 3 Reconnect the power to the electric starter Installing the Engine Briggs Models 1 Attach...

Page 54: ...semble the choke cable to the carburetor linkage Photo EN 42 9 Assemble the throttle cable to the carburetor linkage Photo EN 43 EN 42 EN 43 10 Reattach the ground wire running from the battery termin...

Page 55: ...ocedure Installing the Intake Duct Briggs Models in section DE of this service guide 16 Install the battery and reconnect battery terminals 17 Perform the servicing procedure Installing the Firewall i...

Page 56: ...General Information Argo Service Manual Ontario Drive Gear Limited www odg com PH 519 662 2840 FAX 519 662 2421 GI 28...

Page 57: ...Argo Service Manual Engine System Ontario Drive Gear ltd www odg com centaur 519 662 2840 FAX 519 662 2421 SECTION EN Supplement Pages...

Page 58: ...Engine System Argo Service Manual Ontario Drive Gear ltd www odg com centaur 519 662 2840 FAX 519 662 2421...

Page 59: ...gs between the tailpipe assembly and muffler Photo 1 2 Pull the assembly out through the hood area 1 2 2 Remove the heat deflector shield covering the muffler Photo 3 Disconnect All Wiring 3 Disconnec...

Page 60: ...ess plug ins at the front of the engine compartment and disconnect all wires Photo 8 7 8 7 Locate the starter at the front of the engine compartment and disconnect both red and black power wires from...

Page 61: ...e wrench is the rec ommended tool of choice Photo 16 This type of wrench is preferred for removing 3 of the 4 nylon locknut fasteners The exception is the fastener located at the rear left corner of t...

Page 62: ...not necessary Ensure all hoist chains or belts are secure and hooks are locked into place Keep all fingers and hands clear of the area from which the engine is being lifted 14 Attach the overhead hoi...

Page 63: ...oved EFI models will have an O2 sensor threaded into the muffler that will need to be removed as well Photo 22 18 Remove the hex head fastener securing the driver clutch to the PTO and slide the clutc...

Page 64: ...the key to the keyway of the PTO Photo 3 4 Slide the driver clutch on and up to the shoulder of the PTO Photo 4 1 2 3 4 5 Secure the driver with the hex head fastener Apply blue LOCTITE and Torque to...

Page 65: ...the lower radiator locating pins from dislodging from the rubber gromments under heavy vehicle application Damage can occur to both fan and shroud if this is not done Please note that later spec engin...

Page 66: ...e studs Once aligned properly the engine should just drop into place Do not force or hammer in any way Damage may occur to the threads of the mounting studs IMPORTANT Once the engine is seated into pl...

Page 67: ...l panel on the Kohler engine Photo 15 Insert the throttle cable into the correct hole Photo 16 14 15 16 14 Install the driven clutch Apply blue LOCTITE to the threads of the fastener and Torque to spe...

Page 68: ...connect the ground wire attached at the front of the engine to the valve cover fastener Photo 20 18 Locate the main wire harness plug ins at the front of the engine compartment and reconnect the main...

Page 69: ...odg com PH 519 662 2840 FAX 519 662 2421 24 25 22 Locate and install the tailpipe assembly Attach the connecting springs between tailpipe assembly and muffler Photo26 27 Feed the tailpipe assembly in...

Page 70: ...Engine System Argo Service Manual Ontario Drive Gear Limited www odg com PH 519 662 2840 FAX 519 662 2421...

Page 71: ...tallation ES 8 Changing a Headlamp Bulb Earlier Conquest Models ES 8 Installing the Headlamp Bulb Earlier Conquest Models ES 9 Removing a Headlamp Bulb ES 9 Installing a Headlamp Bulb ES 10 Removing t...

Page 72: ...ling Fan Response Bigfoot ES 17 Installing the Brake Cooling Fan Response Bigfoot ES 18 Removing the Brake Cooling Fan Conquest ES 19 Installing the Brake Cooling Fan Conquest ES 20 Calibrating the Di...

Page 73: ...m RB 12075 08 95 ES 32 Response Model V896 65 From RB 12702 11 96 ES 33 Response Model V896 65 From RB 14121 10 97 ES 34 Reponse Model V899 65 From RB 16104 06 99 ES 35 Response Model V899 65 From RB...

Page 74: ...V696 55 From SN7841 04 95 ES 45 Argo Vanguard2 Model V697 55 From SN8138 11 95 ES 46 Argo Vanguard2 Model V697 55 From SN8138 11 95 ES 47 Argo Vanguard2 Model V699 55 From SN12227 02 01 ES 48 Bigfoot...

Page 75: ...s selected Always disconnect the battery when servicing any electrical component Never weld on the vehicle without first disconnecting both positive and negative battery cables Make sure the part you...

Page 76: ...low charge for at least another 6 hours If the battery loses its electrical charge remove the battery from the ARGO and recharge it with a 12 volt battery charger at the rate of 10 12 amps maximum The...

Page 77: ...in section VB of this service guide 2 Locate the battery on the right hand side of the vehicle 3 Remove the negative battery cable first Accessing the negative ground cable terminal on Conquest model...

Page 78: ...charge for at least 6 hrs If persistant problems with battery charge occur before replacing the battery ensure that the engine charging system is functioning properly Refer to the appropriate engine...

Page 79: ...sket is in place and not damaged Replace if necessary 9 Install the screws to the headlamp trim 10 Plug the power wire leading from the new bulb into the vehicle wire harness Re tape the connection wi...

Page 80: ...he glass surface Do not touch the bulb with your fingers 4 Clip the new bulb assembly into the wire harness 5 Reaching in through the engine access area align the bulb assembly with the head lamp hous...

Page 81: ...Vehicles manufactured prior to S8131 SN8138 1 Remove the engine access cover 2 Disconnect the battery 3 Using a screw driver remove the 4 screws holding the headlamp rim to the upper body 4 Pull the h...

Page 82: ...ponse Bigfoot and Later Vanguard2 Vanguard Models Some earlier Response models incorporated a plastic headlamp bezel that secured itself to the upper body by 2 tabs to the inside of the headlamp openi...

Page 83: ...onnect Photo ES 12 The solenoid is fastened to the top of the starter The Kawasaki starter motor is located between the engine and transmission near the brake cooling duct Photo ES 11 ES 11 ES 12 5 Lo...

Page 84: ...ion the brake cooling duct and secure to the power pack frame with the 2 fas teners 6 Perform the servicing procedure Installing the Driven Clutch in section CS 7 Perform the servicing procedure Insta...

Page 85: ...ove the flywheel nut and recoil cup Photo ES 19 ES 18 ES 19 8 Attach a universal puller to the flywheel and pop the flywheel from the magneto side of the crank using a socket and wrench Photo ES 20 Wh...

Page 86: ...Photo ES 21 11 Locate and remove the 2 fasteners securing the starter motor to the engine 12 Disconnect the main starter cable from the starter Photo ES 22 ES 21 ES 22 Installing the Starter Response...

Page 87: ...n Response Bigfoot Response and Bigfoot models come equipped with a brake cooling system The cooling fan is mounted to the upper body by 4 rivets and air flow is routed via an intake hose to a brake c...

Page 88: ...mounting bracket to the fan Place the fan into the vehicle orienting the outlet towards the front of the vehicle Photo ES 26 2 Align the holes in the bracket with the 4 holes in the upper body and in...

Page 89: ...ed 2 Using a 3 16 drill bit remove the rivets starting from the front center of the vehicle to approximately the dash area Photo ES 29 3 Separate the body supporting it apart with a couple of 2x4 piec...

Page 90: ...intake duct and secure with the 4 bolts and lockwashers Orient the fan with the outlet facing towards the front of the vehicle and facing slightly downward 2 Connect the wiring from the vehicle wire h...

Page 91: ...w hose 8 Install the engine access cover On Conquests manufactured from CB17117 1 Fasten the blower fan to the molded plastic intake duct orienting the fan outlet fac ing down towards the bottom of th...

Page 92: ...Electrical System Argo Service Manual Ontario Drive Gear Limited www odg com PH 519 662 2840 FAX 519 662 2421 ES 22 Models T TB HT HTB FROM 1977 KB FROM 1981 86 K FROM1983 S FROM 1986 SB FROM 1987...

Page 93: ...Limited www odg com PH 519 662 2840 FAX 519 662 2421 ES 23 After T6460 TB8446 HTB8592 Models T TB HT HTB FROM 1977 KB FROM 1981 86 K FROM1983 S FROM 1986 SB FROM 1987 Argo Standard Heavy Duty Models...

Page 94: ...Electrical System Argo Service Manual Ontario Drive Gear Limited www odg com PH 519 662 2840 FAX 519 662 2421 ES 24 Argo Twin Model V888 22 V688 22 From SB8355 S6308...

Page 95: ...Argo Service Manual Electrical System Ontario Drive Gear Limited www odg com PH 519 662 2840 FAX 519 662 2421 ES 25 Argo Vangard Model V891 892 22 V691 692 22 from S6834 SB9691...

Page 96: ...Electrical System Argo Service Manual Ontario Drive Gear Limited www odg com PH 519 662 2840 FAX 519 662 2421 ES 26 Argo Model NKB From 1987 1 87...

Page 97: ...Argo Service Manual Electrical System Ontario Drive Gear Limited www odg com PH 519 662 2840 FAX 519 662 2421 ES 27 Argo I C Model V888 23 V688 23 From NKB 8187 NK 6192 11 88...

Page 98: ...Electrical System Argo Service Manual Ontario Drive Gear Limited www odg com PH 519 662 2840 FAX 519 662 2421 ES 28 Argo Magnum Model V890 23 V690 23 12 89...

Page 99: ...Argo Service Manual Electrical System Ontario Drive Gear Limited www odg com PH 519 662 2840 FAX 519 662 2421 ES 29 Argo Magnum Model V890 23 V690 23 From NKB9466 NK 6812 10 90...

Page 100: ...Electrical System Argo Service Manual Ontario Drive Gear Limited www odg com PH 519 662 2840 FAX 519 662 2421 ES 30 Argo Magnum Model V891 23 From NKB 10785 Models V891 27 V691 27 06 93...

Page 101: ...Argo Service Manual Electrical System Ontario Drive Gear Limited www odg com PH 519 662 2840 FAX 519 662 2421 ES 31 Argo Magnum Model V894 23 V894 27 From NKB 10973 03 94...

Page 102: ...Electrical System Argo Service Manual Ontario Drive Gear Limited www odg com PH 519 662 2840 FAX 519 662 2421 ES 32 Response Model V896 65 From RB 12075 08 95...

Page 103: ...Argo Service Manual Electrical System Ontario Drive Gear Limited www odg com PH 519 662 2840 FAX 519 662 2421 ES 33 Response Model V896 65 From RB 12702 11 96...

Page 104: ...Electrical System Argo Service Manual Ontario Drive Gear Limited www odg com PH 519 662 2840 FAX 519 662 2421 ES 34 Response Model V896 65 From RB 14121 10 97...

Page 105: ...Argo Service Manual Electrical System Ontario Drive Gear Limited www odg com PH 519 662 2840 FAX 519 662 2421 ES 35 Reponse Model V899 65 From RB 16104 06 99...

Page 106: ...Electrical System Argo Service Manual Ontario Drive Gear Limited www odg com PH 519 662 2840 FAX 519 662 2421 ES 36 Response Model V899 65 From RB 17665 12 00...

Page 107: ...Argo Service Manual Electrical System Ontario Drive Gear Limited www odg com PH 519 662 2840 FAX 519 662 2421 ES 37 Conquest V894 37 V894 38 From CB 10847 01 94 Conquest Parts Manual...

Page 108: ...Electrical System Argo Service Manual Ontario Drive Gear Limited www odg com PH 519 662 2840 FAX 519 662 2421 ES 38 Conquest Model V894 37 V894 38 From CB 12580 03 96...

Page 109: ...Argo Service Manual Electrical System Ontario Drive Gear Limited www odg com PH 519 662 2840 FAX 519 662 2421 ES 39 Conquest Model V899 37 V899 38 From CB 16049 05 99...

Page 110: ...Electrical System Argo Service Manual Ontario Drive Gear Limited www odg com PH 519 662 2840 FAX 519 662 2421 ES 40 Conquest Model V899 37 V899 38 From CB 17857 02 01...

Page 111: ...Argo Service Manual Electrical System Ontario Drive Gear Limited www odg com PH 519 662 2840 FAX 519 662 2421 ES 41 Argo Vanguard Model 693 22 From S6999 02 92...

Page 112: ...Electrical System Argo Service Manual Ontario Drive Gear Limited www odg com PH 519 662 2840 FAX 519 662 2421 ES 42 Argo Vanguard Model V693 36 From S7304 06 93...

Page 113: ...Argo Service Manual Electrical System Ontario Drive Gear Limited www odg com PH 519 662 2840 FAX 519 662 2421 ES 43 Argo Vanguard Model V697 51 From S8131 09 97...

Page 114: ...Electrical System Argo Service Manual Ontario Drive Gear Limited www odg com PH 519 662 2840 FAX 519 662 2421 ES 44 Argo Vanguard Parts Manual Model V699 51 From S12222 03 02...

Page 115: ...Argo Service Manual Electrical System Ontario Drive Gear Limited www odg com PH 519 662 2840 FAX 519 662 2421 ES 45 Argo Vanguard2 Model V696 55 From SN7841 04 95...

Page 116: ...Electrical System Argo Service Manual Ontario Drive Gear Limited www odg com PH 519 662 2840 FAX 519 662 2421 ES 46 Argo Vanguard2 Model V697 55 From SN8138 11 95...

Page 117: ...Argo Service Manual Electrical System Ontario Drive Gear Limited www odg com PH 519 662 2840 FAX 519 662 2421 ES 47 Argo Vanguard2 Model V697 55 From SN8138 11 95...

Page 118: ...Electrical System Argo Service Manual Ontario Drive Gear Limited www odg com PH 519 662 2840 FAX 519 662 2421 ES 48 Argo Vanguard2 Model V699 55 From SN12227 02 01...

Page 119: ...Argo Service Manual Electrical System Ontario Drive Gear Limited www odg com PH 519 662 2840 FAX 519 662 2421 ES 49 Bigfoot Model V698 58 From BF9212 08 97...

Page 120: ...Electrical System Argo Service Manual Ontario Drive Gear Limited www odg com PH 519 662 2840 FAX 519 662 2421 ES 50 Bigfoot Model V698 58 From BF12097 12 00 Electrical System Bigfoot Parts Manual...

Page 121: ...Argo Service Manual Electrical System Ontario Drive Gear Limited www odg com PH 519 662 2840 FAX 519 662 2421 ES 51 Conquest 6x6 Model V601 62 From C12747 11 01...

Page 122: ...If no bars are flashing after step 1 press MODE button directly 3 001 will be flashing in bottom left corner press KM MILE to change to 002 press MODE 4 25 0 will be flashing keep pressing KM MILE to...

Page 123: ...moving the Master Cylinder BR 15 Disassembling the Master Cylinder BR 16 Master Cylinder Servicing Inspection BR 17 Master Cylinder Reassembly BR 18 Master Cylinder Installation BR 19 Bleeding the Hyd...

Page 124: ...al BR 30 Mechanical Brake Caliper Installation BR 31 Adjusting the Mechanical Brake Caliper BR 33 Steering Lever Adjustment Mechanical BR 34 Holding Brake Adjustment BR 34 Brake Disc Inspection BR 35...

Page 125: ...re used during that particular manufacturing period when the ARGO was built It is also very helpful using the illustrations to clearly see and define the component being referred to If components are...

Page 126: ...will not result from the servicing procedure or tools selected All brake work should be performed by a qualified mechanic Braking Steering ability and vehicle performance will be seriously impaired if...

Page 127: ...he servicing procedure Brake Pad Inspection hydraulic 3 Every 30 hours of vehicle operation perform the servicing procedure Adjusting The Mechanical Brake Caliper Vanguard Models only 4 Every 50 hours...

Page 128: ...ca brake caliper halves used in production during this earlier manufacturing period were secured together by two M10 bolts only allowing the pads to be pulled from the calipers without having to remov...

Page 129: ...lic Brake Pad Inspection When removing the caliper from the transmission take note of any shims that may have been used between the caliper and transmission mounting boss Earlier models may have emplo...

Page 130: ...caliper make sure that the brake caliper pistons are pushed back into the caliper housing as far as possible This will enure that the new pads can be spread far enough apart from each other to accommo...

Page 131: ...justed brake system Inspect the calipers for the conditions listed in the chart below and then perform the recommended servicing procedures Condition Corrective Action Servicing Procedure Page Cracked...

Page 132: ...Line up the hole provided in the brake disc with the hex head mounting bolts that secure the hydraulic brake caliper to the transmission housing To do this you will need to rotate the tires by hand un...

Page 133: ...Remove the piston from each half by applying compressed air Max 20 psi or less to the hydraulic hose inlet Place a rag in between the caliper to absorb the shock of the piston when it pops from the c...

Page 134: ...ssed air to dry 11 Thoroughly inspect all the components Replace any worn cracked or broken or missing parts 12 Inspect both piston chambers for any pitting scratching scarring or rust Replace pistons...

Page 135: ...t the cavity side is facing up 6 Place the one half caliper into the aluminum jawed vise being careful not to damage it by overtightening it Locate the oil journal which requires the small O ring Plac...

Page 136: ...eaded mount of the caliper casting Photo BR 18 Cap with the rubber plug 10 Slide the brake pads into the calipers and secure with 2 new cotter pins BR 18 BR 17 Hydraulic Brake Caliper Installation 1 R...

Page 137: ...luid can damage components or cause premature wear This will result in a loss of braking steering effectiveness To rebuild a master cylinder removal of the component is necessary to insure a clean and...

Page 138: ...rkbench to prevent them from dropping into the lower body of the vehicle A new rubber boot is supplied with the master cylinder O ring kit and must be replaced when rebuilding a master cylinder Disass...

Page 139: ...attaches to the end of the piston Models prior to this had a shorter spring which did not attach to the piston The newer spring is fully exchangeable with the older style but should be replaced as a...

Page 140: ...the new primary and secondary seals on to the piston Orient as in Photo BR 25 Do not damage the seals during the installation BR 25 2 a Inspect the condition of the master cylinder housing Replace im...

Page 141: ...d insert the 2 mounting bolts Photo BR 28 Conquest models require the rear mounting bolt to also secure the igniter box at the master cylinder 2 Reinstall the nylon locknuts and tighten to anchor the...

Page 142: ...t of the screw If there is any air still present in the system it will be noticeable through this screw with a slight spitting of fluid Re tighten the screw and once again pump the brake system slowly...

Page 143: ...with oil dirt or water can damage the seals or other component parts of the hydraulic brake system Use only Dot 5 silicon brake fluid Other brake fluids may not be compatible with ARGO brake componen...

Page 144: ...remove the firewall of the vehicle Perform the servicing procedure Removing the Firewall for your particu lar model in Section VB of this service guide 2 Remove the engine hood to access the master c...

Page 145: ...causing it to be less aggressive giving it poor turning capabilities This adjustment will also set both handle bars at an even distance from the dash block when both are applied IMPORTANT A 1 4 cleara...

Page 146: ...on the adjustable plunger pin Photo BR 32 BR 31 BR 32 5 With the jam nut loosened the plunger pin may be threaded either in or out In any case the end result should have the master cylinder piston fl...

Page 147: ...levers back push each holding brake handle down until it rests against the brake lever stop Photo BR 34 3 Check the distance between the holding brake stop on each steering lever and the holding brake...

Page 148: ...hose from the caliper Place a catch tray under the free end of the hydraulic hose and allow the hose and master cylinder reservoir to drain 3 Disconnect the hydraulic hose from the master cylinder 4...

Page 149: ...the servicing procedure Mechanical Brake Pad Inspection Replacement Mechanical Brake Caliper Removal 2 Remove the front floor pan and the firewall See servicing procedure Removing the firewall in sect...

Page 150: ...ame Photo BR 38 5 Remove the brake cam assembly and flat washer Photo BR 39 6 Remove both mounting bolts and separate the calipers from the power pack frame Collect the 2 compression springs that are...

Page 151: ...the Brake Pads Mechanical 1 Perform the servicing procedure Me chanical Brake Caliper Removal Mechanical Brake Pad Inspection Replacement Inspect the condition of the brake pads Replace the pads when...

Page 152: ...hanical 1 Place the new brake pad on to the caliper Be sure that the counter sunk side is facing up Photo BR 44 2 Using a pop riveting tool fasten the brake pad to the caliper Photo BR 45 Make sure th...

Page 153: ...ounting bolts Photo BR 49 3 Insert the shorter of the two bolts into the rear hole of the caliper Photo BR 48 2 Take the longer of the two mounting bolts and place it through the front hole of the cal...

Page 154: ...ll bearing with a soft faced mallet to seat it within the cavity Photo BR 53 BR 53 The caliper with the 2 steel ball bearings are always on the side of the brake cam 8 Place the second caliper to the...

Page 155: ...between the left hand brake caliper and the brake disc while pushing the right caliper half against the brake disc Photo BR 60 5 Slowly back off the front jam nut and adjustment nut until movement is...

Page 156: ...ent Steering Lever Adjustment Adjust the steering levers when steering levers travel more than 18 cm 7 from the dash to apply the brakes the levers are not parallel when the brakes are applied or the...

Page 157: ...NT Brake Disc Inspection Badly worn brake pads or abnormal use of the vehicle can cause serious damage to the brake discs Inspect the brake discs for the condition listed in the chart below and perfor...

Page 158: ...ck frame On ARGOS manufactured from SN7841 S8131 and all RB CB BF C vehicles locate the two 3 8 16x3 bolts threaded into the lower frame channel beneath the rear power pack mounting bolt Turn each of...

Page 159: ...f the brake disc sprocket The 40 2x15 Brake discs manufactured from S N S7332 have been unified in length with the 50 2x13 brake disc and no longer require this spacer These lengthened brake discs are...

Page 160: ...erform the servicing procedure Battery Removal in Section ES of this service guide Install a wheel puller on the brake disc and remove it from the transmission output shaft BR 67 Vehicles manufactured...

Page 161: ...overhead mounting bracket BIGFOOT RESPONSE MODELS BR 68 On vehicles produced prior to S N CB16459 RB16446 BF11143 S11188 SN11196 IMPORTANT On vehicles produced from S N CB16459 RB16446 BF11143 S11188...

Page 162: ...nd slip 2 of the longer mounting bolts through the bracket Install 2 long spacers to the bolts as illustrated in Photo BR 69 Be sure to orient the brake bracket as shown The top hole closest to the ba...

Page 163: ...echanical brake components for assembly Photo BR 74 3 Assemble the second caliper bracket to the left side of the power pack frame using 2 of the shorter mounting bolts and 2 short spacers The bracket...

Page 164: ...rake shaft through the parking brake lever from the opposite side as in Photo BR 76 9 Install 4 roll pins to secure both shafts to the parking brake lever Photo s BR 77 78 11 Thread the jam nut to the...

Page 165: ...out the steel balls The one caliper is also the one that is notched Photo BR 82 Do not install the bearing balls to the single caliper with the notched area 15 Locate the notched caliper and slip the...

Page 166: ...king brake rods into each of the ball joints at the cam until there is approximately inch of thread exposed Attach the other end of the rod to the shaft assemblies and secure with a cotter pin Photo B...

Page 167: ...es on each side of the duct Photo BR 91 24 Apply blue 242 LOCTITE to the threads of the bolt at the brake cam and thread a second locknut up to and against the first one Hold the inner nut with an ope...

Page 168: ...odels Only Photo BR 95 IMPORTANT BR 93 BR 94 BR 95 Brake Cooling System All 6x6 Bigfoot and Eight wheel vehicles with hydraulic brakes have a 12 volt fan forcing cool air from outside the engine compa...

Page 169: ...Argo Service Manual Brake System Ontario Drive Gear ltd www odg com centaur 519 662 2840 FAX 519 662 2421 SECTION BR Supplement Pages...

Page 170: ...Brake System Argo Service Manual Ontario Drive Gear ltd www odg com centaur 519 662 2840 FAX 519 662 2421...

Page 171: ...m the steering shaft Photo ST 3 IMPORTANT Be aware of the small key s installed into the steering shaft and ensure they are installed when reassembling the steering system ST 3 6 Disconnect the hand b...

Page 172: ...arm and centering spring from the shaft Avenger Models Only On all models manufactured from C22453 R22452 B14700 A14743 N14708 ST 5 i Slip the Steering Shaft from the Steering Column Assembly Photo ST...

Page 173: ...aft and an equal amount of pin protrudes on each side of the shaft Photo ST 9 ii Slip the first Steering Arm on to the Steering Shaft followed by the Retaining ring seating it to the groove on the sha...

Page 174: ...ST 12 ST 13 Vehicles manufactured from V22441 C22453 R22452 B14700 A14743 N14708 i Install the Spring Pin at the 2nd hole from the end on the Steering Shaft The roll pin should be installed such that...

Page 175: ...ST 16 On Vehicles manufactured from C22453 R22452 B14700 A14743 N14708 i Re attach the 612 117 Steering Column Frame Assembly to the transmission Secure with 2 103 55 fasteners and 2 108 24 Washers a...

Page 176: ...e the shaft turns freely with minimal end play Photo ST 23 12 Install a Flat Washer and a new 117 29 Nylon Locknut to the threaded end of the steering shaft Photo ST 22 10 Place the key to the end of...

Page 177: ...mp is se cured into place with four fasteners Tighten down the fasteners in an X pattern indifferent to starting location at a torque specification of 10 12 Ft LBS 13 5 16N m Photo ST 24 ST 24 15 Appl...

Page 178: ...e for both turning and stopping efficiently If this is a steering assembly with NEW spring pins installed apply firm pressure to handle bars in each steering direction to seat the roll pins before pro...

Page 179: ...he vehicle driver s seat en sure sure that the steering handle bar is parallel with the dash Plunger pins should be threaded so they are in con tact at the back with the steering arms Place the collar...

Page 180: ...efore making the spring adjustment thread the plunger pins together to make sure that they are not coming into contact with the steering arms and will in no way affect the way in which the steering ha...

Page 181: ...519 662 2840 FAX 519 662 2421 BR 11A BR 7 2 Re hook the springs and test Adjust either upper lower or both springs as necessary until the desired outcome is achieved 3 Perform the servicing procedure...

Page 182: ...Brake Steering System Argo Service Manual BR 12A Ontario Drive Gear Limited www odg com PH 519 662 2840 FAX 519 662 2421...

Page 183: ...instructions which have been prepared to assist qualified and competent personnel ODG assumes no responsibility or liability for PERSONAL INJURY or VEHICLE DAMAGE which results from any procedure perf...

Page 184: ...ousing and turn upside down to remove 2nd brake pad from the housing cavity Please note that there is also a washer placed beneath the brake pad Instructions Both left and righthand side emergency par...

Page 185: ...re installing the brake pad Figure 8 Installing Shim 11 Install the second brake pad to the top of the previously installed shim Reassembling the Emergency Parking Brake Caliper to theVehicle The foll...

Page 186: ...Housings 13 Install the shim plate over the 2 two mounting bolts Figure 10 14 Next install two thick washers to the mounting bolts along with the dead side housing which is placed to the outside of th...

Page 187: ...hen to the cam lever Figure 16 Figure 16 Spring Attached 20 Install the lever to the stud of the live side housing Figure 17 Figure 17 Cam Installed 21 Start the castle nut but do not tighten down yet...

Page 188: ...7 21 Equalizer Flat Bar 3 Adjust the cable at the transmission until the cam levers are actually starting to pre load the return springs and the cam lever actuation pin on the caliper is centered in t...

Page 189: ...sary 10 Check the effectiveness of the parking brake by parking the Argo on the steepest hill encountered and by loading to it s maximum working load The parking brake should hold theArgo from moving...

Page 190: ...General Information Argo Service Manual Ontario Drive Gear Limited www odg com PH 519 662 2840 FAX 519 662 2421 GI 28...

Page 191: ...g Spring Cap CS 7 Disassembling the Driver Clutch Cap Screw Spring Cap CS 9 Disassembling the Driver Clutch P N 127 135 Supplement Pages CS 9A Assembling the Driver Clutch P N 127 135 Supplement Pages...

Page 192: ...the same time the transmission s driven clutch plates spread apart as the belt rides down between the faces The tension in this clutch is also regulated by a spring As the vehicle comes under load th...

Page 193: ...tery before servicing Servicing of the Automatic Torque Converter system is necessary when a drop in vehicle performance occurs the vehicle does not speed up or slow down smoothly the vehicle hesitate...

Page 194: ...rely Clutch Malfunction Lubricant Contamination Wrong Drive Belt Old Drive Belt Driver or Driven Clutch Problem Replacing the Drive Belt Driver Clutch Servicing Driven Clutch Servicing Replacing the D...

Page 195: ...If the vehicle is not shifting speeds smoothly if the vehicle hesitates or sticks at one speed or if the vehicle creeps at idle or is hard to shift into gear remove and inspect the driver clutch Serv...

Page 196: ...installed along with a lockwasher sits below the end of the fixed faced pulley shaft This is due to the counterbore in the end of the shaft The lockwasher eliminates the need for the LOCTITE applicat...

Page 197: ...h in that area to free the clutch 6 Remove the clutch to a clean work area for further disassembly Disassembling the Driver Clutch Threaded Bushing Spring Cover On vehicles manufactured prior to seria...

Page 198: ...ace Be sure to always wear eye protection when servicing the clutches or any other vehicle component for that matter with the potential of flying parts 9 Remove the spring guide plate Photo CS 9 11 Se...

Page 199: ...ll locking style flat washers that are installed with each cap screw Be sure these are reinstalled during assembly The cap screws should be loosened a little at a time in an alternating pattern This w...

Page 200: ...ing the clutches or any other vehicle component for that matter with the potential of flying parts 4 Remove the cap and remove the spring Photo CS 15 6 Slip the spring guide washer from the shaft Phot...

Page 201: ...g ring at this location 8 Separate the two halves Photo CS 19 9 Wash clutch components in a clean varsol bath to eliminate accumulated dirt and grease build up 10 Perform the servicing procedure Drive...

Page 202: ...Photo CS 22 Response Bigfoot Vanguard clutches only CS 21 CS 00 4 Place the spring guide washer on next Photo CS 23 5 Install the second retaining ring to the fixed face shaft along with any shim s t...

Page 203: ...measurement is set you may need to turn the threaded cap in either direction to align the machined keyway in the cap with the set screw in the moveable face 9 Apply red 271 LOCTITE to the thread of t...

Page 204: ...er Clutch Cap Screw Spring Cap On vehicles manufactured from serial numbers CB14236 RB14121 BF9347 SN9551 S9596 and all R B N C A models 1 Place the fixed face on a clean work surface with the shaft f...

Page 205: ...RB17610 BF12007 SN12147 S12150 and all R B N C A models Clutches prior to the above serial numbered vehicles do not utilize this spring ring CS 34 CS 35 5 Set the spring to the top of the spring guid...

Page 206: ...and torque to specifications 7 Place each of the weights and blocks into the moveable face and orient as shown in Photo CS 38 39 9 Before installing and tightening the flat washer and nut be certain t...

Page 207: ...er clutch should slip on and up to the shoulder by hand There should not be any reason to use a mallet to install the clutch 4 Align the keyway of the driven clutch with that of the previously install...

Page 208: ...running Do NOT spray lubricant onto the drive belt brake disc or clutch faces Allow the lubricant to dry before using the vehicle If the lubricant is not dry use of the vehicle will attract dirt and...

Page 209: ...519 662 2421 CS 19 does not backshift under load 4 Perform the servicing procedure Driven Clutch Removal Disassembly if the vehi cle is not changing speed smoothly hesitates or sticks at one speed lac...

Page 210: ...aining ring can be removed The use of an old discarded 34 08ARGO transmission cage is a useful tool to em ploy between arbor press and clutch Photo CS 45 CS 45 Removing the Driven Clutch 4 Slip the dr...

Page 211: ...the fixed pulley Photo CS 49 6 The Oilite bushing of the 126 24 driven Clutch movable face is secured with a spring pin Remove the spring pin and press the bushing from the movable face Photo CS 50 C...

Page 212: ...50A 7 To replace the nylon cam slider shoes pry each out with a slot screwdriver or small chisel You may need to use a small hammer applying quick blows to pop the slider shoes loose Photo CS 51 8 Pr...

Page 213: ...y of the fixed shaft Photo CS 52 CS 52 3 There are 6 spring tension adjustment holes in the cam that are numbered 1 through 6 Insert the one end of the cam spring into the number 3 hole Photo CS 53 4...

Page 214: ...ehicle once installed 5 Install the cam and spring to the fixed face shaft aligning the key on the fixed shaft with the keyway in the cam Photo CS 55 6 Take to the arbor press and push the cam onto th...

Page 215: ...y on the input shaft and slip the clutch on and up to the machined shoulder CS 58 Testing The Spring Load Of The Driven Clutch Place the driven clutch in a soft faced aluminum jawed vise and clamp so...

Page 216: ...m PH 519 662 2840 FAX 519 662 2421 CS 26 IMPORTANT The driven clutch should slip on and up to the shoulder by hand There should not be any reason to use a mallet to install the clutch Be sure that all...

Page 217: ...Argo Service Manual Clutch System Ontario Drive Gear ltd www odg com centaur 519 662 2840 FAX 519 662 2421 SECTION CS Supplement Pages...

Page 218: ...Clutch System Argo Service Manual Ontario Drive Gear ltd www odg com centaur 519 662 2840 FAX 519 662 2421...

Page 219: ...the cap spring and spring guide washer Photo 4 1 2 3 4 5 Slip off the 0410 0026 Sliding Flange Photo 5 1 Slip on the 0410 0026 Sliding Flange followed by the spring guide washer Photo 6 CA CA CA CA CA...

Page 220: ...quing the spring cap back down 4 Re install the nylon block and weight assemblies into the sliding flange Orient the block with the rounded side up Photo 9 5 Re install the cap and secure with flat wa...

Page 221: ...ioner Inspection Lower Block Semi Self Adjust WA 11 Replacing the Slider Block Lower Block Semi Self Adjust WA 12 Disassembling the Chain Tensioner System WA 12 Upper and Lower Block Style Disassembli...

Page 222: ...ut Bearing Extension WA 42 Removing the Axle Seals WA 43 Installing the Axle Seals WA 44 Installing an Axle Without Bearing Extension WA 45 Keyed Front Axles Earlier 6x6 Vanguards WA 48 Outer Axle Fla...

Page 223: ...519 662 2840 FAX 519 662 2421 WA 3 SECTION WA Wheels Axles Chains Table of Contents Removing a Tire WA 55 Wheel Disassembly WA 55 Tire Pressure WA 55 TireInspection WA 56 Temporary and General Tire Re...

Page 224: ...uctions Improperly adjusted idler chains or poorly aligned idler shaft assemblies can result in personal injury to the operator extensive damage to brake disc sprockets and idler shaft assemblies and...

Page 225: ...form the following servicing procedures Drive Chain Removal Drive Chain Cleaning Drive Chain Inspection Chain tensioner Inspection Main Frame Information Vanguard2 Frame from S N SN7841 1995 Front Tub...

Page 226: ...CB16049 RB16104 or 6x6 models prior to se rial numbers SN1019 S10178 iv Remove the outside plate and tap out the connecting link There are 2 inside plates located at the center of the RC50 Double Chai...

Page 227: ...y down as close as possible to the cam follower block in the bottom of the frame Secure it in this position with a Vice Grip 10CR as illustrated in DIAGRAM WA 5 WA 5 Drive Chain Inspection The drive c...

Page 228: ...lider block Photo WA 7 2 Pull the ends of the chain together and insert the connecting link as shown in DIAGRAM WA 8 and 9 When con necting the RC50 double chain insert the inside plates before tappin...

Page 229: ...red from serial numbers CB16049 RB16104 or 6x6 models from serial numbers BF9212 C12747 SN10191 S10178 1 Position the drive chain over the slider block and around the drive sprockets 2 Pull the ends o...

Page 230: ...onal injury Drive Chain Cleaning Allow the chains to dry thoroughly re lubricate generously with ARGO Chain Lube and reinstall Idler Chain Lubrication Lubricate the idler chains after 10 hrs of operat...

Page 231: ...hicle operation This chain tensioning system consists of an upper and lower chain tensioner arm which is supported by a pivot pin secured between the outer and inner frame channel A tensioner spring i...

Page 232: ...WA 15 On 8x8 models manufactured from serial numbers CB16049 RB16104 or 6x6 models from serial numbers C12747 BF9212 SN10191 S10178 This chain tensioning system consists of a torsion spring loaded cam...

Page 233: ...ted in DIAGRAM WA 16 4 Place a new slider block over the shaft of the cam assembly 5 Using a piece of wood or similar mate rial pressed against the top of the slider block carefully hammer the piece o...

Page 234: ...the vehicle frame Photo WA 19 4 Slide out the pivot pin which holds the chain tensioner assembly together Photo WA 20 WA 20 WA 21 6 If the nylon slider block needs replac ing place the tensioner arm...

Page 235: ...Turn the tensioner cam assembly in the direction which winds up the torsion spring and push the assembly down as close as possible to the cam follower to loosen the chain Clamp it in this position wi...

Page 236: ...ith the cotter pin hole through the inner channel of the vehicle frame Photo WA 30 Assembling the Chain Tensioner System On 8x8 models manufactured prior to serial numbers CB16049 RB16104 or 6x6 model...

Page 237: ...push the pivot pin through Photo WA 31 6 Insert end of pivot pin into the frame bushing and align the cotter pin holes 7 Insert the cotter pin and bend over with a pair of needle nose pliers Photo WA...

Page 238: ...l the spring between upper and lower arms 5 Press the upper and lower tensioner arms together Make sure that the faces of the nylons slider blocks are up against the chain WA 35 Assembling the Chain T...

Page 239: ...the cam to the bottom of the guide and raise the opposite side to insert over the extended length of the second torsion spring on the bushing side Photo WA 40 WA 41 7 Allow the assembly to sit in the...

Page 240: ...ains can result in rusted corroded or seized up chains damaged brake discs worn or broken idler shaft assemblies and costly repair procedures 1 Every 20 hours of vehicle operation perform the servicin...

Page 241: ...axles These bolts are threaded into nuts welded to the lower frame assembly On ARGOS manufactured from SN7841 S8131 and all RB CB BF C vehicles locate the two 3 8 16x3 bolts threaded into the lower fr...

Page 242: ...aft assembly It may be neces sary to roll the vehicle forward or backward to achieve this If the vehicle can be raised off the ground the wheels can be easily rotated to remove and reinstall any of th...

Page 243: ...ehicle performance damage to idler and brake disc sprockets and a hazard to personal safety Please inspect regularly 1 Perform the servicing procedure Removing the Firewall 2 Inspect the idler chains...

Page 244: ...h the same thing 4 Place the free end of the idler chain around the brake disc sprocket 5 Rotate the idler chain until the open links are halfway between the idler sprocket and brake disc sprocket 6 W...

Page 245: ...ys alternate between each adjustment bolt turning each a little at a time iii Tighten all power pack mounting bolts iv Perform the servicing procedure Installing the Firewall ii Secure the jam nuts of...

Page 246: ...8 16x3 bolts threaded into the lower frame channel beneath the rear power pack mounting bolt Turn each of these counter clockwise to raise the rear of the power pack frame assembly See Photo WA 47 on...

Page 247: ...Remove the front drive chain connecting the front wheel to the idler axle as well as the drive chain connect ing the middle 6 wheel or mid front 8 wheel to the idler axle Photo WA 52 5 Perform the se...

Page 248: ...ket Photo WA 56 On vehicles manufactured prior to S N CB16970 RB17033 and BF11543 i Remove the hardware securing the flanges of the inner and outer bearings Photo WA 54 ii Slide the idler shaft assemb...

Page 249: ...out at the bearing and flange assembly on the opposite end of the shaft Photo WA 62 iv Move the idler shaft assembly to a clean work area and remove the bearings flanges retaining ring and the floatin...

Page 250: ...ight side idler shaft only in section ES Vehicles prior to S N S8131 have the battery box welded to the lower frame 3 Perform the servicing procedure Removing the Driven Clutch Left side idler shaft o...

Page 251: ...o WA 63 5 Perform the servicing procedure Idler Chain Removal WA 63 8 Locate the 2 set screws on the inner and outer bearings and remove Photo WA 64 65 WA 64 9 Using a pry bar at the outer bearing pry...

Page 252: ...ler chains or sprocket misalignment Please inspect regularly 1 Perform the servicing procedure Removing the Firewall in section VB 2 Inspect the sprockets on the idler shaft thoroughly for cracks in t...

Page 253: ...ze 1 retaining ring on each shaft These are seated to a machined groove on each of the shafts during assembly of the floating sprocket The right hand side idler shaft has an inboard retaining ring whi...

Page 254: ...ge to both inner and outer bearing mount studs on the lower frame Photo WA 68 3 Place a gasket to each of the previouly installed flanges Photo WA 69 WA 68 WA 69 WA 70 WA 71 Take note of the machined...

Page 255: ...earing and flanges to the studs Photo WA 74 IMPORTANT Ensure that the greasable flanges are installed with the greaseable fitting facing up Photo WA 75 vi Install all bearing flange hardware and tight...

Page 256: ...Idler Axle i Slip the outboard retaining ring on to the idler shaft past both machined grooves vehicles manufactured from 2007 will have 4 machined grooves on this idler shaft and to the end of the s...

Page 257: ...83 iv Install a greasable flange and the outer bearing to the opposite side of the shaft once again facing the collar and set screws of the bearing inwards Photo WA 84 v Install the idler shaft assem...

Page 258: ...aft only in section CS 8 Reinstall the brake caliper The brake caliper should still be connected to the brake line 6 Perform the servicing procedure Installing the Brake Disc in section BR 4 Perform t...

Page 259: ...Larger diameter sprocket end WA 90 4 Slip the inner bearing to the same end as the greasable flange with the collar facing in Photo WA 91 WA 90 WA 91 WA 88 WA 89 IMPORTANT 6x6 Vanguard and Vanguard2...

Page 260: ...d prior to S N S10178 SN10191 slide an open end wrench between the lower body and frame at the outer idler axle bearing flange assembly Hold the head of the bolt while tightening the mounting hardware...

Page 261: ...to prevent any damage to the inner bearing set screw threads Be sure drilling is done perpendicular to the shaft and does not come into contact with the threads of the set screw holes 13 Apply Red 27...

Page 262: ...ected from the hydraulic system Vanguard2 perform the servicing procedure Bleeding the Hydraulic Brake System in section BR 21 Perform the servicing procedure Installing the Firewall in section VB The...

Page 263: ...rom the inner bearing collar Photo WA 99 4 Remove the set screw from the drive sprocket Photo WA 100 Except for all front sprockets which float 5 Remove all hardware securing the flanges of both inner...

Page 264: ...eded Photo WA 103 12 Remove the greasable flange Removing the Axle Seals 1 Perform the servicing procedure Removing the Axle With bearing Ext or Without Bearing Ext 2 Remove the seals from the greasab...

Page 265: ...eal was staked Use a small pencil die grinder to remove the staked area Photo WA 105 Do not debur the flange excessively Over grinding could produce a loose fitting seal resulting in a poorly sealed a...

Page 266: ...al with red 271 LOCTITE and install at the arbour press with an installation tool Be sure it is seated properly Photo WA 109 2 Apply red 271 LOCTITE to the inner seal as above and install at the arbor...

Page 267: ...est to the sprocket end of the axle with the set screw hole of the bearing Apply 242 blue LOCTITE to the threads of the set screw and install Torque to specifications Photo WA 114 6 Install the second...

Page 268: ...slip it on to the axle with the set screw hole fac ing to the inside Photo WA 121 Be sure that the set screw hole of the sprocket is aligned with the spline on the axle with the machined countersinks...

Page 269: ...he threads of the 2 set screws of the inner bearing and install Torque to specifications Keyed Front Axles used on Vanguard 6x6 s manufactured prior to S N S8131 ii Slip the keyed sprocket on to end o...

Page 270: ...ng equipment At the same time inspect all the axle seals for damage Vegetation wrapping around the axles can damage the rubber lip of the seal allowing dirt and water into the outer cavity Perform the...

Page 271: ...chined area on the axle closest to the wheel hub Carriage mounting bolts are also longer and need to be assembled to the outer flange first before this bearing is secured to the axle See Photo WA 127...

Page 272: ...the spline of the axle with the machined countersinks with the set screw hole in the drive sprocket Photo WA 129 IMPORTANT Drive sprockets on front axles of all models are free floating and do not re...

Page 273: ...ody from the pre vious extension Clean the area thor oughly before assembling the new ex tension to the lower body frame Installing the Bearing Extension 1 Slip 6 bolts through the bearing exten sion...

Page 274: ...ge may be replaced with a new one 2 Remove the inner bearing flange hard ware securing the bearing to the frame and remove the assembly to a clean work surface Photo WA 136 Installing the Inner Bearin...

Page 275: ...lled first to the inner bearing before tightening down and torquing all flange mounting hardware 2 Place a gasket to the top of the greasable flange Photo WA 138 3 Place regular flange to the top of t...

Page 276: ...s If it is difficult to break the bead apply a soap and water solution or tire mounting lubricant to the rim periphery Do not damage the tire bead or rim bead seat Damage to them will prevent proper s...

Page 277: ...he tire with a leak locating solution or placing in a tank of water To repair or replace a tire you will need to remove it from the rim Use of a non standard tire on any Argo model will affect the ste...

Page 278: ...bead is seating NEVER exceed the recommended seating pressure The tire can break with an explosive force which can cause serious injury or death 4 Inflate the tire until until each bead has popped and...

Page 279: ...rocedure Wheel Reassembly in this section of the service guide Wheel Installation 1 Apply anti seize compound to the threads of the axle hub studs 2 Place the wheel on to the mounting studs 3 Install...

Page 280: ...General Information Argo Service Manual Ontario Drive Gear Limited www odg com PH 519 662 2840 FAX 519 662 2421 GI 28...

Page 281: ...Argo Service Manual Wheels Axles Chains Ontario Drive Gear ltd www odg com centaur 519 662 2840 FAX 519 662 2421 SECTION WA Supplement Pages...

Page 282: ...Wheels Axles Chains Argo Service Manual Ontario Drive Gear ltd www odg com centaur 519 662 2840 FAX 519 662 2421...

Page 283: ...ble flange followed by a 101 35 bearing to the op posite end of the shaft Photo 15B 15A Right Hand Idler Shaft Face the collar of the 101 35 bearing towards the sprocket 15B Left Hand Idler Shaft 1 In...

Page 284: ...n locknuts 2 Insert the grease tubing into the bulk head grease fitting Photo 15 H See NOTE following page Avenger models manufactured from serial number V23216 have 90 degree greasable fittings orien...

Page 285: ...See orientation of sprocket collars below Photo 15J 15 K 15 J 15 I 15 K WA 34A Assembling Idler Shafts To The Vehicle Avenger Models From Serial 25622 810 59 Idler Shafts used on later Avenger models...

Page 286: ...tier models requires the assembly of a 107 10 Retaining Ring to each side of the 606 81 Idler Sprocket These retaining rings help limit allowable movement of the idler sprocket under application Each...

Page 287: ...w odg com PH 519 662 2840 FAX 519 662 2421 Argo Service Manual Wheels Axles Chains Diagram D WA 36A DIAGRAM E DIAGRAM F Retaining Ring Locations For Conquest Response and Bigfoot 810 59 Idler Shafts W...

Page 288: ...move the drive belt and driven clutch it may prove easier to access the inner axle bearing and in general provide a roomier working environment Refer to the Clutch Section of the 673 04 Argo Service G...

Page 289: ...xle from the vehicle Photo WA 5 6 WA 6 WA 7 The outer bearing greasable flange and axle will be removed as an assembly Retrieve the drive sprocket from inside the vehicle once the axle has been comple...

Page 290: ...p Position it such that the set screw holes in the collar will be aligned and centred with the flat machined surface on the axle closest to the hub Loosen off or remove the set screws from the new bea...

Page 291: ...he front bearing extension Photo WA 14 On the inside of the vehicle prepare to install the front sprocket as the axle is pushed through to the inner bearing IMPORTANT The front axle sprocket is a floa...

Page 292: ...s Refer to your illus trated parts manual for the breakdown of the hardware used WA 20 13 Apply blue LOCTITE to 2 bearing set screws and install into the bearing collar Torque to specifications The ex...

Page 293: ...e bottom of the frame channels Clamp it in this position with a Vice Grip 10CR or similar plier as il lustrated in WA 21 WA 21 15 Perform the service procedure Drive Chain Installation found in the Wh...

Page 294: ...General Information Argo Service Manual Ontario Drive Gear Limited www odg com PH 519 662 2840 FAX 519 662 2421 GI 28...

Page 295: ...eling the Vehicle FS 3 Removing the Fuel Tank All Models except Avenger FS 4 Removing the Fuel Tank Avenger Models Supplement Pages FS 4A Vented Fuel System FS 4 Removing the Fuel Tank 6x6 Vehicles Pr...

Page 296: ...vicing procedure performed including those instructions outlined in this manual Before performing a servicing operation an individual must have determined to his her satisfaction that a personal injur...

Page 297: ...are equipped with a 32 litre 7 0 Imp Gal 8 4 U S Gal see thru polyethelene fuel tank located underneath the driver s seat depending on loading and driving conditions an ARGO can be driven for 7 to 12...

Page 298: ...runs along the upper body to a fitting at the left rear IMPOR IMPOR IMPOR IMPOR IMPORT T T T TANT ANT ANT ANT ANT Ensure that the vent line is not pinched or becomes kinked between filler neck and rea...

Page 299: ...be removed from the vehicle by pulling it from the seat frame into the rear compartment The tank will need to be raised high enough for the sediment bowl to clear the seat frame assembly below To pro...

Page 300: ...e tank All cushioning provides a secure fit for the tank and protects the tank from wear due to vibration Photo FS 6 FS 6 4 Be sure to reconnect the fuel vent hose at the filler neck and ensure that i...

Page 301: ...tal neck assembly 3 Remove the backrest Locate and pry loose the 3 grey plugs in the upper body behind the backrest 4 Using a socket and extension remove the 3 bolts and washers holding the backrest t...

Page 302: ...the seat support brackets Tighten the bolts with a socket and extension Insert the bolts squarely into the seat cushion and do not overtighten Incorrectly positioned and tightened bolts will strip or...

Page 303: ...Argo Service Manual Fuel System Ontario Drive Gear ltd www odg com centaur 519 662 2840 FAX 519 662 2421 SECTION FS Supplement Pages...

Page 304: ...Fuel System Argo Service Manual Ontario Drive Gear ltd www odg com centaur 519 662 2840 FAX 519 662 2421...

Page 305: ...e the tank from the vehicle The tank will come forward into the drivers compartment Photo FS 1 2 Ensure that the vent tube does not pull out from the filler neck and that it is not kinked in any way w...

Page 306: ...it with the gear clamp Be sure to reconnect the fuel vent hose at the filler neck and ensure that it is facing up and not kinked or pinched in any way 3 With the tank in place reinstall the tool box...

Page 307: ...5 Removing the Floor Pans VB 7 Installing the Floor Pans VB 7 Removing the Rear Seats 8x8 models VB 8 Installing the Rear Seats 8x8 models VB 8 Removing the Rear Seats 6x6 models VB 8 Installing the R...

Page 308: ...General Information Argo Service Manual Ontario Drive Gear Limited www odg com PH 519 662 2840 FAX 519 662 2421 GI 28...

Page 309: ...epared to assist qualified service personnel ODG assumes no responsibility or liability for PERSONAL INJURY or VEHICLE DAMAGE which results from any servicing procedure performed including those instr...

Page 310: ...ll the above models 2 Locate the wing stud fastener at the central lower portion of the firewall Photo VB 2 3 Turn the wing stud fastener to release the firewall from the clip that secures it to the l...

Page 311: ...rior to S8131 1 Remove the front floor pan assembly Pull the clevis pin from each side of the floor pan and pull the floor pan up and out from the vehicle 3 Remove the 2 steering adjustment locknuts a...

Page 312: ...rewall to be pulled up and out from the vehicle 3 Undo the firewall at the dash support The firewall is secured by 2 quick release wingstuds 4 Remove the firewall from the vehicle Installing the Firew...

Page 313: ...asten the firewall at the lower frame assembly Refer to your lllustrated parts manual for the appropriate hardware and location VB 6 3 Reconnect the steering levers at the brake cams and re thread the...

Page 314: ...he hitch pin clips When installing the front floor pan into vehicles manufactured prior to CB16049 RB16104 SN10191 or S10178 be sure to raise the floorpan high enough at the rear of the pan to avoid i...

Page 315: ...VB 10 2 Push the seat towards the inside of the cargo department and lift up and out Photo VB 11 VB 10 VB 11 Installing the Rear Seats 8x8 models 1 Place the rear seat into position aligning the large...

Page 316: ...anual Older Model Vanguards Removing the Backrest Handrail Assembly The Backrest handrail assembly is adjustable to 2 settings This allows the backpad to be adjusted to the drivers preference of eithe...

Page 317: ...r and model of Argo VB 14 1 Locate the plug and lift the lever up wards to loosen the plug 2 Pull the plug from the lower body hole Installing the Drain Plugs 1 Seat the rubber portion of the drain pl...

Page 318: ...cap and plug the fuel filler tube to prevent any foreign material from entering the tank 12 Disconnect the tank venting tube at the filler neck assembly and at the male connec tor located on the lowe...

Page 319: ...ing Vehicle performance can be drastically affected when fuel tank venting becomes restricted The vent tubing for the fuel system is attached to the metal filler neck Caution should be observed as not...

Page 320: ...scrip tion 11 Remove the plug from the filler neck and install the gas cap 12 Reinstall the choke cable 13 Connect all wiring to ignition switch solenoid engine harness and battery 14 Install the exha...

Page 321: ...hole with the 4 mounting carriage bolts and use the 6 holes of the extension as a guide to locate the new holes in the lower body Due to variations in the properties of High Density Polyethylene Plas...

Page 322: ...the vehicle frame seat support assembly and power pack frame thoroughly for cracks or breakage in the welding joints cracked or broken mounting lugs or inserts rusted through or bent frame members If...

Page 323: ...r Conquests from C19672 DE 8 Removing the Muffler Response Vanguard2 Vanguard DE 8 Installing the Muffler Response Vanguard2 Vanguard DE 10 Remove the Muffler Bigfoot Models DE 11 Installing the Muffl...

Page 324: ...General Information Argo Service Manual Ontario Drive Gear Limited www odg com PH 519 662 2840 FAX 519 662 2421 GI 28...

Page 325: ...liability for PERSONAL INJURY or VEHICLE DAMAGE which results from any servicing procedure performed including those instructions outlined in this manual Before performing a servicing operation an in...

Page 326: ...sion 2 Remove the 2 fasters securing the manifold cover to the muffler shield assembly and remove the manifold cover Photo DE 2 3 Collect the 2 spacers that are installed beneath each fastener DE 1 DE...

Page 327: ...DE 8 6 Pull the muffler and shroud assembly into the engine compartment area enough for the tailpipe to clear the outside exhaust screen Turn the assembly 90 degrees and shove it back over the wheel...

Page 328: ...uffler assembly Photo DE 11 2 The above heat shield removed exposes another fastener securing the muffler to the shrouding Remove this fastener Photo DE 12 3 Flip the assembly over and remove the 2 fa...

Page 329: ...e bottom of the shroud Photo DE 17 2 Turning the tailpipe end of the shroud around to face the assembler will put the tailpipe also to the right side of the shroud Photo DE 16 4 Flip the assembly over...

Page 330: ...ugh to provide a good seal between muffler and manifold Over tightening can cause undue stress at the muffler inlet due to the twisting and turning of the vehicle under application Correct tension at...

Page 331: ...s 3 Install the heat shield over the muffler securing with 4 fasteners Refer to the illus trated parts manual for correct hardware and orientation Removing the Muffler Response Vanguard2 Vanguard Mode...

Page 332: ...on springs connecting the tailpipe to muffler and pull the tailpipe out of the vehicle from the engine compartment Photo DE 25 3 Remove the muffler On vehicles manufactured from S6999 SN8138 RB12075 a...

Page 333: ...l for vehicles manufactured in this serial number range All vehicles manufactured from RB12075 SN7841 S8131 and prior to R19647 S13434 N13436 are as in Photo DE 27 2 Reinstall the exhaust duct cover u...

Page 334: ...em 2 Slip the tailpipe from the engine compartment side through the exhaust screen hole and connect at the muffler with 2 extension springs 3 Assemble the heat shield to the top of the muffler using t...

Page 335: ...he screen assembly 7 Clean the screen with a wire brush Soak it in oil solvent if necessary 8 If any breaks in the screen or weldments are discovered replace the assembly Removing the Intake Duct Resp...

Page 336: ...els the upper body must be split from the lower body 1 Peel off the rubber bumper assembly from the vehicle You need only strip it off far enough off to drill out the speci fied rivets 2 Using a 3 16...

Page 337: ...guard Models or Perform the servicing procedure Removing the Muffler Bigfoot Models 2 Remove the 2 fasteners securing the exhaust ducting to the hood support brace Photo DE 32 3 The exhaust ducting is...

Page 338: ...aust ducting is secured at the other end by a body rivet located at the upper body beneath the rubber bumper See Photo DE 33 previous page Peel back the bumper and drill out both rivets 4 Pull the duc...

Page 339: ...Pages TR 2A Separating the Side Cover Earlier Models TR 11 Separating the Side Cover Later Models TR 12 Disassembling the Shifter Assembly TR 18 Disassembling the Differential TR 19 Transmission Compo...

Page 340: ...General Information Argo Service Manual Ontario Drive Gear Limited www odg com PH 519 662 2840 FAX 519 662 2421 GI 28...

Page 341: ...this manual Before performing a servicing operation an individual must have determined to his her satisfaction that a personal injury or vehicle damage will not result from the servicing procedure or...

Page 342: ...d level of oil in the transmission must be done on a regular basis Do not operate the ARGO if the transmission oil level on the dipstick is above or below the grooved indicator Damage to the transmiss...

Page 343: ...dip stick location to prevent any dirt from entering the gearbox and causing pre mature wear to the internal components 4 Remove the dipstick and wipe it clean of oil Return the dipstick to the trans...

Page 344: ...ll quantity of fresh clean oil as specified in the Recommended Oil Type on page TR 3 of this manual iii Remove the funnel and replace the dipstick Apply a small amount of anti seize compound to the th...

Page 345: ...or to mid 1994 will require the dipstick to be threaded from the gearbox using a 3 8 opened end wrench Dipsticks on newer models utilize an O ring and need only be pulled straight up and out from the...

Page 346: ...e compound to the threads before installing it back into the transmission General Inspection Of The Transmission Maintenance Schedule Inspect every 50 hours Inspect more often if the vehicle is used u...

Page 347: ...anguard models manufactured after May 19 1999 3 Perform the servicing procedure Removing the Front Floor Pan in the Vehicle Body Section of this service manual 4 Perform the servicing procedure Removi...

Page 348: ...the Drive Chains in Section WA of this service manual 11 Perform the servicing procedure Re moving the Brake Disc in Section BR of this service manual 12 Locate unfasten and remove the 2 bolts lock w...

Page 349: ...ecures the Reverse Idler Dowel Pin on the outside of the Cover Photo TR 10 4 Tap the Dowel pin back into the transmission far enough to free it from the Side Cover You will need a drift punch to tap i...

Page 350: ...be reused if the technician has determined to his her own satisfaction that they are okay to reuse 25631GU 25668HU 25700MU 8 With a dead blow mallet alternate between striking the Input Shaft and Out...

Page 351: ...ver are long enough to guarantee that the Cover will completely separate itself from the Housing and may be easily lifted off by hand In most cases with this type of separation the differential will r...

Page 352: ...until the Shifter Assembly is freed from the Bearing Photo TR 21 13 If the 101 01 Bearing has remained on the Input Shaft it will be necessary to remove it using a gear puller Photo TR 22 23 14 Slip...

Page 353: ...Using a soft faced hammer tap the Input Shaft out of the Housing Photo TR 28 19 Place the Housing in the assembly fixture to remove all Bearings Retaining Rings Seals and the Plug Plate 20 Remove the...

Page 354: ...hammer remove the inner Bearing in the same manner as in step 20 Photo TR 33 25 Flip the transmission and remove the inner Retaining Ring Photo TR 35 When removing this Bearing take note of the number...

Page 355: ...must remove the Retaining Ring and Shim washer from the Output Shaft Photo TR 37 38 28 Supporting the Cover on each side with 2 short 2x4 s place it in an arbor press and apply pressure to the Output...

Page 356: ...st and machined in this area to eliminate the need for both of these parts The cover will replace all earlier side covers Photo TR 40 The procedure for removing the 101 01 Bearings will require the us...

Page 357: ...the 101 01 Bearings are facing down Photo TR 45 35 Use a mallet to strike the flat stock and knock the 101 01 Bearing from the casting Photo TR 46 TR 45 TR 46 Disassembling the Shifter Assembly 36 The...

Page 358: ...he spline shaft from the assembly TR 49 Disassembling the Differential 40 Secure the Differential by the Output shaft on the cage side within a vise A vise equipped with aluminum jaws must be used to...

Page 359: ...TR 53 TR 54 TR 55 When lifting the Gear Plate from the Cage be aware of any Pinions that may come with the Gear Plate Avoid any of these falling to the floor Any damage to these pinions can result in...

Page 360: ...from the Output Shaft Photo TR 58 TR 57 TR 59 TR 58 48 Press the Output Shafts from both Cage and Gear Plate Photo TR 59 60 TR 60 49 Remove each of the 101 15 Bearings from both Cage and Gear Plate S...

Page 361: ...ore than likely remained assembled to both of these components Photo TR 63 64 65 51 Remove the Bearing from the Input Shaft Place the Input Shaft into an aluminum jawed vise lightly clamping it to the...

Page 362: ...amine all transmission components for wear cracks or breakage Repairing or replacing all faulty components will prevent further premature breakdowns and the need to disassemble the transmission again...

Page 363: ...of this kind Breakage Any gear or spline shaft with cracked broken or missing teeth should be replaced immediately The installation of a badly damaged gear or shaft will lead to premature wear of oth...

Page 364: ...sion Component Description of Change Apr 29 1992 Keys are eliminated on the spline shaft Helical gears and splined shafts are coupled by an extended 6PL spline Fully Exchangeable From Serial Numbers C...

Page 365: ...er 34 16A July 3 2001 Reverse Idler has two 105 03 bushings instead of a single 105 05 bushing along with two radial holes drilled in for better lubrication Fully Exchangeable From vehicles manufac tu...

Page 366: ...he base of the arbor press using a spacer and nut Photo TR 69 2 Install 6 Oilite Bushings into the Aluminum Cage Photo TR70 3 Repeat the process installing these bushings into the appropriate Gear Pla...

Page 367: ...6 Wipe the Output Shaft free of debris with a lint free rag Install this Output Shaft into the Aluminum Cage Photo TR 75 76 TR 73 TR 74 TR 75 TR 76 Use a spacing tool to secure the previously installe...

Page 368: ...acing up Install it to the splined end of the Output Shaft Photo TR 79 80 8 Secure the Sun Gear with a Snap Ring Photo TR 81 9 Be sure the Retaining Ring is properly seated to the machined groove of t...

Page 369: ...t and assemble to the Gear Plate using the same method as described for the Aluminum Cage Photo TR 84 85 86 11 Orient the 2nd Sun Gear as in instruction 8 and install and secure it with a 107 04 Retai...

Page 370: ...91 14 LOCTITE the 3 threaded holes of the Aluminum Cage with Red 271 LOCTITE Photo TR 94 15 Assemble the Gear Plate to the Aluminum Cage Align the top of the Pinions in the Cage with the Oilite Bushi...

Page 371: ...ransmission Argo Service Manual TR 32 16 Seat the Gear Plate to the Aluminum Cage using a soft faced mallet Photo TR 97 17 Apply Red 271 LOCTITE to each of the 3 fasteners Photo TR 98 and tighten down...

Page 372: ...it Orient the gear with the machined side down Photo TR 101 102 103 Drive Gears are as follows M Drive Gear H Drive Gear G Drive Gear 19 Place a Double Gear into the assembly stand or an aluminum jaw...

Page 373: ...09 22 Compress the Ball Bearing into the hole of the Double Gear with a flat screwdriver at the same time inserting the Spline Shaft from the opposite side with the shift gate notches facing down Thes...

Page 374: ...mallet to tap the Spline Shaft completely through the Double Gear Photo TR 113 114 24 Remove the assembly to the bench Grabbing the Double Gear in your hands shift the Double Gear up and down the leng...

Page 375: ...he arbor press Seat it to the previously installed Retaining Ring Photo TR 118 119 27 Apply yellow LOCTITE 641 to the outer edge of 2 Bearings and press them into the Side Cover Be sure the shielded s...

Page 376: ...roove of the Housing s Output Shaft side Photo TR 123 124 29 Install a Retaining Ring into the Housing at the shifter assemblies bearing side Photo TR 125 126 30 Apply 592 LOCTITE Teflon pipe sealant...

Page 377: ...y vary between 1 or 2 shims Use the quantity previously used 34 Install 1 Bearing shielded side down into the Housing s Shifter Assembly side Photo TR 134 135 following Page 31 Tap a burnishing tool t...

Page 378: ...From the inside of the Housing slip the Shifter Assembly through the Oilite Bushing at the top of the Housing Photo TR 141 following page Any transmission being serviced and rebuilt between Serial Num...

Page 379: ...ervice Manual TR 40 38 Orient and secure the Shift Lever Holder to the Shift Shaft using 2 Roll Pins as shown in Photo TR 143 Be sure to support the shaft from below with a piece of metal stock when h...

Page 380: ...e boss of the transmission housing and using a soft face mallet tap it flush to the sealing edge of the housing Photo TR 145 40 Install the Retaining Ring to the bottom of the Dowel Pin Photo TR 146 T...

Page 381: ...Photo TR 149 Install the Differential Assembly 44 Place the Differential into the Housing slipping the Output Shaft into the Output Shaft Bearing Press at the arbor until the shoulder of the Aluminum...

Page 382: ...ft Yoke over the larger di ameter gear of the Double Gear Photo TR 154 Install the Reverse Idler TR 152 TR 153 TR 154 TR 155 TR 156 TR 157 47 Tap the assembly with a soft faced ham mer until the shoul...

Page 383: ...TR 44 49 If the old bushing s was were replaced with new press a burnishing tool through the Oilite Bushing of the Reverse Idler Photo TR 159 160 50 Slip the Reverse Idler on to the Dowel Pin making...

Page 384: ...Black 598 LOCTITE RTV Silicon Gasket Maker to the bottom half of the Housing Photo TR 166 54 Install the Cover Gasket to the sealing edge of the Housing Photo TR 167 55 Apply the same gasket compound...

Page 385: ...Ontario Drive Gear Limited www odg com PH 519 662 2840 FAX 519 662 2421 Transmission Argo Service Manual TR 46 TR 168 TR 169 TR 170 TR 171 TR 172 TR 173...

Page 386: ...e to the cap screw before installing to the lower end of the transmission assembly Photo TR 174 175 TR 174 TR 175 Apply a little gear oil to the inner lip of the Oil Seal to ease assembly around the O...

Page 387: ...ce Manual TR 48 59 Press the inner Oil Seal to the Output Shaft Seat it to the Retaining Ring that was previously installed in the Housing in step 29 Do not over press Photo TR 179 180 181 60 Install...

Page 388: ...he specialized tool holder thread the hex head bolt into the Output Shaft and tighten it down until the shaft has been pulled towards the outside of the Housing Pull the shaft far enough to install th...

Page 389: ...s Retaining Ring to the pin boss located in the transmis sion Housing Through the Input Shaft opening use a hammer and pin installer to tap the Reverse Idler Pin through the boss and out the Transmis...

Page 390: ...5 68 Once the Retaining Ring has been secured to the Cover Side use a hammer and tap the pin back in the opposite direction to seat the Retaining Ring to the Cover Photo TR 196 TR 195 TR 196 TR 197 69...

Page 391: ...ut Bearing over the Input Shaft and seat it with a soft faced mallet and installation tool Photo TR 201 202 203 TR 200 TR 201 TR 202 TR 203 72 Place 1 Shim Washer on top of the previously installed Be...

Page 392: ...t Shaft using a soft faced mallet and seal instal lation tool Photo TR 207 208 209 TR 206 TR 207 TR 208 TR 209 75 Apply 680 Green LOCTITE to the plug plate sealing edge and tap it into the Housing usi...

Page 393: ...es so that it will not interfere when installing the transmission back into the vehicle Photo TR 214 TR 214 TR 215 2 Place the transmisson back into the power pack frame of the vehicle and install bot...

Page 394: ...th fresh new fluid and the brake system will have to bled Refer to Bleeding the Hydraulic Brake System in this service guide if necessary 6 Perform the servicing procedure Installing the Brake Disc IM...

Page 395: ...mission Argo Service Manual TR 56 7 Perform the servicing procedure Installing the Idler Chain 8 Perform the servicing procedure Installing the Driven Clutch 9 Perform the servicing procedure Installi...

Page 396: ...General Information Argo Service Manual Ontario Drive Gear Limited www odg com PH 519 662 2840 FAX 519 662 2421 GI 28...

Page 397: ...Argo Service Manual Transmission Ontario Drive Gear ltd www odg com centaur 519 662 2840 FAX 519 662 2421 SECTION TR Supplement Pages...

Page 398: ...Transmission Argo Service Manual Ontario Drive Gear ltd www odg com centaur 519 662 2840 FAX 519 662 2421...

Page 399: ...Ontario Drive Gear Limited www odg com PH 519 662 2840 FAX 519 662 2421 TR 1A Argo Service Manual Transmission Transmission Re Re 34 100 Series...

Page 400: ...s together There are 11 located on the input shaft side and 4 located on the opposite side Ensure that all fasteners have been removed before proceeding to seperate the transmission housings 5 Remove...

Page 401: ...low shift shaft Photos TR 8 9 TR 5 TR 6 TR 7 TR 8 TR 9 Thread each of these bolts a little at a time and in an uniform alternating pattern DO NOT overtighten to avoid the risk of breaking the housing...

Page 402: ...ft from the transmission housing Photo TR 12 TR 12 12 Remove the spline shaft drive gear assembly Photo TR 13 13 Remove the set screw securing the ball and spring within the housing at the hi lo shift...

Page 403: ...oto TR 19 18 Remove the retaining ring at the reverse gear Photo TR 20 TR 19 TR 20 19 Remove the reverse and low gear from the input shaft at the arbor press Photo TR 21 20 Slip the dog clutch from th...

Page 404: ...the last ball bearing from the input shaft at the arbor press Photo TR 24 TR 24 Disassemble the Spline Shaft Drive Gear Assembly 23 Remove the bearing and high gear from the spline shaft at the arbor...

Page 405: ...rential from the housing at the arbor press Photo TR 28 TR 28 TR 29 The use of wood blocks beneath the housing prevents damage to the sealing edge of the casting as well as provides height for removin...

Page 406: ...erse idler Photo TR 35 TR 35 TR 37 There is 1 Thrust Washer to the top side of the reverse idler gear and a Retaining Thrust Washer to the underside of the reverse idler gear 33 Remove the reverse shi...

Page 407: ...gs The 107 04 smaller is used to secure each sun gear to the end of the Output Shafts within the differential The 107 12 larger is seated just above the Reverse Gear Pinion on the Input Shaft Assembly...

Page 408: ...www odg com PH 519 662 2840 FAX 519 662 2421 TR 10A Transmission Argo Service Manual Reassembling the Transmission 1 Lay out all components of the AVENGER Transmission on a clean work surface See Phot...

Page 409: ...Ontario Drive Gear Limited www odg com PH 519 662 2840 FAX 519 662 2421 TR 11A Argo Service Manual Transmission...

Page 410: ...e 101 01 Bearing to the High Gear end of the Splined Shaft with the shielded side facing out Photo TR 42 TR 41 TR 42 TR 43 Install the High Gear with the machined shoulder up See Photo TR 41 3 Install...

Page 411: ...verse Gear Photo TR 46 TR 46 TR 47 6 Press on the 101 01 bearing to the end of the shaft shielded side up Photo TR 47 See assembled component on the following page IMPOR IMPOR IMPOR IMPOR IMPORT T T T...

Page 412: ...48 Remember to do the comparison check of this retaining ring as described on page TR 9 2 Slip a 108 79 Thrust Washer on to the Input Shaft and up against the previously installed retaining ring Photo...

Page 413: ...to serial A2856 or 34 127 Dog Clutch 3 tooth from serial A2856 to the Input Shaft Photo TR 53 IMPOR IMPOR IMPOR IMPOR IMPORT T T T TANT ANT ANT ANT ANT The Dog Clutch needs to be oriented correctly w...

Page 414: ...Service Manual TR 54 TR 55 9 Secure the Reverse Gear Pinion with a 107 12 Retaining Ring Photo TR 56 TR 56 TR 57 10 Press a 101 01 bearing to the end of the Input Shaft with the shielded side up Photo...

Page 415: ...into both 34 122 cage and 34 124 Gear Plate Photo TR 58 59 TR 58 TR 59 2 Blow all foreign debris from the Cage and Gear Plate 5 Install the 101 15 Bearing into both Cage and Gear plate Photo TR 60 61...

Page 416: ...TR 64 TR 64 7 Orient the 34 14 Sun Gear as in Photo TR 65 with the higher shoulder side fac ing up Install it to the splined end of the Output Shaft Photo TR 66 67 8 Secure the Sun Gear with a 107 04...

Page 417: ...8 Output Shaft and assemble to the Gear Plate using the same method as described for the Aluminum Cage Photo TR 71 72 73 11 Orient the 2nd 34 14 Sun Gear as in instruction 8 and install and secure it...

Page 418: ...Set the assembled 34 122 Aluminum Cage into an assembly stand Photo TR 78 TR 78 14 Install 6 34 13 Pinions into the Oilite Bushings of theAluminum Cage alternating the Pinions in an up and down manner...

Page 419: ...to the Aluminum Cage Align the top of the Pinions in the Cage with the Oilite Bushings in the Gear Plate Photo TR 82 83 TR 82 TR 83 18 Apply Red 271 LOCTITE to each of the 3 112 143 fasteners Photo TR...

Page 420: ...Thrust Washer machined side down below the Reverse Idler Push the 34 114 Reverse Shift Shaft completely through the Reverse Gear and washers and into the opposite side of the housing Install the Rever...

Page 421: ...achined groove located near the end of the reverse shift shaft and require these extra steps to install it i Continue to push the reverse shift shaft through the housing until the machined groove for...

Page 422: ...ool eg an allen wrench into the machined hole of the Reverse Shift Shaft and turn the shaft until the keyways of both shaft and transmission boss are aligned Photo TR 100 iii Push the reverse shift sh...

Page 423: ...le the 34 115 Reverse Shift Block to the Reverse Shift Shaft by aligning the keyway with the previously installed Dowel Pin Photo TR 102 TR 101 TR 102 14 Tap the Shift Block on until the machined hole...

Page 424: ...nto the Housing Photo TR 107 108 17 Press the assembled differential into the Housing Photo TR 109 110 18 Install the Idler Gear Bore Assembly at the arbor press Photo TR 111 112 TR 108 TR 107 If the...

Page 425: ...h the Reverse Shift Shaft and Block down against the Housing boss out of reverse Install 3 109 05 Steel Balls into the Hi Low Shift Shaft cavity of the Housing and push each one into the machined hole...

Page 426: ...5 Steel Ball and 34 32 Spring Photo TR 116 117 118 TR 117 TR 118 22 Apply Blue LOCTITE to the threads of the 112 145 Set Screw and tighten into the Housing approximately 2 1 2 turns This may need to b...

Page 427: ...tion Photo TR 123 TR 123 26 Secure the Hi Lo Shift Fork to the Shift Shaft using a 104 39 Spring Pin Photo TR 124 TR 124 TR 125 27 Install a 106 03 Retaining Ring to the top groove of the 34 101 Left...

Page 428: ...e that the housing is pressed on squarely and evenly to the lower half Photo TR 127 31 Secure the halves of the transmission together using 10 112 143 1 112 144 fas teners 11 108 05 lockwashers instal...

Page 429: ...R 131 35 Install the 102 05 Oil Seal to the Input Shaft Photo TR 131 132 36 Install the 102 03 Oil Seal to the Output Shaft Seat below the Retaining Ring groove Photo TR 133 134 37 Seat a 106 03 Retai...

Page 430: ...Output Shaft 40 Using the Output Shaft puller pull each of the Output Shafts Install a 114 04 Shim under the 107 02 Retaining Ring at the Output Shaft on the Left Side Housing Install a 114 05 Shim u...

Page 431: ...al postion See Photo TR 141 42 Place the 113 11 O ring into the 34 118 Shifter Plate Photo TR 142 43 Assemble the 34 117 Shift Lever to the Shifter Plate Apply a small amount of axle grease to the bal...

Page 432: ...Limited www odg com PH 519 662 2840 FAX 519 662 2421 TR 34A Transmission Argo Service Manual 46 Install the CE 035 Dipstick Photo TR 146 TR 146 47 Fill the transmission with 1 1 L 38 7 oz of 80 W 90...

Page 433: ...put Shaft and install the first half of the 107 14 Retaining Ring to the machined groove at the High Gear Pinion location Photo 1 2 2 Interlock the second half of the 107 14 Retaining Ring into the pr...

Page 434: ...l 4 Locate the 108 85 Retaining Thrust Washer and slip it over the input shaft cupped side towards retaining ring and up against the retaining ring assembly Photo 6 7 5 Install the High Gear Pinion on...

Page 435: ...The Dog Clutch needs to be oriented correctly when assembled to the Input Shaft The dogs on one side of the clutch have a small machined shoulder These dogs will engage with the Low Gear Pinion so th...

Page 436: ...Ontario Drive Gear Limited www odg com PH 519 662 2840 FAX 519 662 2421 TR 38A Transmission Argo Service Manual 13 14 9 Secure the Reverse Gear Pinion with a 107 15 Retaining Ring Photos 15 16 16 15...

Page 437: ...General Information Argo Service Manual Ontario Drive Gear Limited www odg com PH 519 662 2840 FAX 519 662 2421 GI 28...

Page 438: ...Ontario Drive Gear Limited www odg com PH 519 662 2840 FAX 519 662 2421 ARGO SERVICE MANUAL...

Reviews: