background image

Preliminary Technical Data 

UG-1828 


Rev. PrC | Page 311 of 338 


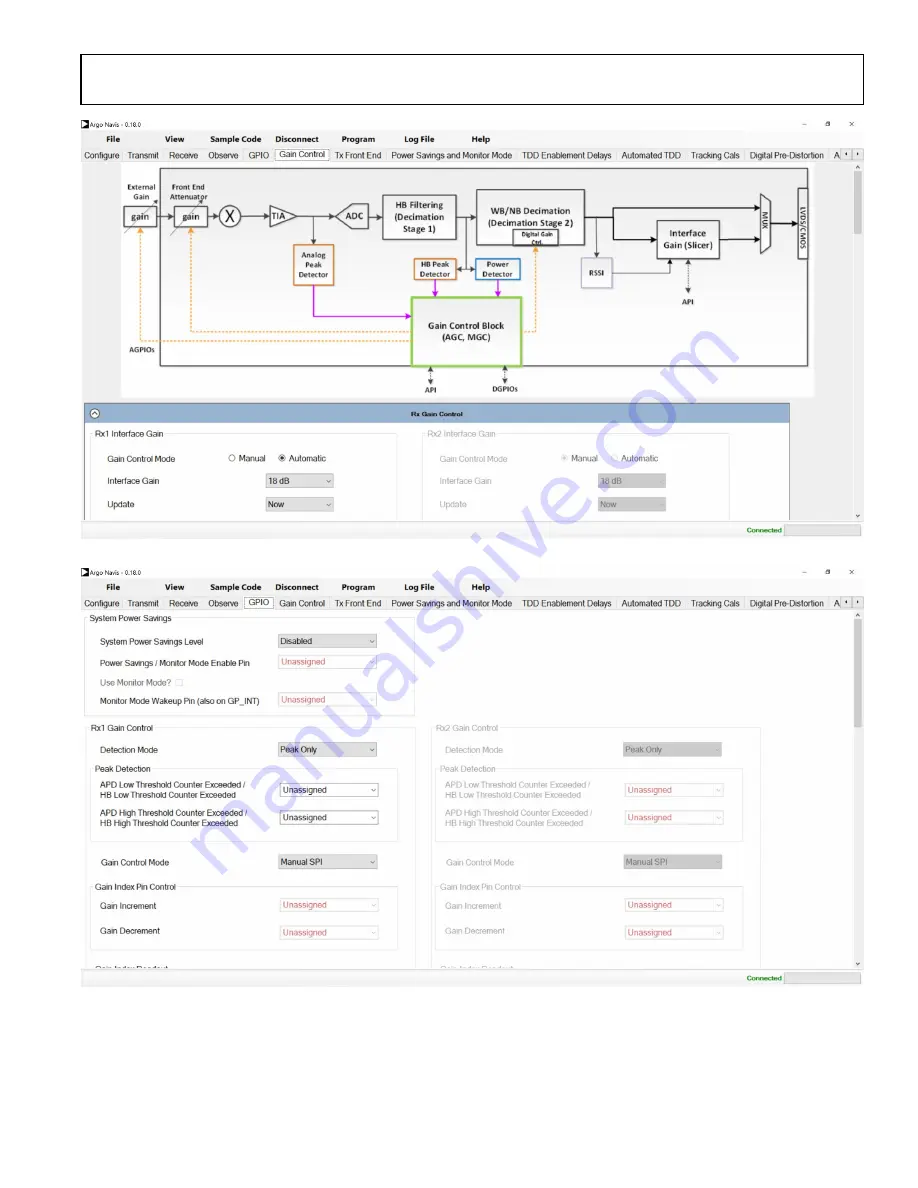
Figure 295. Rx Gain Control Tab 


Figure 296. GPIO Configuration 

For more detailed information refer to Rx Gain Control section of this document. The GPIO tab also shares a section with the frequency 
hopping as seen in Figure 285.  

Tx Front End 

Tx Attenuation 

Summary of Contents for ADRV9001

Page 1: ...s family designator assigned to the System Development User Guide UG 1828 for new ADRV9002 ADRV9003 ADRV9004 and upcoming additional family members The ADRV9001 System Development User Guide covers AD...

Page 2: ...Shutdown Sequence 46 Serial Peripheral Interface SPI 47 SPI Configuration 47 SPI Bus Signals 48 SPI Data Transfer Protocol 48 Timing Diagrams 50 SPI Test 51 Data Interface 52 General Description 52 E...

Page 3: ...Interframe Power Saving 192 Monitor Mode 194 Digital Predistortion 197 Background 197 ADRV9001 DPD Function 197 ADRV9001 DPD Supported Waveforms 199 DPD with Frequency Hopping FH 199 ADRV9001 DPD Perf...

Page 4: ...ine Layout 259 Isolation Techniques Used on the ADRV9001 Evaluation Card 266 Power Supply Recommendations 269 Power Management Considerations 269 Power Supply Sequence 269 Power Supply Domain Connecti...

Page 5: ...E SYSTEM ARCHITECTURE DESCRIPTION SOFTWARE INTEGRATION AND SYSTEM INITIALIZATION AND SHUTDOWN PARAGRAPHS AS WELL AS HAL INTERFACE DEFINITION APPENDIX FOR MORE INFORMATION GO TO PCB LAYOUT RECOMMENDATI...

Page 6: ...TECTORS DATA PORT CMOS SSI OR LVDS SSI DATA PORT CMOS SSI OR LVDS SSI LO1 GENERATOR RF VCO1 SYNTHESIZER DEV_CLK XTAL OSCILLATOR RF VCO2 SYNTHESIZER LO2 GENERATOR n ADVANCED FEATURES FREQUENCY HOPPING...

Page 7: ...performance 1 8 V analog domain is used to optimize transmitter and auxiliary converter performance The digital processing blocks are supplied by a 1 0V source In addition a 1 8 V supply is used to su...

Page 8: ...andom manner dictated by the user Selecting the next frequency to hop to is accomplished by asserting a frequency index word onto the GPIO bus Alternatively the API can be used to select the next freq...

Page 9: ...utonomously poll a region of the spectrum for the presence of a signal while in a low power state In this mode the chip continuously cycles through sleep detect sleep states controlled by an internal...

Page 10: ...to implement MIMO or diversity in their system The ADRV9001 internal AGC can be used to autonomously monitor and set appropriate gain levels for Rx signal chains For non time critical FDD type applica...

Page 11: ...re are no signals present at the Rx input external LNA should be disabled and appropriate termination should be present at LNA output to avoid reflections of Rx calibration tones The maximum input sig...

Page 12: ...Y MIMO RF RECEPTION BAND B DIVERSITY MIMO AND Tx INIT CALIBRATIONS RF TRANSMISSION BAND A AND BAND B DIVERSITY MIMO RF TRANSMISSION BAND A AND BAND B DIVERSITY MIMO RF I O Rx1A Rx1B Rx2A Rx2B Tx1 Tx2...

Page 13: ...depending of RF matching used on the RF ports user 2nd LO harmonic can be as high as 50 dBc and 3rd harmonic can be as high as 9 dBc Therefore the RF filtering on the Rx and Tx path must ensure that s...

Page 14: ...x can be done by toggling control lines ADRV9001 can control external Rx Tx switch using its analog GPIOs as well as provide power amplifier bias voltage by utilizing AuxDAC outputs SPI RESET DEV_CLKL...

Page 15: ...Rx calibration tones The maximum input signal amplitude must not exceed 82 dBm MHz for wideband modes TBD dBm MHz for narrowband modes During Tx initialization sequence the user needs to ensure that...

Page 16: ...opriate gain level for Rx signal chain ADRV9001 can control external LNA using its analog GPIOs as well as provide power amplifier bias voltage by utilizing AuxDAC outputs SPI RESET DEV_CLKL_OUT MCS D...

Page 17: ...es that are present at Rx input The maximum input signal amplitude must not exceed 82 dBm MHz for wideband modes TBD dBm MHz for narrowband modes During Tx initialization sequence user needs to ensure...

Page 18: ...able Radio TETRA type application ADRV9001 can use its internal LO to generate RF LO1 for both uplink and downlink For applications with stringent RF LO requirements the user can use external LO input...

Page 19: ...seband processor then access to the Rx datapath during Tx slots must be time shared between DPD operation and Tx calibrations AGPIOs Analog GPIOs operating at 1 8 V level can be used as read or write...

Page 20: ...the Rx1A should be powered down during Tx slots to ensure proper operation of the Tx calibration path connected to the Rx1B The user must ensure that appropriate attenuation is present in the line to...

Page 21: ...DGPIOs For DMR type applications ADRV9001 supports RF Monitor mode of operation DGPIO pins are used to sent wake up signal to baseband processor allow baseband processor to move ADRV9001 into Monitor...

Page 22: ...nt in line to prevent Rx being overloaded by Tx signal Tx Signal Path The user must ensure that appropriate level of isolation betweenTx1 andTx2 as well as Rx toTx is provided at the system level LO G...

Page 23: ...Tx tracking calibrations are available when ADRV9001 operates in 2R2T FDD mode AGPIOs Analog GPIOs operating at 1 8 V level can be used as read or write digital levels of in the end user system AGPIOs...

Page 24: ...used only during initialization calibrations The user must ensure that appropriate attenuation is present in line to prevent Rx being overloaded by Tx signal Tx Signal Path The user must ensure that...

Page 25: ...des During Tx initialization sequence the user must ensure that the power amplifier is powered down to avoid unwanted emission of Tx calibration tones at the antenna No Tx tracking calibrations are av...

Page 26: ...ts Control of the ADRV9001 Rx and Tx signal chains can be done by toggling control lines ADRV9001 can provide power amplifier bias voltage by utilizing AuxDAC outputs SPI RESET DEV_CLKL_OUT MCS DEV_CL...

Page 27: ...um input signal amplitude must not exceed 82 dBm MHz for wideband modes TBD dBm MHz for narrowband modes During Tx initialization sequence the user must ensure that the power amplifier is powered down...

Page 28: ...UG 1828 Preliminary Technical Data Rev PrC Page 28 of 338 ADRV9001 IN RADAR TYPE APPLICATION Figure 12 ADRV9001 in Radar Type Application...

Page 29: ...Tx tracking calibrations In case of external DPD user must ensure that access to the Rx path during Tx slots is time shared between DPD operation and Tx calibrations Calibrations During Rx initializa...

Page 30: ...s chm files can only be opened from a local drive If you attempt to open from a network drive the file may look empty The ADRV9001 is baseline device for the product family therefore all API and evalu...

Page 31: ...in Figure 15 Each subfolder is explained in the following sections ADI understands that the developer may desire to use a different folder structure Whereas Analog Devices provides ADRV9001 API source...

Page 32: ...ere are placeholder functions left empty for the customer to fill in their platform specific code c_src third_party This section contains third party APIs used to help the FPGA control the system This...

Page 33: ...fpga pointer argument was not NULL The application uses this structure to interact with the DMA the SSI ports and other elements of functionality Figure 17 highlights the areas of the file structure t...

Page 34: ...ints Highlighted More details are provided on the customer folder in the Software Integration chapter which goes into more specifics on the HAL At this point in development it is recommended to read t...

Page 35: ...pective adi_ device _hal h files This allows a user to select only the components which are desired The user is responsible for implementing the interface defined in each HAL in order to use the corre...

Page 36: ...imerWait_us Once done the adi_platform c code will automatically switch to using the placeholder customer code under the customer folder Below is provided a code snippet from adi_adrv9001_hal_customer...

Page 37: ...ity of function calls defined in this section of the codebase are optional For example the adm1293 folder houses code used to interact with the ADM1293 device used for power monitoring via I2C however...

Page 38: ...ration One such API is adi_adrv9001_spi_Verify which performs the following functions 1 Reads readonly register to check SPI read operation 2 Writes scratchpad register with 10110110 reads back the da...

Page 39: ...O_FSEL_OUTP bcm2835_gpio_write CE_PIN HIGH delay 1 return 0 int32_t customer_adi_adrv9001_hal_close void devHalCfg Customer code goes here bcm2835_spi_end return 0 int32_t customer_adi_adrv9001_hal_sp...

Page 40: ...I Error Handling and Debug Logging Functions The API provides a simple logging feature function that may be enabled for debugging purposes Available logging levels are given by adi_common_LogLevel_e a...

Page 41: ...stantiate multiple adi_adrv9001_Device_t structures to describe each physical ADRV9001 device Multiple ADRV9001 devices can have their own adi_adrv9001_Init_t or can share a common adi_adrv9001_Init_t...

Page 42: ...ange Restrictions Analog Devices maintains the code in the c_src devices folders Modification of this code by Application developers is forbidden Direct SPI read write operation is forbidden when conf...

Page 43: ...ent Kit SDK provided to the user The ADRV9001 device can be initialized through the user s own software program independent of TES However the same API calling procedure described in this document sho...

Page 44: ...for operation Then through SPI or PIN mode the device can be moved to the RF enabled state by enabling the transmit receive channels so transmission and reception can start Optionally for power saving...

Page 45: ...a set of API calls which is used to load any radio configuration data not passed by profile before performing initial calibrations such as GPIO configuration PLL loop filter configuration carrier fre...

Page 46: ...nnelEnableMode_Set to set the PIN mode 2 Toggle the pins for example Rx1_ENABLE and Tx1_ENABLE pins for Channel 1 to transition the channel to the RF enabled state SPI Mode 1 Call adi_adrv9001_Radio_C...

Page 47: ...ble 12 Table 12 SPI Settings Data Structure Structure Member Value Function Default MSBFirst 0x00 Least significant bit first 0x01 0x01 Most significant bit first enSpiStreaming 0x00 Disable SW featur...

Page 48: ...es the returning read data fields from the device to the baseband processor during a read transaction In a 4 wire SPI configuration SDO carries the returning data fields to the baseband processor The...

Page 49: ...the next 14 bits in order from next LSB to MSB The next bit signifies if the operation is read set or write clear If the operation is a write the baseband processor transmits the next 8 bits LSB to M...

Page 50: ...25 is only for the SPI timing diagram demonstration purpose Users can use the scratch register 0x009 for the SPI read write test Figure 24 Nominal Timing Diagram SPI Write Operation Figure 25 Nominal...

Page 51: ...th value 0x24 to set ADRV9001 SPI to 3 wire mode Write whatever value to scratch register 0x009 then read register 0x009 to validate if the read value is the write one Users should use the oscilloscop...

Page 52: ...Q data samples of 16bits With I and Q data samples of 12 bits ADRV9001 SSI has various and flexible work modes to support all kinds of system scenarios users can choose their appropriate work modes ac...

Page 53: ...IN CMOS SSI 1 LANE Rx CHANNEL 1 M11 RX1_DCLK_OUT RX1_DCLK_OUT M12 N13 RX1_STROBE_OUT RX1_STROBE_OUT N14 M13 RX1_IDATA1_OUT M14 RX1_DATA_OUT RX1_IDATA0_OUT N11 RX1_QDATA3_OUT N12 RX1_QDATA2_OUT M4 RX2_...

Page 54: ...utput current Drivers shorted together 4 1 mA Clock signal duty cycle 500 MHz 45 50 55 TR TF Output Rise Fall Time 300 mVp swing 0 371 nsec CMOS SYNCHRONOUS SERIAL INTERFACE CMOS SSI One Lane Mode CSS...

Page 55: ...the serialized data I and Q and can be configured to be high For one clock cycle at start of I and Q sample transmit In the case a 16 bit data sample the TX_STROBE is high for one clock cycle and low...

Page 56: ...transmit CSSI interface Tx for a 8 bit data symbols Figure 33 Transmit CSSI Timing for 8 Bit Symbols MSB First Figure 34 illustrates the receive CSSI interface Rx for 16 bit data symbols RX_DATA_OUT R...

Page 57: ...es the remaining data bits are ignored Figure 36 Receive CSSI Timing with 2 Data Clock Rate for 16 Bit I Q Data Sample MSB First 32 Cycles Figure 37 Receive CSSI Timing with 4 Data Clock Rate for 16 B...

Page 58: ...OUT is an output signal indicating the first bit of the serial data sample RX_IDATA0_OUT is an output serial data stream of I sample low byte RX_IDATA1_OUT is an output serial data stream of I sample...

Page 59: ...smit CSSI Timing for 16 Bit I Q Data Sample MSB First Transmit and Receive CSSI Using DDR Clock Transmit and receive CSSI can be operated in either SDR or DDR data transfer Figure 44 illustrates the R...

Page 60: ...5 Transmit CSSI DDR Clock Relation with Strobe Data Figure 46 and Figure 46 illustrate the timing diagram example for four lane mode receive transmit CSSI with DDR clock 16 bit I Q sample Figure 46 Fo...

Page 61: ...Q Figure 48 illustrates the receive LSSI interface Rx1 and Rx2 for a 16 bit I Q data sample with MSB first configuration Figure 48 illustrates the receive LSSI interface for a 12 bit I Q data sample F...

Page 62: ...BE signal can be configured to high for a half clock cycle to indicate the start of I and Q symbols or for half of I and Q data duration to distinguish between I data and Q data Figure 50 illustrates...

Page 63: ...le and low for a half and 11 clock cycles For half of I and Q data duration In the case of a 16 bit data sample the TX_STROBE is high for 4 clock cycles and low for 4 clock cycles Q data sample In the...

Page 64: ...a format for the CMOS and LVDS SSI LVDS 32bit 2 lanes I Q of 32 bit each o LSSI_DATA_I Q 31 0 RxDataPathI Q 21 0 b0 Gain_Change Gain 7 0 CMOS 64bit 1 Lane I Q o CSSI_DATA 63 0 RxDataPathI 21 0 b0 Gain...

Page 65: ...gure 55 The preliminary timing specification for CMOS SSI is described in Table 18 and the preliminary timing specification for LVDS SSI is described in Table 19 Figure 54 Receive SSI Timing Diagram F...

Page 66: ...TX SSI reference clock output TX_DCLK_OUT options lvdsIBitInversion bool Set LVDS SSI I bit differential pads polarity inversion Default false lvdsQBitInversion bool Set LVDS SSI Q bit inversion Defau...

Page 67: ...alse cmosClkInversionEn True RX_IDATA_OUT I0_D15 RX_STROBE_OUT I0_D0 I0_D14 I0_D7 I0_D6 RX_STROBE_OUT I0_D8 I1_D15 Rx_DCLK_OUT Or Figure 59 RX CMOS DDR SSI output cmosDdrPosClkEn True cmosClkInversion...

Page 68: ...di_adrv9001_SsiTestModeData_e testData Type of data to transmit over SSI uint32_t fixedDataPatternToTransmit Value of Fixed pattern to transmit over interface For various SSI data format CMOS Pattern...

Page 69: ...th the specified fixed pattern to verify the SSI work status Users can call API adi_adrv9001_Ssi_Tx_TestMode_Configure to enable and configure the test mode and transmit the corresponding test pattern...

Page 70: ...re the stream is flexible In the same way as the initialization structures change with profile so the stream processor image must change with configuration for example the stream that enables Rx1 diff...

Page 71: ...command or SPI API command TIMING PARAMETERS CONTROL ADRV9001 has integrated stream processors to handle various external and internal events that are required to be serviced in real time Those stream...

Page 72: ...this parameter is not needed except to determine other parameters Enable Rise to Analog On Delay is the delay between TX_ENABLE RX_ENABLE rising edge and analog power up beginning This is a user defin...

Page 73: ...ard data usage is compliant with the standard requirement The transmit enable pin is controlled by user to signal the start and end of a transmit burst at the data port Based on the transmitter enable...

Page 74: ...l datapath as shown in Figure 63 This could achieve better power savings For example if the user measures the propagation delay as 2 5 ms whereas the enableSetupDelay provided by ADRV9001 is 8 s analo...

Page 75: ...hould be switched on after analog power up and switched off before analog power down Figure 64 Transmit Timing Parameters tTxPD tTxEnaSetup Receive Timing Definition Receive timing parameters define t...

Page 76: ...nuously improving in the future propagationDelay tRxPD Helper Parameter Min N A Max N A This parameter should be measured by user and it is profile dependent and board layout dependent It does not nee...

Page 77: ...lling edge and RX_ENABLE rising edge Guard time between RX_ENABLE falling edge and TX_ENABLE rising edge Guard time between TX_ENABLE falling edge and TX_ENABLE rising edge Guard time between RX_ENABL...

Page 78: ...ing edge and RX_ENABLE rising edge is for making sure that the interface is turned off at the end of the previous frame before it turns on again for the next frame Because it takes tRxEnaHold to turn...

Page 79: ...allow these power up procedures to complete If the additional power up procedures in Power Savings Mode 2 takes tPowerUpPSM2 to complete the ADRV9001 prevents the system from entering Power Savings M...

Page 80: ...rame the power down procedures take some small but finite time For receiver channels with large propagation delay this may have no impact because the digital datapath might be on for a long time after...

Page 81: ...addition to that for the transmit channel holdDelay is also reserved for future use and forced to 0 For the receive channel fallToOffDelay is also reserved for future use and forced to 0 API Command a...

Page 82: ...actor Default min enableRiseToOnDelay tTxEnaRise2On enableRiseToAnalogOnDelay enableSetupDelay 91 ms scaleFactor Default min Not needed if not controlling LNA power enableGuardDelay tTxGT Not Used Cur...

Page 83: ...ableHoldDelay tRxEnaHold enableFallToOffDelay enableFallToOffDelay propagationDelay Default max Can decrease if not all data received on air must be sent over interface When ADRV9001 calculates the de...

Page 84: ...ified channel adi_adrv9001_Radio_ChannelEnablementDelays_Configure Configures channel enable delays for the specified channel adi_adrv9001_Radio_ChannelEnablementDelays_Inspect Inspects channel enable...

Page 85: ...DGPIO falling edge will be the time taken for ADRV9001 to fully power down the analog front end This stream status to GPIO debug function can be enabled by API adi_adrv9001_Stream_C0_Gpio_Debug_Set i...

Page 86: ...is generated based on the user s provided sampling frequency Note LP CLKPLL uses less power than HP CLKPLL but produces more jitter noise User must take this trade off into consideration for their en...

Page 87: ...the limitations in decimation interpolation rate supported in the data path The following table summarizes the current dead zone frequency ranges Table 32 Dead Zone Frequency Ranges Dead Zone CLK PLL...

Page 88: ...ve or positive edge of DEV_CLK to meet setup and hold time with good margins Each ADRV900x device uses this sampled MCS to synchronize all internally generated clocks which make them aligned between a...

Page 89: ...83 shows the MCS signal required to be received by ADRV9001 There are a total of 6 pulses First 4 pulses are for the analog clock divider synchronization and the last 2 are for the digital clock divi...

Page 90: ...that phase synchronization will take place but this does not require MCS to rerun Whenever PLL changes the phase sync will need to rerun to ensure the phase between all channels are synchronized To se...

Page 91: ...clock is switched from CLK PLL to Reference clock MCS is initialized Ready to receive MCS pulses For current release 0 13 if the MCS command is sent with power saving mode 0 ADRV9001 will return error...

Page 92: ...or multiple channels have different delays This is typically more important on the transmit side where data coming to SSI interface have different delays On the receive side the delay can be manipulat...

Page 93: ...elay Max all MCS_to_Strobe latency Min all MCS_to_Strobe latency 4 Rx Each channel is independent from other channels o sampleDelay UserDefined o readDelay LVDS Only UserDefined minimum of 1 to compen...

Page 94: ...the different delays and try to align the data in time PHASE SYNCHRONIZATION The preliminary characterization of the phase synchronization is shown below More updates will be provided in future relea...

Page 95: ...error after synchronization of the two LOs these are internal register reads but should be accurate Figure 89 Phase Error after synchronization between two LOs 8 6 4 2 0 2 4 0 500 1000 1500 2000 2500...

Page 96: ...configuration is to follow the recommended programming sequence and use provided API functions to set the clock synthesizer to the desired mode of operation The clock generation block of the clock syn...

Page 97: ...EXTERNAL LO The device is provisioned with two external LO ports These ports are available as a pair of balls and are configured to be input for external LO signals External LO can receive a signal be...

Page 98: ...reference clock source Provide higher reference clock frequency PFD Adjust loop filter bandwidth to trade off between close in band and far out band noise When changing the loop filter bandwidth typi...

Page 99: ...I OPERATION Data Structure and Enums Table 34 Data Structures Related to LO Operation Data Structure Description adi_adrv9001_Device_t Data structure to hold ADRV9001 device instance settings adi_adrv...

Page 100: ..._Radio_Carrier_Inspect Inspects carrier configuration LO Change Procedure To set the LO frequency to a particular channel user must 1 Verify the internal ARM microprocessor has been initialized 2 If d...

Page 101: ...nels Tx1 Tx2 Rx1 Rx2 are using the same LO and user needs to change the LO then user needs to configure all channels Tx1 Rx2 Rx1 Rx2 to achieve that Loop Filter Configuration Currently the loop filter...

Page 102: ...uency hopping are also shown ADRV9001 supports frequency hopping for Tx only Rx only and TRx The propagation delay for the data path must be considered as well as they will affect the channel use case...

Page 103: ...Rx setup signals and sampled at HOP edges and then indicate the next frame will be Tx or Rx frame respectively It is worth noting that in LO muxing mode the information of which channel the frame need...

Page 104: ...each hop frame data can be operated on a new carrier frequency with either Rx or Tx A hop frame is made up of a transition and a dwell period The transition period is the setup time for the hop frame...

Page 105: ...y Prior to each hop the channel Tx or Rx information and the frequency information are obtained Note Tx setup signal has special meaning In LO muxing mode Tx setup falling edge indicates the start of...

Page 106: ...les shown in Figure 106 Figure 106 LO Retune Timing Diagram PLL lock time is discussed in section LO Retune Currently user should rely on the actual test result on the LO retune time with the evaluati...

Page 107: ...hop entries frequencies if two tables are loaded An entry in the frequency hopping table is defined as follows Table 38 Hop Table Entry Parameter Descriptions hopFrequencyHz Operating frequency in Hz...

Page 108: ...make sure the DGPIO signals are set and stable by the time HOP signal edge comes ADRV9001 will sample the DGPIO pins at the HOP signal edge The following restrictions apply to this mode Each DGPIO pin...

Page 109: ...m the newly selected table In the example from Figure 109 the new information read from the table will appear on air at frame 4 Like the PIN method the user can issue an API to switch between the two...

Page 110: ...ge ADRV9001 reads the new entry from table B and switches to table A This frame from the first falling edge to the second rising edge uses table B entry At the next HOP edge the second rising edge at...

Page 111: ...icable to automatic ping pong mode as long as user ensures the second hop table is loaded in prior to the completion of the first table Frequency Hopping Table Timing Time used to load a frequency hop...

Page 112: ...0 f 5100 34 5150 5100 f 5200 35 5250 5200 f 5300 36 5350 5300 f 5400 37 5450 5400 f 5500 38 5550 5500 f 5600 39 5650 5600 f 5700 40 5750 5700 f 5800 41 5850 5800 f 5900 42 5950 5900 f 6000 To reduce t...

Page 113: ...secutive Rx frame Min 2 s thopEdgeToChannelSetupFall Minimum time between the hop edge and when the channel setup can go low This restriction only applies for Tx 0 42 s tChannelSetupRiseToHopEdge Mini...

Page 114: ...Min 0 Max Transition time If ADRV9001 is not controlling the antenna switch this parameter is not needed except to determine other parameters Typically the enableRiseToAnalogOnDelay enableSetupDelay w...

Page 115: ...be dynamic profile dependent and board layout dependent Not necessary to configure ADRV9001 but may be necessary to derive other timing parameters enableRiseToOnDelay Delay between hop edge and the LN...

Page 116: ...antees that the Rx front end and Tx front end are not powered up at the same time To achieve this ADRV9001 enforces a minimum setting for RxRiseToAnaOn specified by analogGuardTime to ensure that the...

Page 117: ...h Long Propagation Delay Tx Only with Long Propagation Delay The ADRV9001 also supports Tx only case where the propagation delay is greater than the duration of a hop frame To achieve this the user ca...

Page 118: ...In the example this is marked by the grey boxes If the user desires they can pad their data to keep the transition and dwell times consistent This is because the transition required for the first Tx...

Page 119: ...y with Long Propagation Delay for LO Retune Tx Only with Short Propagation Delay There is a restriction to how long before the hop edge the Tx setup falling edge must come For profiles with very short...

Page 120: ...ay of their profile Table 44 ORx Timing Parameters Time Required Timing Parameter Time Required us Narrowband Wideband tOrxRiseToOn 8 9 tOrxFallToOff 6 5 Table 45 ORx Timing Parameters Timing Restrict...

Page 121: ...FREQUENCY HOPPING WITH RX ORX GAIN CONTROL In frequency hopping operation the user can configure the Rx gain control to either be manual gain control or AGC The user can configure the AGC as in non F...

Page 122: ...g range of the frequencies For example if user has 6 regions they can specify 5 regions and the rest will be in the 8th region DPD will calculate its coefficients based on the specified regions This m...

Page 123: ...ential pairs that is a total of 10 wires The interface is operated single ended in CMOS synchronous serial interface CSSI mode and differential in LVDS synchronous serial interface LSSI mode The CSSI...

Page 124: ...Direct FM FSK modulation In this mode the DUC IQ FM FSK the interpolation stage 2 power amplifier protection and transmitter attenuation blocks digital part are all bypassed RFPLL is used to generate...

Page 125: ...esponding index Note the attenuation step size for adjacent index is 0 05dB The 3rd column is the control word used to calculate the analog gain shown in the 4th column The equation used for this calc...

Page 126: ...step size mode The TDD ramp mode was designed for power ramping in TDD systems Note it is not supported in the current release The constant step size mode allows to control an exact constant gain ste...

Page 127: ...by continuously monitoring the output power of the Tx datapath Through API commands the user can enable power amplifier protection and set configuration parameters such as average and peak power thre...

Page 128: ...the NCO and inserting it to the transmitter datapath Note this tone is visible at the transmitter output therefore user must ensure that antenna is isolated from the transmitter power amplifier is off...

Page 129: ...nality is currently not enabled in the datapath and will be provided to user in the future Currently to use the FM FSK modulation capability of ADRV9001 user should perform symbol mapping interpolatin...

Page 130: ...refer to API doxygen document Note more details about transmitter power amplifier ramp functionality can be found in this User Guide in the future Table 47 A List of Tx Data Chain APIs Rx Gain API Fun...

Page 131: ...SI frequency offset correction FOC phase offset correction POC and overload detectors DEC is used to decimate the ADC sample rate to the desired output sample rate DC QEC PFIR FOC and POC are used to...

Page 132: ...transmitter output Therefore users must ensure an appropriate level of isolation from ADRV9001 transmitter output to the antenna to ensure that test tones are not transmitted by the system This isolat...

Page 133: ...fferent modulation schemes and bandwidths requirements When DPD is performed externally by baseband processor then baseband processor owns the entire ORx channel It is the user s responsibility to mak...

Page 134: ...I commands followed by a 128 tap programmable PFIR as a channel selection filter In the future API commands will be provided for PFIR for more user interactions After PFIR besides applying the digital...

Page 135: ...ion and linearity performance The HP ADC is based on Continuous Time Delta Sigma CTDS architecture and is 5 bits wide The LP ADC is based on voltage controlled oscillator VCO architecture and is 16 bi...

Page 136: ...s from 24 kHz to 61 44 MHz except for some dead zones due to internal clocking constraints This is achieved through adjusting the internal CLK PLL frequency as well as a flexible arrangement of decima...

Page 137: ...ifference is named as the carrier frequency offset CFO In the receiver data chain a frequency offset correction block is provided as an option to further correct small carrier frequency offset in both...

Page 138: ...the data With the equipped capability of the ADRV9001 it detects the DMR and FM signal independent of the baseband processor during its idle state so that the baseband processor could sleep at the who...

Page 139: ...ness of dynamic switch between Low Power and High Performance ADCs adi_adrv9001_Rx_AdcSwitch_Configure Configures ADC dynamic switch settings for the specified channel adi_adrv9001_Rx_AdcSwitch_Inspec...

Page 140: ...will be discussed in more details in later sections Different from initial calibrations tracking calibrations usually use the real time traffic data for calibration Therefore tracking calibrations ar...

Page 141: ...and chanInitCalMask 1 is the mask for Rx2 Tx2 channels calMode specifies the mode to run the desired initial calibration algorithms and force is a flag which will force all enabled calibrations to re...

Page 142: ...bes the mask bit assignment for initial calibrations in adi_adrv9001_InitCalibrations_e It also explains the functionality of each initial calibration Note it is possible to select a different mask fo...

Page 143: ...01_INIT_CAL_RX_TIA_CUTOFF Rx TIA Cutoff Initial Calibration This is used to tune the 3dB cut off frequency of theTIA filter D15 ADI_ADRV9001_INIT_CAL_RX_GROUP_DELAY Rx TIA Fine Initial Calibration Thi...

Page 144: ...F_GD 8 TX_ATTEN_DELAY 9 TX_PATH_DELAY The calibration order is mostly determined by the algorithm dependency It is important that the users wait for these calibrations to complete successfully before...

Page 145: ...th can appear at the transmitter output so it is important that the power amplifier connected to the device output be switched off which also prevents signals from the antenna reaching the transmitter...

Page 146: ...fier is disabled the load seen at the transmitter output should be 50 The LNA or RF switch if no LNA presented externally for the loopback path should also be switched off to avoid receiving signals f...

Page 147: ...med in the digital domain For RX_QEC_FIC RX_QEC_TCAL RX_GAIN_PATH_DELAY and RX_DMA_PATH_DELAY the calibration results are applied in digital domain for correction For RX_DCC RX_RF_DC_OFFSET RX_TIA_CUT...

Page 148: ...igure 145 demonstrate the Tx LO leakage performance and Tx image rejection performance under different initial calibrations In this experiment the LO is swept from 100MHz to 2 9GHz in 100MHz step size...

Page 149: ..._DAC No Yes No None No None D8 TX_PATH_DELAY Yes Yes No Tone Yes TX_ATTEN_DELAY D9 RX_HPADC_RC No Yes No None No None D10 RX_HPADC_ FLASH No Yes No None No None D11 RX_HPADC_DAC Not enabled Not enable...

Page 150: ...ogramming Failed When Programming Failed happens the user could try the Program again If it continues to fail after multiple attempts as the next step the user could enable disable the optional initia...

Page 151: ...0 Bit 6 7 Not used Reserved for future purpose ADI_ADRV9001_TRACKING_CAL_RX_HD2 0x00000100 ADI_ADRV9001_TRACKING_CAL_RX_QEC_WBPOLY 0x00000200 Bit 10 11 Not used Reserved for future purpose ADI_ADRV900...

Page 152: ...her power efficiency Please refer to the Digital Predistortion section in the User Guide for more details D5 ADI_ADRV9001_TRACKING_CAL_TX_CLGC Tx CLGC Tracking Calibration This is used to compensate f...

Page 153: ...ut to prevent transmitter output data from saturating the observation channel input When external DPD is employed in the system it should time share with other transmitter tracking calibrations to avo...

Page 154: ...ceiver chain followed by a description of the receiver gain table concept Gain Control Modes This section advises how to select between AGC and MGC mode followed by a detailed description of how to op...

Page 155: ...in control capability As shown in this figure the receiver chain has a number of observation elements that can monitor the incoming signal These can be used in either MGC or AGC mode Firstly an Analog...

Page 156: ...called by the user right after loading the gain table to load multiple gain table regions and switch between multiple gain table regions during runtime The 2 fields which are used in the default gain...

Page 157: ...y first assuming the max LNA Gain 0dB until the ADRV9001 front end attenuator runs out of attenuation Then new gain indices are produced by assuming LNA gain of N dB To achieve the desired total atten...

Page 158: ...Element Control Receiver AGPIO Pins to Control External Gain Element Rx1 AGPIO 1 0 Rx2 AGPIO 3 2 These AGPIOs must be enabled as outputs and set for external gain functionality The 2 bit value program...

Page 159: ...ble 62 outlines the counter parameters for the individual overload under range conditions Table 62 Peak Detector Counter Values Over Range Under Range Counter apdHighThresh over range apdUpperThreshPe...

Page 160: ...ure 151 APD HB Gain Changes with Fast Attack Enabled Besides the fast attack mode it is also possible to enable a fast recovery mode This functionality is enabled with the enableFastRecoveryLoop param...

Page 161: ...values This equivalence will be approximate as these thresholds have unique threshold settings and will not be exactly equal This section discusses the relevant priorities between the detectors and ho...

Page 162: ...covery in Peak Detect AGC Mode Peak Power Detect Mode In this mode the peak and power detect work jointly to control the gain of the receiver chain In the event of an over range condition then both th...

Page 163: ...rity scheme in peak power detect mode 1 APD Overrange 2 HB Overrange 3 APD lower level peak exceeded 4 HB lower level peak exceeded 5 Power Measurement In this example the gain would be decremented be...

Page 164: ...ntrol of gain is required API command adi_adrv9001_Rx_GainControl_PinMode_Configure can be used to properly configure this mode In this mode out of 16 digital DGPIO pins 2 pins per receiver are used o...

Page 165: ...V9001_GPIO_PIN_CRUMB_11_10 ADI_ADRV9001_GPIO_PIN_CRUMB_13_12 ADI_ADRV9001_GPIO_PIN_CRUMB_15_14 adi_adrv9001_GpioPinCrumbSel_e In both peak mode and peak and power mode a pair of bits Bit 0 and Bit 1 o...

Page 166: ...o determine the setting of the APD thresholds in terms of the closest possible setting in terms of dBFS of the ADC assuming apdHighdBFS and apdLowdBFS for apdHighThresh and apdLowThresh respectively t...

Page 167: ...rement is controlled by hbOverloadDurationCnt while the number of samples that should exceed the threshold in that period is controlled by hbOverloadThreshCnt Once the required number of samples excee...

Page 168: ...AGC mode the HB peak detector has programmable gain attack and gain recovery step sizes Table 70 HB Attack and Recovery Step Sizes Gain Change Step Size Gain Attack hbGainStepAttack Gain Recovery hbUn...

Page 169: ...pdate counter but more than an SLS delay before the gain update counter expiry Because slow loop settling SLS is typically several orders of magnitude smaller than gain update counter this is the most...

Page 170: ...full gain update period is the sum of the gainUpdateCounter the slowLoopSettlingDelay and a number of AGC clock cycles If the slowLoopSettlingDelay is set to 4 the gain update counter must be set to 1...

Page 171: ...tector_t agcUnderRangeLowInterval agcUnderRangeMidInterval agcUnderRangeHighInterval apdHighThresh apdLowThresh apdUpperThreshPeakExceededCount apdLowerThreshPeakExceededCount apdGainStepAttack apdGai...

Page 172: ...ry 0 1 0 changeGainIfThreshHigh Applicable in both peak and peak and power detect modes 0 Gain changes will wait for the expiry of the gain update counter if a high threshold count has been exceeded o...

Page 173: ...ble the power measurement block can be requested to perform a power measurement for a specific period of a frame This is applicable in TDD modes This parameter sets the duration of this power measurem...

Page 174: ...ct AGC mode 0 63 4 apdHighThresh This sets the upper threshold of the analog peak detector When the input signal exceeds this threshold a programmable number of times set by its corresponding overload...

Page 175: ...e HB under range threshold detectors Used only when the fast recovery option of the peak detect AGC mode is being used 0 16383 5826 hbUnderRangeMidThresh This sets the middle threshold of the HB under...

Page 176: ...erloadThreshCount was exceeded in hbOverloadDurationCount to cause an HB Under Range Mid Threshold Overload Event In Peak Detect AGC mode not having sufficient peaks to cause the overload is flagged a...

Page 177: ...ed by the receiver gain table as mentioned earlier Note different digital gain will be applied when configured in gain correction or gain compensation mode The receiver gain table has a unique front e...

Page 178: ...nt 0 5 dB steps With internal control the device automatically applies the interface gain determined by RSSI which measures the input signal power right before the slicer Note in the gain correction m...

Page 179: ...el 3 Figure 164 Slicer Bit Selection with Different Input Power Levels The slicer algorithm assumes a max PAR of 15dB and it adjusts the interface gain such that the measured signal power 15 dB is les...

Page 180: ...l the API function adi_adrv9001_Rx_InterfaceGain_Set could be used The gain should be selected from one of the 10 options The following table summarizes the list of API functions currently available f...

Page 181: ...g the GPIO pins user is allowed to retrieve the signal detector status which could be used to control receiver gain in Manual mode Note the signal detector status could also be retrieved in AGC mode F...

Page 182: ...1828 Preliminary Technical Data Rev PrC Page 182 of 338 Figure 166 TES Configuration for Rx Interface Gain Signal Detection Parameters and Manual Control Mode Parameters when AGC is Configured 24159 1...

Page 183: ...ne as needed Reset AGC settings to defaults can be used to reset all the parameters to their default values When the receiver gain control is not working as expected the user could perform the followi...

Page 184: ...igurable can be 1 2 4 or 8 of the FIFO writing clock For wideband modes only 1x and 2 are supported and the reading clock rate cannot be above 61 44 MHz In the Signal FIFO as shown in Figure 169 there...

Page 185: ...61 44 MHz Figure 170 presents the spectrum of desired tone and the generated NCO spurs levels relative to desired tone for the CFC NCO at 61 44 MHz sampling frequency The outlined plots show a typical...

Page 186: ...This module can be bypassed Figure 172 Functional Diagram of Frequency Discriminator Illustrated by Figure 172 the Frequency Discriminator outputs the transient frequency deviation FD and the transien...

Page 187: ...r and the ideal digital resampler is collected and plotted at the upside of Figure 174 The maximum phase error is collected and plotted at the downside of Figure 174 The Resampler can be used in both...

Page 188: ...k Cooperating with other hardware blocks for example the CFC DDC and programmable FIR filters and so on ADRV9001 Rx narrowband demodulator can perform FSK and FM demodulation under the control of the...

Page 189: ...fficients loading API function The configuration structure adi_adrv9001_PfirWbNbBuffer_t is defined as the following for the programming FIR filter coefficients typedef struct adi_adrv9001_PfirWbNbBuf...

Page 190: ...firSymmetric_e ADI_ADRV9001_PFIR_COEF_NON_SYMMETRIC pfir_dmr_12p5k tapsSel adi_adrv9001_PfirNumTaps_e ADI_ADRV9001_PFIR_128_TAPS PFIR_128_TAPS pfir_dmr_12p5k gainSel adi_adrv9001_PfirGain_e ADI_ADRV90...

Page 191: ...for different power saving applications Temporarily powering up down the unused Tx Rx channel in Calibrated state Dynamic interframe power saving is running automatically during all regular TDD TX RX...

Page 192: ...lled in Calibrated state Figure 177 shows a DMR radio switch from TX only frames into TX RX alternate frames ADRV9001 is initialized with Tx and Rx enabled at the beginning of TX only frames baseband...

Page 193: ...X must be active If TX and RX transition time is not long enough to allow power down mode 1 or 2 then users have to select TX RX Enable pin power down mode to 0 DGPIO power saving can be engaged durin...

Page 194: ...er Saving mode the DPGIO in System Power Mode can only be pulled up when both Tx Enable and Rx Enable is low adi_adrv9001_powerSavingAndMonitorMode_SystemPowerSavingMode_Set is used to set the System...

Page 195: ...onfigurable and users can decide detection first or sleep first when ADRV9001 is moved into monitor mode The enumerator adi_adrv9001_PowerSavingAndMonitorMode_MonitorDetectionMode_e defines five detec...

Page 196: ...rted simultaneously Similarly once a SYNC code is detected ADRV9001 will start the wake up procedure ADRV9001 has the option to buffer the latest incoming data in Monitor Mode Detecting cycle once a v...

Page 197: ...utput vs Actual Power Amplifier Output ADRV9001 DPD FUNCTION The ADRV9001 device provides a fully integrated DPD function that supports both narrow band NB and wide band WB applications It is a hardwa...

Page 198: ...nts Calculation Engine The Coefficients Calculation Engine computes the DPD coefficients periodically and then updates the DPD Actuator for real time pre distortion of the transmit signal The pre dist...

Page 199: ...ypically has a PAR of about 11dB To achieve higher PA efficiency and DPD algorithm stability a waveform with a large PAR is expected to have crest factor reduction CFR performed in baseband processor...

Page 200: ...performance is significantly improved Figure 187 ACPR Performance Before and After DPD 18000 16000 14000 12000 10000 8000 6000 4000 2000 0 0 2000 4000 6000 8000 10000 12000 14000 16000 18000 OUTPUT AM...

Page 201: ...ansmit gain value Based on those user could further adjust the value and set a proper gain target then close the loop and start the ADRV9001 CLGC algorithm to continuously track the gain variation bas...

Page 202: ...enable adi_adrv9001_DpdAmplifier_e amplifierType adi_adrv9001_DpdLutSize_e lutSize adi_adrv9001_DpdModel_e model bool changeModelTapOrders uint32_t modelOrdersForEachTap 4 uint8_t preLutScale uint8_t...

Page 203: ...0 Min 1 Max 3 75 clgcEnable bool Enable CLGC functionality False Set TRUE does not start the CLGC operation CLGC starts when the corresponding tracking calibration bit is set Each of these parameters...

Page 204: ...upported LUT sizes are 256 and 512 This size determines the number of entries in the DPD LUT A larger number of entries provides better LUT granularity model Currently the model should be set to ADI_A...

Page 205: ...t x t as the following x t TAP0 d t d t TAP1 d t 1 TAP3 d t 2 d t 1 TAP2 d t 2 d t 2 changeModelTapOrders This flag is used to provide user an option to select the default model tap orders or choose a...

Page 206: ...ling factors to increase the signal level which might improve the DPD performance The scaling factor can be determined according to the dBFS of the input data peak As an example if the signal peak pow...

Page 207: ...old uint32_t U2 30 Signal power for the upper threshold for the normalization of the magnitude and phase of the RX and TX data 0 1 0 0 031622776602 15 dBFS detectionPowerThreshold uint32_t U1 31 Power...

Page 208: ...on of the auto correlation matrix using transmit data d n It is used to keep the nominal magnitude of each of the power terms about the same to avoid ill condition of the correlation matrix The scalin...

Page 209: ...tLuts to be 1 it sets most polynomial terms to be 0 to remove the pre distortion at the beginning of DPD operation timeFilterCoefficient This parameter defines the coefficient of a single pole filter...

Page 210: ...V9001 before performing initial calibrations externalLoopbackPeakPower It indicates the peak power of ORx input signal loop backed from the Tx output For DPD CLGC to achieve an optimal performance the...

Page 211: ...ther start from scratch unity coefficients or a set of known coefficients This is a very useful option if user wants to reach convergence quickly under a similar transmit operation condition User coul...

Page 212: ...doxygen document for more details Table 85 DPD APIs DPD Rx Function Name Description adi_adrv9001_dpd_Initial_Configure Configures the pre initial calibration DPD parameters Called by adi_adrv9001_Ut...

Page 213: ...ble tracking calibrations and start with the default DPD post calibration parameter settings provided in TES After programming load and play the provided sample transmit input file Properly tune the t...

Page 214: ...is 1 dB below ideal linearity 2 Determine the initial highest polynomial order of the main tap TAP1 by measuring the spectral regrowth bandwidth to carrier bandwidth ratio All lower order polynomial...

Page 215: ...B o Maximum DPD expansion 3 dB 3 Adjust the transmit attenuator so that the PA input ACPR before PA is about 70 dBc 4 Connect the amplifier drivers and PA to the RF output 5 Increase the transmit atte...

Page 216: ...ase the new profile is applied on all the configured Tx and Rx channels simultaneously so DPS could not operate on channels individually Figure 201 depicts a high level diagram showing the DPS operati...

Page 217: ...ion ADRV9001 operates on the main profile with the fixed SSI rate which does not change during the entire profile switching operation To prepare for operating with the next profile BBIC should properl...

Page 218: ...initial calibrations for dynamic profiles adi_adrv9001_arm_NextDynamicProfile_Set Sends the next dynamic profile to ADRV9001 and waits it to process when profile switching is performed adi_adrv9001_a...

Page 219: ...e releases DPS OPERATIONS IN TES TES provides a user interface for experimenting DPS In the current implementation LTE 61 44MSPS profile must be configured under the Device Configuration page in eithe...

Page 220: ...UG 1828 Preliminary Technical Data Rev PrC Page 220 of 338 Figure 206 Performing DPS in TES...

Page 221: ...evice and then controlled using the Digital GPIO pins and Analog GPIO pins not all functionalities can be enabled at the same time DGPIO 15 DGPIO 14 DGPIO 13 DGPIO 12 DGPIO 11 DGPIO 10 DGPIO 9 DGPIO 8...

Page 222: ...er a rising edge on the assigned pin DGPIO_0 through DGPIO_15 Tx attenuation increment pin select DGPIO0 through DGPIO_15 Tx attenuation decrement pin select Pin Based Rx Gain Index Increment and Decr...

Page 223: ...ote that if the user has programmed a gain table that operates in a subset of the full gain table range i e using index 195 to 255 once the gain Index has reached Min Max Gain index subsequent the pin...

Page 224: ...nge and underrange conditions of APD and power detector are provided to user The DGPIO pins could be associated with either one of the receivers Rx1 or Rx2 However when the similar information is requ...

Page 225: ...AGPIO output each channel has 2 AGPIO control signals and achieve up to 4 external LNA gain steps control The external LNA gain control can be enabled and configured by adi_adrv9001_Rx_ExternalLna_Con...

Page 226: ...upt ARM 2 ARM system error ARM 3 ARM calibration error ARM 4 Monitor interrupt ARM 5 Tx1 power amplifier Protection Error Transmitter 6 Tx2 power amplifier Protection Error Transmitter 7 Low Power Clo...

Page 227: ...the AuxDAC takes precedence over all other AGPIO functionality when AuxDAC is enabled for a specific pin When the AuxDAC is disabled the configured AGPIO functionality is applied The AuxDAC can be en...

Page 228: ...performed those AuxADC gain and offset errors are used to compensate the AuxADCs measure results AuxADC API Programming AuxDAC relative API commands are summarized in Table 94 users can find the deta...

Page 229: ...bands of interest The mixer architecture is very linear and inherently wideband which facilitates wideband impedance matching The differential input impedance of the RX inputs are 100 as shown in Fig...

Page 230: ...94 m5 FREQUENCY 4 500GHz S 2 2 0 249 143 402 IMPEDANCE 32 079 j10 157 m4 FREQUENCY 3 000GHz S 2 2 0 166 177 256 IMPEDANCE 35 757 j0 0585 FREQUENCY 30 00Hz TO 6 000GHz S 2 2 M6 M5 M3 M2 M1 M4 24159 159...

Page 231: ...the simulation this way allows one to measure the S11 S22 and S21 of the 3 port system without complex math operations within the display page Note for highest accuracy EM modelling result of the PCB...

Page 232: ...depending on the common mode voltage level of the external circuit Important considerations for the receiver RF port interface are as follows 1 Device to be interfaced filter balun T R switch externa...

Page 233: ...simulation available in ADS without PCB artwork Figure 216 illustrates a wide band frequency match simulation setup in ADS for ADRV9001 RX1 2 A input pins in ADS for evaluating a possible configurati...

Page 234: ...RF performance that is PO 1 dB PO MAX and so forth to degrade The choke inductance LC should be selected high enough relative to the load impedance such that it does not degrade the output power The...

Page 235: ...ze choke dc resistance RDCR and the balun low frequency insertion loss In commercially available dc bias chokes resistance decreases as size increases However as choke inductance increases resistance...

Page 236: ...nent pads are placed on the board to provide a physical location that can be used for the selected parallel circuit element For example R216 L216 and C216 components only have one set of SMD pads for...

Page 237: ...AVX Ind L0201 series C216 DNI R216 DNI L217 DNI C217 1 5pF Murata GJM03 Series L238 DNI C238 DNI R238 0 L236 DNI C236 DNI R236 DNI L245 246 DNI C245 246 DNI R245 246 0 L247 248 DNI C247 248 DNI R247 2...

Page 238: ...17 0 3 pF Murata GJM03 Series L238 DNI C238 DNI R238 DNI L236 DNI C236 DNI R236 0 L245 246 DNI C245 246 DNI R245 246 DNI L247 248 DNI C247 248 10pF Murata GJM03 Series R247 248 DNI L218 DNI C218 DNI L...

Page 239: ...22 0 7pF Murata GJM03 Series L223 2 7 nH AVX Ind L0201 series C223 DNI R223 DNI L224 DNI C224 0 4pF Murata GJM03 Series L226 DNI C226 DNI R226 DNI L237 DNI C237 DNI R237 0 L249 250 DNI C249 250 DNI R2...

Page 240: ...eliminary Technical Data Rev PrC Page 240 of 338 Figure 226 Return Loss of RX1 2 A Port Figure 227 Return Loss of RX1 2 B Port Figure 228 Insertion Loss Simulated RX1 2 A Port Red Curve RX1 2 B Port B...

Page 241: ...C R313 L339 C339 C346 34 7 R367 36 8 R361 C333 C334 C335 L C R 341 L C R 348 L C 314 L C R 315 L C 316 30MHz 3 GHz MiniCircuits TC 1 13M L311 DNI C311 0 3 pF Murata GJM03 L309 310 220 nH CoilCraft LQW...

Page 242: ...DNI C311 DNI L309 310 220 nH Murata Ind LQW18AN C309 C310 10 nF Murata GRM03 L312 313 1 2 nH AVX Ind L0201 Series C312 313 DNI R312 313 DNI L339 DNI C339 DNI C346 34 7 DNI R367 368 20 pF Cap Murata G...

Page 243: ...matching network is similar to RX and TX port matching Depending on the selected divide ratio of ADRV9001 external LO input frequency divider SPI register setting a band of frequency in which external...

Page 244: ...Refer to Table 100 for power level recommendation Table 99 Specifications for ADRV9001 RF EXT LO Differential Input Pins Parameter Note Min Typical Max Unit External LO frequency FEXTLO 60 12000 MHz...

Page 245: ...on for external LO in range from 500 MHz to 1000 MHz In that region it is possible to inject external LO that will produce RF Channel frequency with x1 multiplier For example For FEXTLO 500 MHz the FC...

Page 246: ...9 DNI R318 0 L326 DNI C319 DNI R356 DNI R321 0 R319 DNI C357 DNI R357 DNI C362 363 470 pF Murata GRM03 R326 327 DNI R328 329 DNI C364 366DN I L330 332 DNI C320 321 DNI R310 354 0 L331 DNI C352 DNI L33...

Page 247: ...RV9001 can accommodate 3 different types of external clock signals applied at device clock input pins A differential low voltage differential signaling LVDS clock signal or a single ended clipped sine...

Page 248: ...d to MODEA pin as shown in Figure 238 When LVDS mode input clock interface is selected with MODEA pin grounded an external clock is used as the reference clock for the RFPLL and the Clocking PLL on th...

Page 249: ..._CLK input circuitry apply DEV_CLK as single ended to DEV_CLK_IN E7 ball and leave DEV_CLK_IN E8 ball unconnected Basically the same hardware configuration as in CMOS mode outlined in Figure 237 ensur...

Page 250: ...Hz 113 02 111 08 107 00 114 02 112 08 108 00 1000 Hz 125 02 123 08 119 00 127 02 125 08 121 00 10 kHz 133 02 131 08 127 00 138 02 136 08 132 00 100 kHz 137 02 135 08 131 00 146 02 144 08 140 00 1 MHz...

Page 251: ...ackup used for the ADRV9001 customer evaluation boards These boards employ 12 layers to achieve proper routing and isolation to best demonstrate all device functionality The dielectric material used i...

Page 252: ...14 50 11 9 00 100 55 9 25 12 Edge Coupled Differential N A 100 00 10 8 25 15 50 11 8 25 99 64 10 02 1 N A means not applicable FAN OUT AND TRACE SPACE GUIDELINES The ADRV9001 device family uses a 196...

Page 253: ...ide RF bandwidth applications For narrow RF bandwidth applications the board line impedance parameters within this document may not be optimal The following list provides general suggestions for board...

Page 254: ...such as stripline may be necessary Design the RF line systems between the device ball pad reference plane and the balun filter reference plane for a differential impedance ZDIFF of 100 for the receive...

Page 255: ...cement for termination resistor near the DEV_CLK_IN pins Traces should be shielded by surrounding ground with vias staggered along the edge of the differential trace pair This arrangement creates a sh...

Page 256: ...r pin A 1 F capacitor should be placed near the power supply pin with the ground side of the bypass capacitor placed so that ground currents flow away from other power pins and their bypass capacitors...

Page 257: ...ld be taken to place the ferrite beads near the ADRV9001 supply pins The ferrite beads should also be spaced to ensure their electric fields do not influence each other The ferrite bead should supply...

Page 258: ...s support for JTAG boundary scan and the MODE pin is used to access the function Connect the MODE pin L13 to ground for normal operation Refer to the datasheet for JTAG boundary scan information Conne...

Page 259: ...ifferential If multi chip synchronization feature is intended to be used in end application those signals should be routed with traces matching length of DEV_CLK_IN traces Figure 248 ADRV9001 AuxADC S...

Page 260: ...cess Figure 249 Receiver Matching Network on ADRV9001 Evaluation Board The circuit in Figure 249 shows the layout topology for the chosen receiver matching network Note the location and orientation of...

Page 261: ...emes suggested in Figure 241 and Figure 252 The red resistors R_DCR indicate the parasitic elements As the impedance of the parasitic increase the voltage drop V across the parasitic element increases...

Page 262: ...hokes it is necessary to find the optimum compromise between the choke physical size choke dc resistance RDCR and the balun passband insertion loss Users should refer to the RF Port Interface Informat...

Page 263: ...an inductor is not needed to match the balun impedance to the Tx output impedance Figure 254 Transmitter Power Supply for a Balun with a Center Tap Chokes The ADRV9001 evaluation board provides flexib...

Page 264: ...ives for each that should be carefully considered Stripline has less loss and emits less EMI than microstrip lines but stripline traces require the use of vias that can add complexity to the task of c...

Page 265: ...DATA_OUT H11 FMC_LA04_N DGPIO_13_TX1_DCLK_OUT D08 FMC_LA01_CC_P DGPIO_12_TX1_DCLK_OUT D09 FMC_LA01_CC_N TX1_DCLK_IN H13 FMC_LA07_P TX1_DCLK_IN H14 FMC_LA07_N TX1_STROBE_IN C10 FMC_LA06_P TX1_STROBE_IN...

Page 266: ...coupling mechanisms Isolation Goals Table 107 lists the isolation targets for each RF channel to channel combination type To meet these goals with significant margin isolation structures were designe...

Page 267: ...ADRV9001 based transceiver As a general rule spacing between square apertures should be no more than 1 10 of the shortest wavelength supported The wavelength can be calculated using Equation 1 300 r W...

Page 268: ...re spaced and aligned to reduce magnetic coupling from the structures in the balun package Care must also be taken to reduce cross talk over shared grounds between baluns Another precaution taken invo...

Page 269: ...number of different input pins They are collectively referred to in the datasheet as the VDDA_1P3 supply Each input should be treated as a noise susceptible input meaning proper decoupling and isolati...

Page 270: ...and LO generation circuitry This pin is sensitive to supply noise B6 ANALOG VRFVCO2_1P0 1 0 1 0 V internal supply node for RF LO2 VCO circuitry Connect this pin together with A6 and bypass with a 4 7...

Page 271: ...Transimpedance Amplifier TIA Tx2 Low Pass Filter LPF and Internal References H3 ANALOG VTX2LO_1P0 1 0 1 0 V internal supply node for Tx2 LO buffers upconverter and LO delay For normal operation leave...

Page 272: ...m those sensors are accurate within 2 5 tolerance If those readback numbers are used to estimate overall power for power supply design user should add an extra power margin to accommodate dynamic cond...

Page 273: ...k SENS 100uF SENS 100uF SENS VDD_1P8 5 tol VDDA_1P3 2 5 tol ADP1762 LDO Optional VDDA_1P0 2 5 tol ADP5056 1 8V 0 8A 1 0V 1 5A 1 3V 2A SENS SHUNT ADM1293 Monitor SHUNT ADM1293 Monitor SHUNT ADM1293 Mon...

Page 274: ...f simulation that is described in Figure 261 The overall frequency response is better than typical bank of capacitor The region 1 GHz outlines performance of implemented cascaded C FB C FB filtering a...

Page 275: ...s For example if the loop filter bandwidth is 50 kHz then any noise on the supply below 50 kHz will not be filtered The roll off of the loop filter provides the noise rejection above 50 kHz For each p...

Page 276: ...ection will outline how decisions based on descriptions above could impact final power supply interconnectivity Figure 263 outlines recommended power supply interconnective in scenarios where user mig...

Page 277: ...N2_1P3 E4 VAUXSYN_1P3 E10 VCLKSYN_1P3 E5 VRFVC01_1P3 A10 VRFVC02_1P3 A5 VCLKVCO_1P3 G5 VAUXVCO_1P3 G10 VANA1_1P3 C8 VANA2_1P3 C7 VCONV_1P3 H8 VRX1LO_1P3 E13 VRX2LO_1P3 E2 VTX1LO_1P3 G12 VTX2LO_1P3 G3...

Page 278: ...1_1P0 A9 VRFVCO2_1P0 B6 VRFLO2_1P0 A6 VCONV_1P3 H8 VRX1LO_1P3 E13 VRX2LO_1P3 E2 VTX1LO_1P3 G12 VTX2LO_1P3 G3 VCLKVCO_1P0 H5 VAUXVCO_1P0 H10 VCONV_1P0 H7 VRX1LO_1P0 E14 VRX2LO_1P0 E1 VTX1LO_1P0 H12 VTX...

Page 279: ...2 VTX1LO_1P3 G12 VTX2LO_1P3 G3 VCLKVCO_1P0 H5 VAUXVCO_1P0 H10 VCONV_1P0 H7 VRX1LO_1P0 E14 VRX2LO_1P0 E1 VTX1LO_1P0 H12 VTX2LO_1P0 H3 VANA2_1P0 C6 VANA1_1P0 C9 4 7 F 4 7 F Not connected 4 7 F Not conne...

Page 280: ...t connect B9 Output VRFVCO1_1P0 Connect to VSSA when unused B14 C14 Input RX1A RX1A When accidentally enabled bias voltage could be present on those inputs Connect to VSSA thru capacitor C3 C4 Input R...

Page 281: ...RESETB Not applicable K14 Output GP_INT Do not connect L1 Input SPI_EN Not applicable L2 Output SPI_DO In SPI 3 wire mode do not connect L3 Input TX2_EN Do not connect L7 L8 Input VDIG_1P0 Not applica...

Page 282: ...0 Input TX1_QDATA_IN Do not connect P11 Input TX1_QDATA_IN Do not connect P12 Input Output TX1_STROBE_IN Do not connect P13 Input TX1_STROBE_IN Do not connect SUMMARY Circuit board layout and power su...

Page 283: ...mption On the ADRV9001 evaluation board all the internal LDOs are used and they generate the 1v needed for all the rails This allows for different RF channels to be used while evaluating In a end syst...

Page 284: ...tion Configuration 1 Some internal LDOs bypassed Internal LO generation used Low power operation Configuration 2 Some internal LDOs bypassed External LO generation used Figure 266 Power Saving LDO Con...

Page 285: ...ifTX2 is not needed VTX2LO_1P3 VTX2LO_1P0 8 CLK_PLL_SYNTH_LDO Power down if the CLK_PLL_LP is in use VCLKSYN_1P3 N A 9 CLK_PLL_VCO_LDO Power down if the CLK_PLL_LP is in use VCLKVCO_1P3 VCLKVCO_1P0 1...

Page 286: ...AVING_MODE_1 ADI_ADRV9001_LDO_POWER_SAVING_MODE_1 ADI_ADRV9001_LDO_POWER_SAVING_MODE_1 ADI_ADRV9001_LDO_POWER_SAVING_MODE_1 ADI_ADRV9001_LDO_POWER_SAVING_MODE_1 ADI_ADRV9001_LDO_POWER_SAVING_MODE_1 AD...

Page 287: ...1P3 E4 VAUXSYN_1P3 E10 VCLKSYN_1P3 E5 VRFVC01_1P3 A10 VRFVC02_1P3 A5 VCLKVCO_1P3 G5 VAUXVCO_1P3 G10 VANA1_1P3 C8 VANA2_1P3 C7 VRFVCO1_1P0 B9 VRFLO1_1P0 A9 VRFVCO2_1P0 B6 VRFLO2_1P0 A6 VCONV_1P3 H8 VRX...

Page 288: ...ation used VDDA_1P3 2 5 tol VDDA_1P0 2 5 tol Internal PLLs not used for LOs LO GEN supply disconnected and powered down internally Figure 268 Tx1 Rx1 External LO Power Solution Now that the hardware c...

Page 289: ...C implementation of this configuration will be the following adi_adrv9001_PowerManagementSettings_t initialize_powerManagementSettings_35 ldoPowerSavingModes ADI_ADRV9001_LDO_POWER_SAVING_MODE_1 ADI_...

Page 290: ...orms not included in the ADRV9001 demonstration kit One 1 12 V power supply for powering the Xilinx Platform The operating system on the controlling PC must be Windows 7 86 and 64 or Windows 10 86 and...

Page 291: ...Preliminary Technical Data UG 1828 Rev PrC Page 291 of 338 Figure 269 Xilinx Evaluation Board with Jumper Settings and Switch Position Configured to Work with ADRV9001 Evaluation Platform 24159 300...

Page 292: ...should be noted that quality of clock source used to generate DEV_CLK will directly impact overall system performance User must ensure that high quality stable and low phase noise clock source is used...

Page 293: ...g steps 1 All jumpers are in the positions shown in Figure 272 2 SW6 is in position as shown in Figure 269 2 3 4 A position 3 The SD card included with the evaluation kit is placed in the J100 slot of...

Page 294: ...n chip on the board the Q1 Q1_N pins of ADCLK944 generates the DEV_CLK for the ADRV9001 and REF_CLK for the Xilinx FPGA a It should be noted that quality of clock source used to generate DEV_CLK will...

Page 295: ...h low phase noise to provide an input signal to the selected Rx RF input Use a shielded RG 58 50 coaxial cable 1m or shorter to connect the signal generator 5 To set the input level near the Rx receiv...

Page 296: ...quency and the gain settings through the path a Note that there should be no input signal applied to the Rx input when performing an init calibration 5 For transmitter testing connect a spectrum analy...

Page 297: ...g Devices ADRV9002 Transceiver Evaluation Software If this is not possible TES can be installed into any other location that user have write access to it The last step of the installation process is t...

Page 298: ...connected hardware and revisions of different software setup blocks DHCP is enabled by default in Firmware version 0 14 5 5 When connecting the evaluation platform directly to a PC the default IP add...

Page 299: ...allows the System Clock to run as slow as 150 MHz Under FDD Analog FM setup is supported LTE setup is supported This mode allows users to configure different channel configurations such as Rx2 Tx1 Con...

Page 300: ...and before the power amplifier is transmitting real data The user can use the ExternalPathDelay_Calibrate and ExternalPathDelay_Get to retrieve the external loopback path delay in ns There is an Iron...

Page 301: ...ith the External Gain Control word to get the desired gain Shown in Figure 281 the user can see that the top row is a copy of row 196 with just the external gain control changed Figure 280 Receiver Ob...

Page 302: ...y at DEV_CLK_OUT Enable disable the DEV_CLK_OUT signal Select the clock PLL type to be either high performance or low power Note that LP PLL supports only certain sampling rates see Clock Generation s...

Page 303: ...ning In some configuration modes such as TDD LTE an Antenna Diversity checkbox appears here This checkbox can be used to change the routing of the LOs from Rx1 Tx1 and Rx Tx2 to all on the same LO Set...

Page 304: ...selected from Carrier Configuration Mode drop down menu For details on using the Frequency Hopping settings in the TES see the Frequency Hopping section above Figure 285 Carriers Configuration Tab Fr...

Page 305: ...GH MED or LOW receiver ADC rate Select active Rx ADC from high performance or low power types Determine the Analog low pass filter frequency response Select Rx frequency offset correction Select DAC 3...

Page 306: ...ividual tabs Enable disable Rx and Tx initialization calibrations Enable or Disable CLGC Closed Loop Gain Control This enable the CLGC setting in the Digital Pre Distortion Tab Monitor Mode RSSI Confi...

Page 307: ...ated MCS signal which triggers simultaneous transfer on both ports Initial Calibrations The Initial Calibrations Figure 290 shows a list of the calibrations that will be run during the initialization...

Page 308: ...igure 294 tabs aim to provide more detail on ADRV9001 selected mode of operation using Device Configuration tab Figure 279 The Rx and Tx datapath overview diagrams are provided in each tab These tabs...

Page 309: ...capability allows zooming of the passband response using the mouse cursor as well as restoring to the full scale plot The TES also provides capability to export the data plotted on the graphs to an e...

Page 310: ...process of compensating for the analog attenuation in the device prior to the ADC with a corresponding amount of digital gain before the digital signal is sent to the user Gain compensation uses the...

Page 311: ...38 Figure 295 Rx Gain Control Tab Figure 296 GPIO Configuration For more detailed information refer to Rx Gain Control section of this document The GPIO tab also shares a section with the frequency ho...

Page 312: ...ing mode in this tab Figure 299 We divide power saving modes to two categories System Power Savings and Channel Power Savings System Power Savings include CLKPLL LDO and ARM power down These can be co...

Page 313: ...al data and the lower plot shows its time domain waveform When multiple Tx outputs are enabled the user can select desired data to be displayed in the Spectrum plot using the checkboxes below the plot...

Page 314: ...e data is then stored on the Xilinx platform motherboard RAM and the RAM pointer loops through the data continuously until the stop button is pressed Figure 300 Transmit Data Tab Transmit Data File Fo...

Page 315: ...C Rejection tracking calibration Change frequency offset in Hz Read back main parameters measured in received signal such as fundamental frequency its amplitude and DC offset Plot and save received da...

Page 316: ...formatted as follows Channel 1I Channel 1Q I1 Q1 I2 Q2 I3 Q3 I4 Q4 In the case of RX frequency deviation only I samples are shown all Q samples are 0 Observer Operation The Observe tab opens a window...

Page 317: ...ations by default However user can configure the timing as needed In the Automated TDD tab user can configure the parameters using TDD configuration files Frame and Sequences User can specify the dura...

Page 318: ...populated by the TES based on the configuration file chosen Enable Column User can enable disable receiver transmitter channel Signal Column This displays the signal name attributed to that row Frame...

Page 319: ...his can be used as ORX enable signal when routed to the GPIO assigned as ORX control RX1 DMA RX2 DMA TX1 DMA TX2 DMA ORX1 DMA ORX2 DMA The DMA enables that gate data transfer for each of the channels...

Page 320: ...R_SMA_2 1 ADI_FPGA9001_DMA_TRIGGER_MCS 2 ADI_FPGA9001_DMA_TRIGGER_GPIO 3 ADI_FPGA9001_DMA_TRIGGER_TDD_ENABLE 4 ADI_FPGA9001_DMA_TRIGGER_IMMEDIATE 5 adi_fpga9001_DmaTrigger_e If using ADI_FPGA9001_DMA_...

Page 321: ...istortion tab and closes the loop by unchecking the open loop tick box The Tx output power can be controlled by the CLGC Target Gain dB field in the transmit tab To use either of these functions the D...

Page 322: ...e 1 Manual Frequency Hopping In this mode the user does not need to specify timing In most cases this is a mode to help users understand how frequency hopping operates in ADRV9001 Here we use DMR prof...

Page 323: ...ample we will use default Mux Preprocess 6 Specify Operation a Automatic Loop Automatically increment through a frequency hopping table and wrap around once end has been reached b Automatic Ping Pong...

Page 324: ...to the user frequency hopping is working in manual mode a Commit Frame After Next to Rx Tx and Perform Hop button will commit the Frame after Next to Rx Tx Notice this is not the same as next frame it...

Page 325: ...are shown both in table A and table B vii All entries should display Unassigned viii The upcoming frame is not assigned ix There should not be any signal coming out of Tx 12 Click on Commit Frame Afte...

Page 326: ...e the same for Tx Only shown in Tx Only The only difference is user instead of click play on Transmit tab must click play on Receive tab TRx TRx steps are also very similar Except user must click play...

Page 327: ...e sequence that the user wants The integer 0 will correspond to the gain and attenuation value used in the table shown in Figure 316 This allows the user to reuse the same gain and attenuation setting...

Page 328: ...ibed in the gain and attenuation tables Example 3 Automated TDD with Frequency Hopping Unlike the previous mode in this mode user will have to specify TDD timing User also will not have the frequency...

Page 329: ...Therefore from time domain the Tx spectrum analyzer should show gaps between frames OTHER FUNCTIONALITIES Under File menu there are Save Session and Load Session options which allow save and restore T...

Page 330: ...and select Set IronPython path For the default Iron Python installation this path is set to C Program Files x86 IronPython 2 7 Lib Figure 322 shows the IronPython editor after executing the File New f...

Page 331: ...ting on the Tx to load and run the python script Inside the script you should only change PLL loop fitter bandwidth Other PLL parameters should be kept the same You can read them change the bandwidth...

Page 332: ...erature Monitoring Window Driver Debugger A driver debugger is available from the View menu This is a live window that captures all the driver calls being used by the TES This can be used for debuggin...

Page 333: ...uding firmware FPGA API and so on If errors occur for example programming the chip fails log file will provide certain debugging information on what is failing Figure 326 Log File Window Note that all...

Page 334: ...r guide for jumper settings a Check that the switch on the Xilinx platform is set properly to boot from the SD card You can find these settings here Hardware Operation 3 SD card not compatible with FP...

Page 335: ...voltage on that power domain should not exceed 1 89V The SD card provided with the evaluation card ensures that VADJ is properly set On an Evaluation Card there is a red LED installed close to the FM...

Page 336: ...ch other or in combination with other innocuous errors that make little sense for generated code such as this Errors and bugs pertaining to implicit declarations undeclared pointers and missing bracke...

Page 337: ...ces for its use nor for any infringements of patents or other rights of thirdpartiesthatmayresultfromitsuse Nolicenseisgrantedbyimplicationorotherwiseunderanypatentorpatent rightsofAnalogDevices Trade...

Page 338: ...UG 1828 Preliminary Technical Data Rev PrC Page 338 of 338...

Reviews: