Using Help
|
Contents
|
Index
Back
223
Adobe Premiere Pro Help
Superimposing and Compositing
Using Help
|
Contents
|
Index
Back
223
The segments connecting keyframes form a graph that indicates changes in keyframe
values along the duration of the clip or track. Adjusting keyframes and segments changes
the shape of the graph.
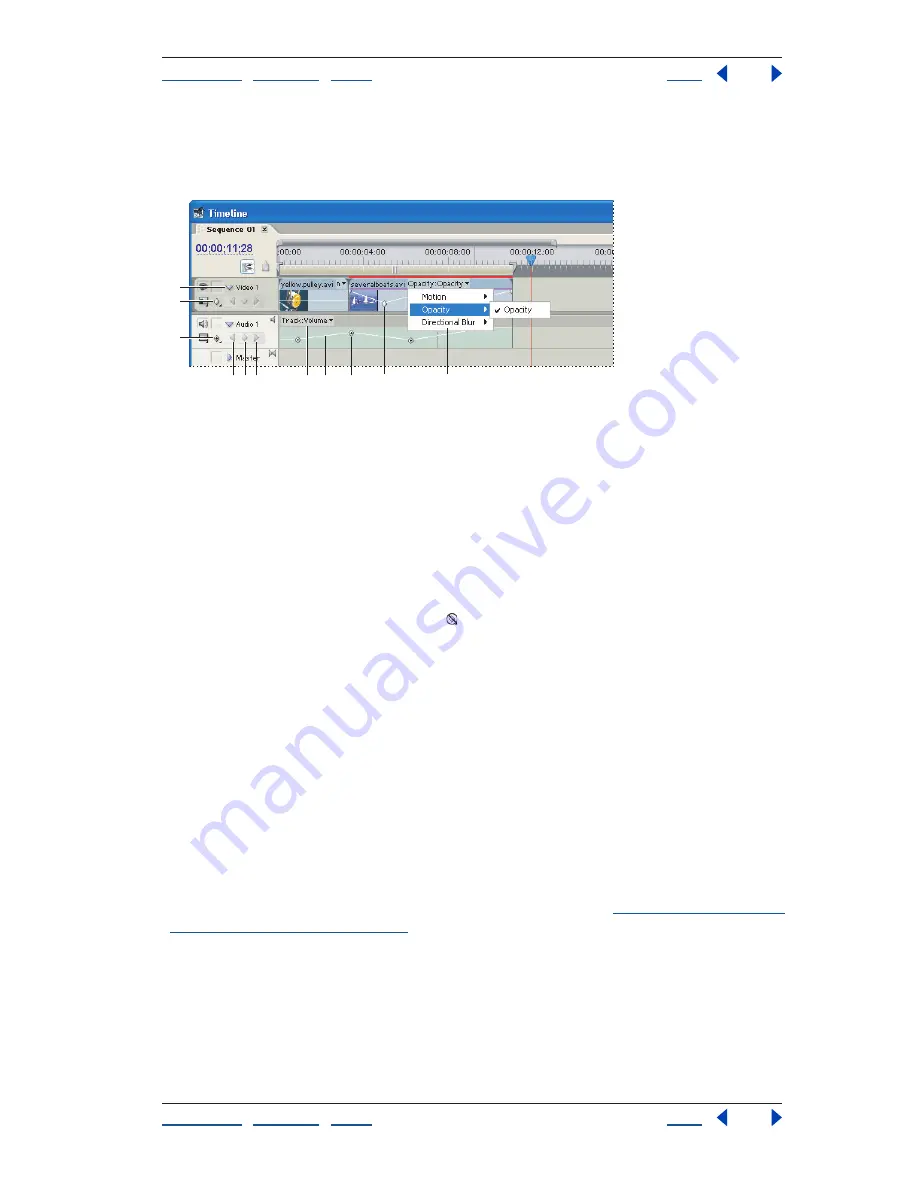
Track keyframe controls in the Timeline window
A.
Disclosure triangle
B.
Show Keyframes (video)
C.
Show Keyframes (audio)
D.
Previous Keyframe
button
E.
Add Keyframe button
F.
Next Keyframe button
G.
Track effect properties
H.
Keyframe graph
I.
Track keyframes
J.
Clip keyframes
K.
Clip effect properties
To enable keyframe display in the Timeline window:
1
If the track is collapsed, click the triangle to the left of the track name to expand it.
2
Click the track’s Show Keyframes icon, and select a keyframe display mode.
To display clip opacity keyframes:
Click the track’s Show Keyframes button , and choose Show Opacity Handles from the
menu that appears.
To display audio volume keyframes:
Click the track’s Show Keyframes button, and choose Show Clip Volume or Show Track
Volume from the menu that appears.
To display keyframes for a specific effect property other than opacity or volume:
In the effect properties pop-up menu that appears after the name of the clip or track,
select the property you want to adjust. If you can’t see the pop-up menu, try increasing
the magnification of the Timeline window.
Adding keyframes in the Timeline window
You can add keyframes to the Timeline window at the current time using the Add
Keyframe button, or at any time using the pen tool. Before adding keyframes, keyframe
display must be enabled for the track or clip you want to edit; see
“Displaying keyframes in
the Timeline window” on page 223
.
To add a keyframe using the Add Keyframe button:
In the keyframe navigator in the Timeline window, click the Add Keyframe button.
D E F
G
H
I
J
K
A
B
C


