

Chapter 18 SMTP Redirect
UAG4100 User’s Guide
197
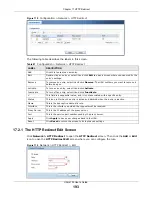
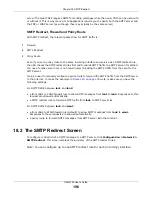
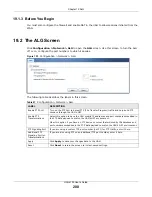
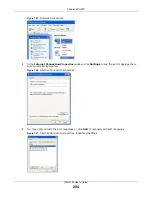
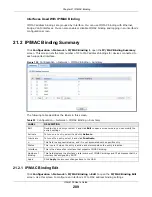
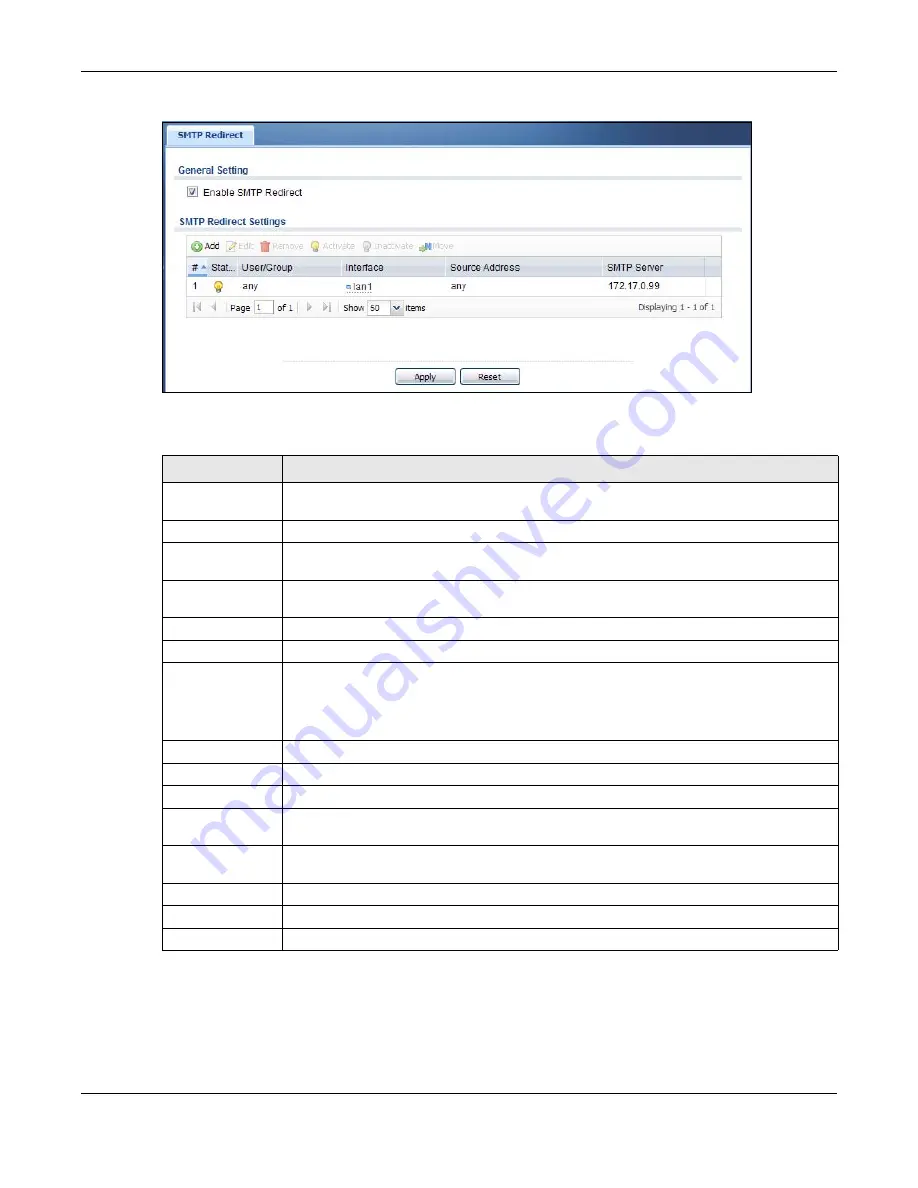
Figure 121
Configuration > Network > SMTP Redirect
The following table describes the labels in this screen.
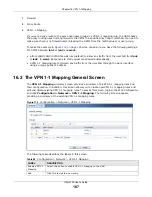
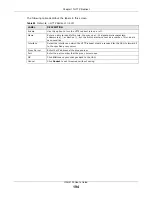
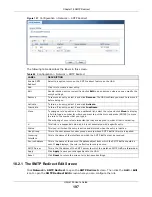
18.2.1 The SMTP Redirect Edit Screen
Click
Network > SMTP Redirect
to open the
SMTP Redirect
screen. Then click
the
Add
or
Edit
icon to open the
SMTP Redirect Edit
screen where you can configure the rule.
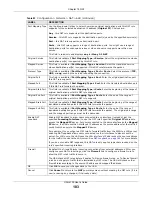
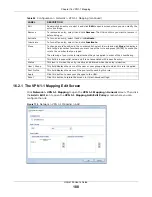
Table 89
Configuration > Network > SMTP Redirect
LABEL
DESCRIPTION
Enable SMTP
Redirect
Select this option to turn on the SMTP redirect feature on the UAG.
Add
Click this to create a new entry.
Edit
Double-click an entry or select it and click
Edit
to open a screen where you can modify the
entry’s settings.
Remove
To remove an entry, select it and click
Remove
. The UAG confirms you want to remove it
before doing so.
Activate
To turn on an entry, select it and click
Activate
.
Inactivate
To turn off an entry, select it and click
Inactivate
.
Move
To change a rule’s position in the numbered list, select the rule and click
Move
to display
a field to type a number for where you want to put that rule and press [ENTER] to move
the rule to the number that you typed.
The ordering of your rules is important as they are applied in order of their numbering.
#
This field is a sequential value, and it is not associated with a specific entry.
Status
This icon is lit when the entry is active and dimmed when the entry is inactive.
User/Group
This is the user account or user group name to whose SMTP traffic this rule is applied.
Incoming
Interface
This is the name of the interface on which the SMTP traffic must be received.
Source Address
This is the name of the source IP address object from which the SMTP traffic should be
sent. If
any
displays, the rule is effective for every source.
SMTP Server
This is the IP address of the SMTP server to which the matched SMTP traffic is forwarded.
Apply
Click
Apply
to save your changes back to the UAG.
Reset
Click
Reset
to return the screen to its last-saved settings.
Содержание UAG4100
Страница 43: ...Chapter 3 Printer Deployment UAG4100 User s Guide 43 ...
Страница 118: ...Chapter 10 Interfaces UAG4100 User s Guide 118 Figure 76 Configuration Network Interface Ethernet Edit External Type ...
Страница 119: ...Chapter 10 Interfaces UAG4100 User s Guide 119 Figure 77 Configuration Network Interface Ethernet Edit Internal Type ...
Страница 129: ...Chapter 10 Interfaces UAG4100 User s Guide 129 Figure 82 Configuration Network Interface PPP Add ...
Страница 207: ...Chapter 20 UPnP UAG4100 User s Guide 207 Figure 133 Network Connections My Network Places Properties Example ...
Страница 221: ...Chapter 24 Web Authentication UAG4100 User s Guide 221 Figure 146 Configuration Web Authentication Web Portal ...
Страница 222: ...Chapter 24 Web Authentication UAG4100 User s Guide 222 Figure 147 Configuration Web Authentication User Agreement ...
Страница 267: ...Chapter 26 Billing UAG4100 User s Guide 267 Figure 184 Configuration Billing Payment Service Custom Service ...
Страница 355: ...Chapter 38 Certificates UAG4100 User s Guide 355 Figure 237 Configuration Object Certificate Trusted Certificates Edit ...
Страница 404: ...Chapter 41 Log and Report UAG4100 User s Guide 404 Figure 283 Configuration Log Report Email Daily Report ...
Страница 408: ...Chapter 41 Log and Report UAG4100 User s Guide 408 Figure 285 Configuration Log Report Log Settings Edit System Log ...
Страница 413: ...Chapter 41 Log and Report UAG4100 User s Guide 413 Figure 287 Configuration Log Report Log Settings Edit Remote Server ...
Страница 466: ...Appendix B Legal Information UAG4100 User s Guide 466 Environmental Product Declaration ...


