IM 701510-01E
13-11
Saving and Loading Data from the SCSI Device
(for DL1520L
with suf
fix code -C4)
13
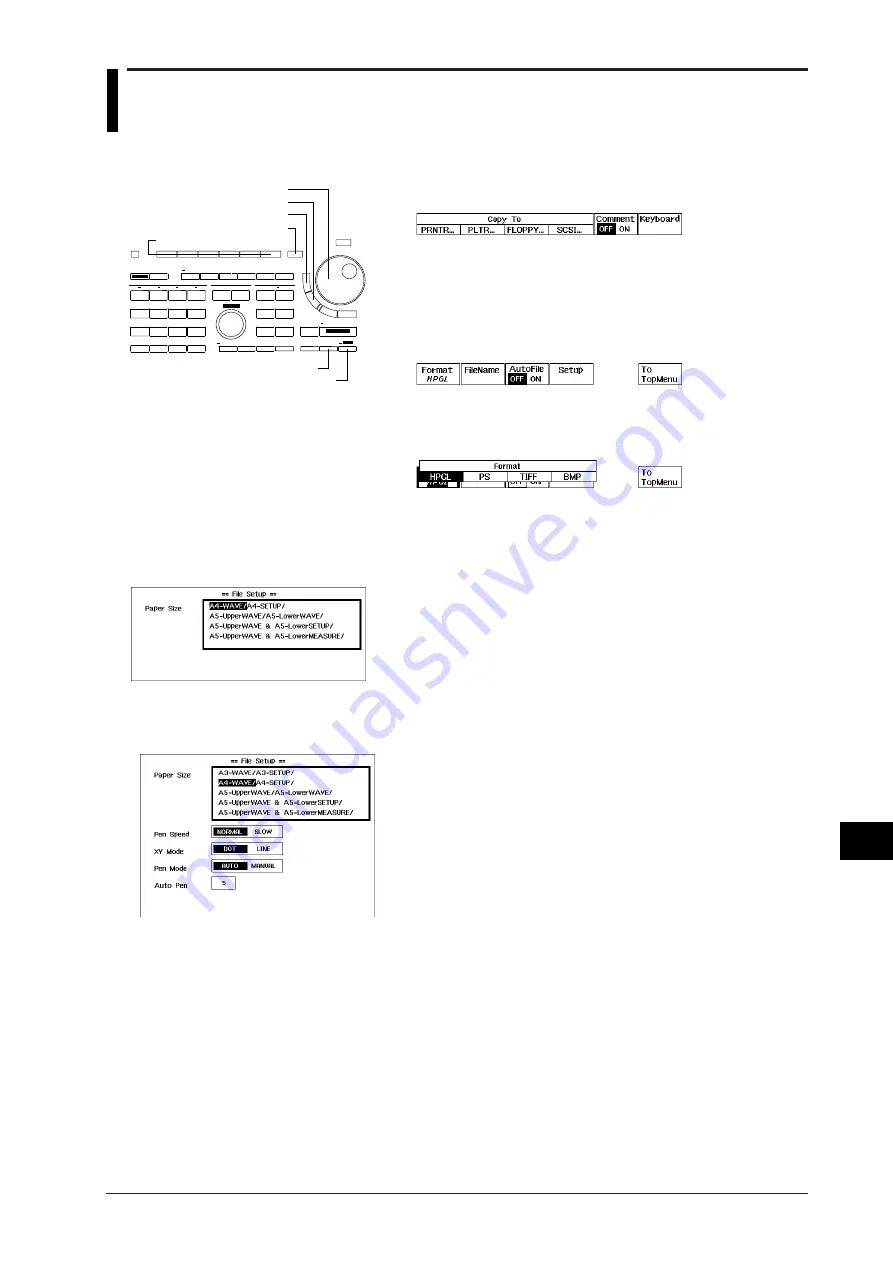
13.5 Saving Screen Image Data
1.
Following the steps described in section 13.1, select SCSI device as
the media.
2.
Press the “
FILE...
” soft key to display the image setting menu.
Turning ON/OFF the auto naming function
3.
Press the “
AutoFile
” soft key to select “
ON
” or “
OFF
”. For more
details concerning this function, refer to the explanation later on.
Saving screen image data
4.
Press the “
Format
” soft key to display the image data setting menu.
5.
Press the soft key corresponding to the desired format. In case you
selected “
HPGL
” or “
PS
”, continue with step 6. In case you selected
“
TIFF
” or “
BMP
”, continue with step 19.
6.
Press the “
Setup
” soft key to display the output setting menu.
Selecting the paper size
7.
After having selected the “
Paper Size
” setting using the rotary knob,
press the the
SELECT key
to select the desired paper size. In case
you selected “
PS
” at step 5, there is no need to use the rotary knob
and you may continue with step 18.
Selecting the pen speed
8.
After having selected the “
Pen Speed
” setting using the rotary knob,
press the the
SELECT key
to select from “
NORMAL
” or “
SLOW
”.
Selecting the XY Mode
9.
After having selected the “
XY Mode
” setting using the rotary knob,
press the the
SELECT key
to select from “
DOT
” or “
LINE
”.
Assigning pens
10.
After having selected the “
Pen Mode
” setting using the rotary knob,
press the the
SELECT key
to select from “
AUTO
” or “
MANUAL
”.
In case you selected “
MANUAL
”, continue with step 14.
11.
After having selected “
AUTO
”, and after having selected the “
Auto
Pen
” setting using the rotary knob, press the
SELECT key
to display
the setting frame.
12.
Use the rotary knob to set the number of pens. Press the
RESET key
to return the default value.
13.
Press the
SELECT key
or the
ESC key
to close the setting frame.
Continue with step 18.
14.
After having selected “
MANUAL
”, use the rotary knob and the
SELECT key
to select the “
Grid Pen
” setting, the “
TRACE1 Pen -
TRACE4 Pen
” setting and the “
LOAD1 Pen - LOAD4 Pen
”
setting.
15.
Use the rotary knob to set the pen numbers. Press the
RESET key
to
return the default value.
16.
Press the
SELECT key
or the
ESC key
to close the setting frame.
17.
Repeat steps 14 to 16 to set other items of the “
MANUAL
” setting.
18.
Press the
ESC key
to close the setting menu.
COPY(MENU) key
Rotary knob
ESC key
SHIFT key
Soft keys
SELECT key
RESET key
Keys and Procedure
Output setting menu in case "PS" is selected
Output setting menu in case "HPGL" is
selected


