86
Reference Manual
Scene memory
2
Scene memory
On CL series consoles, you can assign a name to a set of mix parameter and input/output
port patch settings, and store the mix settings in memory (and later recall them from memory)
as a
“scene.”
Each scene is assigned a number in the range of 000-300. Scene 000 is a read-only scene
used to initialize the mix parameters. Scenes 001-300 are writable scenes.
Each scene contains the position of the top panel faders and [ON] key status, as well as the
following parameters.
•
Input/output port patching
•
Bus settings
•
Head amp settings
•
EQ settings
•
Dynamics 1 and 2 settings
•
Rack (GEQ/Effect/Premium Rack) settings
•
Pan/balance settings
•
Insert/Direct Out settings
•
On/off status and send level of signals sent to MIX buses
•
On/off status and send level of signals sent to MATRIX buses
•
DCA group settings
•
Mute group settings
•
Channel link settings
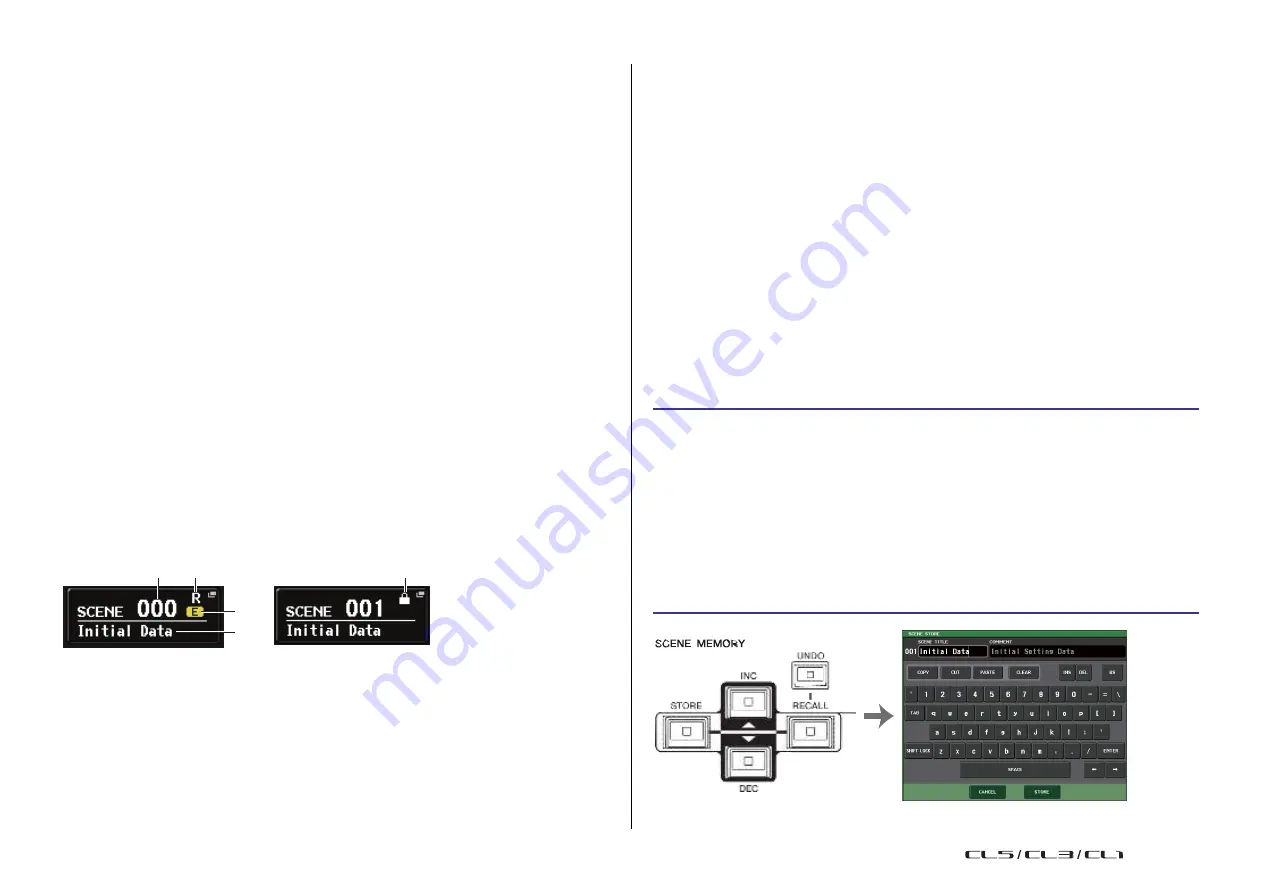
The number of the currently-selected scene appears in the SCENE field of the Function
Access Area.
SCENE field
3
Scene title
Indicates the title of the currently-selected scene.
4
E symbol (EDIT symbol)
This symbol appears when you edit the mix parameters for the currently-loaded scene.
This symbol indicates that you must execute the Store operation if you want to keep the
changes you made.
NOTE
You cannot store data to a scene number for which the Protect symbol or R symbol is displayed.
Storing and recalling scenes
To store the current mix settings as a scene in memory and recall it later, you can use the keys
in the SCENE MEMORY/MONITOR section on the top panel, or you can use the SCENE LIST
window.
Storing a scene
◆
Using the keys of the SCENE MEMORY/MONITOR section
STEP
1.
Use the pad controls of the top panel or the buttons in the touch screen to set the
mix parameters as desired.
2.
Use the SCENE MEMORY [INC]/[DEC] keys to select the store-destination scene
number.
3.
Press the SCENE MEMORY [STORE] key.
4.
Assign a title or comment to the scene in the SCENE STORE window as desired.
5.
Press the SCENE MEMORY [STORE] key or the STORE button located in the lower
1
2
part of the SCENE STORE window.
6.
Press the OK button in the STORE CONFIRMATION dialog box to execute the Store
operation.
4
3
You can press the SCENE field to access the SCENE LIST window, where you can view and
edit more detailed settings for the scene.
1
Scene number
Indicates the number of the currently-selected scene. When you select a new scene
number, the number will blink. This blinking indicates that the displayed scene number
is different than the currently-loaded scene number.
2
R symbol (READ ONLY)/Protect symbol
Read-only scenes are indicated by an R symbol (READ ONLY) displayed here. Write-
protected scenes are indicated by a Protect symbol.
SCENE MEMORY [INC]/[DEC] keys
SCENE STORE window
USO
RESTRITO
Содержание CL5
Страница 257: ...Data List USO RESTRITO ...


