


16. Introduction to the Command WorkStation
Xerox Phaser 790
16–22
RIP area
The job icons in the RIP area are described below:
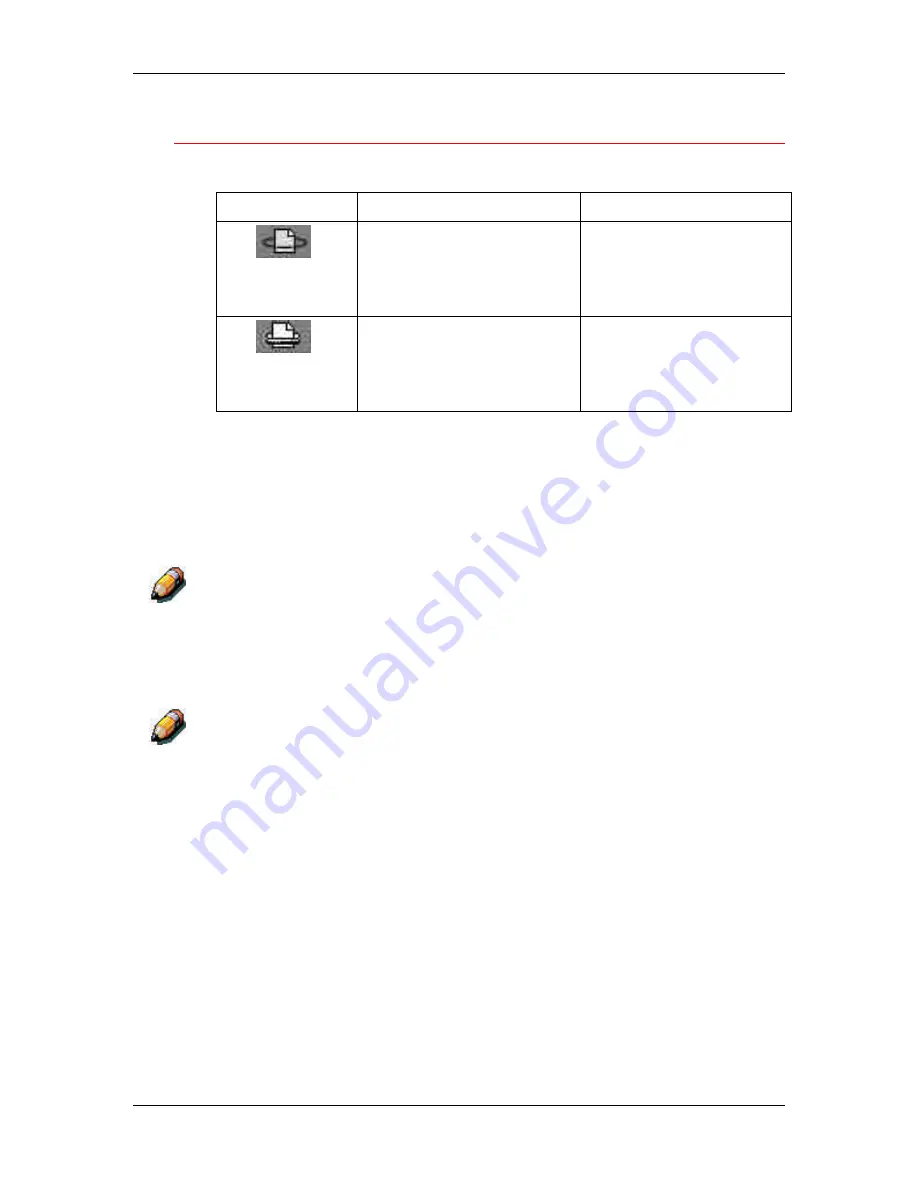
Icon
Indicates
How long you see the job
1
Yellow raster
icon and job row
Raster data; no destination
defined; may have been
printer before and held.
Until it is deleted, moved to
the Archive, or stripped of its
raster data and sent to the
Spool area
2
White printer
icon and job row
Raster data headed for print in
its turn; no hold defined.
Until the printer is free to
print the job
After a job is rasterized, it goes into the RIP area. The RIP area holds
only raster data (i.e., jobs that have been rasterized). Jobs in the RIP
area are either waiting for the printer to be free (Print queue jobs, icon
2 in the above table), or they are being held. Held jobs in the RIP area
have already been rasterized (RIP and Hold) or they have been printed
and their raster data has been routed back to the RIP area
(
Print and
Hold), where they are shown in yellow rows (icon 1).
Raster jobs in the RIP area that are waiting to print (icon 2 in the table
above) cannot be manipulated by job commands.
Jobs held in the RIP area remain there until the operator moves them
to the Archive window or deletes them. Printing these jobs does not
remove them from the RIP area. Instead, a copy of the job is created
and printed.
For all rasterized jobs, the print option settings, in addition to the current
calibration state of the printer, remain with the saved raster data each time
the job is reprinted. To print the job with new print option settings and with
new calibration data, you must remove the raster data and reRIP the job.
Содержание Phaser 790
Страница 1: ...Phaser 790 Documentation The Document Company XEROX...
Страница 24: ...Table of contents User Documentation Xerox Phaser 790 xxiv...
Страница 28: ...1 Setting up the Phaser 790 Preparing for the installation 1 4 Xerox Phaser 790...
Страница 36: ...1 Setting up the Phaser 790 Installing the 2 Tray Module 1 12 Xerox Phaser 790...
Страница 48: ...1 Setting up the Phaser 790 Unpacking the Printer 1 24 Xerox Phaser 790...
Страница 68: ...1 Setting up the Phaser 790 Loading paper in the paper tray 1 44 Xerox Phaser 790...
Страница 72: ...1 Setting up the Phaser 790 Printing the Test Page Xerox Phaser 790 48...
Страница 424: ...22 Using ColorWise Pro Tools Xerox Phaser 790 22 18...
Страница 430: ...23 Problem Solving Clearing a Duplex Tray jam 23 6 Xerox Phaser 790 3 Firmly close the Duplex Tray 301268a...
Страница 434: ...23 Problem Solving Clearing Area 1 jams 23 10 Xerox Phaser 790...
Страница 436: ...23 Problem Solving Clearing Area 2 jams 23 12 Xerox Phaser 790...
Страница 438: ...23 Problem Solving Clearing Area 3 jams 23 14 Xerox Phaser 790...
Страница 440: ...23 Problem Solving Clearing Area 4 jams 23 16 Xerox Phaser 790...
Страница 446: ...23 Problem Solving Clearing Area 5 jams 23 22 Xerox Phaser 790...
Страница 448: ...23 Problem Solving Clearing Area 6 jams 23 24 Xerox Phaser 790...
Страница 454: ...23 Problem Solving Adjusting the color 23 30 Xerox Phaser 790...
Страница 458: ...23 Problem Solving Printer Error messages 23 34 Xerox Phaser 790...
Страница 460: ...23 Problem Solving Printer Error Codes 23 36 Xerox Phaser 790...
Страница 486: ...24 Maintenance Cleaning procedures 24 2 Xerox Phaser 790...
Страница 496: ...24 Maintenance Replacing the Copy Print Cartridge 24 12 Xerox Phaser 790...
Страница 514: ...25 Technical Data 25 14 Xerox Phaser 790...


