background image

S

CANNING


FROM


THE

 A

DVANCED

 I

NTERFACE

61

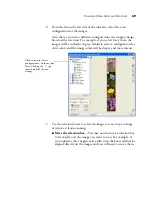
4. If the dotted line is not exactly where you want it, put the pointer 

on the line and drag the line.

5. If you want to remove the selected area and start over, click 

Remove


on the Scan Info box.

6. When the settings are what you want, click 

Scan

.

T

HE

 S

CAN

 I

NFO

 B

OX

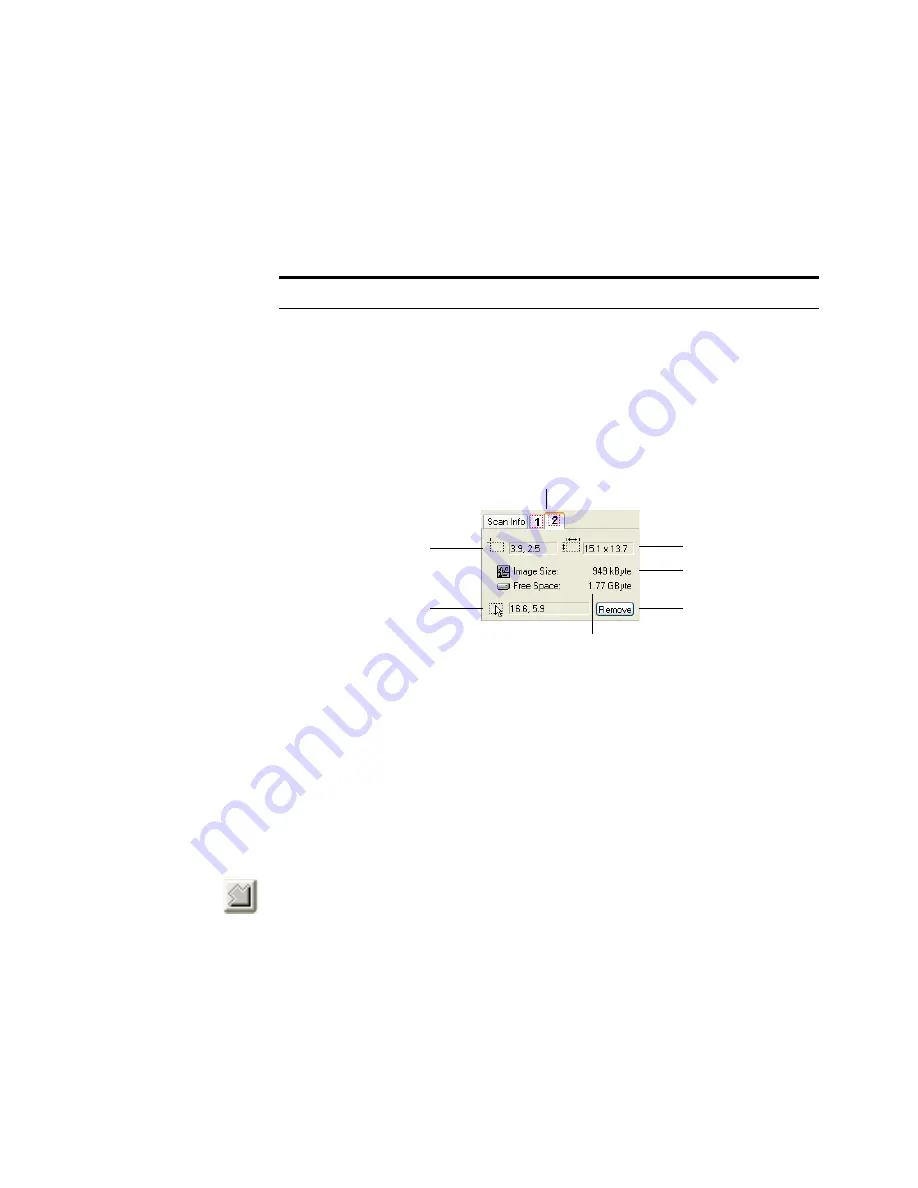
The following figure shows the information on the Scan Info box:

T

HE

 R

ULER

 U

NITS

The ruler around the edges of the image help you precisely position a 
custom sized image. You can change the ruler units to suit the type of 
measurements you want.

To set the ruler units:

1. Click the arrow icon at the top left corner of the Preview Image on 

the Advanced Interface.

2. As you click the icon, the ruler units cycle among inches, 

centimeters, and pixels.

Note

:  Clicking 

Remove

 re-selects the entire 8.5" by 11.69" area.

Location of the top 
left corner of the 
image in the 


Preview window.

Physical size of the 
image to scan.
Size of the file of the 
scanned image.

The space on your 
computer’s hard drive.

Current location of 
the pointer as you 
drag it on the 


Preview window.

Tabs for each selected area. Click a tab to 
see the information for its area.

Click to remove the 
selected area.

Содержание OneTouch 9520

Страница 1: ...for Windows Visioneer OneTouch 9520 Photo Scanner User s Guide...

Страница 2: ...Visioneer OneTouch 9520 Photo Scanner User s Guide F O R W I N D O W S...

Страница 3: ...ORIGINAL PURCHASE IF A VALID REGISTRATION IS NOT RECEIVED DURING THE INITIAL 90 DAY PERIOD THE 12 MONTH WARRANTY IS NO LONGER AVAILABLE AND YOUR PRODUCT WARRANTY WILL TERMINATE AFTER THE 90 DAY INITIA...

Страница 4: ...the OneTouch Buttons 25 Check a Scanner Button s Settings Before You Scan 27 Scan from the OneTouch Button Panel 29 The OneTouch Button Panel s Features 30 Scanning From the TWAIN Interface 32 A Note...

Страница 5: ...72 About the OneTouch Properties Window 73 Selecting New Settings for a Button 76 Setting Destination Application Properties 78 Selecting Format Options 87 Scanning with Optical Character Recognition...

Страница 6: ...bleshooting 137 How to Uninstall Your Scanner 140 Uninstalling the OneTouch 4 0 Scanner Software 140 Uninstalling the PaperPort Software 140 To Install Another Driver 141 Visioneer 9520 Photo Scanner...

Страница 7: ...iv TABLE OF CONTENTS...

Страница 8: ...egatives and place their electronic images on your computer WHAT S IN THE BOX Before starting the installation check the contents of the box to make sure that all parts are included If any items are m...

Страница 9: ...E THE VISIONEER ONETOUCH 9520 PHOTO SCANNER Glass Reference marks Scanner lid Option port OneTouch buttons panel USB port Status light OneTouch buttons Power jack Email Copy Photo Archive Transparency...

Страница 10: ...Touch button panel Scans to the appropriate application indicated by the button For example pressing the Email button scans the document then opens your Email program with the image of the scanned doc...

Страница 11: ...gh Color 16 bit or True Color 24 bit or 32 bit Resolution set to at least 800 x 600 pixels To set your monitor s colors and resolution Open the Windows Control Panel Double click on Display then selec...

Страница 12: ...is finished If you already have a scanner connected to your computer it is recommended that you remove its driver program prior to installing your Visioneer OneTouch 9420 USB scanner You can remove t...

Страница 13: ...he scanner 2 Plug the Transparency Adapter Cable into the Option port on the body of the scanner The Transparency Adapter Cable must be securely attached for your scanner to be able to scan 35mm slide...

Страница 14: ...continue with the installation It must also be unlocked to scan 5 Proceed to Step 2 Install the Software Note The locking tab protects the scanner s scan head by holding it securely in position Lock...

Страница 15: ...Disc 1 first Note If the CD does not start check the following Make sure you have inserted Disc 1 Make sure the CD drive s door is completely shut Make sure the CD was inserted in the drive in the pr...

Страница 16: ...9 3 On the Main Menu select Install Products 4 Make sure the boxes for Nuance PaperPort Scanner Driver and Corel Paint Shop Pro are checked If you also want to install the ArcSoft Suite software selec...

Страница 17: ...are will not be installed 4 On the Customer Information window accept the current values or enter new information then click Next 5 On the Setup Type window keep the default Setup Type and click Next...

Страница 18: ...ard opens 1 Click Next 2 On the Visioneer License Agreement window read the license agreement If you accept the terms select I Agree If you choose not to accept the license agreement the installation...

Страница 19: ...nned items look good on your monitor Gamma controls the brightness of the midtones of colors That setting can be changed later on as you re scanning 4 Select the option that looks best to you and clic...

Страница 20: ...lick on OK yet Leave the window open and proceed to Step 3 Connect the Scanner on page 14 Note If you want to see more information about your scanner and a quick explanation of how to use the OneTouch...

Страница 21: ...SB cable into the scanner s USB port If the plug does not attach easily make sure that you are plugging it in correctly Do not force the plug into either connection You can also connect the scanner to...

Страница 22: ...scanner is illuminated indicating the scanner is receiving power Note Your scanner does not have a power switch Plugging it in turns on the power Note Only use the power adaptor Model No PA 08J made...

Страница 23: ...port your scanner may scan a bit slower than with a USB 2 0 port Your computer recognizes that a scanner has been plugged into the USB port If your computer is running Windows XP or Windows Vista you...

Страница 24: ...indow and click OK to finish the installation process Note If you want to see more information about your scanner and a quick explanation of how to use the OneTouch features click the More button on t...

Страница 25: ...E 6 Click Close on the Installation Complete window 7 If you selected Corel Paint Shop Pro to install its installation will now begin Follow the instructions on the screen 8 If you also selected ArcSo...

Страница 26: ...scanner and software Note ArcSoft Suite contains several scanning and image enhancement software applications with features that include intuitive steps to scan photo editing hands on instructions to...

Страница 27: ...he User Guides you want The User Guides are in Adobe Acrobat PDF format The CD also includes a free copy of Acrobat Reader in case your computer does not have it already installed The Scanner Readme f...

Страница 28: ...Return to the Visioneer User Guides window and repeat the process to open view and save all the other User Guides you want The Scanner Readme file has late breaking news about your scanner 3 When you...

Страница 29: ...for Online Updates from the pop up menu 3 Follow the instructions on the screen and register your scanner by entering your scanner s serial number and your email address The serial number is located o...

Страница 30: ...on See Scan from the OneTouch Button Panel on page 29 TWAIN Interface This option is for scanning 35mm slides and negatives but you can also use it to scan paper items The TWAIN interface is available...

Страница 31: ...scanner lid and press one of the OneTouch buttons A scan progress window opens then the image is sent to the selected application for the OneTouch button In this example the image is scanned in the T...

Страница 32: ...ed for typical scanning tasks To change button settings see Selecting New Settings for a Button on page 76 Based on the recommended installation of PaperPort and the scanner driver your scanner is pre...

Страница 33: ...ere you can process the image or send it to another application on your computer Sends the scanned image to a storage folder Scans the item as a color document in the PDF format and stores it in a fol...

Страница 34: ...l also opens with more details about the settings of the scanner button you pressed in this case the Scan button This is the OneTouch Button Panel s Detail View Press hold down then release a scanner...

Страница 35: ...the scanner button You can also scan by clicking an icon on the OneTouch Button Panel Note If you closed the OneTouch Properties window and want to re open it you can press and hold down the scanner...

Страница 36: ...corner of the glass 2 Close the scanner lid and click the OneTouch icon in the Windows System Tray at the bottom right corner of the screen The button panel opens on the screen The five buttons on the...

Страница 37: ...ton 2 On the OneTouch Button Panel Left click a Destination Application icon to start the scanning If the OneTouch Properties window is open you must close it first Right click a Destination Applicati...

Страница 38: ...so forth See the Corel Paint Shop Pro user guide for more information You can also access the TWAIN interface from Paint Shop Pro See Setting Up Your Scanner to Work With Corel Paint Shop Pro on page...

Страница 39: ...an be accessed from any TWAIN scanning application you have installed on the computer Three TWAIN compliant software applications are provided with your scanner Nuance PaperPort Corel Paint Shop Pro a...

Страница 40: ...structions for accessing the TWAIN interface from OneTouch and from PaperPort Opening the TWAIN Interface from OneTouch 1 First choose a OneTouch button that you would like to change the scanning func...

Страница 41: ...anning from the TWAIN interface the final image will be sent to the destination application set for that button Note At this time the TWAIN interface is where you will adjust your scan settings Please...

Страница 42: ...ss the TWAIN interface from PaperPort 1 On the Windows taskbar click Start point to Programs point to ScanSoft PaperPort then click PaperPort The PaperPort Desktop opens 2 Click the Scan icon on the P...

Страница 43: ...rs the first time you select from the list while PaperPort initializes the scanner Later on selecting from the list activates immediately Note If the Scan button at the bottom of the panel is not avai...

Страница 44: ...the scanning job is finished by clicking Done on the TWAIN interface then clicking Done on the PaperPort Scan window Multiple pages are stacked on the PaperPort Desktop Note that items scanned as jpg...

Страница 45: ...to set up PaperPort to work with your scanner Note Setting up your scanner is a one time only process for each option from the Scanner drop down list Therefore you may have to set up your scanner onc...

Страница 46: ...nner 1 From the Scanner drop down list select one of the options such as Twain Visioneer 9520 2 Click the Setup button A window opens to begin the setup process 3 Click Yes then click Next The next wi...

Страница 47: ...king the connection between your scanner and the computer 5 Click Next After the Setup Wizard checks the connections the next window is displayed It has a series of setup options but only the Basic sc...

Страница 48: ...RFACE 41 6 Click Next The next window tells you to insert a page or photo into the scanner 7 Place an item face down on the glass Align the edge of the item with the arrow at the upper left corner of...

Страница 49: ...Click Next The TWAIN Interface opens 9 Click the Scan button on the TWAIN interface The Setup Wizard runs the scan test A message window opens that says Basic scan test passed Note If you are setting...

Страница 50: ...ndow The final Setup window opens to let you know the setup process is finished 11 Click Finish Your scanner is now setup for the scanning option you selected in the example above it s the TWAIN optio...

Страница 51: ...t up Corel Paint Shop Pro for your Visioneer 9520 Photo scanner 1 Open the Corel Paint Shop Pro software from the Windows taskbar by pointing to Programs then to the Corel Paint Shop Pro folder then t...

Страница 52: ...he Basic Interface plus a wide range of more advanced settings such as color saturation gamma and hue The Advanced Interface is also where you select settings to scan 35mm slides and negatives To swit...

Страница 53: ...Using for scanning paper items You cannot use the Basic Interface to scan 35mm slides or negatives 2 Choose the color grayscale or black and white option from the Picture Type menu 3 Click the Previe...

Страница 54: ...e menu To scan only a portion of the image see the section Scanning Part of an Image on page 49 6 To preview the item with the new settings click the Preview button again on the Basic Interface 7 When...

Страница 55: ...ear as individual thumbnails on the PaperPort desktop Depending on the file type you selected for the images multiple pages appear as PaperPort stacks For example images with the pdf file type can be...

Страница 56: ...you want to scan A dotted outline shows the selected area in the image You can now move or resize the outline to select the specific area you want to scan 2 To move the dotted outline put the pointer...

Страница 57: ...hange it The setting s options appear on the right side of the Advanced Interface where you can make changes if necessary When you are satisfied with the scan settings click Scan Click Preview to view...

Страница 58: ...yScale scans the image using up to 256 true shades of gray Use this setting to scan black and white photographs and other higher quality black and white images You can also scan a color photo with thi...

Страница 59: ...humbnail of the scanned image s appears on the PaperPort desktop Single page items appear as individual thumbnails on the PaperPort desktop 12 Use the PaperPort software to work with the image GETTING...

Страница 60: ...Advanced Interface select a configuration for example Color Configurations 2 Click a setting in the list of settings or click its corresponding button on the right side of the Advanced Interface Reso...

Страница 61: ...you click the Resolution setting in the list or click the Resolution button Note The information in the scan settings list and the options you select on the various settings panels are interactive As...

Страница 62: ...the details however higher dpi settings also take longer to scan and produce larger files sizes Usually the higher resolution settings are used for precision work such as photographs or fine artwork...

Страница 63: ...to the left to decrease the resolution or to the right to increase it You can also type a number directly into the resolution setting box or click the up and down arrows to increase or decrease the s...

Страница 64: ...ast is only available for Color and Gray Scale configurations To adjust the brightness and contrast 1 Drag the Brightness slider to the left to make the item darker or to the right to make the item li...

Страница 65: ...th or purity of a color and hue is the color your eyes see as reflected from the image The following figure shows the color options To adjust the color settings 1 Drag the Gamma Saturation and Color H...

Страница 66: ...otograph and want to focus on one section adjusting the input size removes the rest of the photograph from the final scanned image The following figure shows the input size options To manually set the...

Страница 67: ...e selected area and drag the mouse 3 To resize the selected area put the pointer on a dotted line and drag the line Note that as you drag the dotted line the menu selection for the image size changes...

Страница 68: ...ge the ruler units to suit the type of measurements you want To set the ruler units 1 Click the arrow icon at the top left corner of the Preview Image on the Advanced Interface 2 As you click the icon...

Страница 69: ...eset profiles for example Black White Configurations Custom 2 Adjust the settings as required then click the Save As button The Save Profile dialog box opens 3 Type a name for the new profile and clic...

Страница 70: ...e scanning sensors If a 35mm slide or negative is on the glass however the light from the bottom of the scanner would shine up through the transparent 35mm slide or negative and would not reflect its...

Страница 71: ...perly on the glass aligned at the corner 2 Follow the printed directions on the mask and place the 35mm slides horizontally into the slide holder Notice that the mask has a narrow slot next to the sli...

Страница 72: ...arrow on the mask labeled Use this mask for scanning 35mm negatives is aligned with the arrow in the upper left corner of the scanner The 35mm negative holder also has a calibration slot next to it D...

Страница 73: ...ns on your computer To open the Corel Paint Shop Pro software that you received with your scanner from the Windows taskbar point to Programs then to the Corel Paint Shop Pro folder then to Corel Paint...

Страница 74: ...ype of transparency to scan Scan Slide Using to scan 35mm slides Scan Negative Using to scan 35mm negative filmstrips The Advanced Interface then shows a representation of the type of transparency you...

Страница 75: ...d Interface is for scanning 35mm slides This example of the Advanced Interface is for scanning a filmstrip of 35mm negatives Selection boxes appear around the images Four boxes appear for negatives as...

Страница 76: ...for vivid colors and the image colors will be deeper and more intense 7 Use the selection boxes to select the image to scan crop an image or remove it from scanning Move the selection box You may need...

Страница 77: ...inter becomes a resize pointer Press and hold down the mouse button and drag the edge to crop the image This example shows a selection box not aligned directly over the image Put the pointer into the...

Страница 78: ...age on the Advanced Interface on page 53 for details about adjusting settings 9 Click Scan when you are satisfied with the image 10 When you re finished scanning the slides or negatives click Done to...

Страница 79: ...window To open the OneTouch Properties window 1 Click the OneTouch icon On the button panel right click the button you want to configure The OneTouch Properties window opens for that button You can al...

Страница 80: ...F image format Note Some of the options on the OneTouch Properties Window and other OneTouch windows and dialog boxes are grayed out and are not available Grayed out options are not appropriate for yo...

Страница 81: ...tton The configuration s basic settings include scanning mode resolution dpi page size brightness Br and contrast Cr To see the configuration s basic settings click its icon Click the icon again to cl...

Страница 82: ...s example shows the formats that apply to Microsoft Outlook The button names indicate their file types See Selecting Format Options on page 87 for more about the formats Button tabs click to select a...

Страница 83: ...n 2 From the Select Destination list select the application where you want documents sent when scanning is finished See Selecting Options for a Button on page 93 to display a full list of the Destinat...

Страница 84: ...n you select For example if you select Microsoft Word as the Destination Application the available formats are for text such as txt and rtf But if you select Microsoft Paint as the Destination Applica...

Страница 85: ...e various properties that you can select 1 On the OneTouch Properties window click a Destination Application 2 Click the Properties button A OneTouch 4 0 Link Properties dialog box opens for the type...

Страница 86: ...folder to receive your scanned items 1 Select the PaperPort folder where you want the file of the scanned image to be located 2 Click OK 3 Click OK or Apply on the OneTouch Properties window When Pap...

Страница 87: ...ions will apply to all the applications in the group Always send a file even when no text was found The scanned file is sent to the OCR reader even if the image does not appear to contain text This co...

Страница 88: ...in the OneTouch Destination List 5 In step 4 of the dialog box select the file formats that the application will accept Refer to the documentation that you received with the application to see which...

Страница 89: ...his option to ensure that an image will fit on the computer s screen When a computer screen is set to a lower resolution bitmap images with a higher resolution may be too big to fit on the screen Conv...

Страница 90: ...pply to the Destination Application named Transfer to Storage If a CD burner is attached to your computer you can also use this dialog box to start the Burn to CD process See the section Scan and Burn...

Страница 91: ...h and week so you can keep track of when you scanned the documents 2 Click the Browse button to specify the location to store the scanned documents or type a location directly into the box If you are...

Страница 92: ...AOL you need to know which folder contains the scanned documents so you can manually attach them to your email messages 1 Click the Browse button for Folder for storing attachments and choose a folde...

Страница 93: ...ble to AOL 4 Select the options for color document handling Convert Bitmaps using Screen resolution Use this option to ensure that an image will fit on the computer s screen When a computer screen is...

Страница 94: ...tend to be larger than the JPG format Because JPG image files can be reduced in size the JPG format is often used for images on web pages or if file size might be a problem when electronically sendin...

Страница 95: ...allest file size lowest image quality Normal Medium file size some loss of image quality Maximum Quality Largest file size no loss of image quality Your selection pertains only to the button currently...

Страница 96: ...numbers such as a business letter report or spreadsheet The text format icon has several file formats available depending on the Destination Application you select The specific file format is the fil...

Страница 97: ...n of a file type pertains only to the button currently selected on the OneTouch Properties window Other buttons that have a text option selected as the Format are not affected so you can set the text...

Страница 98: ...on Application that has one of the Text formats TEXT RTF XLS or HTML 2 Scan the document Your scanned pages open in the Destination Application with their text ready for editing and other text process...

Страница 99: ...ly oriented page image so the text is recognizable by the OCR process Single column output Select this option to produce a single column of text in the Destination Application even if the original ima...

Страница 100: ...enu arrow and choose the button for new options 3 Select button options Show All Destinations This option selects all the Destination Application categories The list of Destination Applications availa...

Страница 101: ...ents scanned to PDF format Email includes Microsoft Outlook and other email applications See EMail Properties on page 85 for details about attaching scanned documents to your email messages Storage an...

Страница 102: ...s option you can choose to save permanent copies of those types of images on your hard drive The copies will be saved in the folder specified in the Folder Copy Options section You can selectively cho...

Страница 103: ...Select the grouping option for the documents The Group by button option groups the documents under the name of the scanner button Group by type arranges the scanned documents by the type of file such...

Страница 104: ...w configuration 1 Open the OneTouch Properties window and click the tab of the button that you want to have a new configuration 2 Scroll through the applications in the Select Destination list and cli...

Страница 105: ...ng mode Black White to scan in black and white For example letters and memos are usually scanned in black and white This scan mode produces the smallest file size GrayScale to scan items such as docum...

Страница 106: ...and contrast set too light or too dark For example a note written with a light pencil may need to be scanned darker to improve legibility Brightness refers to the lightness or darkness of the image Co...

Страница 107: ...f photographs or illustrations particularly newspaper and magazine illustrations Selecting Reduce Moire Patterns will limit or eliminate moire patterns in the scanned image This option is only availab...

Страница 108: ...idtones of the color 9 Drag the sliders to the left and right to change the color settings As you do the image changes to show the effects of the new settings Saturation is the strength or purity of a...

Страница 109: ...e the image will automatically be reduced to fit the page Actual size crop image if necessary If the scanned image is to big to be printed or faxed on a single page the image will automatically be cro...

Страница 110: ...ed Destination Application is set as Transfer to Storage such as for the Archive scanner button You use the options on this tab to select where you want to save your scanned items for storage when sca...

Страница 111: ...ed the documents Type refers to the file type selected as the Page Format on the OneTouch Properties window By default the location of the archived documents is at C Documents and Settings your user n...

Страница 112: ...the scan configuration you want to edit or delete The selection must be an unlocked configuration The following example shows a new scan configuration that was created named Scan for Light Text 3 To...

Страница 113: ...nges to a configuration but for the changes to be saved the configuration must first be unlocked Click the Lock icon to unlock the configuration Clicking it toggles between locking and unlocking the c...

Страница 114: ...Touch Properties window for that button Please see Accessing the TWAIN Interface from PaperPort on page 33 for detailed instructions on scanning with the TWAIN interface or Scanning with the Windows I...

Страница 115: ...asic Interface on page 46 or Scanning from the Advanced Interface on page 50 WIA The Windows Image Acquisition WIA interface opens for you to configure the scanning The WIA option is only available if...

Страница 116: ...been setup to use the Configure Before Scan option 3 The Basic TWAIN interface will open 4 Choose your scan settings such as the Picture Type of Color Grayscale or Black White Resolution in DPI and P...

Страница 117: ...scanner 2 When the TWAIN interface opens select the appropriate scan settings for your document 3 Click on the Scan button in the TWAIN interface 4 After the scanning progress bar closes you can place...

Страница 118: ...p to this point are not deleted You can place a new page on the flatbed glass adjust the TWAIN settings for the new page then click on the Scan button in the TWAIN interface to continue scanning At th...

Страница 119: ...if you ve set it up to scan and burn to a CD 4 Select Burn to CD as the Destination Application The Burn to CD Destination Application is only available if you have a CD burner attached to your compu...

Страница 120: ...ing the button you selected to use to scan and burn to CD When scanning is finished a bubble message on the screen tells you that files are waiting to be burned to the CD 8 On the OneTouch window make...

Страница 121: ...anned images to the proper storage location where the Windows XP or Windows Vista CD writing wizard can find the files to burn to the CD Likewise when you create a custom configuration for CD burning...

Страница 122: ...ing the scanner waits to start scanning until you select the application to use After you select the application its interface opens and you use it to continue scanning To scan with event forwarding 1...

Страница 123: ...ses 6 Start scanning using the button you selected for event forwarding A dialog box opens for you to select the application to use for scanning 7 Select the application in the box and click OK Now th...

Страница 124: ...your scanner to a web ready format in one automatic step To scan and create an HTML web page 1 Open the OneTouch Properties window 2 Click the tab of the button you want to use to scan pages for HTML...

Страница 125: ...ernet Explorer then opens showing your converted page 9 Choose Save As from the Internet Explorer File menu give the page a name and save it in the location you use for your web page files You may als...

Страница 126: ...the Archive button for the OCR process The Archive button on your scanner is preset to transfer scanned documents to storage If you changed the settings for the Archive button or want to set up anothe...

Страница 127: ...her tab if you want it to be for archiving instead 2 Choose a text format as the file format 3 Right click on the text format icon and choose the file format for the scanned documents Note The Storage...

Страница 128: ...for Personal Receipts and a third folder might be for Annual Receipts To scan to multiple folders you create multiple configurations each with a different storage location for the scanned documents Sc...

Страница 129: ...e Scan Configuration Properties dialog box opens 6 Click the Scan Settings Page Settings and Advanced Settings tabs and select the settings you want To help you remember which folder it is give the ne...

Страница 130: ...where you set the different folder locations for the new configurations 8 Click the Browse button 9 Select the folder you created for storing the scanned documents If you haven t created the folder ye...

Страница 131: ...as a Transfer to Storage configuration 12 Repeat the process to create additional new configurations such as one named Storage for Personal Receipts 13 Make sure to designate separate folders as the S...

Страница 132: ...to Storage is selected as the Destination Application 4 Select one of the configurations you created for storage 5 Click OK The OneTouch Properties window closes The OneTouch panel will show the name...

Страница 133: ...eTouch Properties window again and select the other configuration you created for storage 8 Click OK The OneTouch panel will show the name of the other configuration 9 Now scan the next set of documen...

Страница 134: ...server or mapped drive You select a mapped drive using the Browse button 1 See Scanning to Multiple Folders on page 121 or Transferring Scanned Documents to Storage on page 119 for the steps to selec...

Страница 135: ...or the scanned documents Servers and mapped drives are represented by an icon that indicates its network connection 4 Click OK Now when you scan using Transfer to Storage as the Destination Applicatio...

Страница 136: ...choose Show Hardware from the pop up menu You can also click the Hardware icon at the top of the OneTouch Button Panel If the Hardware View of the panel is already open you can also right click on th...

Страница 137: ...HOTO SCANNER USER S GUIDE 2 Click the Properties button Your scanner has a built in power saving feature that is set to power down after a period of idle time You can set the power save mode from 1 mi...

Страница 138: ...he Transparency Adapter lamp click TA Lamp On To manually turn off the TA Lamp close the Device Configuration dialog box and the Hardware Properties dialog box then reopen them again The TA Lamp will...

Страница 139: ...y Windows XP applications have commands to access WIA including PaperPort To access WIA from PaperPort choose WIA Visioneer 9520 from the scanner drop down list See page 36 To access WIA from Corel Pa...

Страница 140: ...canner or Camera The scan window opens Use this window to select scanning options and start the scan process 3 Click the button most appropriate for the item you re scanning 4 Click Preview to preview...

Страница 141: ...ng Your Scans Change the size of the scanned image To do this click and hold the mouse pointer over one of the four sizing boxes on the corners of the previewed image Then drag the box to increase or...

Страница 142: ...You can select new settings before you scan an item to fine tune exactly how you want to scan a particular item To select the scanner settings before you scan 1 On the scan window click Adjust the qu...

Страница 143: ...rrow and choose the dots per inch dpi of the resolution The maximum resolution is 600 dpi the minimum is 50 dpi The higher the dpi setting the sharper and clearer the scanned image However higher dpi...

Страница 144: ...e file contains additional information that may help you diagnose problems with the scanner If you try all the troubleshooting procedures described in this section and in the Readme file and the scann...

Страница 145: ...select another TWAIN source for acquiring images If you use multiple TWAIN devices with your computer you may have selected another source for images Start the PaperPort software and TWAIN Visioneer...

Страница 146: ...and you need to remove those other drivers and re install your Visioneer 9520 Photo scanner Please see the documentation that you received with the other scanner for the steps to remove its driver pr...

Страница 147: ...message box opens and asks if you are sure you want to remove OneTouch 4 0 from your computer Click Yes The OneTouch 4 0 software is removed from your computer 5 Unplug the scanner s USB cable 6 Clos...

Страница 148: ...e Programs icon Windows Vista Double click the Programs and Features icon c Select OneTouch 4 0 then click on the Remove button d An Add or Remove message box opens and asks if you are sure you want t...

Страница 149: ...9 7 cm Scanner dimensions Height 2 6 inches 6 6 cm Width 11 9 inches 30 cm Length 17 inches 43 cm Weight 5 8 pounds 2 64 kg USB Standard Hi Speed USB 2 0 compatible with USB 1 1 Operating temperature...

Страница 150: ...T 143 VISIONEER 9520 PHOTO SCANNER PARTS LIST Please use the following part names and numbers when ordering replacements for your scanner Part Name Part Number Transparency Mask 88 0569 000 USB Cable...

Страница 151: ...144 VISIONEER ONETOUCH 9520 PHOTO SCANNER USER S GUIDE...

Страница 152: ...mputer specifications 4 Configure Before Scan 107 Contrast 136 contrast 57 99 contrast slider 99 create single page items check box 37 custom button 26 D Destination Application 72 OCR 91 text file fo...

Страница 153: ...Port Desktop 35 help topics 52 Scan pane 36 PaperPort Properties 79 PDF 87 94 PDF file size 88 Picture type 136 power save mode 130 Preview button 46 133 preview image 51 68 Q question mark icon 31 R...

Страница 154: ...en Image 100 T Text Documents Properties 80 Text Editors 94 text file format 89 Text Formats 89 thumbnail image 48 TIFF 87 Transfer to Storage 119 transparency scan 63 71 TWAIN 107 TWAIN standard 32 U...

Страница 155: ...INDEX 148...

Страница 156: ...Copyright 2007 Visioneer Inc 05 0701 100 visioneer...

Отзывы: