


1-1
1 NOMENCLATURE AND FUNCTIONS
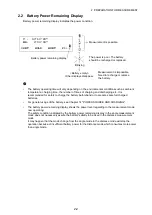
1
NOMENCLATURE AND FUNCTIONS
1.1 Nomenclature
1 Handle
2
Bluetooth
antenna
3 External interface hatch
(USB port)
4 Instrument height mark
5 Battery cover
6 Operation panel
7 Serial connector
8 Circular level
9 Circular level adjusting screws
10 Base plate
11 Levelling foot screw
12 Optical plummet focussing ring
13 Optical plummet eyepiece
14 Optical plummet reticle cover
(12-14: Not included on
instruments with laser plummet
(option))
15 Display unit
16 Objective lens
(Includes Laser-pointer function)
17 Handle locking screw
18 Tubular compass slot
19 Vertical clamp
20 Vertical fine motion screw
21 Speaker
22 Trigger key
23 Horizontal fine motion screw
24 Horizontal clamp
25 Tribrach clamp
26 Telescope eyepiece screw
27 Telescope focussing ring
28 Sighting collimator
29 Instrument center mark
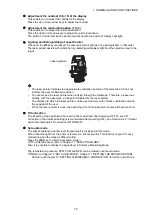
Sighting collimator
Use sighting collimator to aim the ES in the direction of the measurement point. Turn the instrument
until the triangle in the sighting collimator is aligned with the target.
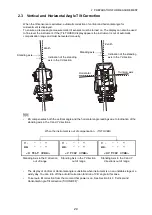
Instrument height mark
The height of the ES is as follows:
•
192.5mm (from tribrach mounting surface to this mark)
•
236mm (from tribrach dish (TR-103) to this mark)
"Instrument height" is input when setting instrument station data and is the height from the
measuring point (where ES is mounted) to this mark.
Trigger Key
Press the trigger key when the ES is in the observation screen or when
[MEAS]
is indicated on the
display unit. You can start/stop measurement.
In the screen displaying
[AUTO]
, press trigger key to perform automatic operation from distance
measurement to recording.
4
4
1
3
8
6
5
7
9
10
11
13
12
15
14
16
17
2
4
4
18
22
21
19
20
23
24
26
25
27
28
29