


8-10
8 LAYOUT
7
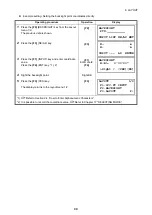
When the display value dHR, dHD and dZ are
equal to 0, the layout point is established.*3)
8
Press the
{F2}
(NEZ) key.
The coordinate data is shown.
{F2}
9
Press the
{F4}
(NEXT) key to set next layout point.
PT# is automatically incremented.
{F4}
*1)
Refer to Section 2.4 “How to Enter Alphanumeric Characters”.
*2) Point number could not be entered when data to comply with the coordinate value does not exist in the
file.
*3) Cut & Fill displaying function is available.
Refer to Chapter 17 “SELECTING MODE”.
N * 100.000 m
E : 100.000 m
Z : 1.015 m
MODE ANGLE NP/P NEXT
LAYOUT
PT#: LP-101
INPUT LIST NEZ ENTER