7-6
7 DATA COLLECTION
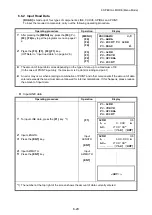
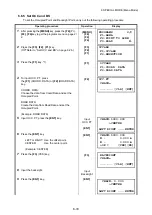
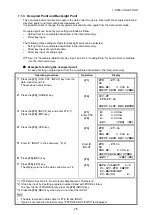
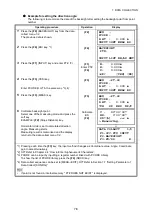
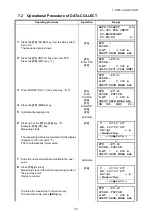
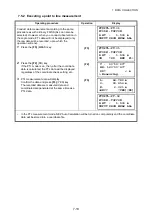
Example for setting the direction angle:
The following is to memorize the data of the backsight after setting the backsight point from point
number.
Operating procedure
Operation
Display
1
Press the
{F2}
(BACKSIGHT) key from the data
collect menu 1/2.
The previous data is shown.
{F2}
2
Press the
{F4}
(BS) key. *1)
{F4}
3
Press the
{F1}
(INPUT) key and enter PT#. *2)
{F1}
Enter PT#
{F4}
4
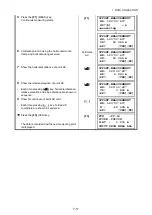
Press the
{F3}
(YES) key.
Enter PCODE,R.HT in the same way. *3),4)
{F3}
5
Press the
{F3}
(MEAS) key.
{F3}
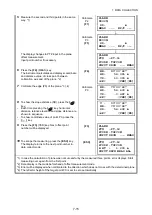
6
Collimate back sight point.
Select one of the measuring mode and press the
soft key.
EXAMPLE:
{F2}
(Slope Distance) key.
Horizontal circle is set to calculated direction
angle. Measuring starts.
Measuring result is memorized and the display
returns to the data collect menu 1/2.
Collimate
BS
{F2}
*1) Pressing each time the
{F3}
key, the input method changes as Coordinate value, Angle, Coordinate
point name alternatively.
*2)
Refer to Chapter 2.4 “How to Enter Alphanumeric Characters”.
*3) PCODE can be input by inputting a register number linked with PCODE Library.
To show the list of PCODE library, press the
{F2}
(SRCH) key.
*4) Data collect sequence can be set to [MEAS
→
EDIT].
Refer to Section 7.7 “Setting Parameter of
•
If point is not found in internal memory " PT# DOES NOT EXIST" is displayed.
BS#
→
PCODE :
R.HT : 0.000 m
INPUT 0SET MEAS BS
BACKSIGHT
PT#:
INPUT LIST NE/AZ ENT
N: 0.000m
E: 0.000m
Z: 0.000m
>OK? [YES] [NO]
BS#
→
PT-22
PCODE :
R.HT : 0.000 m
INPUT 0SET MEAS BS
BS#
→
PT-22
PCODE :
R.HT : 0.000 m
*VH SD NEZ NP/P
V : 90°00'00"
HR: 0°00'00"
SD*[n] <<< m
> Measuring...
DATA COLLECT 1/2
F1:OCC.PT# INPUT
F2:BACKSIGHT
F3:FS/SS P
↓

