54
ii.) Examine all visible wiring for brittle or
worn insulation and make sure electrical
contacts are clean and that they function
properly. Give special attention to solder
joints on bellows and float when this type of
control is used.
iii.) Check float for evidence of collapse and
check mercury bulb (where applicable) for
mercury separation or discoloration.
b.) Probe Type: Probe type LWCO should be
removed once a year and cleaned of any dirt
accumulations to assure proper operation.
Do not attempt to repair mechanisms in
the field. Complete replacement
mechanisms, including necessary gaskets and
installation instructions, are available from the
manufacturer.
12. Verify proper operation after servicing.
Air Filter
A. Perform a visual inspection of air filter and replace
as necessary.
1. Remove upper front panel.
2. Remove tube from nipple on filter assembly.
3. Remove wing nut.
4. Remove filter assembly from boiler. For the
EVCA-3000: to facilitate assembly removal, loosen
the two top screws on the lower front panel and
lean the lower front panel forward. Remove the
blower filter front plate, if necessary.
5. Remove foam prefilter and wash with soap and
water.
6. Replace primary filter as necessary.
Pilot and Main Flame
A. Perform a visual inspection of pilot burner flame.
1. Refer to the flame safeguard instruction manual
and conduct a pilot turndown test.
2. Observe pilot operation and record pilot signal.
Flame should be steady medium hard blue.
B. Pilot cleaning and maintenance
1. Shut off gas supply and disconnect electrical
service.
2. Disconnect scanner, ignition electrode, loosen
and remove pilot gas line and combustion air
line from fan.
3. Remove mounting fasteners and pull pilot
assembly from heat exchanger.
4. Examine pilot electrode and set gaps to 1/8" if
needed. Clean as required.
5. Reassemble in reverse order using a new gasket
available from Thermal Solutions.
C. Perform a visual inspection of main burner flame
1. Observe main flame and record flame signal.
Flame color should be steady deep orange in color
with dark blue checkerboard pattern throughout.
2. Main burner requires no cleaning or annual
maintenance.
Check Combustion and Safety Controls
A. Check flame failure detection system with system
operating.
1. Pilot
a.) Refer to the flame safeguard instruction
manual.
b.) Manually close pilot fuel supply and verify
lock out of primary control.
2. Main Flame
a.) Refer to the flame safeguard instruction
manual.
b.) Close manual main fuel shut-off valve and
Secondary Heat Exchanger
A. Remove vent pipe from stack adapter
B. See Figure 18. Use flashlight to inspect the fins of
the heat exchanger through stack adapter opening.
C. If excessive deposits are found, refer to the
following section for cleaning instructions.
D. Re-install vent on stack adapter.
Cleaning Secondary Heat Exchanger for EVCA
Units:
A. Remove vent pipe from stack adapter.
B. See Figure 18. Using the opening in the stack
adapter (1) as a point of entry, remove foreign
matter from the secondary heat exchanger (2) by
sprayng an industrial coil cleaner as specified by
the manufacturer.
C. Reinstall vent on stack adapter.
Mixing Valve:
A. Set TSBC to control the mixing valve manually.
B. Stroke the valve from 0-100%, periodically
stopping to check for proper positioning and valve
seizures.
C. Troubleshoot control signals and valve actuator for
positioning errors.
D. Replace valve body if seizure occurs.
1. When removing/servicing the mixing valve,
never lift by the mixing valve actuator. Lift the
valve body.
CAUTION
Do not attempt to remove or service burner.
Damage to the burner may result. Consult
boiler manufacturer.
Содержание EVCA SERIES
Страница 13: ...13 Figure 3 Typical Sidewall Pressurized Venting Optional Figure 2 Typical Sidewall Pressurized Venting ...
Страница 14: ...14 Figure 4 Typical Vertical Pressurized Venting ...
Страница 16: ...16 Figure 6 Vertical Air Intake Piping Figure 5 Horizontal Air Intake Piping ...
Страница 19: ...19 Figure 8 Schematic Boiler Piping ...
Страница 25: ...25 Figure 9a 208 230 480V 1PH 3PH 60HZ Supply Power Wiring Schematic ...
Страница 26: ...26 Figure 9b 120V 1PH 60HZ Supply Power Wiring Schematic ...
Страница 27: ...27 Figure 9c Control Wiring Schematic EVCA 750 2000 ...
Страница 29: ...29 Figure 9e Control Wiring Schematic EVCA 3000 ...
Страница 32: ...32 Figure 10 Modular System Horizontal Air Intake Piping ...
Страница 33: ...33 Figure 11 Modular System Vertical Air Intake Piping ...
Страница 34: ...34 Figure 12 Modular System Typical One Pipe Water Piping ...
Страница 35: ...35 Figure 13 Modular System Typical Primary Secondary Water Piping ...
Страница 36: ...36 Figure 14 Modular System Typical Primary Secondary without System Pump ...
Страница 37: ...37 Figure 15 Modular System Typical Reverse Return Water Piping ...
Страница 38: ...38 Figure 16 Modular System Reverse Return with System Pump Only ...
Страница 39: ...39 Figure 17 Modular System Typical Primary Secondary with Reverse Return ...
Страница 55: ...55 Figure 18 Cleaning Secondary Heat Exchanger 1 2 ...
Страница 56: ...56 This page intentionally left blank ...
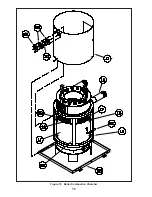
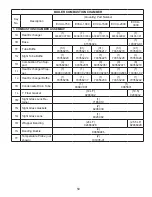
Страница 58: ...58 Figure 19 Boiler Combustion Chamber ...
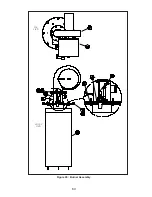
Страница 60: ...60 Figure 20 Burner Assembly FRONT VIEW TOP VIEW ...
Страница 62: ...62 Figure 21a UL FM CSD 1 Main Gas Train Assembly EVCA 750 2000 ...
Страница 64: ...64 Figure 21b UL FM CSD 1 Main Gas Train Assembly EVCA 3000 ...
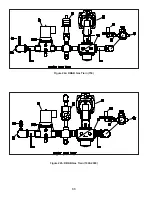
Страница 66: ...66 Figure 22a DB B Gas Train 750 Figure 22b DB B Gas Train 1000 2000 ...
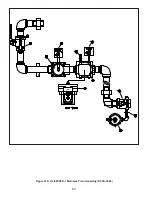
Страница 68: ...68 Figure 22c DB B w POC Gas Train 750 Figure 22d DB B w POC Gas Train 1000 2000 ...
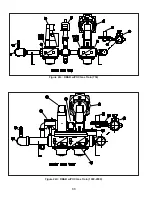
Страница 70: ...70 Figure 22e DB B Gas Train EVCA 3000 Figure 22f DB B w POC Gas Train EVCA 3000 ...
Страница 72: ...72 Figure 23 Jacket ...
Страница 74: ...74 Figure 24 EVCA 750 1000 and 1500 Secondary Heat Exchanger and Housing ...
Страница 78: ...78 Figure 25b EVCA 3000 Secondary Heat Exchanger and Housing ...
Страница 80: ...80 Figure 26 Control Panel Assembly ...
Страница 82: ...82 Figure 27 Bishop Pilot Assembly ...
Страница 97: ...97 NOTES ...
Страница 98: ...98 NOTES ...
Страница 99: ...99 NOTES ...


