44
V. Lighting Instructions
•
If you cannot reach your gas supplier, call the fire
department.
C
. Do not use this appliance if any part has been under
water. Immediately call a qualified service technician
to inspect the appliance and to replace any part of the
control system and any gas control which has been
under water.
A
. This appliance is equipped with an ignition device
which automatically lights the pilot. Do
NOT
try to
light the pilot by hand.
B
. BEFORE OPERATING smell all around the appliance
area for gas. Be sure to smell next to the floor because
some gas is heavier than air and will settle on the floor.
WHAT TO DO IF YOU SMELL GAS
•
Do not try to light any appliance.
•
Do not touch any electric switch; do not use any
phone in your building.
•
Immediately call your gas supplier from a neighbor's
phone. Follow the gas supplier’s instructions.
FOR YOUR SAFETY, READ BEFORE OPERATING
WARNING:
If you do not follow these instructions exactly, a fire or explosion may result
causing property damage, personal injury, or loss of life.
1. STOP! Read all the safety information (warnings,
cautions etc.) in this manual.
2. Turn off all electric power to the appliance.
3. Set the system control so that there is
no
call for heat
to the appliance.
4. This appliance is equipped with an ignition device
which automatically lights the pilot and main
burner. Do not try to light the pilot or main flame
by hand.
5. Remove front door panel.
6. Locate the gas pilot valve at the rear of the appliance.
7. Locate the gas main valves at the rear of the
appliance and at the end of the gas supply pipe inside
the appliance.
8. Rotate gas shutoff valves clockwise
from
"ON" position to "OFF". Make sure handle rests
against stop.
9. Wait five (5) minutes to clear out any gas. Then smell
for gas, including near the floor. If you smell gas,
STOP! Follow "B" in the safety information above on
this label. If you do not smell gas, go to the next step.
10. Rotate gas shutoff valves counterclockwise
from "OFF" to "ON". Make sure handle rests against
stop. Do not force.
12. Turn on all electric power to the appliance.
13. Set thermostat to desired setting.
14. If the appliance will not operate, follow
the instructions " TO TURN OFF GAS TO
APPLIANCE" and call your service technician or
gas supplier.
15. Move the switch to the "ON" position.
16. Set system control so that there is a call for heat
from the system.
17. Observe prepurge, pilot ignition and main flame
ignition.
18. If pilot or main flame ignition does not occur
during initial attempt, remove the upper front jacket
panel of the appliance. If the appliance pilot and
main flame light, go to step 20.
OPERATING INSTRUCTIONS
Содержание EVCA SERIES
Страница 13: ...13 Figure 3 Typical Sidewall Pressurized Venting Optional Figure 2 Typical Sidewall Pressurized Venting ...
Страница 14: ...14 Figure 4 Typical Vertical Pressurized Venting ...
Страница 16: ...16 Figure 6 Vertical Air Intake Piping Figure 5 Horizontal Air Intake Piping ...
Страница 19: ...19 Figure 8 Schematic Boiler Piping ...
Страница 25: ...25 Figure 9a 208 230 480V 1PH 3PH 60HZ Supply Power Wiring Schematic ...
Страница 26: ...26 Figure 9b 120V 1PH 60HZ Supply Power Wiring Schematic ...
Страница 27: ...27 Figure 9c Control Wiring Schematic EVCA 750 2000 ...
Страница 29: ...29 Figure 9e Control Wiring Schematic EVCA 3000 ...
Страница 32: ...32 Figure 10 Modular System Horizontal Air Intake Piping ...
Страница 33: ...33 Figure 11 Modular System Vertical Air Intake Piping ...
Страница 34: ...34 Figure 12 Modular System Typical One Pipe Water Piping ...
Страница 35: ...35 Figure 13 Modular System Typical Primary Secondary Water Piping ...
Страница 36: ...36 Figure 14 Modular System Typical Primary Secondary without System Pump ...
Страница 37: ...37 Figure 15 Modular System Typical Reverse Return Water Piping ...
Страница 38: ...38 Figure 16 Modular System Reverse Return with System Pump Only ...
Страница 39: ...39 Figure 17 Modular System Typical Primary Secondary with Reverse Return ...
Страница 55: ...55 Figure 18 Cleaning Secondary Heat Exchanger 1 2 ...
Страница 56: ...56 This page intentionally left blank ...
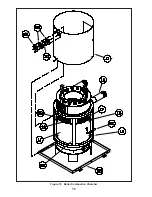
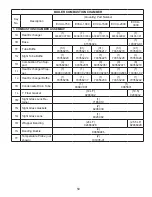
Страница 58: ...58 Figure 19 Boiler Combustion Chamber ...
Страница 60: ...60 Figure 20 Burner Assembly FRONT VIEW TOP VIEW ...
Страница 62: ...62 Figure 21a UL FM CSD 1 Main Gas Train Assembly EVCA 750 2000 ...
Страница 64: ...64 Figure 21b UL FM CSD 1 Main Gas Train Assembly EVCA 3000 ...
Страница 66: ...66 Figure 22a DB B Gas Train 750 Figure 22b DB B Gas Train 1000 2000 ...
Страница 68: ...68 Figure 22c DB B w POC Gas Train 750 Figure 22d DB B w POC Gas Train 1000 2000 ...
Страница 70: ...70 Figure 22e DB B Gas Train EVCA 3000 Figure 22f DB B w POC Gas Train EVCA 3000 ...
Страница 72: ...72 Figure 23 Jacket ...
Страница 74: ...74 Figure 24 EVCA 750 1000 and 1500 Secondary Heat Exchanger and Housing ...
Страница 78: ...78 Figure 25b EVCA 3000 Secondary Heat Exchanger and Housing ...
Страница 80: ...80 Figure 26 Control Panel Assembly ...
Страница 82: ...82 Figure 27 Bishop Pilot Assembly ...
Страница 97: ...97 NOTES ...
Страница 98: ...98 NOTES ...
Страница 99: ...99 NOTES ...


