


Page 29
6/23/04 DI-50B51 320 Series (NZ306)
Texmate, Inc. Tel. (760) 598-9899
•
www.texmate.com
Step 6
Step 7
Step 8
Step 9
From Step 5
Step 4
Step 5
CONFIGURE
DATA SOURCE
Select [000] to leave
Code 1
Save Data Source setting
Example
Exit Code 2.
Return to
Operational Display
Operational Display
Select [diSP] as
the Data Source
from the options
listed in the Select
Data Source
diagram below.
Set Code 1 to [X50]:
1st Digit = X Note relevant
2nd Digit = 5 Selects data source mode
3rd Digit = 0 Selects primary display
Step 3
Step 1
Step 2
Operational Display
80
100
90
70
60
50
40
30
20
10
0
SP
SP
6
5
4
3
2
1
Press
at same
time
Press
at same
time
Enter
Brightness Mode
80
100
90
70
60
50
40
30
20
10
0
SP
SP
6
5
4
3
2
1
80
100
90
70
60
50
40
30
20
10
0
SP
SP
6
5
4
3
2
1
80
100
90
70
60
50
40
30
20
10
0
SP
SP
6
5
4
3
2
1
Press
2
80
100
90
70
60
50
40
30
20
10
0
SP
SP
6
5
4
3
2
1
80
100
90
70
60
50
40
30
20
10
0
SP
SP
6
5
4
3
2
1
80
100
90
70
60
50
40
30
20
10
0
SP
SP
6
5
4
3
2
1
80
100
90
70
60
50
40
30
20
10
0
SP
SP
6
5
4
3
2
1
Pass Brightness and
Calibration Modes
and enter Code 1
80
100
90
70
60
50
40
30
20
10
0
SP
SP
6
5
4
3
2
1
80
100
90
70
60
50
40
30
20
10
0
SP
SP
6
5
4
3
2
1
80
100
90
70
60
50
40
30
20
10
0
SP
SP
6
5
4
3
2
1
80
100
90
70
60
50
40
30
20
10
0
SP
SP
6
5
4
3
2
1
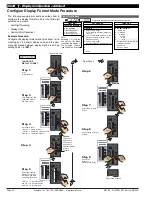
0
Primary Display
1
Second Display (See Note)
2
Third Display (See Note)
3
Peak/Valley
4
Analog Output 1
5
Analog Output 2
6
Totalizer 1
7
Totalizer 2
Press
1
80
100
90
70
60
50
40
30
20
10
0
SP
SP
6
5
4
3
2
1
Press
1
80
100
90
70
60
50
40
30
20
10
0
SP
SP
6
5
4
3
2
1
Press
1
Press
at same
time
Press
at same
time
X
X
OR
OR
OR
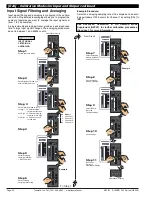
Programming Tip
Pressing the
and
buttons at the same time
increases the displayed
parameter in increments
of 100 counts.
Programming Tip
Pressing the
button
reaches
[000] faster.
Use the
buttons to cycle
through the
options
ST
ST
AR
AR
T HERE
T HERE
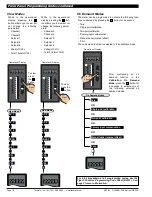
Example Procedure:
Configure the Primary Display with the display [diSP] as the
data source by setting Code 1 to [
X50
]. See diagram at the
bottom of the page for data source selection options.
Configure Data Source Procedure
The following example procedure describes how to select the
source of the data to be displayed for the third digit selection.
Programming Tip
To enter the Main Programming Mode press the
and
buttons at the same time. To exit and
return to the operational display, press the
and
buttons again at the same time.
At the end of any procedure (Step 8 in this proce-
dure) the
must be pressed before the
and
buttons are pressed,otherwise the meter returns
to the operational display without saving the new
settings.
P
P
P
P
Note:
Options 1 and 2 listed for the 3rd digit in Step 3 above are only for use with
meters that have more than one display. With bargraph meters the PRIMA-
RY display is the digital display, and the SECONDARY display is the bar-
graph display.
I
n
i
ti
al
S
e
t
up P
r
o
c
e
du
r
e
s
[
C
o
d
E
_
1
]
-
D
i
s
p
l
a
y
C
o
nf
i
g
u
r
ati
o
n
c
o
n
ti
nu
e
d
Use the
buttons to
cycle through the Registers
Menu and Registers (1 to
244) to select data source for
displays (also see page 48).
Select Data Source
P
[rESLt]
[Ch1]
[Ch2]
[Ch3]
[Ch4]
[tot_1]
[tot_2]
[PEAK]
[tArE]
[VALEY]
[diSP]
[ 1]
[ 10]
[100]
[200]
[244]


