


Page 25
6/23/04 DI-50B51 320 Series (NZ306)
Texmate, Inc. Tel. (760) 598-9899
•
www.texmate.com
CODE 1 – Digital Display Configuration
Setpoint Annunciators Mode
The setpoint annunciators mode is configured by changing the first
digit in Code 1. The setpoint annunciators can be configured to
operate as follows:
•
On when the setpoint activates.
•
All annunciators are permanently on and each one only goes off
when its setpoint activates.
•
All annunciators are always off (See Note 1 on Code 1 diagram
on Page 30).
•
Setpoint
1
annunciator comes
on
indicating a
rising signal
.
Setpoint
2
annunciator comes
on
indicating a
falling signal
.
Example Procedure
. The example procedure on Page 37
shows how to select the setpoint annunciators to come ON
when the setpoints are OFF (not active).
Update Display at Selected Sample Rate
The meter
’
s default display update rate is 0.5 seconds and is
set in the second digit of Code 1 as [X0X].
The display can be configured to update at the input signal sample
rate selected in Code 2.
Example Procedure
. The example procedure on Page 37 shows
All digital display configuration modes, except the display
brightness mode, are configured in Code 1.
All bargraph display configuration modes are configured in
Code 10 (See diagram below).
See Code 1 diagram on Page 30 for a breakdown of 1st,
2nd, and 3rd digit settings.
See Code 10 diagram on Page 31 for a breakdown of 1st,
2nd, and 3rd digit settings.
how to configure the display to update at 50 samples per second by
setting Code 1 to [X2X].
For these settings to take effect, the analog sample rate must be
set at [2XX] in Code 2. See
Code 2 – Channel 1 Measurement
Task and Sampling Rate
on Page 35 for an example.
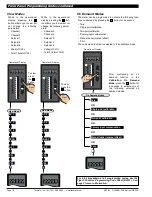
Manual Loader Mode
The meter can be configured to function exclusively as a man-
ual loader by setting Code 1 to [X1X].
See Analog Output Module Supplement (NZ200) for full
details on manual loader mode functions.
Display Functions Mode
The display functions mode is configured by changing the 2nd
and 3rd digits in Code 1:
•
Selecting [X5X] enters the
Data Source
sub-menu.
•
Selecting [X6X] enters the
Display Format
sub-menu.
•
Selecting [X7X] enters the
Last Digit Text Character
sub-menu.
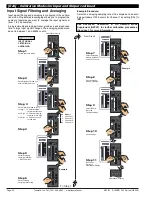
Data Source – 2nd Digit [X5X]
The
digital
display is the
primary
display. The
bargraph
dis-
play is the
secondary
display.
To select the data source for the
primary
display select
5
in the
2nd digit and
0
in the 3rd digit [X
50
].
To select the data source for the
secondary
display select
5
in
the 2nd digit and
1
in the 3rd digit [X
51
].
Selecting
5
in the 2nd digit enters a sub-menu and allows the
data from one of a number of meter registers to be selected as
the data source for the displays or functions selected in the third
digit.
Example Procedure
. The example procedure on Page 29
shows how to select the data source for the
primary
display.
The three digits are set to [
X50
]. The same example can be
used for selecting the data source for the
secondary
display
(bargraph). The three digits are set to [
X51
].
The 2nd digit in Code 1 can also be used to select the data
source for the remaining functions in the 3rd digit:
•
[X53] = Peak and Valley.
•
[X54] = Analog Output 1.
•
[X55] = Analog Output 2.
•
[X56] = Totalizer 1.
•
[X57] = Totalizer 2.
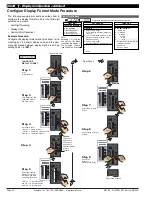
Display Format – 2nd Digit [X6X]
Selecting
6
in the 2nd digit enters the Display Format sub-menu
where the following display format settings can all be config-
ured:
•
Last digit rounding.
•
Display units (Decimal, octal, or optional 12 or 24-hour clock).
•
Decimal point placement.
Example Procedure
. The example procedure on Page 35
shows how to configure the three display format modes for the
3rd digit selection.
CODE 1
–
Digital Display Configuration
Setpoint
Annunciators
Mode
First Digit
Update
Display Mode
Second Digit
Manual
Loader Mode
Second Digit
Display Functions
Mode
Second & Third Digits
Configure
Data Source
[X5X]
Configure
Display
Format
[X6X]
Configure
Last Digit
Text Character
Sub-menu
[X7X]
CODE 10
–
Bargraph Display Configuration
Bargraph
Display
Settings
First Digit
Processed
Data Source
Second Digit
Bargraph
Type
Third Digit
Set Up
Bargraph
Scaling
[3XX]
Set Up Scaling
for Linear
Bargraph
[3X0]
Set Up Scaling
for Logirithmic
Bargraph
[3X3 to 7]
OR
OR
Digital Display
[X50]
Bargraph Display
[X51]
I
n
i
ti
al
S
e
t
up P
r
o
c
e
du
r
e
s
[
C
o
d
E
_
1
]
-
D
i
s
p
l
a
y
C
o
nf
i
g
u
r
ati
o
n


