


Section 4 INSTALLATION &
BASIC OP
55
The U and S/T Interface (USA & Canada)
Connect the ISDN line from the telephone central office directly to the
lower
RJ- 11 style
“U interface" modular jack on the rear panel ISDN interface using the standard phone
cable provided..
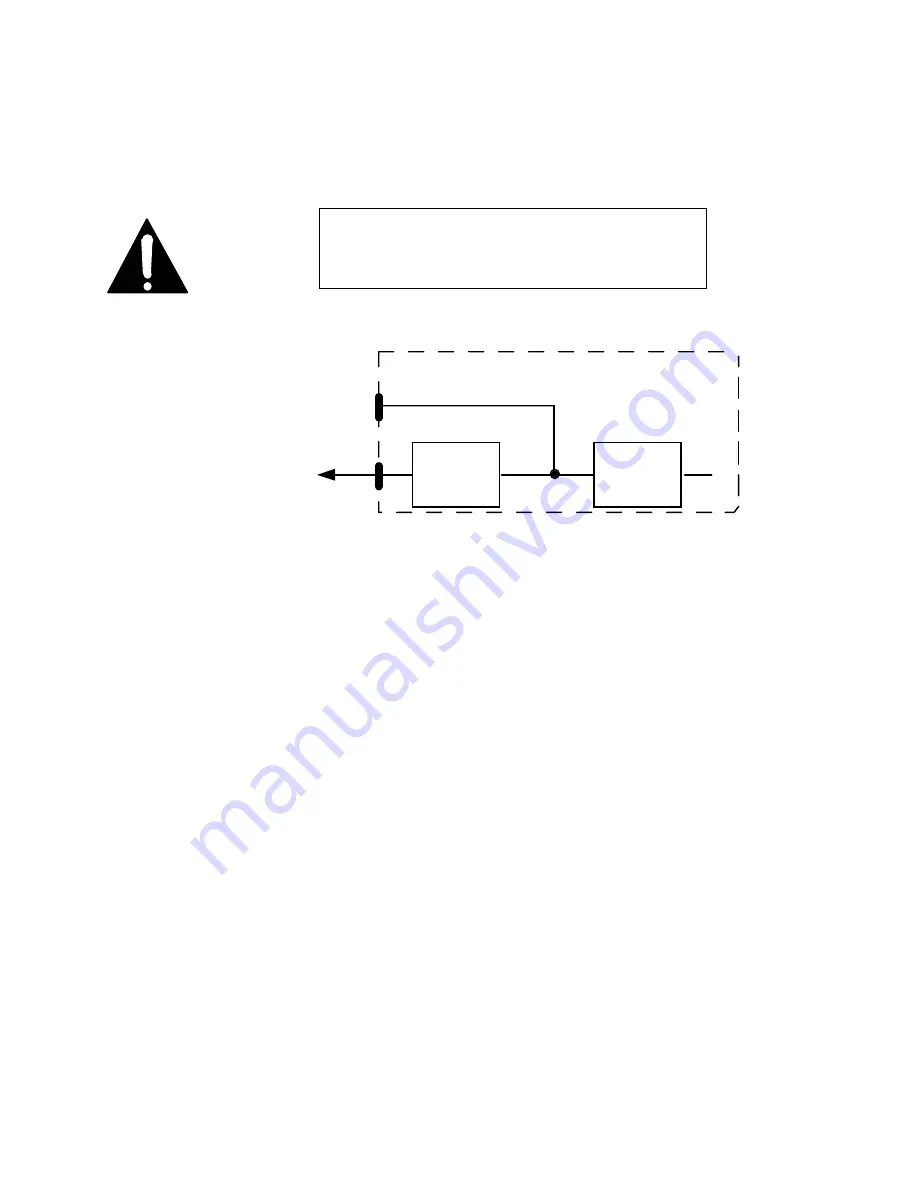
U
S/T
NT1
TA
Zephy r USA ISDN Interface
To Telco Line
(Standard Modular)
Normal set-up. The U jack connects directly
to the Telco line and the S/T jack is unused.
The Zephyr's S/T interface is always active, and may be used to parallel additional ISDN
terminal equipment, such as an additional Zephyr or ISDN phone set, to the line. The
internal NT1 operates just as if it were an external box in order to permit this to occur
(see diagram, below).
U Interface Status LED
The LED indicator of the status of the ISDN connection is on the rear panel near the U
jack. If the NT1 is inactive, the LED will remain in the OFF state. Activation in progress is
indicated by a rapidly blinking LED (about five times per second). If NT1 can contact
the central office, the LED will blink slowly (about once per second). The LED will come
on solid when all handshaking is completed and the basic line connection is good.
IMPORTANT!
An RJ-11 style 6-position plug can be inserted into the center
of an RJ-45 style 8-position jack if the Telco charged you extra
and installed a RJ-45 jack for your ISDN line.
Содержание Zephyr
Страница 13: ...Table of Contents 13 SECTION 1 QUICK RESULTS ...
Страница 26: ...Section 2 INTRODUCTION 26 This page intentially left blank ...
Страница 27: ...Section 2 INTRODUCTION 27 SECTION 2 INTRODUCTION ...
Страница 38: ...Section 2 INTRODUCTION 38 This page intentionally left blank ...
Страница 39: ...39 SECTION 3 ZEPHYR AT A GLANCE ...
Страница 52: ...Section 4 INSTALLATION BASIC OPERATION 52 This page intentionally left blank ...
Страница 53: ...Section 4 INSTALLATION BASIC OP 53 SECTION 4 INSTALLATION BASIC OPERATION ...
Страница 84: ...Section 4 INSTALLATION BASIC OPERATION 84 ...
Страница 85: ...Section 5 ISDN 85 SECTION 5 ISDN ...
Страница 105: ...Section 6 NON ISDN NETWORKS 105 SECTION 7 AUDIO CODING ...
Страница 118: ...Section 7 AUDIO CODING PRINCIPLES 118 This page intentionally left blank ...
Страница 119: ...Section 8 DETAILED MENU REFERENCE 119 SECTION 8 DETAILED MENU REFERENCE ...
Страница 157: ...Section 9 REMOTE CONTROL 157 SECTION 9 REMOTE CONTROL ...
Страница 176: ...Section 9 REMOTE CONTROL 176 This page intentionally left blank ...
Страница 177: ...Section 10 ADVANCED PROBLEM SOLVING 177 SECTION 10 ADVANCED PROBLEM SOLVING ...
Страница 196: ...Section 10 ADVANCED PROBLEM SOLVING 196 This page intentionally left blank ...
Страница 197: ...Section 11 TECHNICAL INFORMATION 197 SECTION 11 DETAILED TECHNICAL INFORMATION ...
Страница 219: ...Section 12 SCHEMATICS 219 SECTION 12 SCHEMATICS ...
Страница 221: ...Section 13 MANUFACTURER S DATA SHEETS 221 SECTION 13 MANUFACTURER S DATA SHEETS ...
Страница 223: ...Section 14 SPECIFICATIONS WARRANTY 223 SECTION 14 SPECIFICATIONS AND WARRANTY ...
Страница 228: ...228 This page intentionally left blank ...
Страница 229: ...Section 15 APPENDICES 229 SECTION 15 APPENDICES ...
Страница 239: ...Section 15 APPENDICES 239 You Com L3 Mono L3 Stereo L2 Mono yes L2 Stereo yes L2 M128 yes G 722 yes ...
Страница 257: ...Section 15 APPENDICES 257 1 Two SPID numbers depending upon number of active B channels 2 Two Directory Numbers ...


