


252
Examples of Use
CP525 cMux User’s Manual Rev. 5.20.12 (3944)
ID: um_tsmux
1. Perform the steps described in
on both units.
2. Verify that the OFDM and MIP parameters are identical among the units.
3. Verify that they have the same time sources, see section
and
4. Enable SFN sync as described in section
.
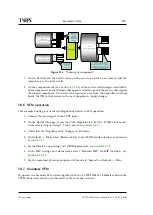
5. Connect both units to the same switch on a T-VIPS TNS541 TS Seamless Switch. Make
sure that TNS541 is set to MIP matching mode. See the T-VIPS TNS541 TS Seamless
Switch User’s Manual on how to change
Matching mode
.
6. To verify complete operation, connect the output of the TNS541 to a MIP analyzer and
verify that there are no MIP errors when switching between the streams.
Tip:
If you have the T-VIPS TNS541 TS Seamless Switch with two switch-
ers, you may connect the output of the first switch to the second switch
to analyze the MIP stream when performing a Seamless SFN switch to
verify correct operation.
10.8 Adding an unsignalled component (Ghost PID)
The CP525 supports insertion of unsignaled PIDs (ghost PIDs) from any input into any service(s).
This functionality is often termed Ghost PID insertion. A ghost PID component may be added
to several services.
1. Adding the ghost PID is done by editing the outgoing service you want to add the
component for. How to edit a service is shown in
2. Navigate to the
Components
tab from the service edit dialogue as shown in
3. Press
Add
, which brings up a new dialogue as shown in
.
4. Select
Custom
. This changes the layout to
. In this dialogue you may select
previously created components, or you may create new component configurations.
5. Press
New
to add the new component. This brings up a new dialogue as shown in
.
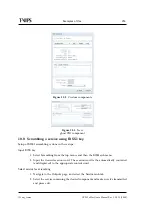
6. In this view you must select the input port for the unsignalled PIDs. When the input
port is selected you may press the icon next to the "Input PID" field to list all unsignaled
PIDs of that input. When the PID value is defined you must also specify the type for
the componenet, and also add descriptors for the new component, if desired.
7. Press
Apply
for all open dialogues. The
Components
view from
should
now show a new component with a + sign next to it. If the new component is present in
the configuration, you should be able to see the new component signalled in the PMT
for your service by looking at the "Outgoing services" as shown in
.
Содержание CP525 cMux
Страница 1: ...CP525 cMux User s Manual Revision 5 20 12 3944 2012 12 17 Valid for SW version 5 20 12 and newer ...
Страница 2: ......
Страница 10: ......
Страница 12: ...12 CP525 cMux User s Manual Rev 5 20 12 3944 ID um_tsmux ...
Страница 18: ...18 CP525 cMux User s Manual Rev 5 20 12 3944 ID um_tsmux ...
Страница 24: ...24 CP525 cMux User s Manual Rev 5 20 12 3944 ID um_tsmux ...
Страница 66: ...66 CP525 cMux User s Manual Rev 5 20 12 3944 ID um_tsmux ...
Страница 238: ...238 CP525 cMux User s Manual Rev 5 20 12 3944 ID um_tsmux ...
Страница 248: ...248 CP525 cMux User s Manual Rev 5 20 12 3944 ID um_tsmux ...
Страница 276: ...276 CP525 cMux User s Manual Rev 5 20 12 3944 ID um_tsmux ...


