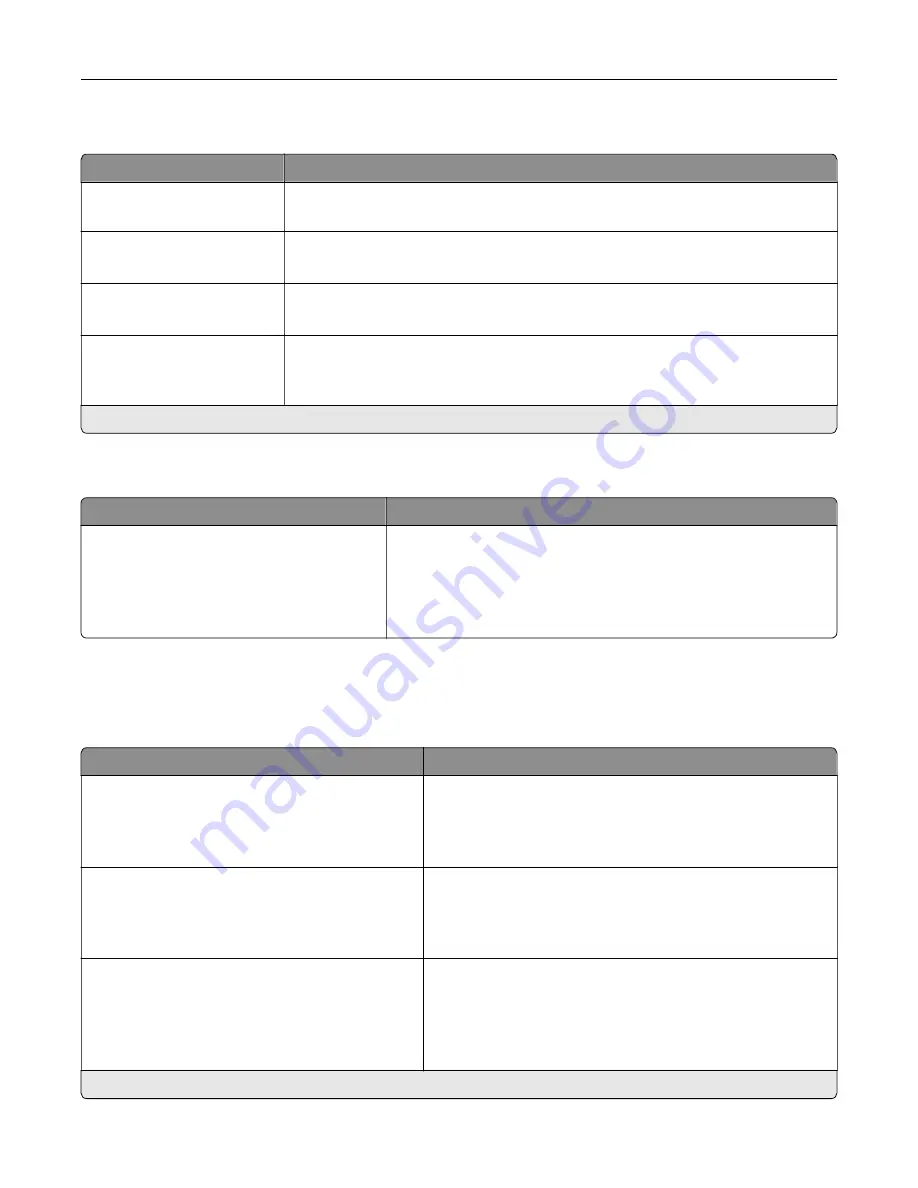
Accessibility
Menu item
Description
Duplicate Key Strike Interval
0–5 seconds (0*)
Set the interval during which the printer ignores duplicate key presses on an
attached keyboard.
Key Repeat Initial Delay
0.25–5 seconds (1*)
Set the initial length of delay before a repeating key starts repeating.
Note:
Appears only when a keyboard is attached to the printer.
Key Repeat Rate
0.5–30 (30*)
Set the number of presses per second for a repeating key.
Note:
Appears only when a keyboard is attached to the printer.
Prolong Screen Timeout
Off*
On
Let the user remain in the same location and reset the Screen Timeout timer when
it expires instead of returning to the home screen.
Note:
An asterisk (*) next to a value indicates the factory default setting.
Restore Factory Defaults
Menu item
Description
Restore Settings
Restore all settings
Restore printer settings
Restore network settings
Restore app settings
Restore the printer factory default settings.
Maintenance
Configuration Menu
Menu item
Description
USB Configuration
USB PnP
1*
2
Change the USB driver mode of the printer to improve its
compatibility with a personal computer.
USB Configuration
USB Speed
Full
Auto*
Set the USB port to run at full speed and disable its high
‑
speed
capabilities.
Tray Configuration
Size Sensing
Tray [x] Sensing
Off
On*
Set the tray to sense automatically the paper size loaded into
it.
Note:
An asterisk (*) next to a value indicates the factory default setting.
Understanding the printer menus
39
Содержание MX-C607P
Страница 1: ...DIGITAL FULL COLOR PRINTER MX C607P User s Guide October 2021 Machine type 5063 Model 53H ...
Страница 85: ...Replacing parts and supplies Replacing a developer unit 1 Open door A Maintaining the printer 85 ...
Страница 86: ...2 Remove the waste toner bottle Maintaining the printer 86 ...
Страница 88: ...7 Insert the imaging unit 8 Insert the waste toner bottle 9 Close door A Maintaining the printer 88 ...
Страница 91: ...Replacing a photoconductor unit 1 Open door A Maintaining the printer 91 ...
Страница 92: ...2 Remove the waste toner bottle Maintaining the printer 92 ...
Страница 94: ...7 Insert the imaging unit 8 Insert the waste toner bottle 9 Close door A Maintaining the printer 94 ...
Страница 95: ...Replacing an imaging unit 1 Open door A Maintaining the printer 95 ...
Страница 96: ...2 Remove the waste toner bottle Maintaining the printer 96 ...
Страница 100: ...2 Remove the waste toner bottle 3 Unpack the new waste toner bottle Maintaining the printer 100 ...
Страница 101: ...4 Insert the new waste toner bottle 5 Close door A Maintaining the printer 101 ...
Страница 102: ...Replacing the transfer belt 1 Turn off the printer 2 Open door A Maintaining the printer 102 ...
Страница 103: ...3 Remove the waste toner bottle 4 Open door A1 Maintaining the printer 103 ...
Страница 105: ...8 Close door A1 9 Insert the waste toner bottle 10 Close door A 11 Turn on the printer Maintaining the printer 105 ...
Страница 107: ...4 Insert the new transfer roller 5 Remove the white packing material 6 Close door B Maintaining the printer 107 ...
Страница 129: ...Staple jam in door G 1 Open door G 2 Pull out the staple cartridge holder Clearing jams 129 ...
Страница 131: ...5 Insert the staple cartridge holder 6 Close door G Clearing jams 131 ...


