Configuring confidential jobs
Using the control panel
1
From the home screen, touch
Settings
>
Security
>
Confidential Print Setup
.
2
Configure the settings.
Using the Embedded Web Server
1
Open a web browser, and then type the printer IP address in the address field.
Notes:
•
View the printer IP address on the home screen. The IP address appears as four sets of numbers
separated by periods, such as 123.123.123.123.
•
If you are using a proxy server, then temporarily disable it to load the web page correctly.
2
Click
Settings
>
Security
>
Confidential Print Setup
.
3
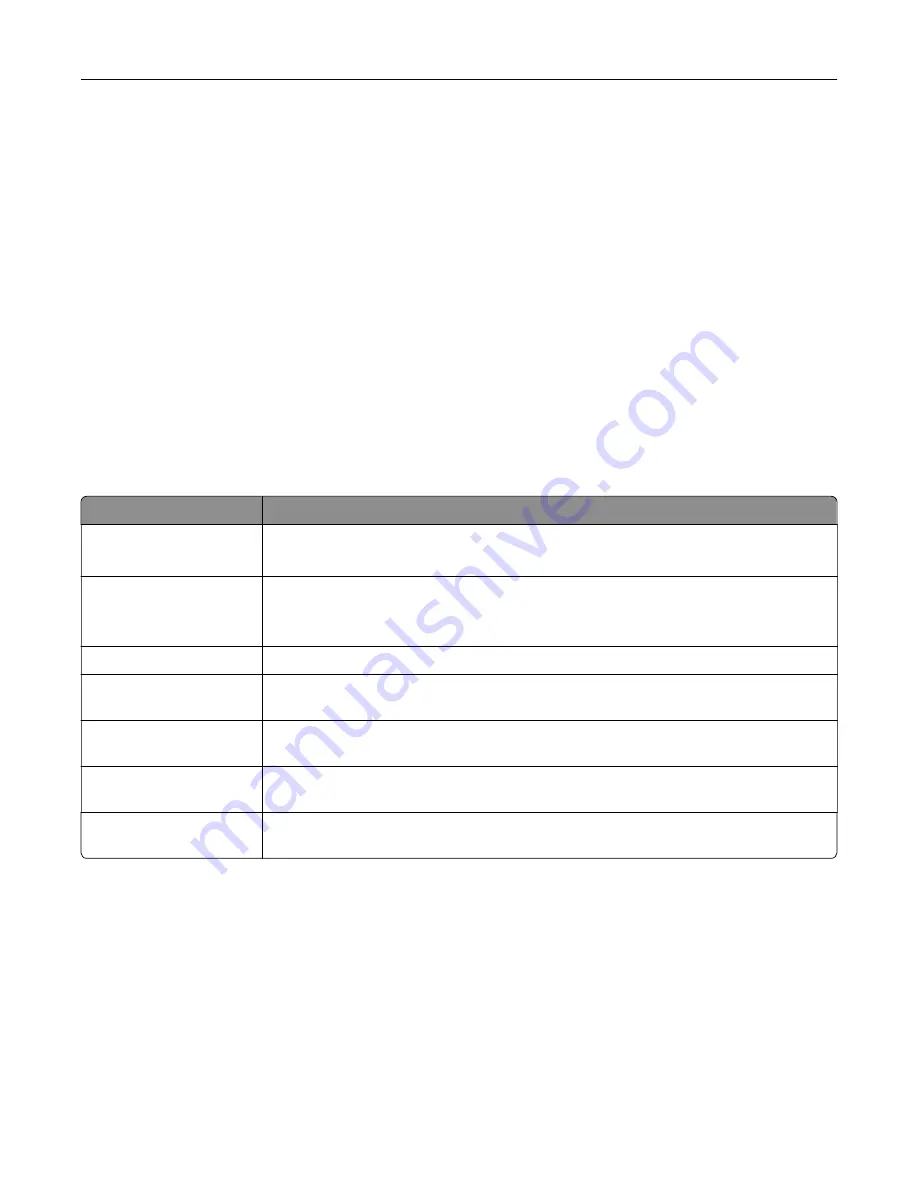
Configure the settings.
Setting
Description
Max Invalid PIN
Set the number of times an invalid PIN can be entered.
Note:
When the limit is reached, the print jobs for that user name are deleted.
Confidential Job
Expiration
Set an individual expiration time for each held job before it is automatically deleted from
the printer memory or hard disk.
Note:
A held job is either Confidential, Repeat, Reserve, or Verify.
Repeat Job Expiration
Set the expiration time for print jobs that you want to repeat.
Verify Job Expiration
Set the expiration time for printing a copy of a job for you to check its quality before
printing the remaining copies.
Reserve Job Expiration
Set the expiration time print for jobs that you want to store in the printer for printing
later.
Require All Jobs to be
Held
Set the printer to hold all print jobs.
Keep duplicate
documents
Set the printer to keep all documents with the same file name.
Printing confidential and other held jobs
For Windows users
1
With a document open, click
File
>
.
2
Select a printer, and then click
Properties
,
Preferences
,
Options
, or
Setup
.
3
Click
Print and Hold
.
4
Select
Use Print and Hold
, and then assign a user name.
Printing
31
Содержание MX-C607P
Страница 1: ...DIGITAL FULL COLOR PRINTER MX C607P User s Guide October 2021 Machine type 5063 Model 53H ...
Страница 85: ...Replacing parts and supplies Replacing a developer unit 1 Open door A Maintaining the printer 85 ...
Страница 86: ...2 Remove the waste toner bottle Maintaining the printer 86 ...
Страница 88: ...7 Insert the imaging unit 8 Insert the waste toner bottle 9 Close door A Maintaining the printer 88 ...
Страница 91: ...Replacing a photoconductor unit 1 Open door A Maintaining the printer 91 ...
Страница 92: ...2 Remove the waste toner bottle Maintaining the printer 92 ...
Страница 94: ...7 Insert the imaging unit 8 Insert the waste toner bottle 9 Close door A Maintaining the printer 94 ...
Страница 95: ...Replacing an imaging unit 1 Open door A Maintaining the printer 95 ...
Страница 96: ...2 Remove the waste toner bottle Maintaining the printer 96 ...
Страница 100: ...2 Remove the waste toner bottle 3 Unpack the new waste toner bottle Maintaining the printer 100 ...
Страница 101: ...4 Insert the new waste toner bottle 5 Close door A Maintaining the printer 101 ...
Страница 102: ...Replacing the transfer belt 1 Turn off the printer 2 Open door A Maintaining the printer 102 ...
Страница 103: ...3 Remove the waste toner bottle 4 Open door A1 Maintaining the printer 103 ...
Страница 105: ...8 Close door A1 9 Insert the waste toner bottle 10 Close door A 11 Turn on the printer Maintaining the printer 105 ...
Страница 107: ...4 Insert the new transfer roller 5 Remove the white packing material 6 Close door B Maintaining the printer 107 ...
Страница 129: ...Staple jam in door G 1 Open door G 2 Pull out the staple cartridge holder Clearing jams 129 ...
Страница 131: ...5 Insert the staple cartridge holder 6 Close door G Clearing jams 131 ...


