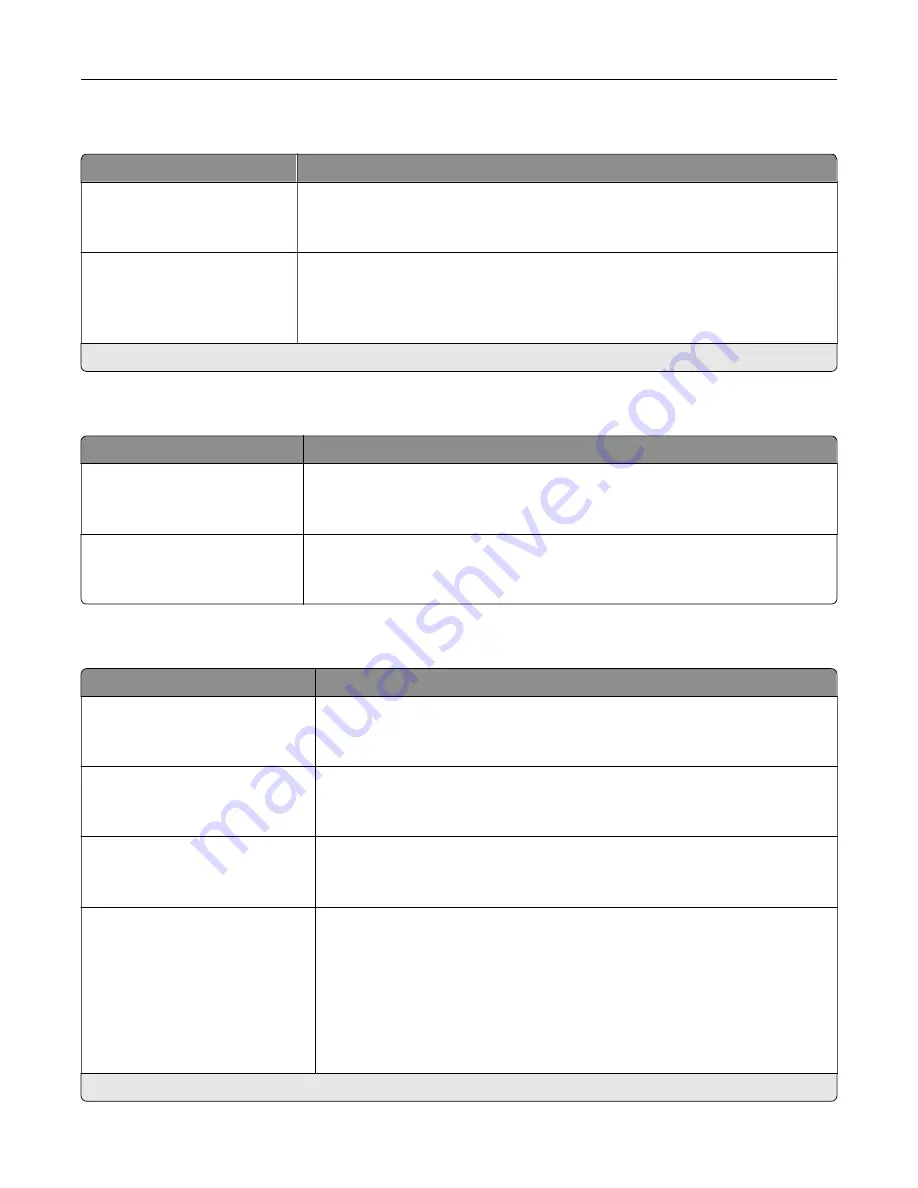
Erase Temporary Data Files
Menu item
Description
Stored in onboard memory
Off*
On
Delete all files stored on the printer memory.
Stored on hard disk
1 Pass Erase*
3 Pass Erase
7 Pass Erase
Delete all files stored on the printer hard disk.
Note:
This menu item appears only when a printer hard disk is installed.
Note:
An asterisk (*) next to a value indicates the factory default setting.
Solutions LDAP Settings
Menu item
Description
Follow LDAP Referrals
Off*
On
Search the different servers in the domain for the logged-in user account.
LDAP Certificate Verification
Yes
No*
Enable verification of LDAP certificates.
Miscellaneous
Menu item
Description
Protected Features
Show*
Hide
Show all the features that Function Access Control (FAC) protects regardless
of the security permission that the user has.
Note:
Hide displays only FAC
‑
protected features that the user has access.
Print Permission
Off*
On
Let the user log in before printing.
Default Print Permission Login
User Name/Password*
User Name
Set the default login for Print Permission.
Security Reset Jumper
Enable “Guest” access*
No Effect
Specify user access to the printer.
Notes:
•
The jumper is located beside a lock icon on the controller board.
•
Enable “Guest” access provides anyone access to all aspects of the
printer.
•
No Effect may make access to the printer impossible when the required
security information is unavailable.
Note:
An asterisk (*) next to a value indicates the factory default setting.
Understanding the printer menus
73
Содержание MX-C607P
Страница 1: ...DIGITAL FULL COLOR PRINTER MX C607P User s Guide October 2021 Machine type 5063 Model 53H ...
Страница 85: ...Replacing parts and supplies Replacing a developer unit 1 Open door A Maintaining the printer 85 ...
Страница 86: ...2 Remove the waste toner bottle Maintaining the printer 86 ...
Страница 88: ...7 Insert the imaging unit 8 Insert the waste toner bottle 9 Close door A Maintaining the printer 88 ...
Страница 91: ...Replacing a photoconductor unit 1 Open door A Maintaining the printer 91 ...
Страница 92: ...2 Remove the waste toner bottle Maintaining the printer 92 ...
Страница 94: ...7 Insert the imaging unit 8 Insert the waste toner bottle 9 Close door A Maintaining the printer 94 ...
Страница 95: ...Replacing an imaging unit 1 Open door A Maintaining the printer 95 ...
Страница 96: ...2 Remove the waste toner bottle Maintaining the printer 96 ...
Страница 100: ...2 Remove the waste toner bottle 3 Unpack the new waste toner bottle Maintaining the printer 100 ...
Страница 101: ...4 Insert the new waste toner bottle 5 Close door A Maintaining the printer 101 ...
Страница 102: ...Replacing the transfer belt 1 Turn off the printer 2 Open door A Maintaining the printer 102 ...
Страница 103: ...3 Remove the waste toner bottle 4 Open door A1 Maintaining the printer 103 ...
Страница 105: ...8 Close door A1 9 Insert the waste toner bottle 10 Close door A 11 Turn on the printer Maintaining the printer 105 ...
Страница 107: ...4 Insert the new transfer roller 5 Remove the white packing material 6 Close door B Maintaining the printer 107 ...
Страница 129: ...Staple jam in door G 1 Open door G 2 Pull out the staple cartridge holder Clearing jams 129 ...
Страница 131: ...5 Insert the staple cartridge holder 6 Close door G Clearing jams 131 ...


